5.7 Channel Upgrade from OES 11 SP2 to OES 2015 SP1
The OES 11 SP2 documentation is a single zip file. Click OES 11 SP2 documentation to download the zip file.
-
Install and configure OES 11 SP2 on SLES 11 SP3 with the required OES services. For more information, see Installing OES 11 SP2 as a New Installation in the OES 11 SP2: Installation Guide.
-
Register the OES 11 SP2 server with the SMT or NCC server.
-
To register with the NCC server, run the following command:
suse_register -a email=<Email-Address> -a regcode-sles=<SLESactivation-key> -a regcode-oes=<OES-activation-key> -L /root/.suse_register.log
-
For information on registering with the SMT server, see Configuring Clients with the clientSetup4SMT.sh Script in the Subscription Management Tool Guide.
-
-
Update the SLES 11 SP3 and OES 11 SP2 to latest patches available. For more information, see Updating (Patching) an OES 11 SP2 Server in the OES 11 SP2: Installation Guide.
-
Run the zypper pd command to ensure that the SUSE_SLES-SP4-migration product is listed.
-
Run the zypper in -t product SUSE_SLES-SP4-migration command to install the SLES11-SP4-migration product.
The following message is displayed:
Loading repository data...
Reading installed packages...
Resolving package dependencies...

The following NEW package is going to be installed:
SUSE_SLES-SP4-migration

The following NEW product is going to be installed:
SUSE_SLES Service Pack 4 Migration Product

1 new package to install.
Overall download size: 4.0 KiB. After the operation, additional 3.0 KiB will be used.
Continue? [y/n/? shows all options] (y):
Enter 'y' to continue.
-
Run the zypper pd -i command to check SUSE_SLES-SP4-migration product is installed.
-
Run the suse_register -L /root/.suse_register.log command to register the products and to get the SLES11-SP4 repositories (SLES11-SP4-Pool and SLES11-SP4-Updates).
-
Check the repositories using the zypper lr command. It should list the following repositories, and they should be enabled.
-
OES11-SP2-Pool
-
OES11-SP2-Updates
-
SLES11-SP3-Pool
-
SLES11-SP3-Updates
-
SLES11-SP4-Pool
-
SLES11-SP4-Updates
-
-
Run the following commands to add OES2015-SP1-Pool and OES2015-SP1-Updates repositories manually from the SMT or NCC server.
zypper ar –c "https://<SMT/NCC_Server>/repo/\$RCE/OES2015-SP1-Pool/sle-11-x86_64/" OES2015-SP1-Pool
zypper ar –c "https://<SMT/NCC_Server>/repo/\$RCE/OES2015-SP1-Updates/sle-11-x86_64/" OES2015-SP1-Updates
If you use nu.novell.com, run the following command with username and password to add OES2015-SP1-Pool repository.
zypper ar -c "https://<Username>:<Password>@nu.novell.com/repo/\$RCE/OES2015-SP1-Pool/sle-11-x86_64" OES2015-SP1-Pool
zypper ar -c "https://<Username>:<Password>@nu.novell.com/repo/\$RCE/OES2015-SP1-Updates/sle-11-x86_64" OES2015-SP1-Updates
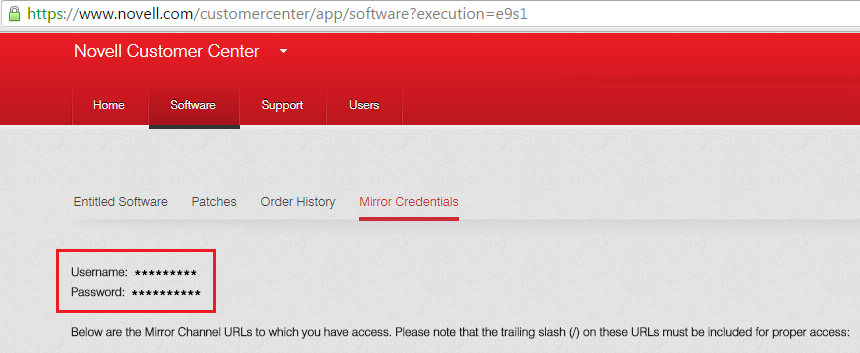
The username and password must be Mirror Credentials available in Novell Customer Center as follows:
-
Run the zypper ref command to refresh the repositories. If prompts to trust the new key, select ‘a’ to trust the key.
NOTE:If any error occurs while executing zypper ref command, ensure to resolve the error before proceeding.
-
Check the repositories using the zypper lr command. It should list the following repositories, and they should be enabled.
-
OES11-SP2-Pool
-
OES11-SP2-Updates
-
OES2015-SP1-Pool
-
OES2015-SP1-Updates
-
SLES11-SP3-Pool
-
SLES11-SP3-Updates
-
SLES11-SP4-Pool
-
SLES11-SP4-Updates
-
-
Perform a distribution upgrade using the zypper dup --from SLES11-SP4-Pool --from SLES11-SP4-Updates --from OES2015-SP1-Pool --from OES2015-SP1-Updates command.
-
The following products are going to be upgraded:
Novell Open Enterprise Server 11 SP2 SUSE Linux Enterprise Server 11 SP3
-
The following packages are going to be downgraded:
libmysqlclient15 libmysqlclient_r15 novell-oes-samba-krb-printing novell-oes-samba-libsmbsharemodes0 novell-oes-samba-libwbclient0 novell-oes-samba-winbind novell-oes-samba-winbind-32bit novell-pluginsdk-webservice openssh-askpass yast2-bootloader yast2-http-server yast2-sound yast2-users yelp yelp-lang
-
The following packages are not supported by their vendor:
crash-eppic libblas3 libcryptsetup1 libiptc0 liblapack3 libxtables9
NOTE:The packages listed here may vary based on your setup.
Verify the products to be upgraded and enter 'y' to continue.
-
-
Once the upgrade is successfully completed, run the zypper rr OES2015-SP1-Pool OES2015-SP1-Updates <SLES11SP3_Media_RepoName> <OES11SP2_Media_RepoName> command to remove the OES2015-SP1-Pool and OES2015-SP1-Updates repositories that are added manually and SLES11-SP3 and OES11-SP2 media (CD or Network Source).
-
Run the suse_register -L /root/.suse_register.log command to remove the old repositories (OES11-SP2 and SLES11-SP3) and to obtain the OES2015-SP1 and SLES11-SP4 repositories.
NOTE:If any error occurs while executing this command, repeat Step 2 with SLES and OES activation key.
-
Run the zypper ar -c -f <URL_Of_SLES11SP4_Media_Network_Source/URL_Of_OES2015SP1_Media_Network_Source> <SLES11SP4-Media/OES2015SP1-Media> command to add the SLES11SP4/OES2015SP1 media.
For example,
-
If CD is used to add repositories, run the following command:
SLES media: zypper ar -c -f /media/SLES-11-SP4-DVD-x86_6412211 SLES11SP4-Media
OES media: zypper ar -c -f /media/OES2015-SP1-addon-x86_6400521 OES2015SP1-Media
-
If Network Source is used to add repositories, run the following command:
SLES media: zypper ar -c -f http://10.0.0.0/install/SLES11SP4-Media SLES11SP4-Media
OES media: zypper ar -c -f http://10.0.0.0/install/OES2015SP1-Media OES2015SP1-Media
Where 10.0.0.0 is the server IP address of the network source.
-
If ISO is used to add repositories, run the following command:
SLES iso: zypper ar -c -f "iso:/?iso=/source/SLES-11-SP4-GM/SLES-11-SP4-DVD-x86_64-GM-DVD1.iso" SLES11SP4-ISO
OES iso: zypper ar -c -f "iso:/?iso=/source/OES2015-SP1-addon-x86_64-Media1.iso" OES2015SP1-ISO
-
-
Reboot the server.
-
After the reboot, log on to the server and run the yast2 channel-upgrade-oes command to complete the OES services reconfiguration. This will prompt for eDirectory or DSfW password if the answer file is not created. Provide the password and continue. For more information on creating the answer file, see Section 5.5.2, Creating an Answer File to Provide the eDirectory and DSfW Passwords.