5.8 Channel Upgrade from OES 11 SP3 to OES 2015 SP1 Using Zypper
-
Install and configure OES 11 SP3 on SLES 11 SP4 with the required OES services. For more information, see Installing OES 11 SP3 as a New Installation.
-
Register the OES 11 SP3 server with the SMT or NCC server.
-
To register with the NCC server, run the following command:
suse_register -a email=<Email-Address> -a regcode-sles=<SLESactivation-key> -a regcode-oes=<OES-activation-key> -L /root/.suse_register.log
-
For information on registering with the SMT server, see Configuring Clients with the clientSetup4SMT.sh Script in the Subscription Management Tool Guide.
-
-
Update the SLES 11 SP4 and OES 11 SP3 to latest patches available. For more information, see Updating (Patching) an OES 11 SP3 Server.
-
Check the repositories using the zypper lr command. It should list the following repositories, and they should be enabled.
-
OES11-SP3-Pool
-
OES11-SP3-Updates
-
SLES11-SP4-Pool
-
SLES11-SP4-Updates
-
-
Run the following commands to add OES2015-SP1-Pool and OES2015-SP1-Updates repositories manually from the SMT or NCC server.
zypper ar -c "https://<SMT/NCC_Server>/repo/\$RCE/OES2015-SP1-Pool/sle-11-x86_64/" OES2015-SP1-Pool
zypper ar -c "https://<SMT/NCC_Server>/repo/\$RCE/OES2015-SP1-Updates/sle-11-x86_64/" OES2015-SP1-Updates
If you use nu.novell.com, run the following command with username and password to add OES2015-SP1-Pool repository.
zypper ar -c "https://<Username>:<Password>@nu.novell.com/repo/\$RCE/OES2015-SP1-Pool/sle-11-x86_64" OES2015-SP1-Pool
zypper ar -c "https://<Username>:<Password>@nu.novell.com/repo/\$RCE/OES2015-SP1-Updates/sle-11-x86_64" OES2015-SP1-Updates
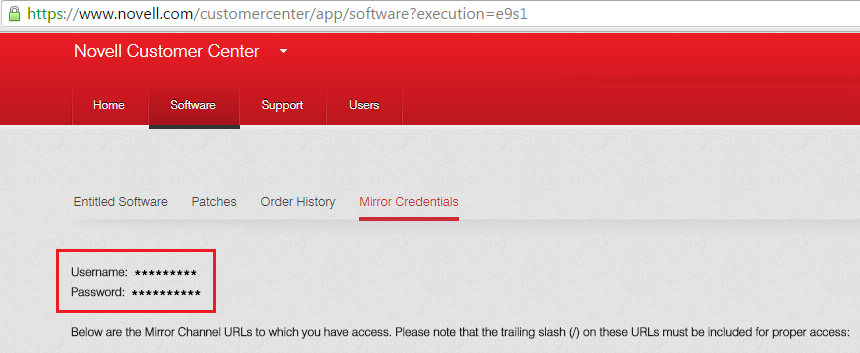
The username and password must be Mirror Credentials available in Novell Customer Center as follows:
-
Run the zypper ref command to refresh the repositories.
NOTE:If any error occurs while executing zypper ref command, ensure to resolve the error before proceeding.
-
Check the repositories using the zypper lr command. It should list the following repositories, and they should be enabled.
-
OES11-SP3-Pool
-
OES11-SP3-Updates
-
OES2015-SP1-Pool
-
OES2015-SP1-Updates
-
SLES11-SP4-Pool
-
SLES11-SP4-Updates
-
-
Perform a distribution upgrade using the zypper dup --from SLES11-SP4-Pool --from SLES11-SP4-Updates --from OES2015-SP1-Pool --from OES2015-SP1-Updates command.
-
The following product is going to be upgraded:
Novell Open Enterprise Server 11 SP3
-
The following packages are going to be downgraded:
ifolder3-clients novell-NDSbase novell-NDSbase-32bit novell-NDScommon novell-NDSimon novell-NDSmasv novell-NDSmasv-32bit novell-NDSrepair novell-NDSserv novell-NDSserv-32bit novell-NLDAPbase novell-NLDAPbase-32bit novell-NLDAPsdk novell-NLDAPsdk-32bit novell-NOVLembox novell-NOVLice novell-NOVLice-32bit novell-NOVLsnmp novell-NOVLsubag novell-dclient novell-dclient-32bit novell-edirectory-jclnt novell-edirectory-ldap-extensions novell-edirectory-ldap-extensions-32bit novell-edirectory-log4cxx novell-edirectory-tsands novell-edirectory-tsands-32bit novell-edirectory-xdasinstrument novell-edirectory-xdaslog novell-ganglia-monitor-core-gmetad novell-ganglia-monitor-core-gmond novell-ganglia-web novell-nmas novell-nmas-libnmasext novell-nmas-libnmasext-32bit novell-nmas-libspmclnt novell-nmas-libspmclnt-32bit novell-nmasclient novell-nmasclient-32bit novell-npkiapi novell-npkiapi-32bit novell-npkiserver novell-npkiserver-32bit novell-npkit novell-npkit-32bit novell-ntls novell-ntls-32bit novell-plugin-nmas novell-plugin-pki novell-sss
NOTE:The packages listed here may vary based on your setup.
Verify the products to be upgraded and enter 'y' to continue.
-
-
Once the upgrade is successfully completed, run the zypper rr OES2015-SP1-Pool OES2015-SP1-Updates command to remove the OES2015-SP1-Pool and OES2015-SP1-Updates repositories that are added manually.
-
Run the suse_register -L /root/.suse_register.log command to remove the old repositories (OES11-SP3) and to obtain the OES2015-SP1 repositories.
NOTE:If any error occurs while executing this command, repeat Step 2 with SLES and OES activation key.
-
Run the zypper ar -c -f <URL_Of_SLES11SP4_Media_Network_Source/URL_Of_OES2015SP1_Media_Network_Source> <SLES11SP4-Media/OES2015SP1-Media> command to add the SLES11SP4/OES2015SP1 media.
For example,
-
If CD is used to add repositories, run the following command:
SLES media: zypper ar -c -f /media/SLES-11-SP4-DVD-x86_6412211 SLES11SP4-Media
OES media: zypper ar -c -f /media/OES2015-SP1-addon-x86_6400521 OES2015SP1-Media
-
If Network Source is used to add repositories, run the following command:
SLES media: zypper ar -c -f http://10.0.0.0/install/SLES11SP4-Media SLES11SP4-Media
OES media: zypper ar -c -f http://10.0.0.0/install/OES2015SP1-Media OES2015SP1-Media
Where 10.0.0.0 is the server IP address of the network source.
-
If ISO is used to add repositories, run the following command:
SLES iso: zypper ar -c -f "iso:/?iso=/source/SLES-11-SP4-GM/SLES-11-SP4-DVD-x86_64-GM-DVD1.iso" SLES11SP4-ISO
OES iso: zypper ar -c -f "iso:/?iso=/source/OES2015-SP1-addon-x86_64-Media1.iso" OES2015SP1-ISO
-
-
Reboot the server.
-
After the reboot, log on to the server and run the yast2 channel-upgrade-oes command to complete the OES services reconfiguration. This will prompt for eDirectory or DSfW password if the answer file is not created. Provide the password and continue. For more information on creating the answer file, see Section 5.5.2, Creating an Answer File to Provide the eDirectory and DSfW Passwords.