12.2 Moving an NSS Volume with DFS
Before you begin, make sure you have completed the prerequisites in Section 12.1, Prerequisites for Moving an NSS Volume with DFS
-
If you plan to temporarily retain the source volume as a deleted volume in salvage after a successful volume move, verify that your server’s setting and the setting meet your needs.
IMPORTANT:These settings must be in effect if you disable in Step 7 in order for the volume to be available in salvage.
-
Enable salvage for deleted volumes. At the server console, enter
nss /NoImmediatePurgeOfDeletedFiles
For more information about this parameter, see
Setting the Immediate Purge of Deleted Files for All NSS Volumes
in the OES 2015 SP1: NSS File System Administration Guide for Linux. -
Configure the setting as desired. The default setting is 4 days (345600 seconds), but the actual setting might differ.
At the server console, enter
nss /logicalVolumePurgeDelay=valuewhere value is the number of seconds until a deleted volume is purged from the salvage area. For more information about this parameter, see
Salvaging and Purging Deleted Volumes, Directories, and Files
in the OES 2015 SP1: NSS File System Administration Guide for Linux.
-
-
Log in to iManager using an administrator username and password that are valid on both the source and destination servers.
-
In iManager, click .
For instructions, see Section 8.1.3, Accessing Roles and Tasks in iManager.
-
Use the Server object browser to locate and select the server that contains the NSS volume you want to move.
For instructions, see Section 8.1.4, Selecting a Server to Manage.
-
From the list, select the volume that you want to move.
Wait for the page to refresh with the volume’s details before continuing.
-
Click to open the dialog box.

-
Specify the following parameters, then click .
-
Purge Data from Original Volume Immediately: Select this option to purge the original volume’s deleted data from the server’s salvage area immediately following the successful completion of a volume move job.
If this option is disabled (deselected), DFS delays the purge of the volume’s deleted data according to the server’s setting and the normal purge process.
You can manually purge or restore the original volume’s deleted data at any time during the purge delay period. Use the normal method of purging deleted volumes. For information, see
Viewing, Salvaging, or Purging Deleted NSS Volumes in a Pool
in the OES 2015 SP1: NSS File System Administration Guide for Linux. -
New Location: Specify the Novell eDirectory common name of the server where you want to move the selected volume.
If the destination volume is a shared volume, select the virtual server object for the pool on which the shared volume is to be created.
If the shared destination volume is migrated to another node during the move job, the data copy to the volume is not affected.
-
Run Schedule: Select to begin the move immediately, or specify the date and time you want to schedule the move.
Make sure that the volume is active at the time that the move is to begin.
-
-
Specify a unique name for the new volume.
Typically, the new volume’s name is different from the original volume’s name. The new volume’s name must meet the uniqueness requirements in the new location and must conform to volume naming conventions. For guidelines about naming volumes, see
Naming NSS Storage Objects
in the OES 2015 SP1: NSS File System Administration Guide for Linux. It is possible, though not necessarily advisable, to use the same name under some conditions, such as when the original location and the new location are on different servers.IMPORTANT:If the name you provide is not unique, you receive an error message. You must click to back out of the dialog box, then begin the move process again.
-
Specify the pool on the new location where you want the new volume to reside, specify the volume quota, then click .
Only pools that have free space appear in the list. You can select an existing pool from the list or create a new pool. If you create a new pool, the dialog box guides you through steps similar to the process for creating a new pool. For instructions, see
Creating a Pool
in the OES 2015 SP1: NSS File System Administration Guide for Linux.If no pools are listed, there is no space available to create a volume in the new location. Cancel the dialog box, add more devices to the server and expand the desired pool, or free up space by deleting existing pools, then return to the Volume Management page to begin the move process from the beginning.
-
Specify the attributes for the new volume you are creating, based on the volume attributes of the original volume.
The dialog box displays the volume attributes for the original volume. Modifiable attribute settings can differ on the new volume. However, settings such as Compression that cannot be changed after they are set for a volume must be the same on the original volume and the new volume.
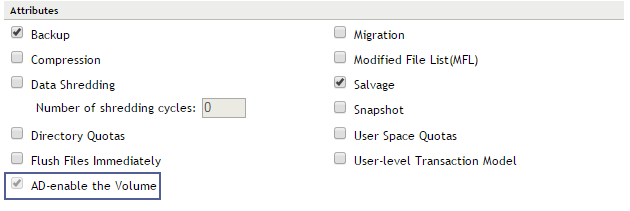
A new option is introduced in OES 2015. This option is available only if the Pool containing the NSS volumes is media upgraded. If the volume is already AD-enabled, this option is disabled.
-
Click .
The move can take a few minutes to several hours, depending on how much data needs to be moved.
-
To view the job’s status or to pause and resume the job, click .
For information, see Section 14.0, Managing Move Volume or Split Volume Jobs.
-
(Optional) After the job completes successfully, if you disabled the option, you can manually purge or restore the original volume’s deleted data at any time during the purge delay period, using the normal method of purging deleted volumes.
For information, see
Viewing, Salvaging, or Purging Deleted NSS Volumes in a Pool
in the OES 2015 SP1: NSS File System Administration Guide for Linux. -
Manually update script files, configuration files, or mappings by modifying the location of the original volume to the location of the new volume.