6.4 NURM (OES User Rights Management)

The OES User Rights Map (NURM) utility is used by administrators to map the Access Control List (ACL) of NSS resource that is owned by an identity in eDirectory to an identity in Active Directory. It maps the users and groups from eDirectory to Active Directory using a common name or any other field that is selectable by the tool. With this utility, the administrators can:

  • Create User Maps: Map eDirectory and Active Directory users and groups.

  • Leverage Existing IDM-based User Maps: Leverage NetIQ Identity Manager 4.5 or later maps that are created using IDM Designer (but not the IDM iManager plug-in).

  • Map User Rights: Assign rights to Active Directory users on NSS resources.

  • View Rights: View the rights of Active Directory and eDirectory users on a given volume.

  • Synchronizing Rights: Synchronize the rights of Active Directory and eDirectory users using the user-rights-map command line utility.

6.4.1 Prerequisites

  • Ensure that the universal password is enabled for the eDirectory user who is accessing NURM. This utility uses CIFS to fetch the volume information. Hence, when a user who is not universal-password-enabled accesses NURM, the volumes are not listed under the View Rights and Map Rights pages. For more information on enabling Universal Password Policy, seeCIFS and Universal Password in the OES 2015 SP1: Novell CIFS for Linux Administration Guide.

  • The eDirectory user managing NURM must have read and write access on the /_admin/Manage_NSS/manage.cmd.

  • Ensure that CIFS user context is configured for the eDirectory user who is accessing NURM. For more information, see Configuring a CIFS User Context in the OES 2015 SP1: Novell CIFS for Linux Administration Guide.

  • If you are to use NURM in an environment where eDirectory and Active Directory are synchronized using NetIQ IDM, ensure that DirXML-ADContext attribute is populated in eDirectory server.

6.4.2 Accessing OES User Rights Map Utility (NURM)

Along with the installation and configuration of NSS AD, the NURM utility gets installed.To access NURM:

  1. Open the OES server welcome page, then click Management Services > OES User Rights Map.

    OR

    Point your browser to https://<OES server IP address or the host name>/storm.

  2. Specify the user name or the FQDN of the eDirectory administrator in the User Name, specify the password, then click Login.

    The NURM welcome page should look similar to the following:

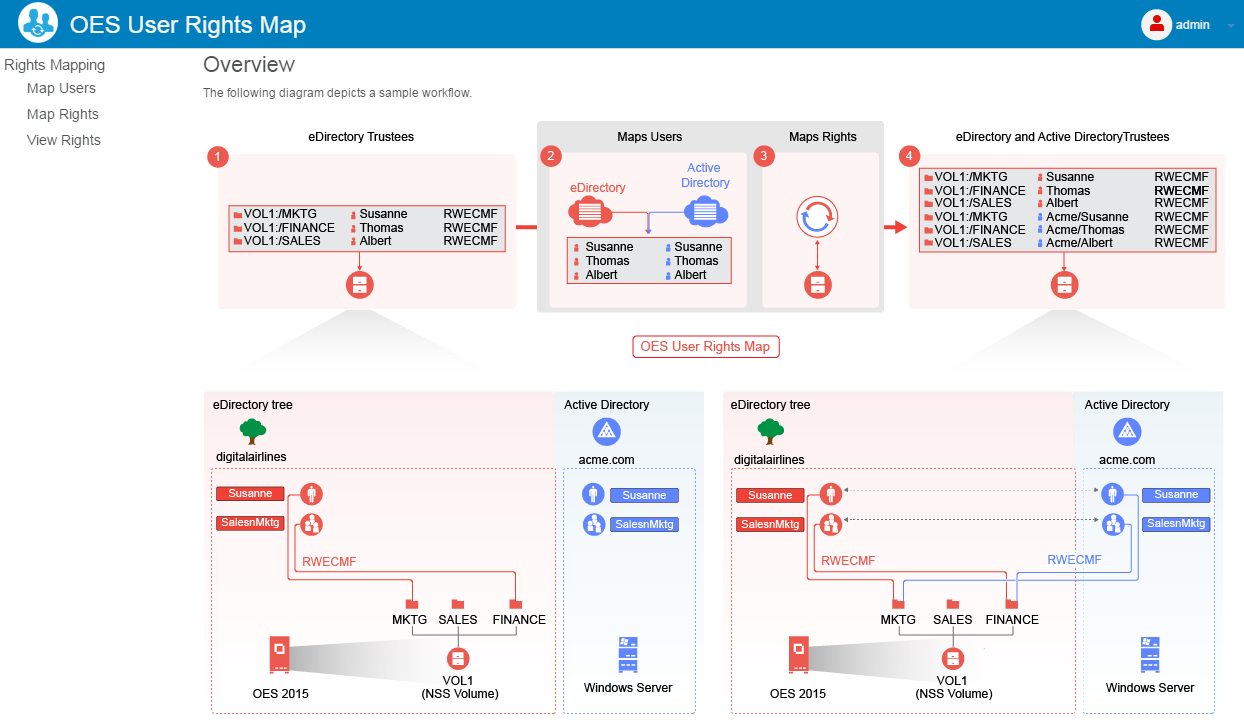
    NURM is also available as a command line utility (user-rights-map). For more information on the CLI utility, see Section 6.4.6, NURM Command Line Utility.

6.4.3 Mapping Users

In an NSS AD environment, OES servers are joined to an Active Directory domain to provision AD users and groups native NSS resources access. To aid this, identities from Active directory will have to be mapped with identities on eDirectory and assigned the same rights as that of the eDirectory identities. NURM helps in creating this identity map, which is called a user map. User maps are used to assign rights to AD identities on the NSS resources.

Using the Map Users feature, administrators can do the following:

  • Create new user maps: Map eDirectory and Active Directory (AD) users and groups.

  • Import user maps

  • Export user maps

  • Refresh user maps

  • Delete user maps

    Before creating user maps, ensure that you are connected to an AD server.

Connecting to an Active Directory Server

To connect to the target AD server, click Connect to Active Directory, specify the following details, then click Connect.

  • User Name: Specify the AD Administrator user name or the FQDN.

  • Password: Specify the AD Administrator password.

  • Domain Name: Specify the realm of the AD domain.

  • Port: Specify the port with which you would like to connect to the AD server. If you would like this connection to be secure, select Use SSL. Some of the standard LDAP ports for Active Directory are 389, 636, 3268, and 3269.

After you successfully establish the connection with the AD server, the icon is displayed. The NURM screen should look similar to the following:

To disconnect from the target AD server, click > .

NOTE:NURM supports multiple AD forests. Login to the respective forest before generating the user map.

Creating a New User Map

The user map could be created using any of the following methods:

  • Propose Map: Use this method to view, validate, and edit the generated user map before saving it on the server.

  • Save Map: Use this method when the number of records to be mapped are high and when you anticipate the user map generation to take more than five minutes. You can initiate the user map generation operation and continue using the application. The user map generation operation continues on the server side, and on completion, the generated user map is saved on the server and gets listed in the Map Users page.

  1. Click New, then specify the following details:

    • Match Type: Select an object mapping (user to user, group to group, or container to group). In the Target Matching Pattern, specify the wildcard-based search criteria.

      For example, if you want to match a group from the source identity store with a group on the target identity store that differs in naming conventions, you can use the Target Matching Pattern.

      For example, assume that you have the following groups on the source identity: eng-group-acme, sales-group-acmeUS, and so on; and technology-acme, sales-acmeUS, and so on in the target identity. In the Target Matching Pattern, specifying *-acme finds the match from eng-group-acme and technology-acme groups.

    • LDAP Attributes: Select Common Name to Common Name (CN to CN), Common Name to SAM-Account-Name (CN to SAM), or Custom Attributes matching criteria.

      If you choose custom attributes, you will have to specify the eDirectory and Active Directory object attributes.

      Examples of eDirectory object attributes include User Name (uid), Common Name (cn), Last Name (sn), and First Name (givenName).

      Examples of Active Directory object attributes include SAMAcountName, First Name (givenName), Last Name (sn), and email address (email).

    • eDirectory Context: Specify or browse and select the eDirectory tree search base context. If you would like to do a subtree search, select Search Subtree.

    • Active Directory Context: Specify or browse and select the AD server context. If you would like to do a subtree search, select Search Subtree.

  2. Click Propose Map to generate the user map.

  3. Validate the user mapping. If you need to modify any user mapping:

    1. Click <<, then specify or browse the AD server context.

    2. To replace or add an AD user in the proposed user map, select a row in the proposed user map, then from the search results, click (add) found next to the search result.

    3. To remove a user from the proposed user map, click (remove). To undo the deletion, click (undo).

    HINT:

    • To modify an existing user mapping, click the user map name in the Map Users page, then follow the instructions in Step 3.

    • Pagination and Filtering: When the number of records to be displayed are huge, they are paginated, and each page holds up to 1000 records. The filter option works based on records in all the pages.

    • Sorting: Click any column title to sort the data either in ascending or descending order.

If the number of records to be displayed are more than 1000, pagination is displayed at the bottom of the page for ease of navigation. Pagination includes the following:

  • Number of Pages: Displays the total number of pages. For example, Pages 4.

  • First: Displays the first page.

  • Last: Displays the last page.

  • <: Displays the previous page.

  • >: Displays the next page.

  • Page Numbers: Clicking on these numbers, displays the respective page.

  • Go To Page: If you would like to navigate directly to a particular page, click the drop-down arrow, specify the page number, then click Go.

Importing a User Map

  1. Click Import, then select the user map XML file using the Browse button.

  2. Specify an appropriate name for the user map, then click Import.

Exporting a User Map

Select the user map of your choice, click Export, then save it to a location of your choice on your computer.

Refreshing a User Map

If you feel that the mapping have changed since the time you have created a user map, you could refresh them using the same conditions that were used while creating them.

To refresh an old user map, select the desired user map and then click Refresh. If there are any differences since the time there were created, those entries are highlighted with an information icon (undo). If you would like to revert changes, use the undo icon. After verifying the changes, click Save Map.

Delete a User Map

Select the user maps that you want to delete, then click Delete.

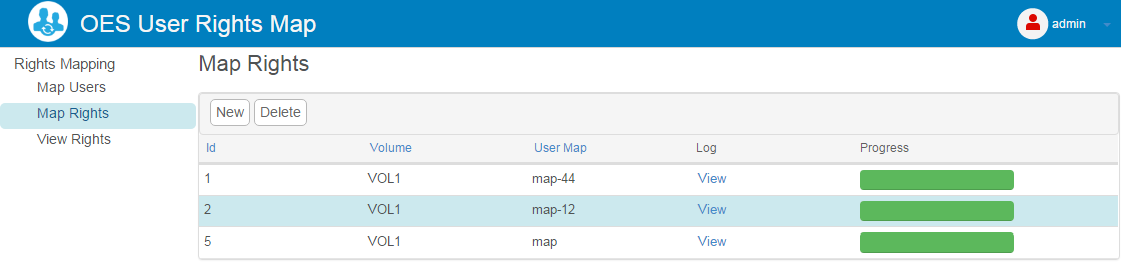
6.4.4 Mapping Rights

Using this feature, you can map rights to AD users on a specific NSS volume. While doing so, you can choose to remove eDirectory trustees from the NSS file system and migrate the eDirectory IDs (owner, modifier, archiver, metadata modifier, and deletor) to AD users.

To map rights:

  1. Select a volume on which you want to map rights to AD users.

  2. Select the source of user mapping:

    • NetIQ IDM: If you select this option, then directly go to Step 3.

      NOTE:When IDM is used, the connection to eDirectory is established with secure SSL port 636. For information on creating user map using IDM, see the NetIQ Identity Manager 4.5 Documentation.

    • User Map: If you select this option, choose the appropriate user map name, then click Show >>. The user map is displayed along with the rights that will be assigned to the AD users. You can hide or display the user map and rights details using the Show >> and << Hide buttons.

  3. Select the following options as needed:

    • Apply to Salvage: Applies rights to AD users on the salvaged files and folders.

    • Remove eDirectory Trustees: After assigning AD users as trustees, the eDirectory users will be removed from the NSS file system as trustees.

    • Migrate IDs: Assign eDirectory trustee IDs (owner, modifier, archiver, metadata modifier, and deletor) to AD users.

  4. Click Apply.

To delete the mapped rights, select the Map Rights, then click Delete.

NOTE:After deletion, you can no longer synchronize rights on the volume using the deleted map rights.

To view the log information of the mapped rights, click View link under the Log column.

6.4.5 Viewing Rights

Using this feature, an administrator can view the explicit rights of both eDirectory and Active Directory users on the selected volume. When you select the volume name, the explicit rights are displayed along with the path, trustee, and rights information. This is the only tool that allows the administrators to view the rights of both AD and eDirectory users in a consolidated view.

Beginning with OES 2015 SP1, a Refresh button is added next to volume name drop-down box, which allows users to view the rights information dynamically.

6.4.6 NURM Command Line Utility

map-users

Use this utility to generate a user map after specifying the necessary match type, context and so on.

Syntax

map-users

map-users -u <specify the user map name> -a <eDirectory Username> -w <eDirectory password> -s <eDirectory Server IP> -p <eDirectory Connection Port> -l -c <eDirectory context> -st -t <specify the match type as user2user, group2group, or container2group> -m <specify the matching attribute as cn2sam> -A <AD username> -W <AD user password> -S <specify the AD server IP> -P <specify the AD server connection port> -L -C <specify the Active Directory context> -ST

Options

-u, --usermap-file <user map file name>

Specify the name of the user map. After a successful execution of the map-users command the user map file is saved with the name that you specify here.

-a, --user <eDirectory username>

Specify the eDirectory username to connect to NURM.

-w, --password <eDirectory user password>

Specify the eDirectory user password.

-s, --server-ip <eDirectory server IP>

Specify the name IP of the eDirectory server.

-p, --port <eDirectory server connection port>

Specify the port number to be used to connect to the eDirectory server.

-c, --context <specify the eDirectory server context>

Specify the eDirectory server context. For example, ou=users,o=novell.

-st --subtree-search

Use this option if you would like to consider all the users in the subtree.

-t, --match-type <specify the match type>

Specify the user match type. For example, user2user, group2group, or container2group.

-m, --matching-attribute <attributes>

Specify the match attributes. For example, cn2sam. As of now only cn2sam is supported.

-A, --USER <specify the AD user name>

Specify username of the AD user.

-W, --PASSWORD <AD user password>

Specify the AD user password.

-S, --SERVER-IP <specify the AD server IP>

Specify the IP address of the AD server that you would like to connect to.

-P, --PORT <specify the AD server connection port>

Specify connection port with which you would like to connect to the AD server.

-L, --USE-SSL-AD

Use this option if you would like a secure connection to the AD server.

-C, --CONTEXT <specify the AD server context>

Specify AD server context.

-ST, --SUBTREE-SEARCH

Use this option if you would like to consider all the users in the subtree.

-h, --help

Displays the usage information of the command.

Examples

  1. For an interactive user map generation, use the following command and follow the on screen instructions:

    map-users

  2. To map users by providing all the arguments:

    map-users -u mkt-usr-map -a root -w pa55word -s 192.168.1.1 -p 636 -l -c ou=users,o=mkt -st -t user2user -m cn2sam -A Administrator -W Pa55word@@ -S 192.168.1.2 -P 636 -L -C cn=users,dc=acme,dc=com -ST

    This command creates a user map with the following details:

    • Saves the user map as “mkt-usr-map”

    • Connects to the eDirectory server (192.168.1.1) with root credentials, context as ou=users,o=mkt, match type as user to user, matching attributes as CN to SAM, and searches the entire subtree while generating the user map. The connection type used is SSL using port 636.

    • Connects to the AD server (192.168.1.2) using the administrative credentials, context as cn=users,dc=acme,dc=com, and searches the entire subtree while generating the user map. The connection type used is SSL using port 636.

user-rights-map

Use this utility to map the rights of the mapped eDirectory and Active Directory users, groups, and containers. The mapped rights information is stored in a file and assigned an ID. Using this id, you can synchronize the rights of the users.

Syntax

user-rights-map -l

user-rights-map -L

user-rights-map -v <volume name> [[-u <User Map name 1 or the User Map 1 XML file path>,<User Map name 2 or the User Map 2 XML file path>,...,<User Map name n or the User Map n XML file path> |-i <-U username -P password>]][-a -m -r]

user-rights-map -S -M <map rights id> [-O <ad | edir>]

Options

-l, --list-map-rights

Lists the id, name of the user map, and the volume for which the rights are mapped.

-L, --list-usermaps

Lists the name of the user map, object mapping type (user to user, group to group, or container to group), eDirectory tree context, and Active Directory server context.

-v, --volume <VOLUME_NAME>

Specify the NSS volume on which rights will be provisioned for the mapped users. The volume name should always be specified in upper case.

-u, --usermap <user map name or path of the user map xml file>

Specify the name of the user map or the path of the user map (.xml) file that contains the mapping details of the eDirectory and Active Directory users, groups, or containers. If any of the user map names contain special characters, ensure to enclose all the user map names within double quotes.

NOTE:If you need to perform a sync, you must pass the name of the user map as an input parameter. Whereas, if the sync operation is performed using the user map (.xml) file, it cannot be synced later.

-i, --use-IDM <-U username -P password>

Specify the eDirectory admin credentials (in LDAP format) to authenticate to eDirectory. The user map created using IDM is used for mapping the rights.

-a, --apply-to-salvage

Performs rights mapping on files and folders in the salvage system.

-m, --migrate-ids

Migrates the IDs [owner, archiver, metadata modifier, deletor] of files and folders to the mapped Active Directory users. This operation might take a while to complete.

-r, --remove-old-trustee

Removes the eDirectory user as a trustee on the files and folders after successfully mapping the user rights. Removes the Active Directory or eDirectory user as a trustee on the files and folders when used with -S and -O options. This operation is irreversible.

-S, --sync

Synchronizes the rights for both the eDirectory and Active Directory trustees. By default, it merges the rights of both the eDirectory and Active Directory trustees. To overwrite trustee rights, use the -O option. It is mandatory to use the sync option with the -M option.

NOTE:The sync operation only synchronizes rights (applicable to salvage option). When creating the user map, if the options migrate-ids or remove-old-trustee are passed, they are ignored.

-M, --map-rights-id <arg>

Specify the id of the map rights operation. This option is used only with the sync option.

-O, --overwrite-with <ad | edir>

You must either pass ad or edir as an input parameter. When the ad parameter is passed, the rights of the eDirectory trustees are overwritten with the rights of the Active Directory trustees. When the edir is passed, the rights of the Active Directory trustees are overwritten with the rights of the eDirectory trustees. This option is used only with the sync option.

-h, --help

Displays the usage information of the command.

NOTE:The user rights map log information is located at /var/opt/novell/log/nurm/user-rights-map.log.

Examples

  1. Provision the rights on all files and folders of the volume MKTVOL, including the ones in the salvage system.

    user-rights-map -v MKTVOL -u /root/temp/UserMap.xml -a -m -r

    After successful execution of the user-rights-map operation, all the files and folders are provisioned with rights, all the ids are migrated, and the eDirectory user is removed as a trustee.

    NOTE:If any of the user map names contain special characters, ensure to enclose all the user map names within double quotes. For example, user-rights-map -v MKTVOL -u "/root/temp/UserMap.xml,usermap#2 -a -m -r.

  2. To list the user maps:

    user-rights-map -L or

    user-rights-map --list-usermaps

  3. To list the user rights map ids:

    user-rights-map -l or

    user-rights-map --list-map-rights

  4. To sync rights between Active Directory and eDirectory trustees. The rights of the eDirectory user1 are RWF and the rights of Active Directory user1 are FMA on file1:

    user-rights-map -S -M 2

    The value “2” in the command represents the map rights job id created in example 1.

    After successful execution of the command, the rights of eDirectory and Active Directory trustees are merged. The rights of eDirectory user1 are RWFMA and the rights of Active Directory user1 are RWFMA on file1.

  5. After the sync, the rights of the eDirectory trustees are overwritten with the rights of Active Directory trustees. The rights of the eDirectory user2 are RWF and the rights of Active Directory user2 are FMA on file2:

    user-rights-map -S -M 1 -O ad

    The value “1” in the command represents the map rights job id created in example 1.

    After successful execution of the command, the rights of eDirectory user2 are FMA and the rights of Active Directory user2 are FMA on file2.

  6. To synchronize rights between eDirectory and AD trustees (two way sync):

    user-rights-map -S -M 2 -O edir -m -r

    Synchronizes the rights of eDirectory trustees with AD trustees using the map rights job id “2”. During the sync process, it overwrites the Active Directory trustees with eDirectory trustees, migrates all the IDs, and the eDirectory trustee information is removed from the source after the sync process.

    user-rights-map -S -M 2 -O ad -m

    Synchronizes the rights of AD trustees with eDirectory trustees using the map rights job id “2”. During the sync process, it overwrites the eDirectory trustees with AD trustees, migrates all the IDs, and the AD trustee information is removed from the source after the sync process.