14.2 Virtual Machines as Cluster Resources
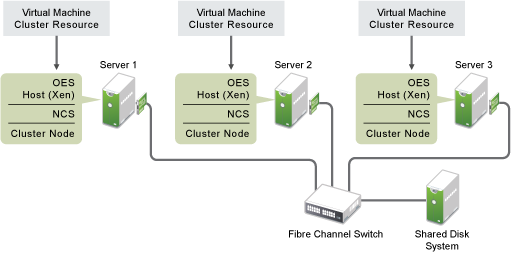
In this scenario, you have an OES cluster configured on physical machines. OES and Xen are installed and configured on each node along with OES Cluster Services. This part of the OES Cluster Services configuration does not differ from that of an OES cluster without virtualization.
You can create OES virtual machines on each cluster node and configure those virtual machines to be cluster resources. You can then fail over or migrate virtual machine cluster resources (entire virtual machines) to different physical nodes in your cluster.
Figure 14-1 depicts how this setup might look. OES Cluster Services (NCS) is installed and running on the virtual machine (VM) host server.
Figure 14-1 Virtual Machines as Cluster Resources
The following sections describe how to create a cluster resource and its cluster scripts for each virtual machine:
14.2.1 Creating a Xen Virtual Machine Cluster Resource
OES Cluster Services includes two Xen (virtual machine) resource templates, which greatly simplify the process for creating a virtual machine cluster resource. Much of the virtual machine cluster resource configuration is performed automatically by the Xen resource templates. The two templates are named Xen_Template and XenLive_Template. Both templates perform similar functions to automatically configure the cluster resource for the virtual machine.
The XenLive template provides an additional function to allow a manual virtual machine resource migration without the need to boot or bring up the virtual machine on the cluster node where the virtual machine has been migrated. This lets clients continue to access a virtual machine that has been migrated without reconnecting or waiting for the virtual machine to boot or load on the target node.
IMPORTANT:The live migrate function is only useful for a manual virtual machine resource migration, and does not work for a virtual machine resource failover or failback.
Ensure that your Xen setup is working properly before you attempt to set up the OES Cluster Services clustering for your virtual machines in the Xen host environment. Refer to the Introduction to Xen Virtualization to find out how to set up XEN and XEN virtual machines.
To configure a virtual machine as a cluster resource:
-
Open your Internet browser and enter the URL for iManager.
The URL is http://server_ip_address/nps/imanager.html. Replace server_ip_address with the IP address or DNS name of a server in the cluster or with the IP address for Apache-based services.
-
Specify your user name and password, specify the tree where you are installing the cluster, then click Login.
-
In iManager, select Clusters > My Clusters, select the cluster, then click Cluster Options.
-
On the Cluster Options page, click New.
-
Click the Resource radio button to specify Resource as the resource type you want to create, then click Next.
-
Specify a name for the virtual machine resource.
-
In the Inherit From Template field, browse to the Cluster object container, then select the desired Xen template name from the list of templates in the container.
The Xen templates are named Xen_Template and XenLive_Template.
-
Select the Define Additional Properties check box, click Next, then continue with Configuring Virtual Machine Load, Unload, and Monitor Scripts.
14.2.2 Configuring Virtual Machine Load, Unload, and Monitor Scripts
The Xen resource templates configure the virtual machine resource by automatically creating load, unload, and monitor scripts, setting failover and failback modes, and assigning the virtual machine as a resource to all nodes in the cluster.
The load, unload, and monitor scripts for virtual machine cluster resources do not need to be modified if all the following are true:
-
The resource name is the same as the virtual machine name.
-
The configuration file name is the same as the virtual machine name.
-
The mount point directory name is the same as the virtual machine name.
-
You are using the Reiser file system.
If you are not modifying the scripts, continue the setup by configuring the resource policies and the resource server assignments. See Section 10.9, Configuring the Start, Failover, and Failback Modes for Cluster Resources and Section 10.10, Configuring Preferred Nodes and Node Failover Order for a Resource.
If you are modifying the scripts, continue with the following sections:
Configuring the Load Script
The virtual machine resource load script page should already be displayed. The load script contains commands to start the virtual machine. You can customize some commands for your specific configuration.
-
View and, if necessary, edit the lines in the script for your specific directory structure, mount point, configuration file, and file system type (in the Xen_Template).
See the following examples of the default Xen_Template and XenLive_Template load scripts:
-
Click Next and continue with Configuring the Unload Script.
Sample Xen_Template Load Script
The Xen_Template load script appears similar to the following example:
#!/bin/bash
. /opt/novell/ncs/lib/ncsfuncs
export OCF_ROOT=/usr/lib/ocf/

#define domU name
OCF_RESOURCE_INSTANCE=xen_vm_name

#define shared volume name
VOLUME_NAME=$OCF_RESOURCE_INSTANCE

#define the volume group name
CONTAINER_NAME=name
# define the device
MOUNT_DEV=/dev/$CONTAINER_NAME/$VOLUME_NAME

# filesystem settings
export OCF_RESKEY_device=$MOUNT_DEV
export OCF_RESKEY_directory=/mnt/$OCF_RESOURCE_INSTANCE
export OCF_RESKEY_fstype=ext3
#export OCF_RESKEY_options=

# service settings
export OCF_RESKEY_xmfile=$OCF_RESKEY_directory/$OCF_RESOURCE_INSTANCE

#activate the volume group
exit_on_error vgchange -a ey $VOLGROUP_NAME

# mount the file system
exit_on_error ocf_start Filesystem

# start the service
exit_on_error ocf_start Xen

# return status
exit 0
Sample XenLive_Template Load Script
The XenLive_Template load script appears similar to the following example:
#!/bin/bash
. /opt/novell/ncs/lib/ncsfuncs
export OCF_ROOT=/usr/lib/ocf/
OCF_RESOURCE_INSTANCE=xen_vm_name

# filesystem settings
export OCF_RESKEY_directory=/mnt/$OCF_RESOURCE_INSTANCE

# service settings
export OCF_RESKEY_xmfile=$OCF_RESKEY_directory/$OCF_RESOURCE_INSTANCE

# start the service
if [ -n "$NCS_TOFROM" ]
then
    exit_on_error ocf_migrate_from Xen
else
    exit_on_error ocf_start Xen
fi

# return status
exit 0
Configuring the Unload Script
The virtual machine resource unload script page should now be displayed. The unload script contains commands to stop the virtual machine. You can customize some commands for your specific configuration.
-
View and, if necessary, edit the lines in the script for your specific directory structure, mount point, configuration files, and file system type (in the Xen_Template).
Use the same values that you specified in the load script.
See the following examples of the default Xen_Template and XenLive_Template unload scripts:
-
Click Next, then continue the setup by configuring the resource policies and the resource server assignments.
See Section 10.9, Configuring the Start, Failover, and Failback Modes for Cluster Resources and Section 10.10, Configuring Preferred Nodes and Node Failover Order for a Resource.
-
If you want to enable monitoring for the resource, continue with Configuring the Monitor Script.
Sample Xen_Template Unload Script
The Xen_Template unload script appears similar to the following example:
#!/bin/bash
. /opt/novell/ncs/lib/ncsfuncs
export OCF_ROOT=/usr/lib/ocf/

#define domU name
OCF_RESOURCE_INSTANCE=xen_vm_name

#define shared volume name
VOLUME_NAME=$OCF_RESOURCE_INSTANCE

#define the volume group name
CONTAINER_NAME=name
# define the device
MOUNT_DEV=/dev/$CONTAINER_NAME/$VOLUME_NAME

# filesystem settings
export OCF_RESKEY_device=$MOUNT_DEV
export OCF_RESKEY_directory=/mnt/$OCF_RESOURCE_INSTANCE
export OCF_RESKEY_fstype=ext3
#export OCF_RESKEY_options=

# service settings
export OCF_RESKEY_xmfile=$OCF_RESKEY_directory/$OCF_RESOURCE_INSTANCE

# stop the service
exit_on_error ocf_stop Xen

# umount the file system
sleep 10 # if not using SMS for backup, please comment out this line
exit_on_error ocf_stop Filesystem

#deactivate the volume group
exit_on_error vgchange -a n $VOLGROUP_NAME

# return status
exit 0
Sample XenLive_Template Unload Script
The XenLive_Template unload script appears similar to the following example:
#!/bin/bash
. /opt/novell/ncs/lib/ncsfuncs
export OCF_ROOT=/usr/lib/ocf/
OCF_RESOURCE_INSTANCE=xen_vm_name

# filesystem settings
export OCF_RESKEY_directory=/mnt/$OCF_RESOURCE_INSTANCE

# service settings
export OCF_RESKEY_xmfile=$OCF_RESKEY_directory/$OCF_RESOURCE_INSTANCE
export OCF_RESKEY_CRM_meta_migrate_target=$NCS_TOFROM

RC=0
# stop the service
if [ -n "$NCS_TOFROM" ]
then
    RC=`ocf_migrate_to Xen`
    if [ $RC -ne 0 ]
    then
        ignore_error ocf_stop Xen
    fi
else
    ignore_error ocf_stop Xen
fi

# return status
exit $RC
Configuring the Monitor Script
The Xen_Template and XenLive Template each include a resource monitor script that you can customize. You use the script to monitor the health of a virtual machine cluster resource.
Resource monitoring is disabled by default. If you want to enable resource monitoring for a virtual machine cluster resource, you must enable it prior to customizing the resource monitor script.
Enabling Resource Monitoring
To enable resource monitoring for a virtual machine cluster resource:
-
In iManager, select Clusters > My Clusters.
-
Select the cluster.
-
On the Cluster Manager page, select the check box next to the virtual machine resource, then click the Details link.
-
Click the Monitoring tab, then select the Enable Resource Monitoring check box to enable resource monitoring for the resource.
Resource monitoring is disabled by default.
-
For the polling interval, specify how often you want the resource monitor script for this resource to run.
You can choose to specify the number in minutes or seconds.
-
Specify the number of failures (Maximum Local Failures) for the specified amount of time (Time Interval).
If the resource monitor detects that the resource fails the number of times specified in the amount of time specified, a failure action initiates.
-
Specify whether you want the resource to be set to a comatose state, to migrate to another server, or to reboot the hosting node (without synchronizing or unmounting the disks) if a failure action initiates. The reboot option is normally used only for a mission-critical cluster resource that must remain available.
If the failure action initiates and you chose the option to migrate the resource to another server, the resource migrates to the next server in its Preferred Nodes list. The resource remains on the server it has migrated to unless you migrate it to another server or the failure action initiates again, in which case it again migrates to the next server in its Preferred Nodes list.
If the failure action initiates and you chose the option to reboot the hosting node without synchronizing or unmounting the disks, each of the resources on the hosting node will fail over to the next server in its Preferred Nodes list because of the reboot. This is a hard reboot, not a graceful one.
With resource monitoring, the Failover, Failback, and Start modes have no effect on where the resource migrates. This means that a resource that has been migrated by the resource monitoring failure action does not migrate back to the node it migrated from unless you manually migrate it back.
Viewing or Modifying the Monitor Script
To view or customize the monitor script for the virtual machine’s cluster resource:
-
In iManager, select Clusters > My Clusters.
-
Select the cluster.
-
On the Cluster Manager page, select the check box next to the virtual machine resource that you created, then click the Details link.
-
Click the Scripts tab, then click the Monitor Script link.
-
View or edit the commands in the script that monitor the resource on the server.
You can use the same commands that would be used at the Linux terminal console.
See the following examples of the default Xen_Template and XenLive_Template monitor scripts:
-
Specify the Monitor Script Timeout value, then click Apply to save the script.
The timeout value determines how much time the script is given to complete. If the script does not complete within the specified time, the failure action initiates based on your settings in Step 7 of Enabling Resource Monitoring. Cluster Services marks the monitor process as failed right after the defined timeout expires, but it must wait for the process to conclude before it can start other resource operations.
Sample Xen_Template Monitor Script
The Xen_Template monitor script appears similar to the following example:
#!/bin/bash
. /opt/novell/ncs/lib/ncsfuncs
export OCF_ROOT=/usr/lib/ocf/

#define domU name
OCF_RESOURCE_INSTANCE=xen_vm_name

#define shared volume name
VOLUME_NAME=$OCF_RESOURCE_INSTANCE

#define the volume group name
CONTAINER_NAME=name
# define the device
MOUNT_DEV=/dev/$CONTAINER_NAME/$VOLUME_NAME

# filesystem settings
export OCF_RESKEY_device=$MOUNT_DEV
export OCF_RESKEY_directory=/mnt/$OCF_RESOURCE_INSTANCE
export OCF_RESKEY_fstype=ext3
#export OCF_RESKEY_options=

# service settings
export OCF_RESKEY_xmfile=$OCF_RESKEY_directory/$OCF_RESOURCE_INSTANCE

#check the logical volume
exit_on_error status_lv $MOUNT_DEV

# status of the file system
exit_on_error ocf_status Filesystem

# status of the service
exit_on_error ocf_status Xen

# return status
exit 0
Sample XenLive_Template Monitor Script
The XenLive_Template monitor script appears similar to the following example:
#!/bin/bash
. /opt/novell/ncs/lib/ncsfuncs
export OCF_ROOT=/usr/lib/ocf/
OCF_RESOURCE_INSTANCE=xen_vm_name

# filesystem settings
export OCF_RESKEY_directory=/mnt/$OCF_RESOURCE_INSTANCE

# service settings
export OCF_RESKEY_xmfile=$OCF_RESKEY_directory/$OCF_RESOURCE_INSTANCE

# status of the service
exit_on_error ocf_status Xen

# return status
exit 0
14.2.3 Setting Up Live Migration
Live migrations use the XenLive template. You can manually copy the virtual machine configuration files to the same path on each node of the cluster, or you can set up an OCFS2 file system for the configuration files. Do one of the following:
-
Manually copy the configuration file for the virtual machine to the same directory (the path must be the same) on each cluster node where the virtual machine will run.
-
Configure the OCFS2 file system on a shared disk system and copy the virtual machine configuration file to a directory on the file system. You also must ensure that all cluster nodes where the virtual machine will run have access to the OCFS2 file system on the shared disk system.
Ensure that your OCFS2 file system is working properly before you attempt to use it with OES Cluster Services.
For detailed information about using OCFS2, see the OCFS2 Project on the Oracle website.
For information about setting up live migration, see Configuring a Xen VM for Live Migration with a Cluster in Micro Focus Cool Solutions.