5.2 Installing Printers
You can install and distribute iPrint printers in the following ways:
5.2.1 Using the iPrint Printer List Web Page on Windows
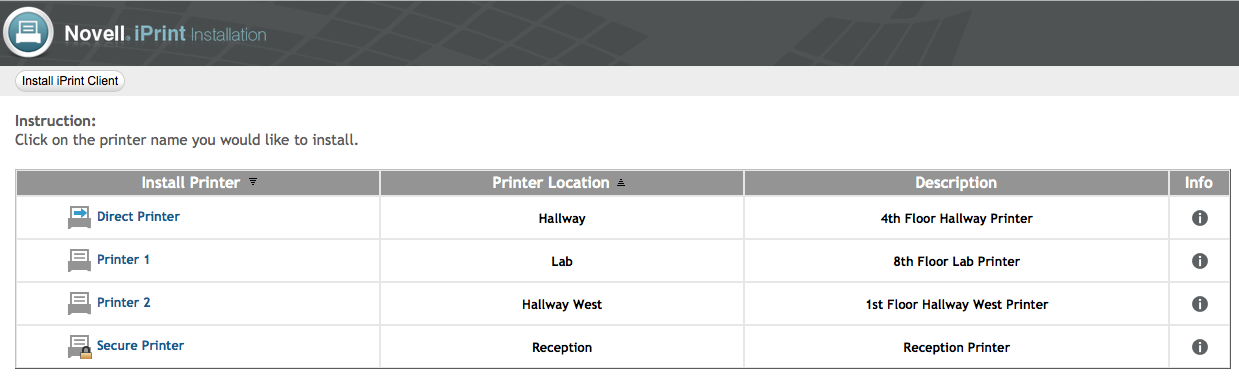
iPrint generates a list of printers associated with a Print Manager that can be used to install the iPrint Client, install an iPrint printer, or check the status and configuration of a printer and a list of print jobs.
You can install the iPrint printers using the following browsers:
If the iPrint Client is not installed, install it when you are prompted.
On Microsoft Internet Explorer
-
Launch the browser, and either the DNS name or the IP address to access the iPrint Printer List web page.
For example, http://server_IP_ address_or_dns_name/ipp.
All the available printers are listed on the iPrint Printer List web page.
-
Click on the printer that you want to install.
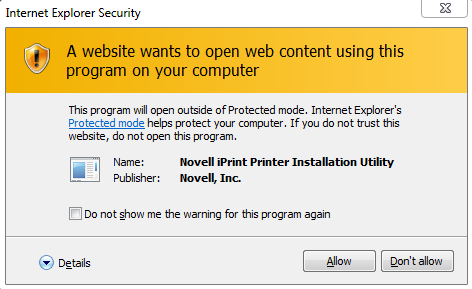
On some versions of Internet Explorer, if you are prompted with an Internet Explorer warning message message, click .
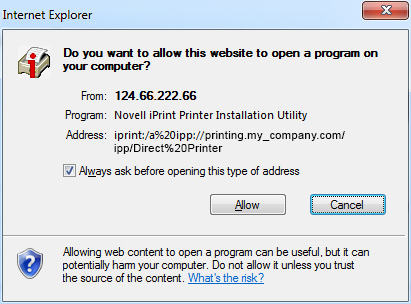
The Internet Explorer Security warning message dialog box is displayed.
-
Click on the warning message dialog box to proceed with the installation of the printer.
-
(Optional) To avoid future prompts to launch the iPrint applications, select the check box.
On Mozilla Firefox
-
Launch the browser, and either the DNS name or the IP address to access the iPrint Printer List page.
For example, http://server_IP_ address_or_dns_name/ipp.
All the available printers are listed on the iPrint Printer List web page.
-
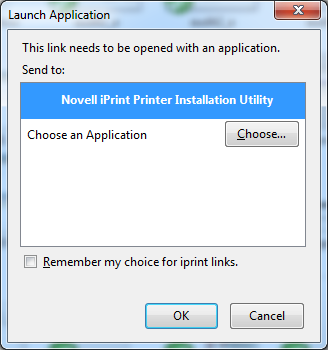
Click on the printer that you want to install.
The Launch Application dialog box is displayed.
-
Select in the dialog box, then click to proceed with the installation of the printer.
-
(Optional) To avoid future prompts to launch the iPrint applications, select check box.
On Google Chrome
-
Launch the browser, and either the DNS name or the IP address to access the iPrint Printer List page.
For example, http://server_IP_ address_or_dns_name/ipp.
All the available printers are listed on the iPrint Printer List web page.
-
Click on the printer that you want to install.
The External Protocol Request dialog box is displayed.

-
Click on the dialog box to proceed with the installation of the printer.
-
(Optional) To avoid future prompts to launch external protocol links, select the check box.
If the iPrint Client is not installed, install it when you are prompted.
During the printer installation, iPrint downloads and installs the printer driver, if one is associated with the printer, and installs the printer on the user’s workstation. The first time a printer is installed, printer drivers are forced to the workstation, even if the workstation contains a newer driver. Print Managers refresh their saved copies of printer drivers for the printers they are hosting with updated printer drivers from the associated Driver Store.
5.2.2 Using the iPrint Printer List Web Page on Macintosh
iPrint generates a list of printers associated with a Print Manager that can be used to install the iPrint Client, install an iPrint printer, or check the status and configuration of a printer and a list of print jobs.
You can install the iPrint printers using the following browsers:
On Safari
-
Launch the browser, and use either the DNS name or the IP address to access the iPrint Printer List page.
For example, http://server_IP_ address_or_dns_name/ipp.
All the available printers are listed on the iPrint Printer List web page.
-
Click on the printer that you want to install.
The iPrint Printer Installation dialog box is displayed.

-
Click to proceed with the installation of the printer.
-
If you are installing a secure printer, the iPrint Printer Installation dialog box is displayed once again prompting for your user credentials.

-
Specify your user credentials.
-
(Optional) To avoid future prompts, select check box.
-
Click after you have specified your credentials.
-
-
Click when the printer installation is complete.
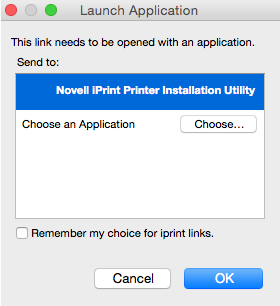
On Mozilla Firefox
-
Launch the browser, and use either the DNS name or the IP address to access the iPrint Printer List page.
For example, http://server_IP_ address_or_dns_name/ipp.
All the available printers are listed on the iPrint Printer List web page.
-
Click on the printer that you want to install.
The Launch Application dialog box is displayed.
-
Select in the dialog box, then click to proceed with the installation of the printer.
-
(Optional) To avoid future prompts to launch the iPrint applications, select check box.
The iPrint Printer Installation dialog box is displayed.
-
Click to proceed with the installation of the printer.
-
If you are installing a secure printer, the iPrint Printer Installation dialog box is displayed.
-
Specify your user credentials.
-
(Optional) To avoid future prompts, select check box.
-
Click after you have specified your user credentials, then click to proceed with the installation of the printer.
-
-
Click when the printer installation is complete.
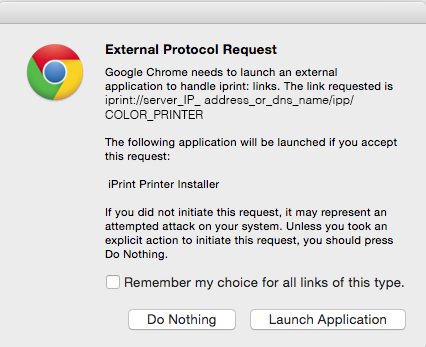
On Google Chrome
-
Launch the browser, and use either the DNS name or the IP address to access the iPrint Printer List page.
For example, http://server_IP_ address_or_dns_name/ipp.
All the available printers are listed on the iPrint Printer List web page.
-
Click on the printer that you want to install.
The External Protocol Request dialog box is displayed.
-
Click on the dialog box to proceed with the installation of the printer.
-
(Optional) To avoid future prompts to launch external protocol links, select the check box.
The iPrint Printer Installation dialog box is displayed.
-
Click to proceed with the installation of the printer.
-
If you are installing a secure printer, the iPrint Printer Installation dialog box is displayed.
-
Specify your user credentials.
-
(Optional) To avoid future prompts, select check box.
-
Click after you have specified your user credentials, then click to proceed with the installation of the printer.
-
If the iPrint Client is not installed, install it when you are prompted.
During the printer installation, iPrint downloads and installs the printer driver, if one is associated with the printer, and installs the printer on the user’s workstation. The first time a printer is installed, printer drivers are forced to the workstation, even if the workstation contains a newer driver. Print Managers refresh their saved copies of printer drivers for the printers they are hosting with updated printer drivers from the associated Driver Store.