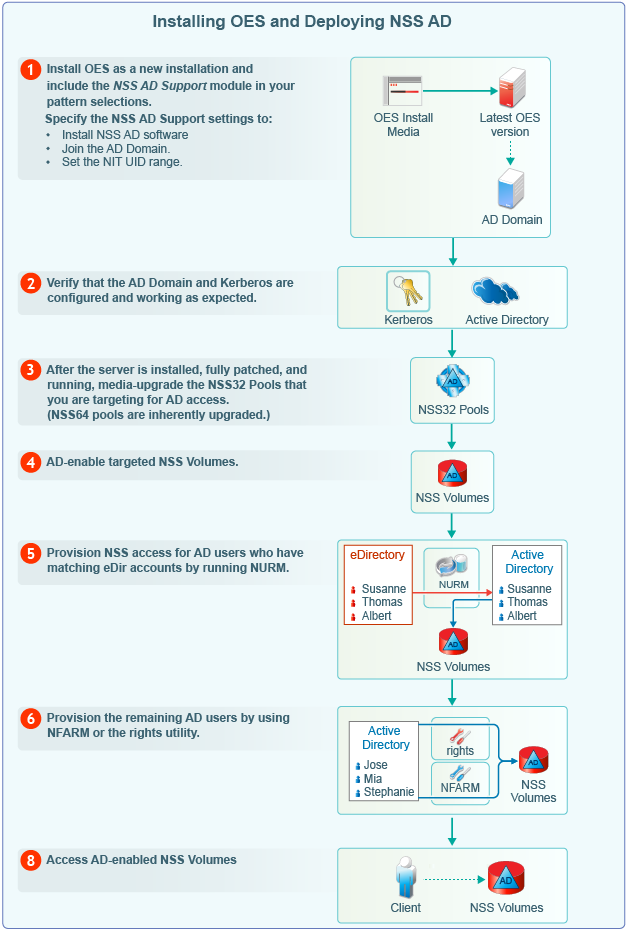
Table 3-1 Installing OES and Deploying NSS AD

|
|

|
-
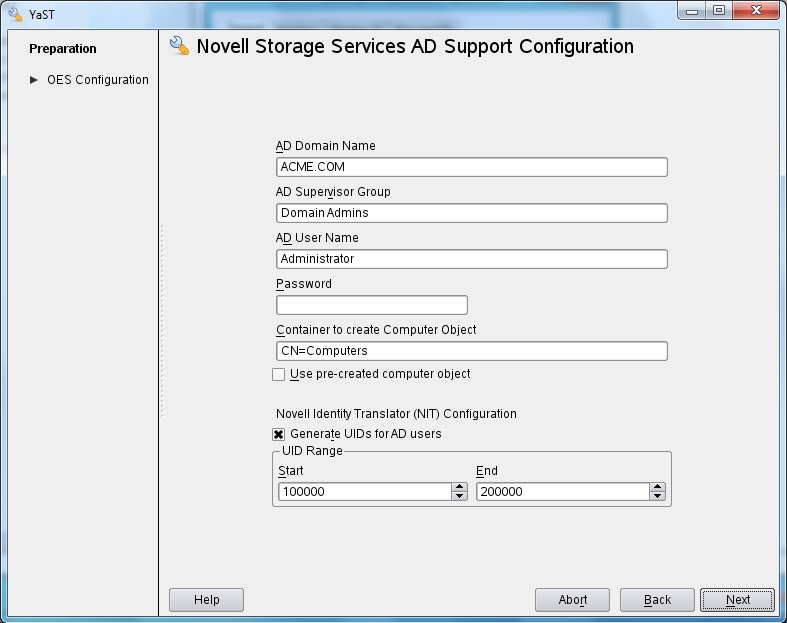
Ensure that the OES computer object is created in the AD domain you specified.
-
Verify that the default keytab entries for the OES server are created by entering the following command at the server’s terminal prompt:
klist -k
For example: tstsrv:~/Desktop #klist -k
Keytab name: FILE:/etc/krb5.keytab
KVNO Principal
---- ----------------------------------
2 tstsrv$@ACME.COM
2 tstsrv$@ACME.COM
2 tstsrv$@ACME.COM
2 cifs/tstsrv.acme.com@ACME.COM
2 cifs/tstsrv.acme.com@ACME.COM
2 cifs/tstsrv.acme.com@ACME.COM
2 cifs/tstsrv@ACME.COM
2 cifs/tstsrv@ACME.COM
2 cifs/tstsrv@ACME.COM
2 host/tstsrv.acme.com@ACME.COM
2 host/tstsrv.acme.com@ACME.COM
2 host/tstsrv.acme.com@ACME.COM
tstsrv:~/Desktop #
The 12 keytab entries represents the Service Principals of the OES server.
-
You can also execute kinit -k <name of the OES server>$ to ensure that the OES server is joined to the AD domain successfully.
For example, kinit -k tstsrv$
On successful execution of the above command, it does not display any output message and returns to terminal.
|

|
-
Media-upgrade the NSS32 pools that your AD users need access to.
The following is a simple, GUI-driven method.
-
At a terminal prompt, enter nssmu.
-
Select
-
Select a pool.
-
Type g, then type Y(es) > O(kay).
-
Select another pool and continue until all of the NSS32 pools that AD users need access to are media-upgraded
For more information on the NSS Media upgrade options and processes, see NSS Media Upgrade Commands in the OES 2018 SP2: NSS File System Administration Guide for Linux. |

|
-
AD-enable the NSS volumes that your AD users need access to.
The following is a simple, GUI-driven method.
-
At a terminal prompt, enter nssmu.
-
Select
-
Select a volume.
-
Type G, then type Y(es) > O(kay).
-
Select another volume and continue until all of the volumes that AD users need access to are AD-enabled.
For more information on the NSS Media upgrade options and processes, see NSS Media Upgrade Commands in the OES 2018 SP2: NSS File System Administration Guide for Linux.
See also, AD-enable the Volume in the OES 2018 SP2: NSS File System Administration Guide for Linux. |

|
-
Review the information in Section 4.0, Assigning NSS Trustee Rights for AD Users and Groups to ensure that you understand the trustee-assignment processes and the associated caveats, then continue with Step 2.
-
Assess whether the OES User Rights Map utility (NURM) applies to your organization by considering the following questions:
-
Do any of your AD users and groups have matching eDirectory accounts?
If so, you can use the OES User Rights Map utility (NURM) to map the rights between eDirectory and Active Directory users and groups and then apply NSS trustee assignments based on the mapping.
If not, skip to process 6.
-
Do you use NetIQ Identify Manager 4.5 or later to coordinate identities and passwords between Active Directory and eDirectory, and do you have a user map that was created using IDM Designer?
If so, NURM can leverage that map.
If not, you can create a map using NURM.
-
Do you want to consolidate your overlapping eDirectory and Active Directory accounts to only Active Directory?
If so, you can have NURM delete the eDirectory trustee assignments.
-
If applicable, run NURM to assign NSS trustee rights to your AD users.
For more information, see Section 6.4, NURM (OES User Rights Map). |

|
|

|
To access the AD enabled NSS volumes, do the following:
-
Ensure to create a forward lookup DNS entry for OES server where AD enabled NSS volumes are available.
-
Map the NSS volume with the complete DNS name of the OES server or host name (not with the IP address).
|