2.2 Upgrading from 23.2 or 23.3 to 23.4 and Later
Use the instructions in the following sections to upgrade from Retain 23.2 or later to Retain 23.4 and later.
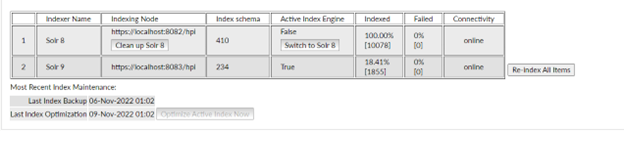
2.2.4 Updating to the Solr 9 Indexing Engine
After Retain 23.4 or later is updated, update the Indexing Engine to Solr 9. You can do this at any time after the upgrade, but if you have Manage Server rights, you are prompted to perform the Index Engine update.
-
In Admin Console, when it is prompted to update the indexing engine, click .
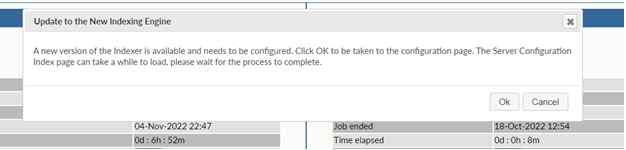
NOTE:It can take some time for the Server Configuration page to load.
-
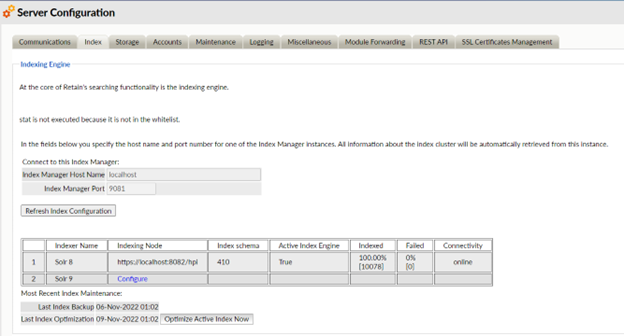
In > , click in the column.
IMPORTANT:When you configure Solr 9, all delete jobs are disabled until Solr 8 clean-up is completed.
-
You are prompted to select a Port and Index Path. The default Port is 1 more than the port used for Solr 9. For example, if the port for Solr 8 index engine is 8081, then on upgrading Retain, the default port for Solr 9 will be 8082. The index path is the new path for index files. If the index directory is using a symlink, another symlink needs to be created for the new index folder so that the new index files are stored in an appropriate storage location.
NOTE:
-
If you are running Retain on a Windows Server, Solr 9 restricts the use of Windows SMB shares on the UNC format, such as\\myhost\myshare\mypath. For the indexer storage path, you can use a drive and mount it later. As a workaround, map the storage path in UNC format to a symbolic link folder on the local drive:
-
On the server where Retain is running, run the following command in the Windows Command Prompt: mklink /D C:\myLink \\IP address\c\Retain\Index In the above command, C:\myLink corresponds to the linked folder on the local drive and \\IP address\c\Retain\Index corresponds to the storage path in UNC format.
-
Ensure that the Retain Tomcat service is running as a user who has access to the shared folder. If not, please update the service and restart Tomcat.
-
-
If you are running Retain on a Linux Server, using a different path than the default, you need to make sure the ownership is set to tomcat:www.
A disk check will run to make sure that there is enough space on your server to migrate the indexer. The free space needed for the migration is 3 times the size of the current index. The recommended free space is 3.5 times the current index size.

When the check passes, Solr 9 is configured and starts indexing. At this point, you can continue with the next steps to switch to Solr 9 or you can wait for Solr 9 to finish indexing.
IMPORTANT:Once Solr 9 is configured, index optimization and backup are disabled until Solr 8 clean-up is completed.
-
-
After Solr 9 is configured, click and restart the Tomcat service.
IMPORTANT:If you switch to Solr 9 when the re-indexing is in progress, the search results in Retain will not be accurate.
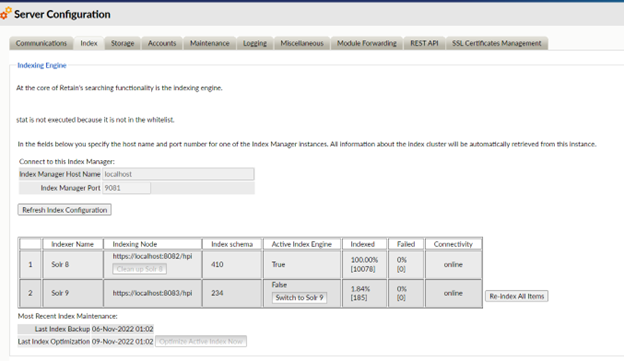
Ensure that Solr 9 works as expected. If not, select and switch back to Solr 8.
-
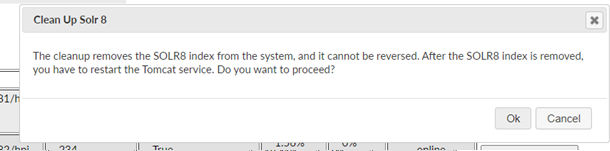
Click .
IMPORTANT:This deletes Solr 8 and all the Solr 8 data from the system. Before you perform Solr 8 clean up, ensure that the Solr 9 is working as expected.
-
Click to confirm.