2.6 Upgrading from 4.9 to 4.11

Use the instructions in the following sections to upgrade from Retain 4.9 or later to Retain 4.11.

2.6.1 Preparing to Upgrade to 4.11

Table 2-19 Preparing for Retain 4.9

Task

Details

If you archive Office 365 using Basic Authentication

Be aware of the following points:

  • Basic Authentication is not supported in Retain 4.9 and later.

    The upgrade will succeed with Basic Authentication still in place. However, you should switch to OAuth as soon as possible.

  • Each time you log in to the administrative console, a pop up message displays reminding you that an O365 module is using basic authentication and that you need to switch OAuth authentication to ensure continued data archiving.

  • If the system uses Retain’s SMTP notification system, when you run a maintenance job, the system sends an alert email to the designated recipient with the subject Retain Alert - Basic Authentication Not Supported.

Ensure that the Retain index has been optimized

By default, Retain optimizes its index at 1 a.m. every Sunday morning.

To make sure that your system’s index has been optimized since upgrading to version 4.7.0.1, do the following:

  1. In the web administrative console, go to Configuration > Server Configuration > Maintenance tab > Maintenance/Caching panel.

  2. Check the Last Index Optimization date.

  3. If the last optimization occurred before the upgrade to Retain 4.7.0.1, click the Optimize Now button and wait until the date changes before proceeding.

Ensure that the Retain server is connected to the Internet

  1. Verify that the Retain server is connected to the Internet, so that the installer can install OpenJDK 11.

    If your server isn’t connected to the Internet, see Installing Java on a Server with no Internet Connection.

Ensure that SMTP Is Working in Retain

  1. The installer must be able to email status messages to the configured SMTP account. Otherwise, it will stop and display an error message.

Get the 4.11 software

  1. Using your Micro Focus Customer Center account, download the latest version of the Retain installation .zip file.

  2. Copy the file and unzip/extract it on the following:

    • The Retain server that you are upgrading.

    • Every server that is running a Retain Worker or other component.

  3. (SLES) Open a terminal, navigate to the extracted folder, run the following command to make the script files executable:

    chmod +x *.sh

Ensure Adequate RAM

  1. Make sure that the Retain server has at least 12 GB RAM.

Back up the Database and the Retain Server

The upgrade should run smoothly. However, best practice always dictates backing up systems before making major changes.

  1. Back up your database and the Retain server immediately before starting the upgrade.

2.6.2 Upgrading to 4.11 (SLES)

If you are upgrading Retain on a Windows server, go to Upgrading to 4.11 (Windows)

Table 2-20 Upgrading to 4.11 on SLES

Installation Section

Details

Stop Retain before Upgrading

  1. On the Retain server, open a terminal prompt.

  2. Stop Retain by stopping the Apache Tomcat service.

    For example, on SLES 11 enter the following command:

    rcretain-tomcat stop

Run the Retain 4.9 Installation

  1. At the terminal prompt, navigate to the folder that you prepared in Get the 4.11 software, then enter the following command:

    ./RetainInstall.sh

License Agreement

  1. Scroll through the license agreement, then type 1 and press Enter.

Software and RAM Requirements

The Linux install lists the 4.11 software and RAM requirements.

  1. Press Enter to continue.

Retain Components Selection Page

The install displays the Retain components that are already installed on the server.

  1. If you want to upgrade only the listed components, enter 1.

  2. If you want to also install additional components, enter 2, then enter y for the components you wish to add to the server.

Pre-requirements Status

The install checks for OpenJDK 11 and an updated version of Tomcat 8.5. If they are not installed, it installs and configures them for Retain.

NOTE:The Java and Tomcat verification/installation process can take a while, so be patient while the installation works in the background.

The installation process extracts and installs Retain 4.11.

Next, it starts the system processes that Retain requires.

Finally, a message reminds you to consult the documentation.

  1. When the system prompt displays, wait a few moments to make sure all the components are running.

  2. Then continue with Updating to the Solr 8 Indexing Engine

2.6.3 Upgrading to 4.11 (Windows)

If you are upgrading Retain on a SLES server, go to Upgrading to 4.11 (SLES)

Table 2-21 Upgrading to 4.11 on Windows

Dialog/Section

Details

Stop Retain before Upgrading

  1. On the Retain server, click Start > Administrative Tools > Services (or the equivalent on your version of Windows Server).

  2. Stop Retain by stopping the Retain Tomcat service.

Run the Retain 4.11 Installation

  1. In the folder that you prepared in Get the 4.11 software, right click RetainInstall.exe and select Run as Administrator.

Welcome to the Retain Setup Wizard

  1. Click Next.

Software Requirements

The install lists the 4.11 software and hardware requirements along with the software that it will install

  1. Click Next.

License Agreement

  1. Accept the agreement and click Next.

Select Destination Location

  1. If you want to install the upgraded Retain components in a non-default location, use the Browse button to change the path.

  2. Click Next.

Retain Components Selection Page

The install displays the components that are already installed on the server.

  1. If desired, you can select additional components for installation.

  2. Click Next.

Pre-requirements Status

  1. The install checks for OpenJDK 11 and an updated Tomcat 8.5. If they are not installed, it indicates that they will be.

  2. Click Next.

    If needed, the install runs the OpenJDK 11 installation and updates Tomcat 8.5.

    Click through any security alerts or other dialogs to allow the process to run to completion.

Information

The install reminds you to consult the documentation.

  1. Wait a few moments to make sure all components have finished installing.

  2. Click Next.

General Information

A message shows the Retain access URL.

  1. Click Next.

Completing the Retain Setup Wizard

  1. Click Finish.

  2. Continue with Updating to the Solr 8 Indexing Engine

2.6.4 Updating to the Solr 8 Indexing Engine

Once Retain has been updated to 4.11, you need to update to the Solr 8 Indexing Engine. This can be done at any time after the upgrade, but if a user has Manage Server righs, they are prompted to perform the update until it is completed.

NOTE:Retain 4.11 onwards, the Zookeeper folder is decoupled from the index folder and is placed inside Retain’s base path.Ensure that the ownership of the base path is set to tomcat:www. For more information see the Indexes section in the Retain 4.11: Planning guide.

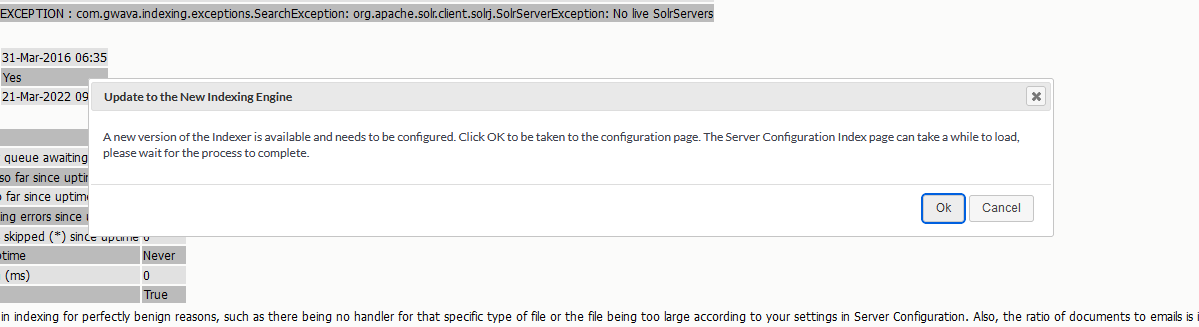
  1. In Retain’s web admin console, a message displays that you need to update the indexing engine.

  2. Click Ok to update the indexing engine.

    NOTE:It can take some time for the Server Configuration page to load.

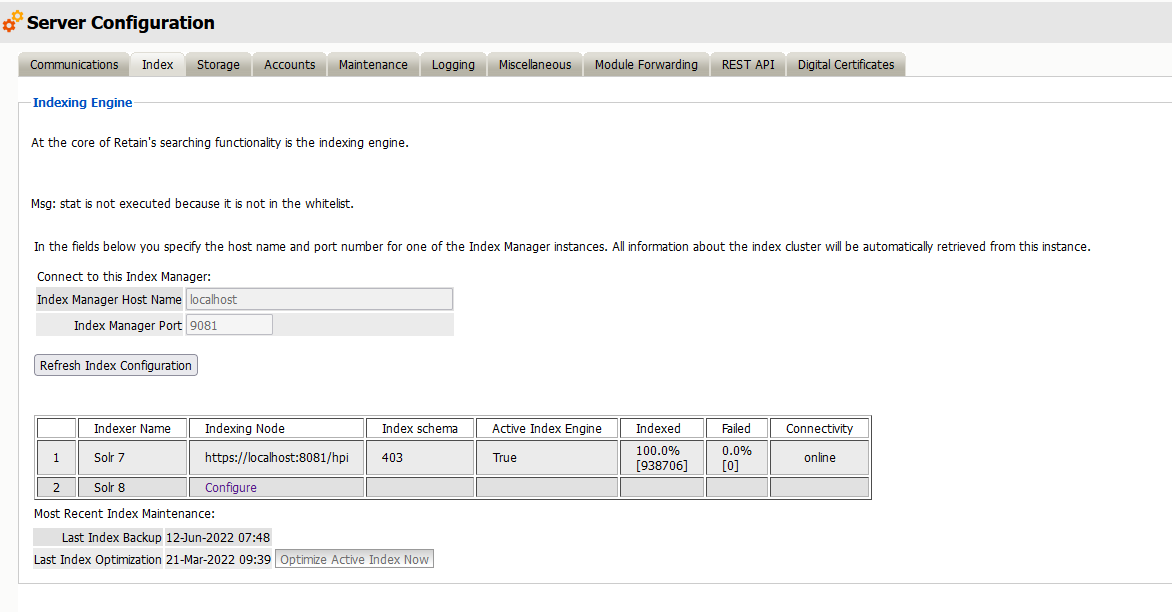
  3. On the Server Configuration page, click Configure next to Solr 8.

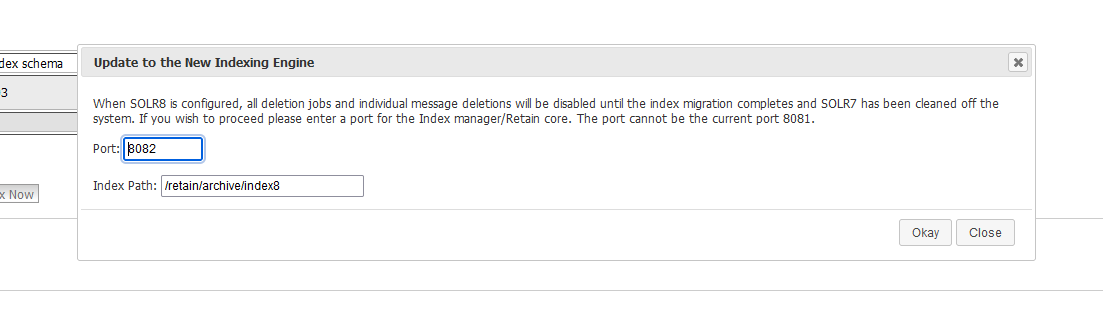
    IMPORTANT:When you configure Solr 8, all deletion jobs will be disabled until Solr 7 has been cleaned up.

  4. You are prompted to select a Port and Index Path. The default Port is 1 more than the port used for Solr 7. The index path in the new path for index files. If the index directory is using a sim link, another sim link needs to be created for the new index folder so the new index files are put on the proper storage.

    NOTE:If you are using a different path than the default, you need to make sure the ownership is set to tomcat:www.

    A disk check will run to make sure that there is enough space on your server to migrate the indexer. The required free space needed for the migration is 3 times the size of the current index. The recommended free space is 3.5 times the current index size.

    When the check passes, Solr 8 is configured and starts indexing. At this point you can continue with the next steps to switch to Solr 8 or you can wait for Solr 8 to finish indexing.

    IMPORTANT:Once Solr 8 is configured, index optimization and backup are disabled until Solr 7 is cleaned up.

  5. Once Solr 8 is configured, you can switch to it at any time by clicking the Switch to Solr 8 button and restarting tomcat.

    IMPORTANT:If you switch to Solr 8 before it has reindexed all items your search results in Retain will not be accurate.

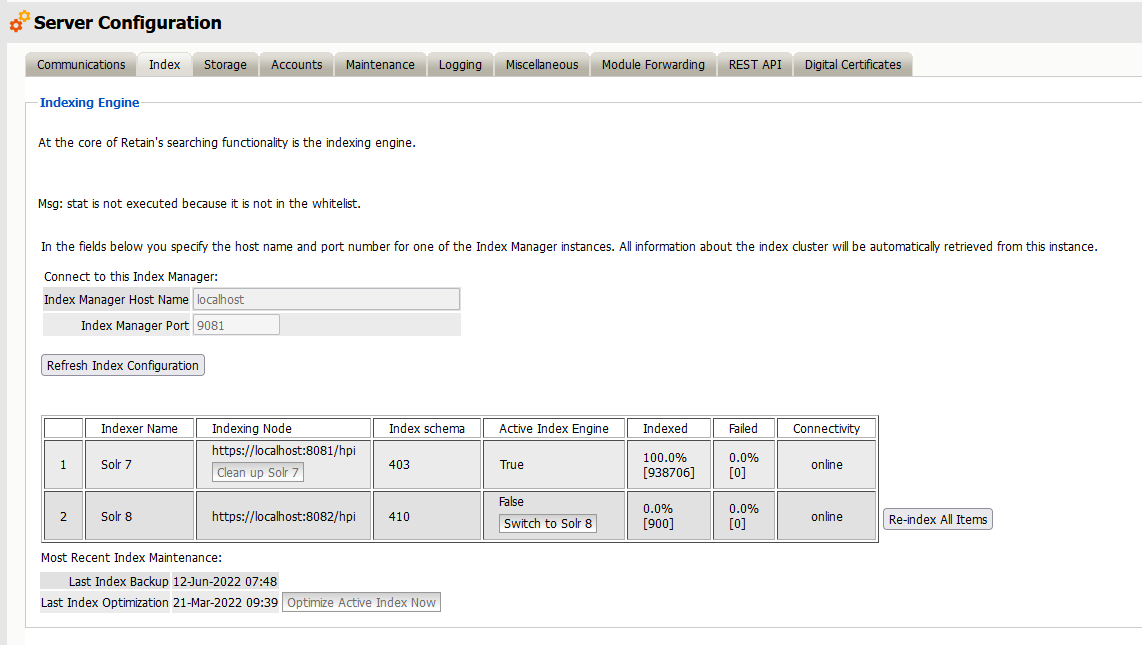
    At this point, you should test your system to make sure that Solr 8 is working properly. If you have any issues, you can select Re-index All Items and switch back to Solr 7.

  6. When you are ready, click Clean up Solr 7 and click Okay in the prompt.

    IMPORTANT:This deletes Solr 7 and all Solr 7 data from the system. Please make sure Solr 8 is working properly before following this step.

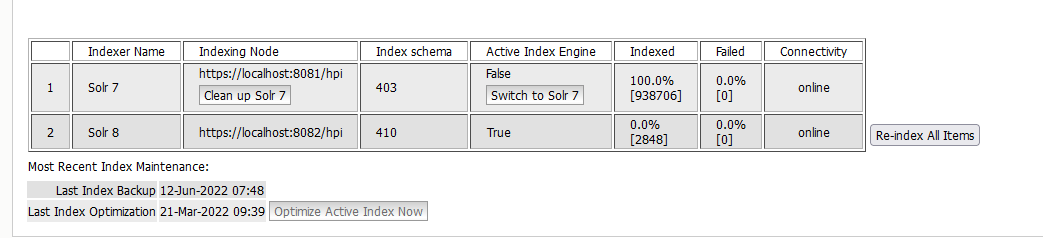
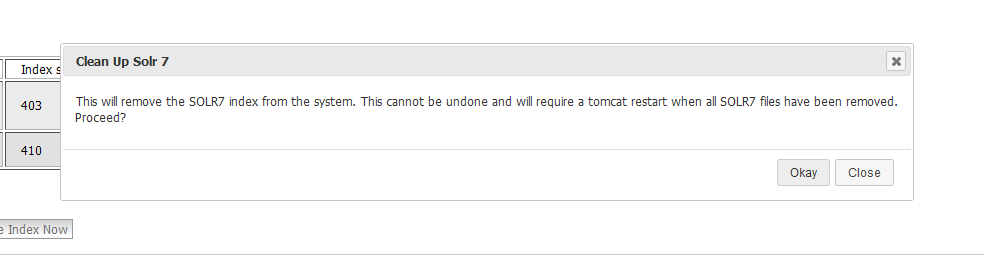
Table 2-22 Completing the Upgrade to 4.11

Dialog/Section

Details

  1. In your administrative browser, open Retain’s web admin console and log in as the Retain admin.

Database Schema Enhanced

A message displays stating that the Configuration Database schema requires updating.

  1. Click Ok.

  2. Log in as the Retain admin user.

    Red text displays with a progress indicator.

  3. When green text indicates that the schema is updated, restart the Retain Tomcat service.

  4. Wait a few moments for Tomcat to restart, then refresh the browser.

Retain Login Dialog

  1. Log in as the Retain admin user.