2.4 Accounts Tab

Use this to control the creation and functionality of accounts.
Path: Retain Server Manager > >
The Accounts tab contains the following panels:
The accounts tab lets you control accounts and manage access to Retain.
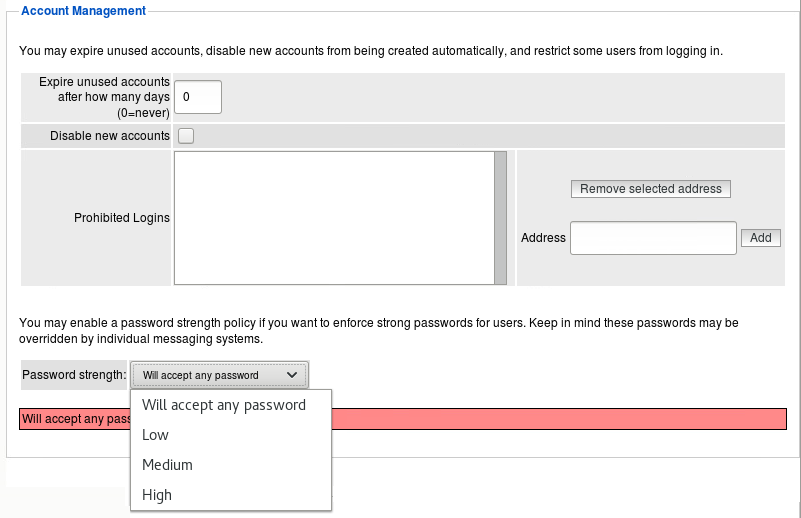
2.4.1 Account Management Panel
The settings in this panel affect all users in the Retain system, including those with accounts listed in the Users dialog and those found only in the archive’s Address Book.
Path: Retain Server Manager > > >
Table 2-12 Using the Account Management Panel
|
Option, Field, or Sub-panel |
Information and/or Action |
|---|---|
|
|
Setting this to 0 disables account expiration. Setting it to a different value causes any account, including the Admin account, to be removed when it has not logged in for the specified number of days. The default is 30 days. |
|
option |
By default, Retain is an Enabling this option makes Retain a If you don’t want specific users to access the Retain archives, add them to the list of Prohibited Logins (below) To make a “closed” Retain system, simply click on “Disable New Accounts”. If you use this option, it means that you will have to manually create accounts in Retain for authorized users. In other words, the only people who can access your system will be people for whom you specifically create an account. |
|
list |
You can block individual users from logging in to Retain by adding them here. |
|
button |
Select an address to remove from the list and click this button. |
|
|
Type the address to add in this field. |
|
button |
Click this to add a typed address to the list. |
|
drop-down |
Use this to specify password strength for a user account. Settings on a back-end messaging system override this. User-created passwords can be required to meet specific requirements.
|
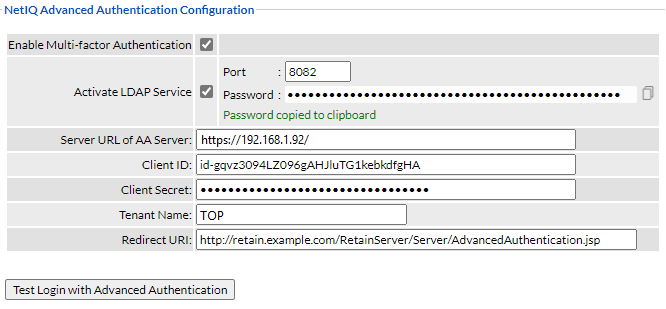
2.4.2 NetIQ Advanced Authentication Configuration Panel
Depending on the identity stores configured in NetIQ Advanced Authentication, Retain supports multi-factor authentication for any combination of Retain users.
You use this panel to connect the Retain server with the NetIQ system.
For information about the entire process of enabling multi-factor authentication on Retain, see Configuring Retain for NetIQ Advanced Authentication MFA Support.
Figure 2-1 The NetIQ Advanced Authentication Configuration Panel
Path: Retain Server Manager > > >
Table 2-13 Using the NetIQ Advanced Authentication Configuration Panel
|
Option, Field, or Sub-panel |
Information and/or Action |
|---|---|
|
checkbox |
You must enable this for multi-factor authentication to work. |
|
checkbox |
You must enable the checkbox to activate Retain’s User Account LDAP service.
Specify the following when creating the repository for Retain’s User Account LDAP service:
|
|
field |
The URL that this system uses to communicate with the Advanced Authentication server. |
|
field |
The Client ID generated for this Retain system when you create an OAuth2 event for it on the Advanced Authentication server. See Configuring Retain for NetIQ Advanced Authentication MFA Support, Step 7 |
|
field |
The Client Secret generated for this Retain system when you create an OAuth2 event for it on the Advanced Authentication server. See Configuring Retain for NetIQ Advanced Authentication MFA Support, Step 7 |
|
field |
The default Tenant Name is TOP. If you created a different name, specify that here. |
|
field |
The URI path from the AA server to this Retain server. See Configuring Retain for NetIQ Advanced Authentication MFA Support, Step 4 |
|
button |
When Retain and the Advanced Authentication server are configured and the system is ready, use this button to check that MFA is working as expected. When prompted, log in as one of the users that you have enabled for MFA. |
2.4.3 Office 365 End User Authentication Panel
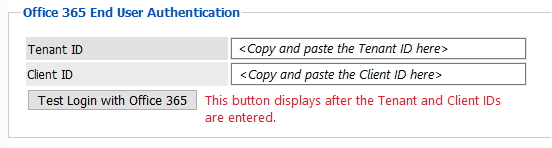
Retain supports modern authentication through users entering their Office 365 credentials to access Retain. This panel sets up the connection with Office 365. The entire setup procedure is documented in Providing Retain Users with Access Through Their Office 365 Accounts
in Retain 4.10: Archiving Guide.
Path: Retain Server Manager > > >
Table 2-14 Using the Office 365 End User Authentication Panel
|
Option, Field, or Sub-panel |
Information and/or Action |
|---|---|
|
field |
This information is exposed when you complete the procedures described in |
|
field |
This information is exposed when you complete the procedures described in |
|
button |
Click this to verify that the credentials you have entered are valid with your Office 365 system. |
2.4.4 KeyShield SSO Panel
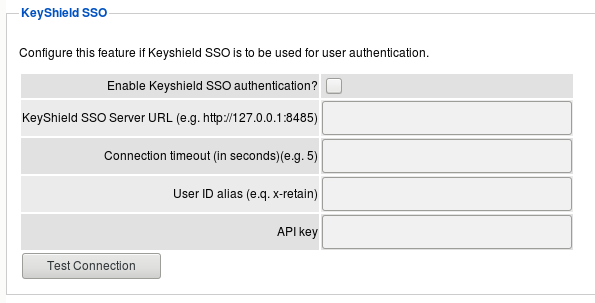
Retain supports the use of KeyShield SSO for users.
Path: Retain Server Manager > > >
Table 2-15 Using the KeyShield SSO Panel
|
Option, Field, or Sub-panel |
Information and/or Action |
|---|---|
|
option |
Select this to enable KeyShield SSO authentication. |
|
|
Specify the KeyShield server URL. |
|
|
Specify the length of time a connection request remains active |
|
|
The alias id assigned to this server |
|
|
The API key from KeyShield |
|
button |
Click this to test the KeyShield connection. |
To use the KeyShield client in coordination with Retain, Retain needs to have an open connection to the KeyShield server, the User ID alias, and the API key. Specify the KeyShield SSO Server URL, Alias, and API key. The Timeout is set in seconds, and may be anything required, 5 is recommended. Test the connection to ensure proper function.
When configured, Retain checks to see if the KeyShield client is running and if the user is currently logged in. If they are logged in, Retain checks the user against the specified KeyShield Server and then either fails authentication and sends users to the login page, or immediately passed them to their interface. The effect is that users who are already logged into the KeyShield client will not be required to login to Retain, but will be immediately taken to their appropriate interface.
2.4.5 Intruder Lockout Panel
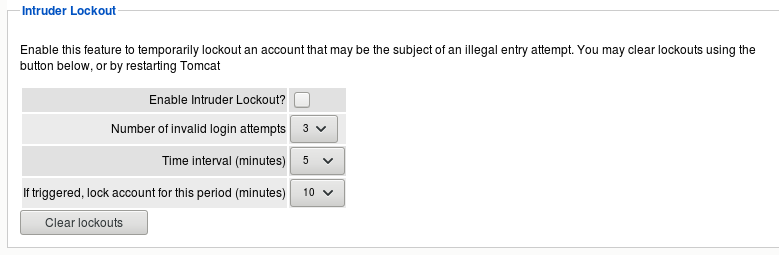
Accounts can be locked if multiple failed attempts are detected within a specified window of time. This is useful to deny password cracking attempts on the server.
Path: Retain Server Manager > > >
Table 2-16 Using the Intruder Lockout Panel
|
Option, Field, or Sub-panel |
Information and/or Action |
|---|---|
|
option |
Select this to enable intruder lockout protection. |
|
|
Set the number of invalid login attempts before an account is locked. |
|
|
Specify how long the system allows access attempts. |
|
|
Specify how long the account is locked out. |
|
button |
Use this to clear locked accounts. (Doesn’t require saving.) |
To enable Intruder Lockout, select the checkbox next to the ‘Enable Intruder Lockout’ option and save the changes. All changes will be immediate as soon as the save button is selected.
If a user has locked their account and requires immediate access to the system, all lockouts may be cleared. To clear any locked accounts, select the ‘clear lock outs’ button at the bottom of the page. There is no need to save changes; the clear command is immediate.