3.6 Mobile Device Management
3.6.1 Mobile Device Management Overview
Mobile devices are managed through the device management interface on the Mobile page. You may click on columns to sort by ascending or descending, or search with the filter text field.
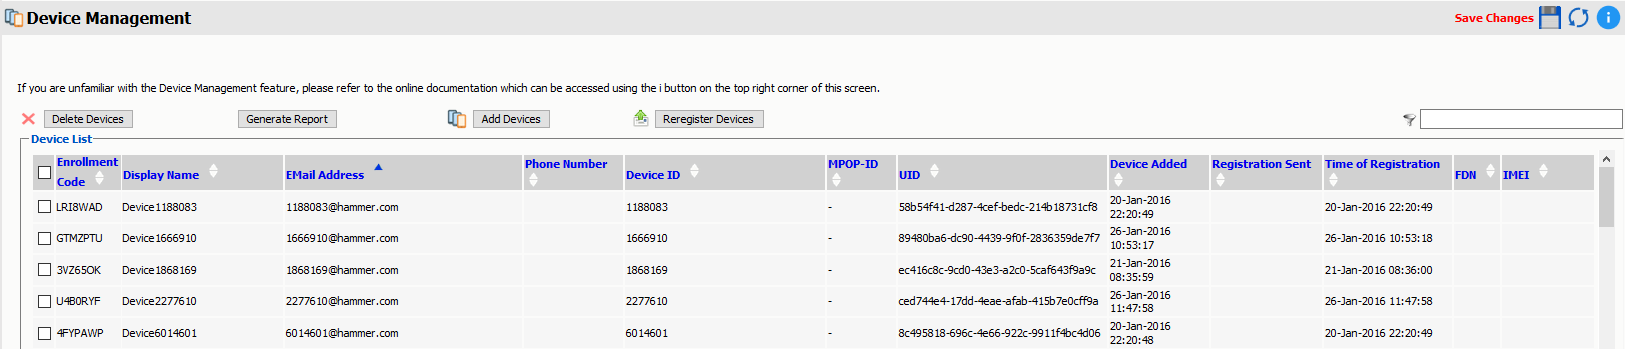
Provisioning Mobile Devices
Before mobile devices can be registered in Retain they need to be provisioned.
From the Retain device management page, devices can be provisioned in three different ways:
-
Using the Add Devices button.
-
Batch device registration.
-
Provisioned group or groups from an LDAP directory.
NOTE:Phone numbers can only be added with “Add Device for A New User” or adding the phone number to the CSV file for Batch Device Registration. There is no option to edit the user to add the phone number when adding the user by searching “Add Devices for Existing Retain Users”.
You can add existing users that are cached in the Retain system, that have a user name and email address from another module.
You can also add users which are not cached in the Retain system, but they must be added one at a time by manually entering the display name, email address, phone number and device IMEI associated with each device.
You have the option to add a user via:
-
Email registration
-
Automatic registration
Add Device Button
Devices can be added individually through the Add Devices button for either existing Retain users or new Retain users.
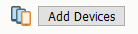
Existing User
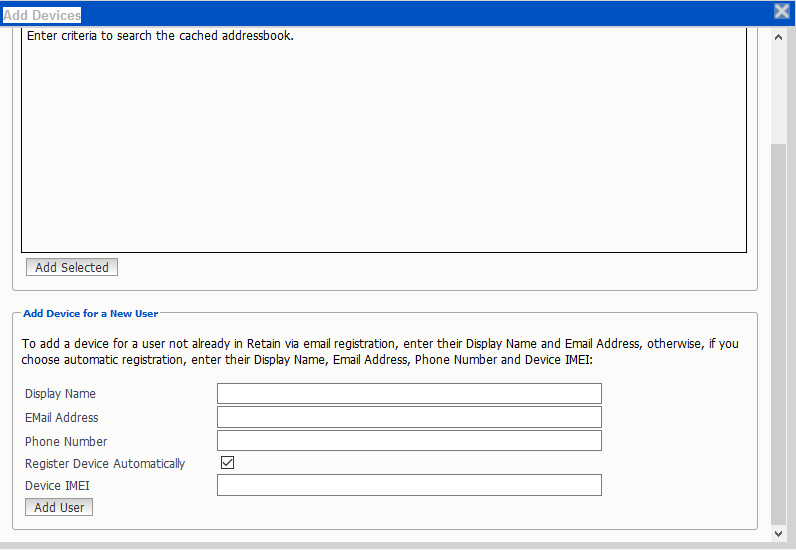
To add devices for users that are already cached in the Retain system, navigate to the device management page and click on the Add Devices button.
-
In the Add Devices window that opens, under Add Devices for Existing Retain Users, enter the criteria to search the cached address book of Retain and click on the Search button.
-
Select the desired users from the returned search results.
-
Click on Add Selected button at the bottom left corner.
-
Your selected users are now added to the device management table.
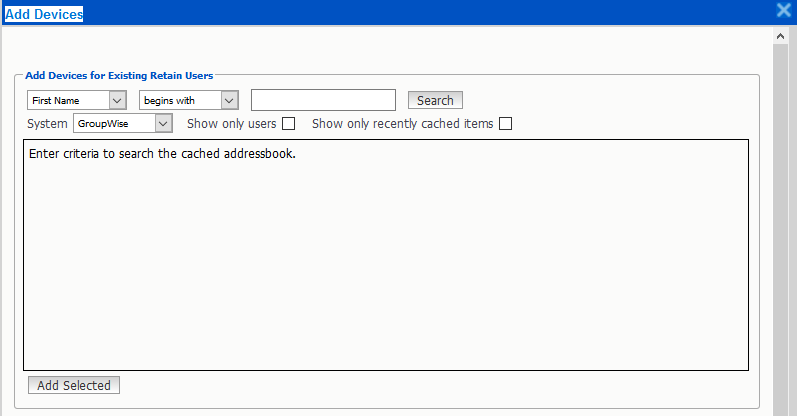
New User (email)
Email registration requires end user intervention as Retain sends a registration email to the user, which must be accessed from the device in order to register with the Retain Server.
The user must have the RetainService application installed on the device for successful registration.
Email registration offers two options to register with the Retain Server:
-
Via Retain Registration JSON file: the user downloads the JSON file and places it in the device’s Download folder to complete the registration process.
-
Via the activation link: the user opens the activation link using the RetainService application to complete the registration process.
To use email registration:
-
Navigate to the device management page and click on the Add Devices button.
-
In the Add Devices window that opens, under Add Device for a New User.
-
Provide values for Display Name and Email Address.
-
Click on Add User button found on the bottom left corner.
-
Your user is now added to the device management table and an email is sent to the user, which will be used to complete the registration process.
New User (automatic with IMEI)
Automatic registration will register devices without end user intervention. The user must have the RetainService application installed for successful registration.
To use automatic registration:
-
If using IMEI automatic registration the Retain server must have access to the Micro Focus Retain Cloud Mobile Service (CMS) through the firewall (via whitelisting etc.). Customers who use automatic registration need to permit the Retain server to access: cms.qa.gwava.com.
-
Navigate to the device management page and click on the Add Devices button.
-
In the Add Devices window that opens, under Add Device for a New User, check the box to Register Device Automatically.
-
Provide values for Display Name, Email Address, Phone Number and Device IMEI.
-
Click on Add User button found on the bottom left corner.
-
Your user is now added to the device management table and an automatic registration attempt takes place.
Batch Device Registration
To register multiple devices, a file can be used to specify the Display Name, EMail Address, Phone Number, and Device International Mobile Equipment Identity (IMEI) Number for each device that is uploaded to Retain which will sent registration data to the device.

The display name and email address is required in all cases. The RetainService app must be on the target device before attempting to register the device.
To register a device with an email message, enter the display name and email address of the users. A registration email will be sent to the user and the user will need to open the email and click the link to register the device.
To register a device automatically, enter the display name, email address, phone and IMEI numbers of the users, no further user intervention is necessary.
Once the file is prepared, upload the file to Retain.
To upload the registration file, click on Browse, select the file and click on Upload a CSV file. Once the file is processed, the entries will appear in the list of devices.
Batch Registration CSV file
You will find a sample file under the “Example link” on the Add Device page.
The registration file must contain one record per line with these four fields, delimited by a comma (,) character: Display Name, EMail Address, Phone Number, Device IMEI
For email registration, the Phone Number and IMEI fields can be left empty, but must still include the comma delimiter like this example:
Joe Cole,joec@microfocus.com,,
For automatic registration, all fields must be supplied, like this example:
Bob Wood,bobw@microfocus.com,4548278127,451289080261454
The Retain Server must have access to CMS as adding a new user above. To upload the registration file, click on Browse, select the file and click on Upload a CSV file. Once the file is processed, the entries will appear in the list of devices.
Provisioned Groups
A provisioned group of users in your LDAP system can be used to add user devices in Retain by providing the necessary attributes in the device management page, under Provisioned Groups section.
Provisioned groups are synced every 8 hours by default. The LDAP sync frequency can be changed in the Mobile Module configuration page under the Core Settings tab. A manual sync process can be triggered by clicking on the Synchronize Now button in the device management page.
Adding Users To Retain with a Provisioned Group
When a user is added to the provisioned group, during the sync process the user will be identified as new user by Retain.
If there are only name and email address fields a registration email will be sent and the user will have to complete the registration process manually.
If there are name, email, phone and IMEI fields then the device will be registered automatically.
If there is no email address then an error will be logged and the user will not be added. Changing the email address will trigger a new registration during the next synchronization process.
If a user is removed from the provisioned group then the archiving of messages will be disabled during the next synchronization. If the user is added back into the group archiving will resume after the next synchronization, messages and calls from the period outside of the group will not be archived. The same mailbox will be used unless the email address was changed.
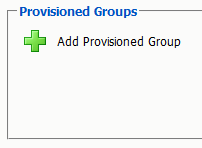
Add a Provisioned Group
Add a new group by pressing the green plus sign.
You may now fill in the group information so that Retain can connect to and gather data from your LDAP directory.
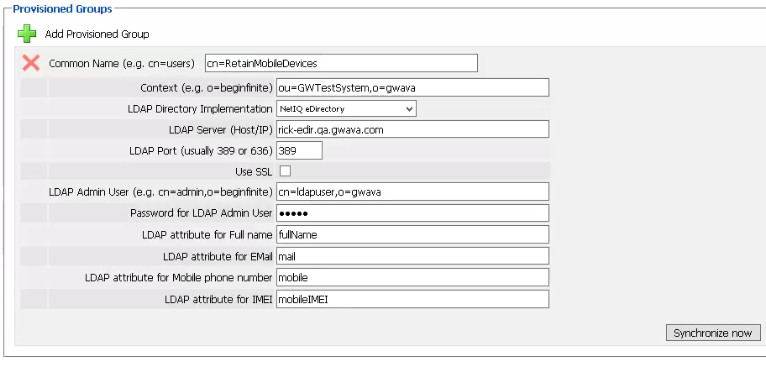
Common name: The common name of the provisioned group. The distinguished name of the organizational unit of the group. For example, CN=MobileUsers.
Context: The context of the group, or the LDAP path to the organizational unit. For example, OU=”Special Groups”,OU=Users
LDAP Directory Implementation: Choose NetIQ eDirectory or Microsoft Active Directory.
LDAP Server: The hostname or IP address of the LDAP server.
LDAP Port: 389 or 636.
Use SSL: Enable, if desired. Set the port appropriately above.
LDAP Admin User: The distinguished name of an LDAP admin. For example, CN=admin,OU=Users,DC=company,DC=com
Password for LDAP Admin User: Password of the LDAP admin user.
LDAP attribute for Full Name: Specify the Display name field used in the directory. Required for email registration. Required for IMEI automatic registration.
LDAP attribute for Email: Specify the email field used in the directory. Required for email registration. Required for IMEI automatic registration.
LDAP attribute for Mobile phone number: Specify the mobile phone number field used in the directory. Required for IMEI automatic registration.
LDAP attribute for IMEI: Specify the IMEI of the mobile device field used in the directory. Required for IMEI automatic registration.
Press the Synchronize Now button to have Retain synchronize with the LDAP group.
Registering Mobile Devices
Once mobile devices are provisioned they can be registered with Retain. Devices can be registered via email or automatically.
Device Permissions
The Retain APK requires permission to access certain areas of the device. RetainService needs to be allowed to:
-
Access Contacts
-
Make and Manage Phone Calls
-
Access Phone Call Logs
-
Access Photos, Media, and Files
-
Send and View SMS messages
Email Registration
Email registration takes place when:
-
Only the Display Name and the Email Address are provided at the time the user was added in Retain.
-
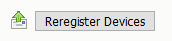
The sysadmin clicks on the Reregister Devices button on the device management page.
Email Registration by JSON
The RetainService application needs to be registered to a Retain Server before any data collection is done.
-
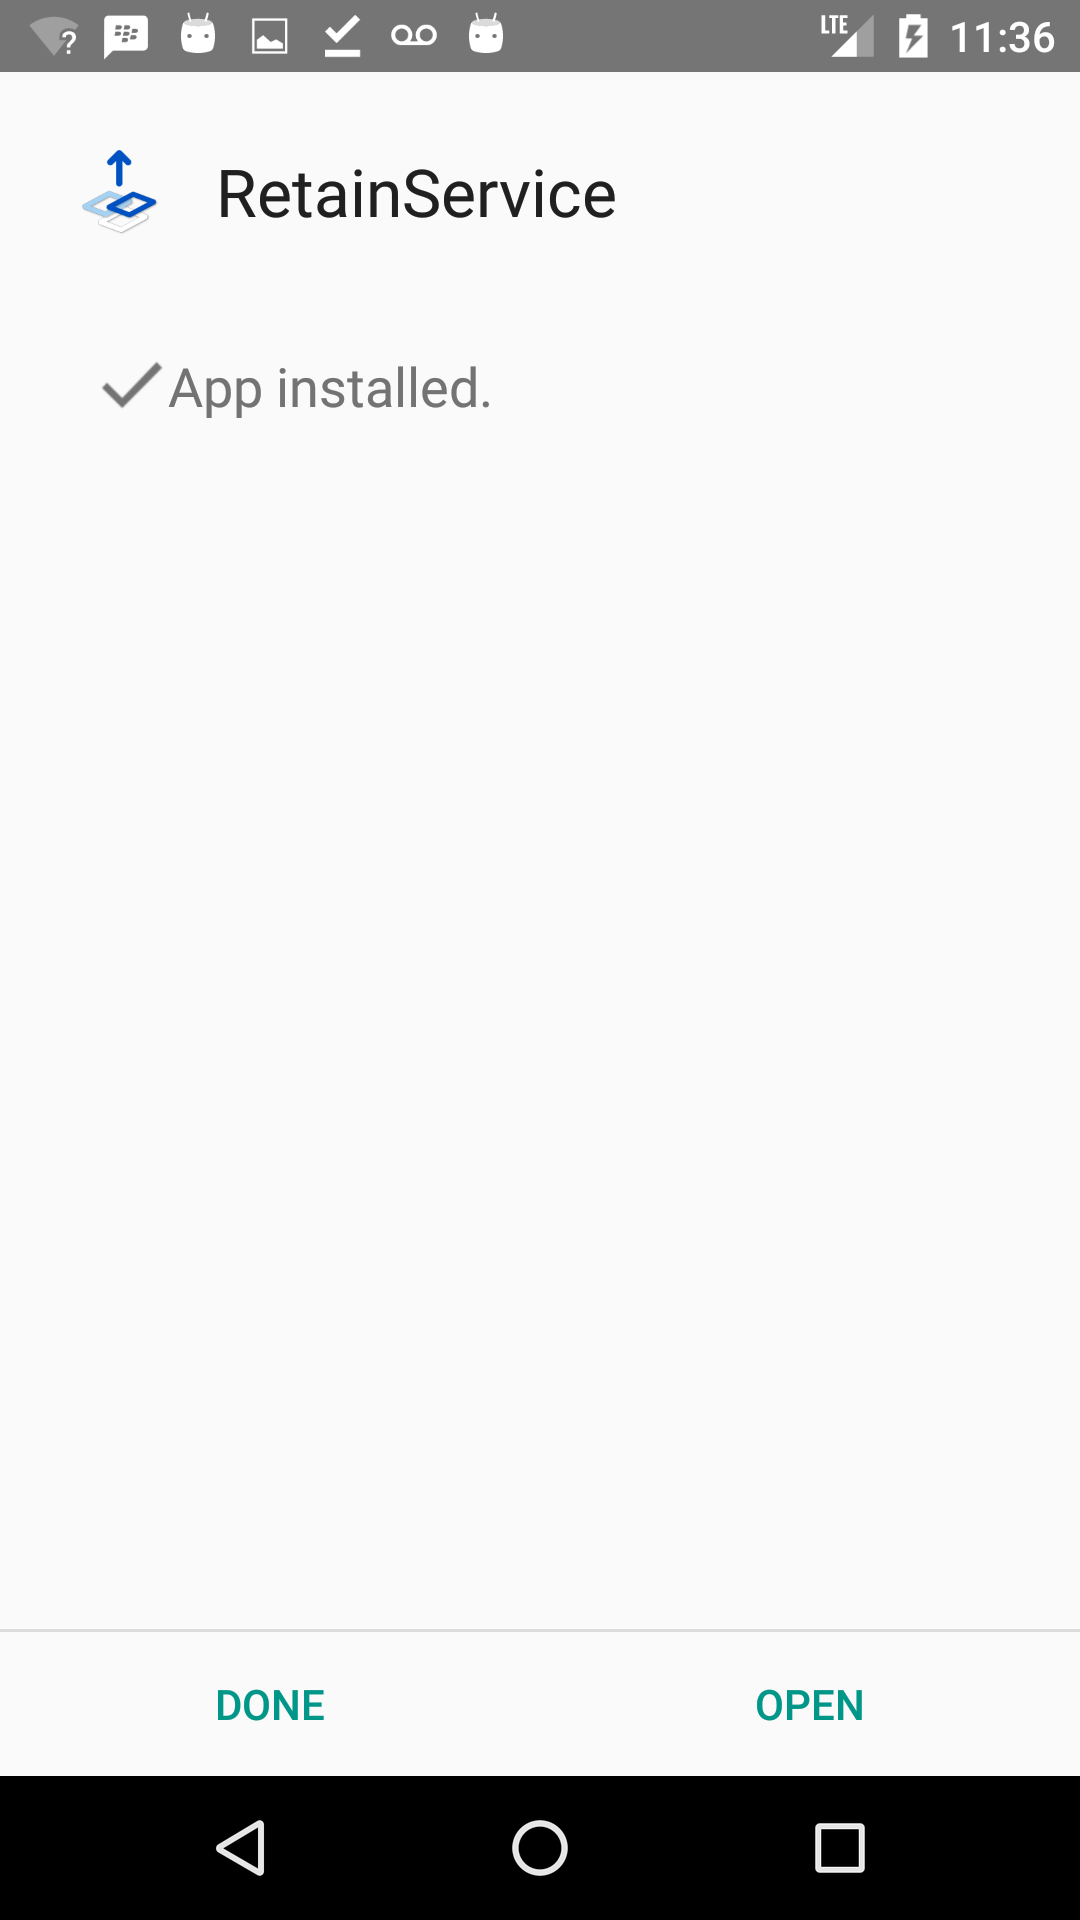
Install the RetainService application on your Android device.
-
Click on Open once the installation is complete.
-
The application has to be launched once in order to be subscribed to notifications. The user/MDM will have to grant all rights to the app:
-
Allow RetainService to make and manage phone calls.

-
Allow RetainService to access your contacts.

-
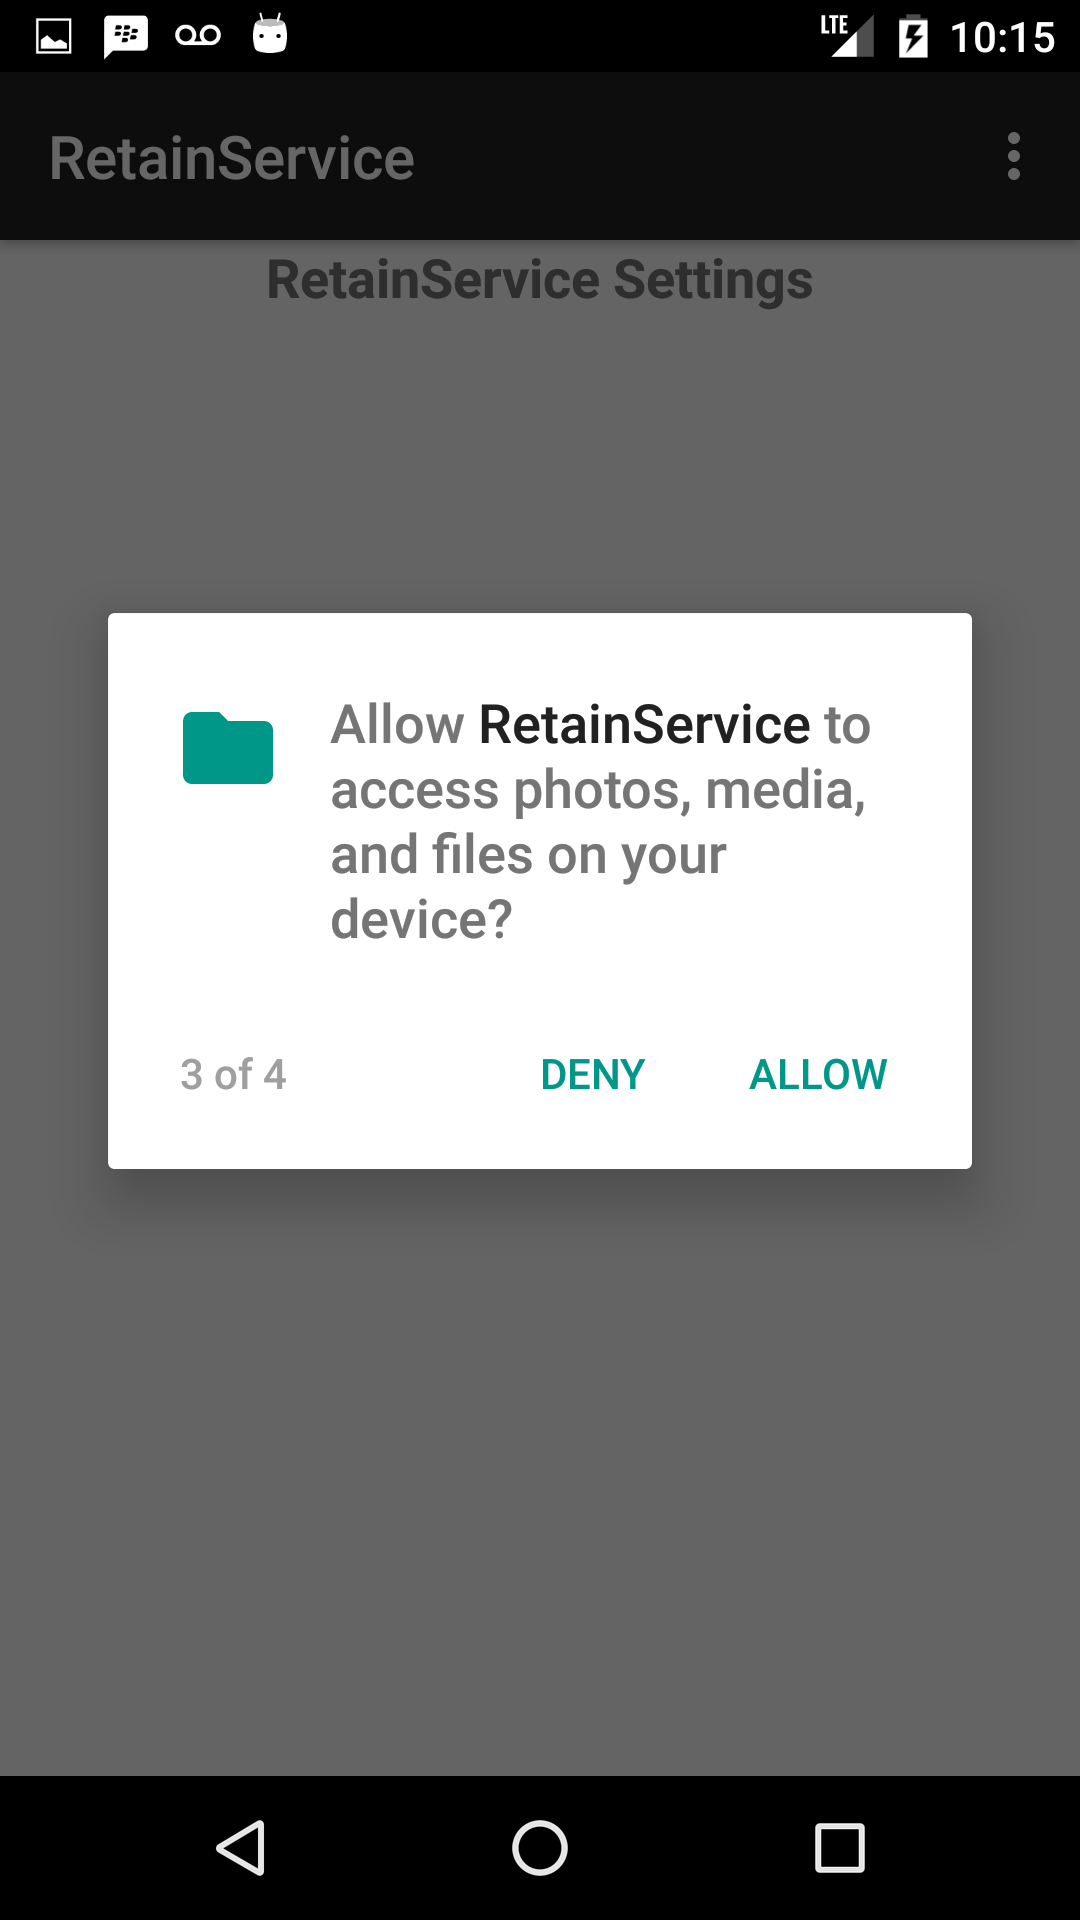
Allow RetainService to access photos, media and files on your device.
-
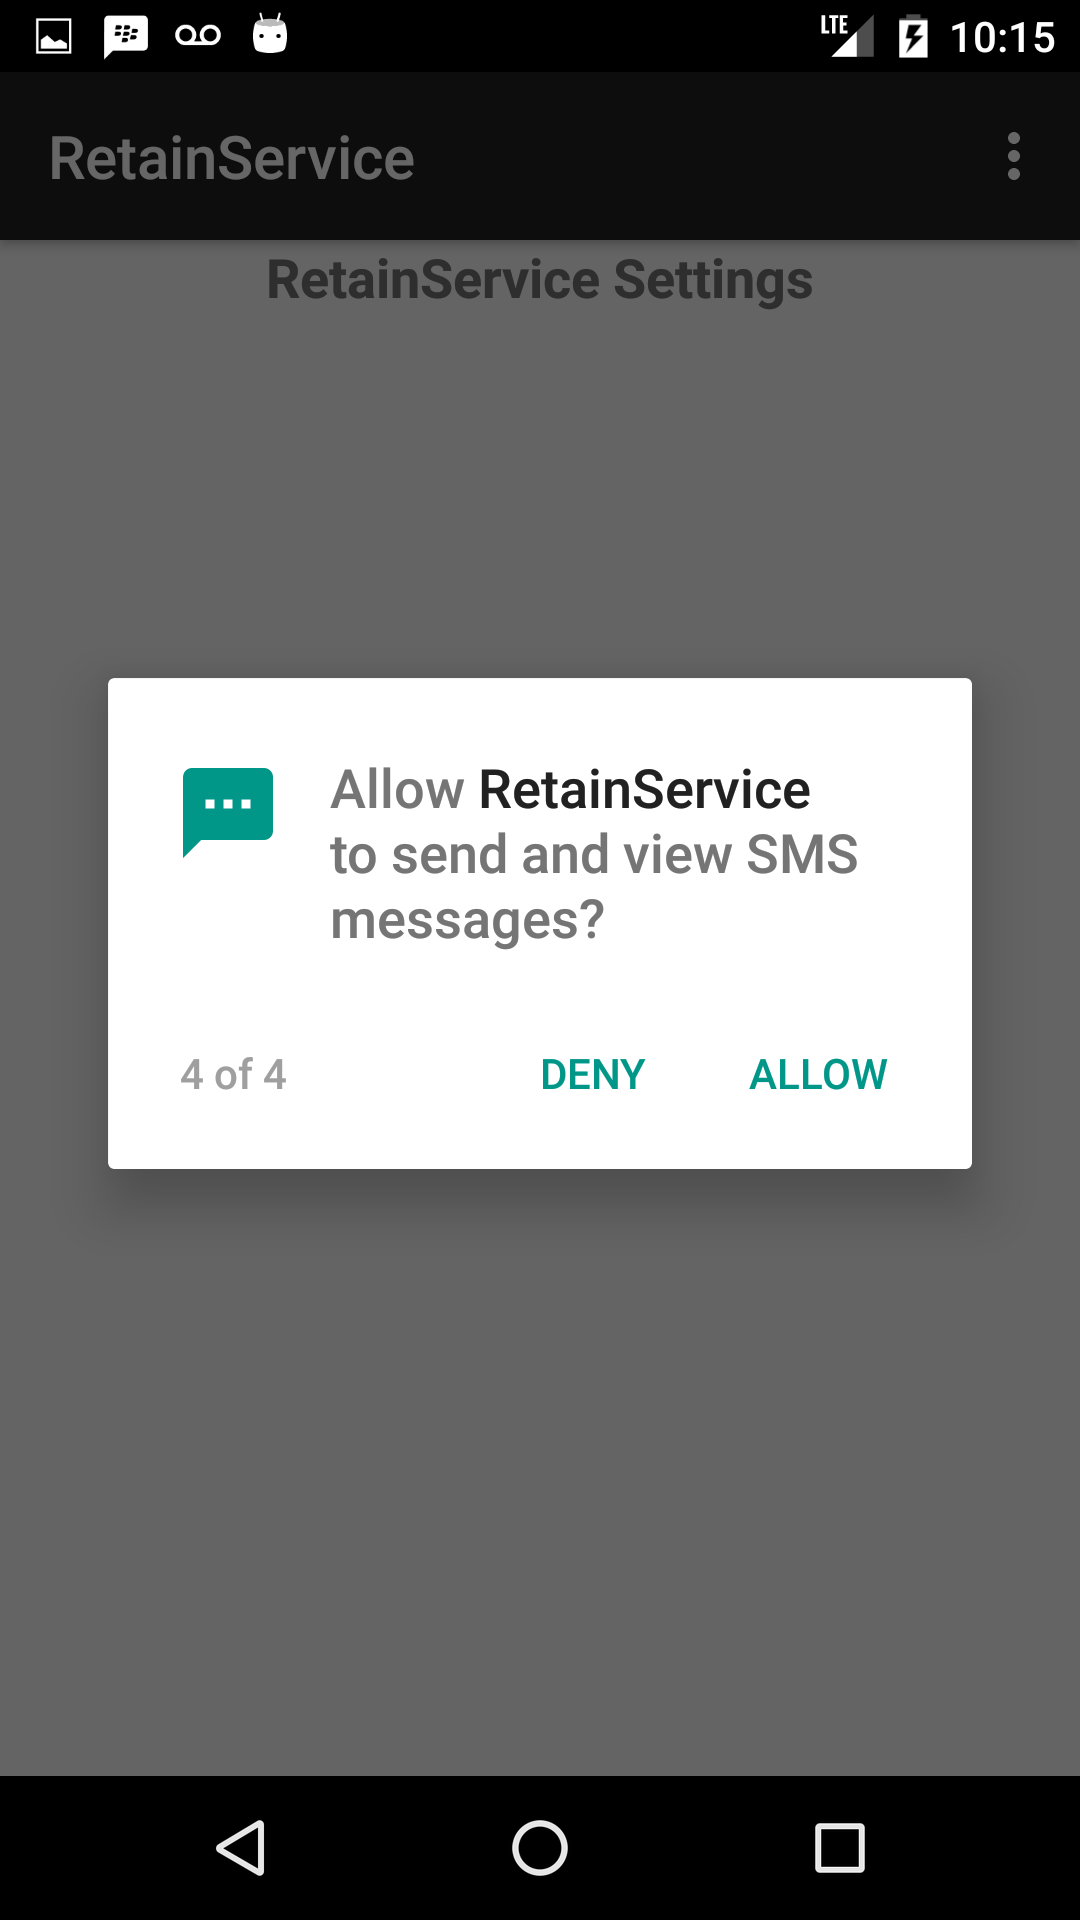
Allow RetainService to send and view SMS messages.
-
-
Close the RetainService application and make sure it is not running.
-
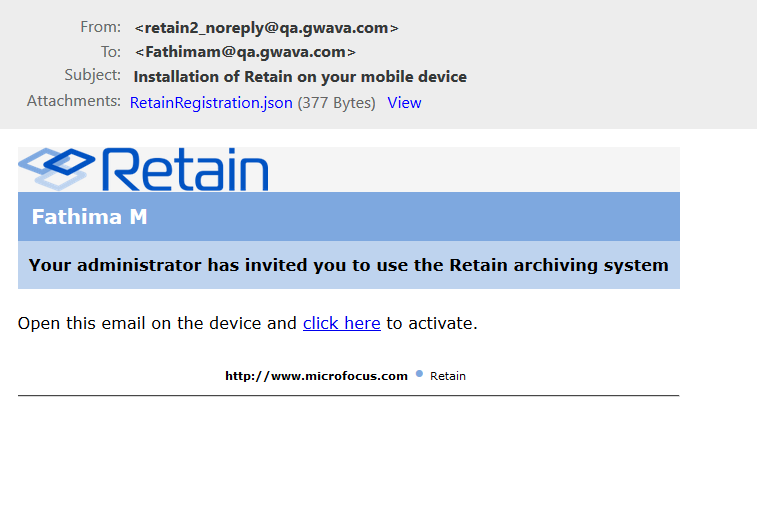
From your Android device, open the registration email sent by Retain.
-
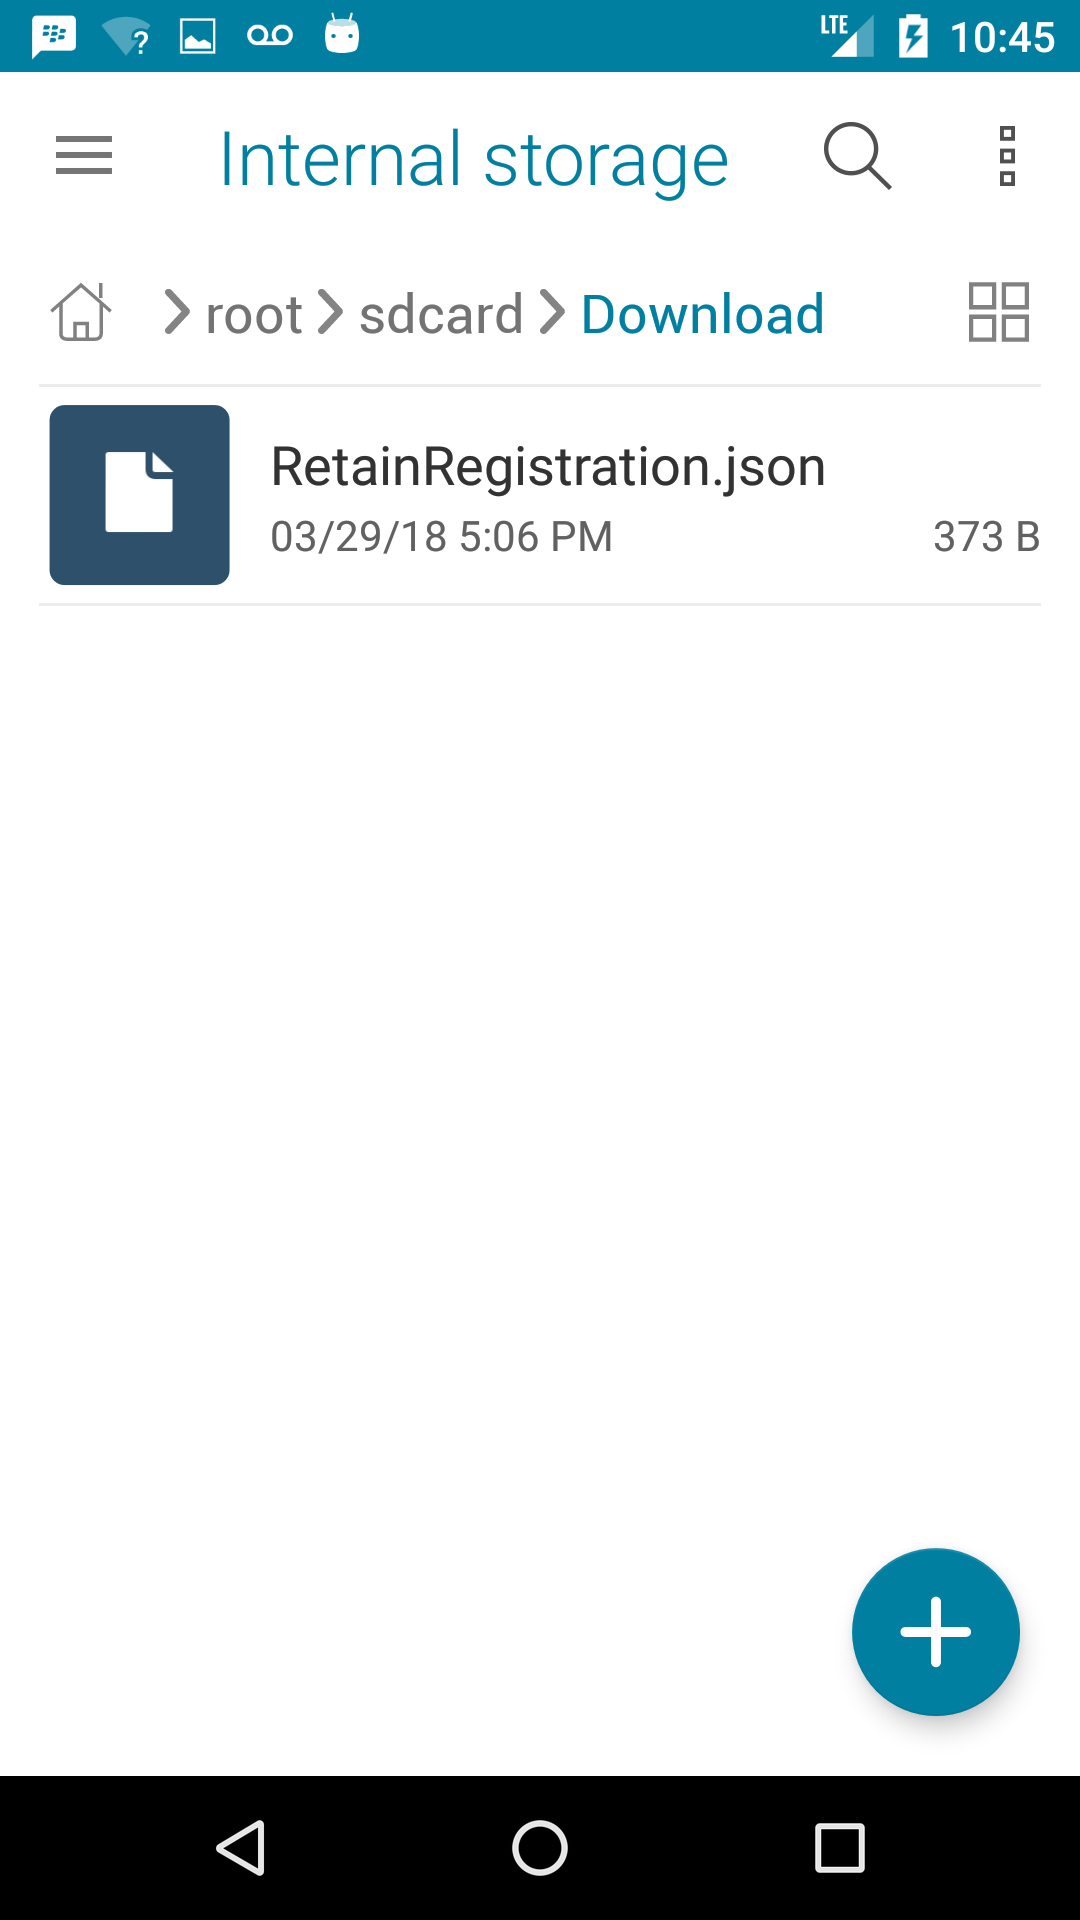
Place the RetainRegistration.json file inside the Download folder on your mobile device.
-
Open the RetainService application.

-
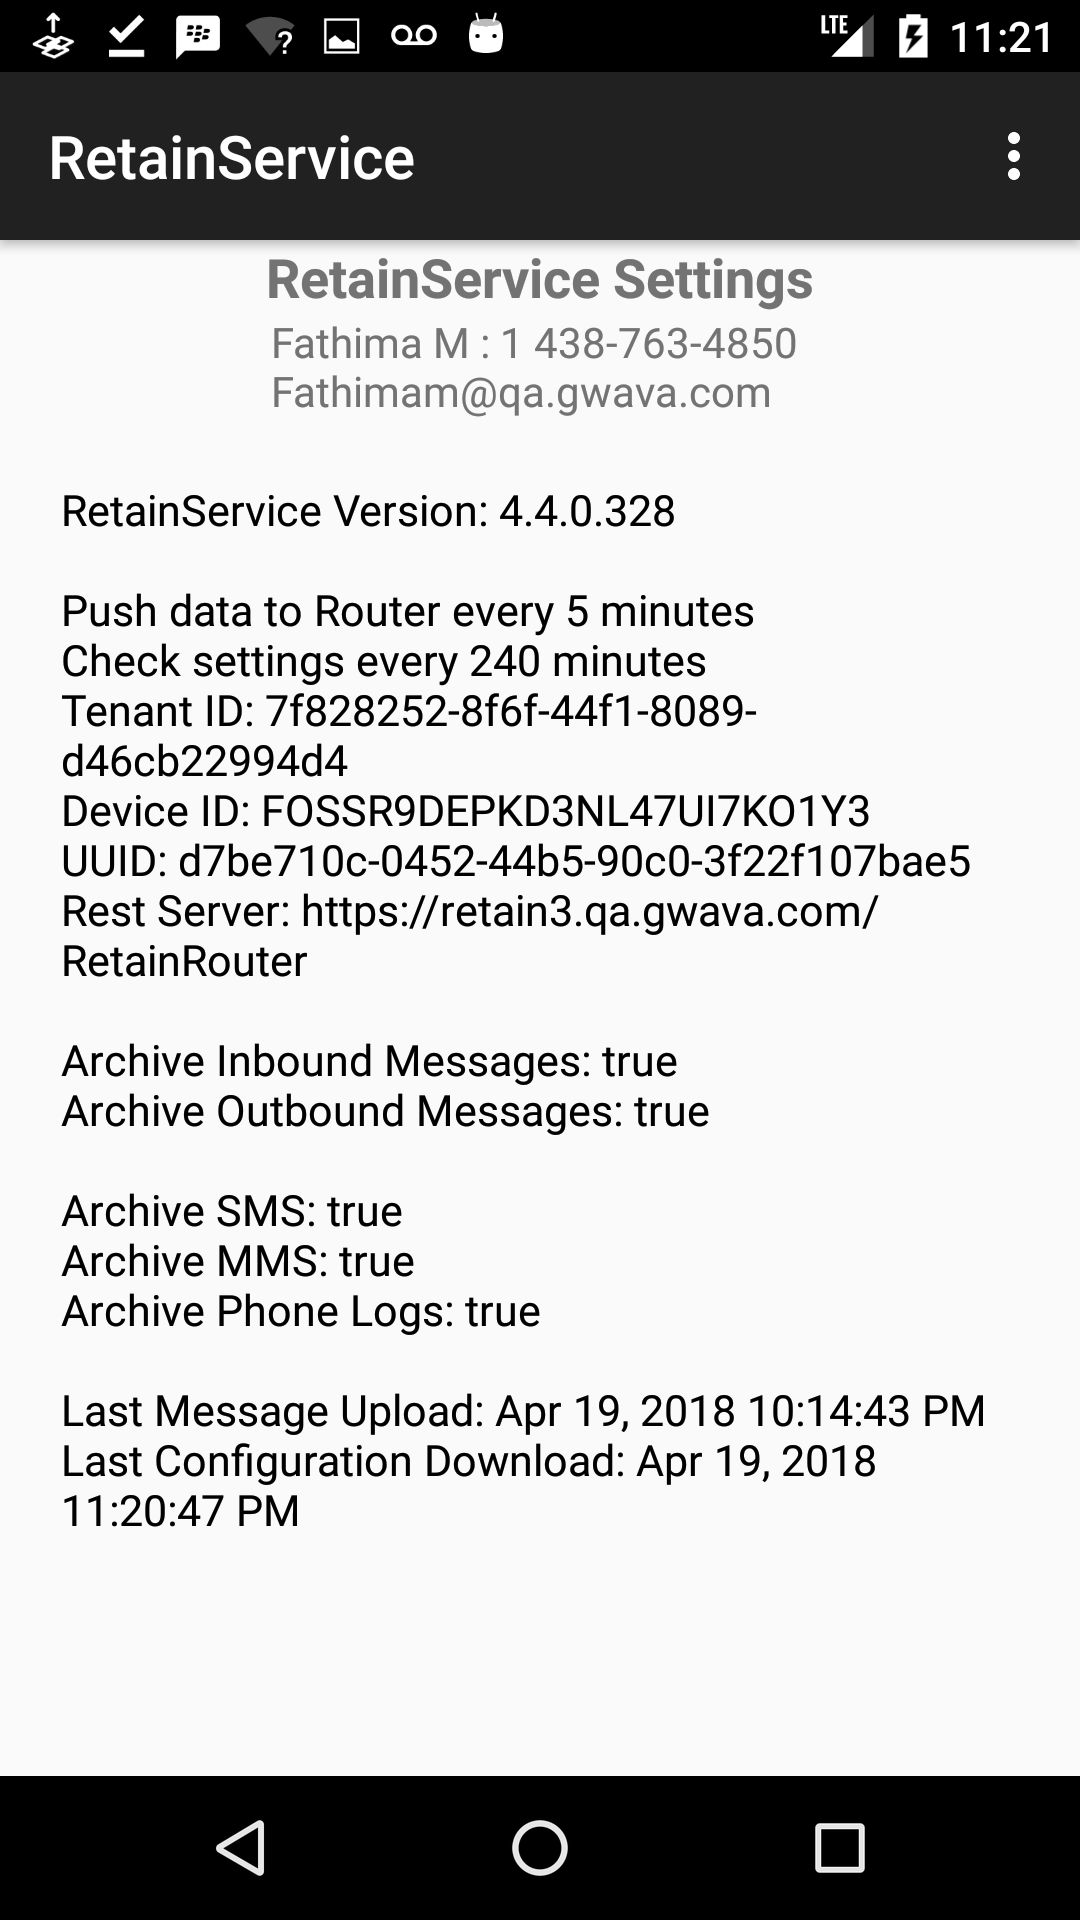
Upon successful registration, your main activity screen should display the Tenant ID, DeviceID, UUID and Rest Server URL.
-
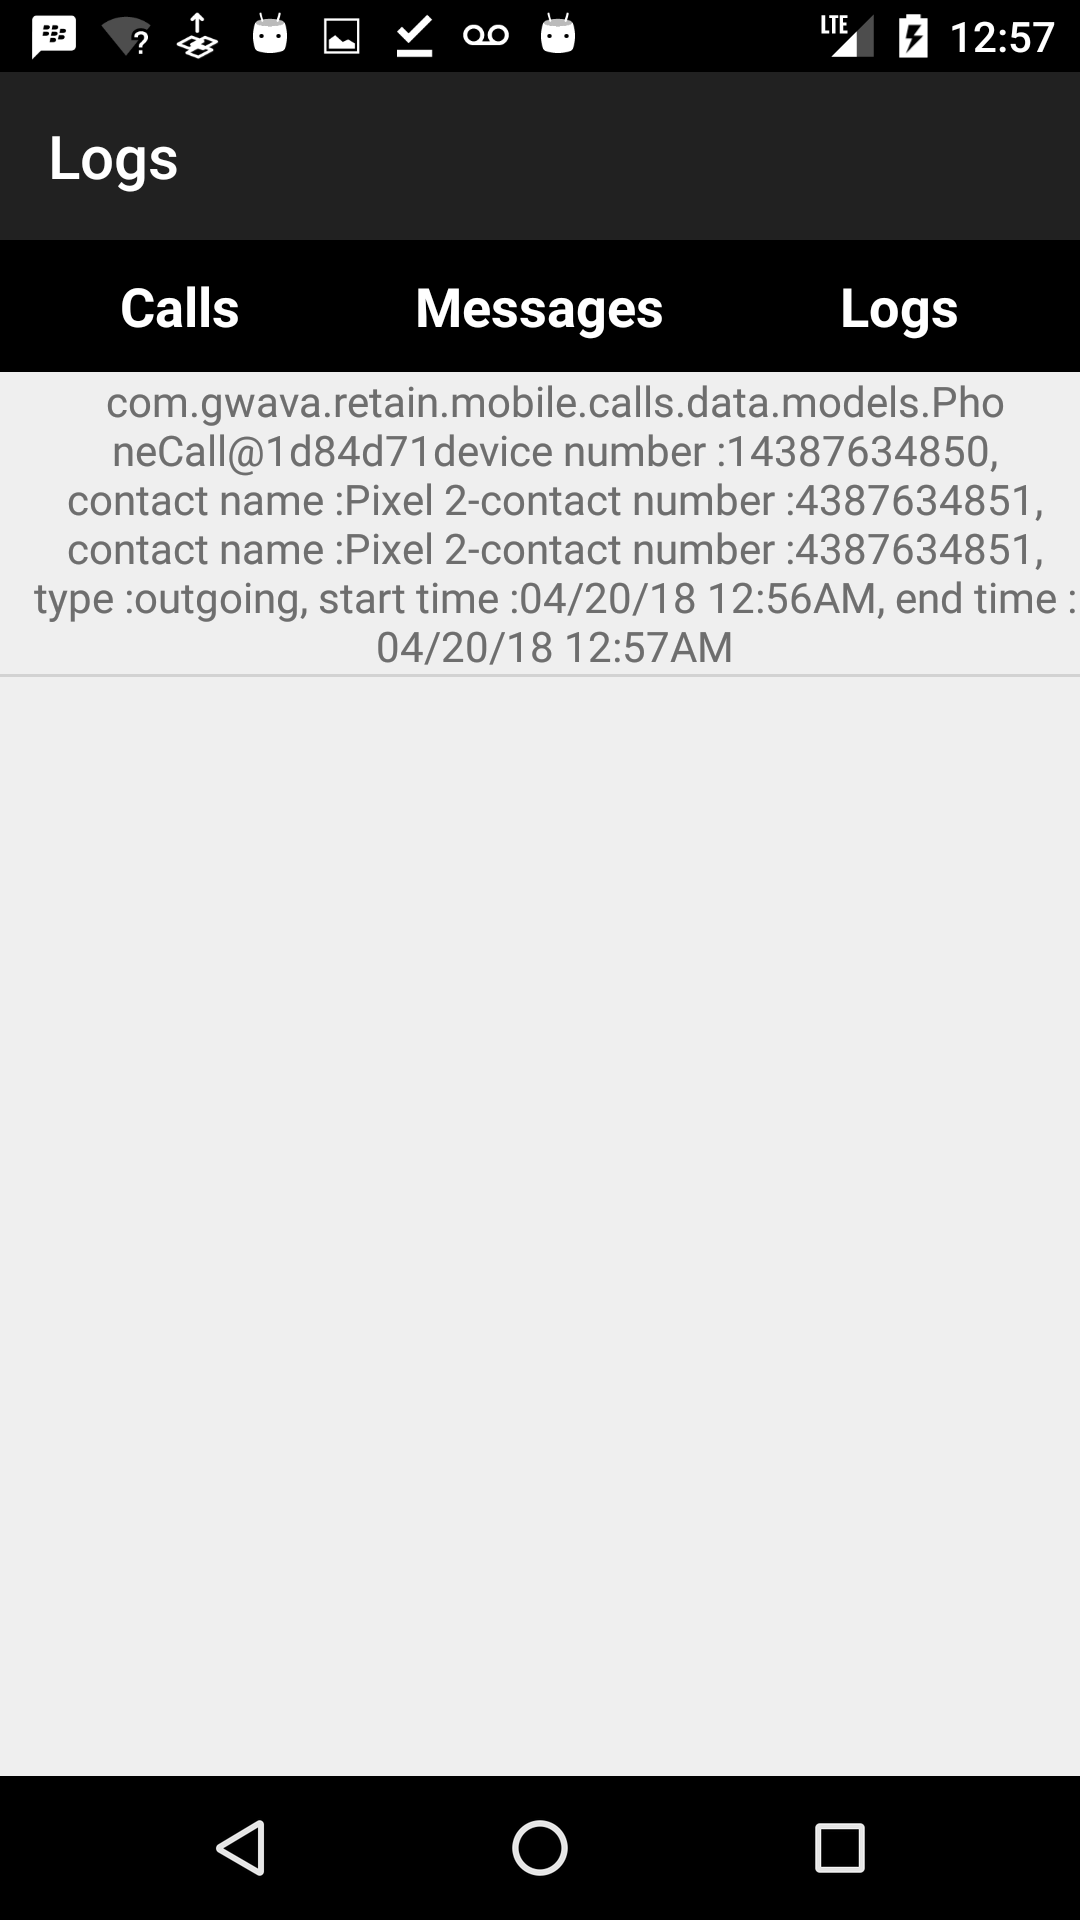
You can now begin archiving your SMS/MMS messages as well as phone calls. SMS/MMS messages will appear in the logs under the Messages tab and phone calls will appear under Calls tab.

JSON File Details
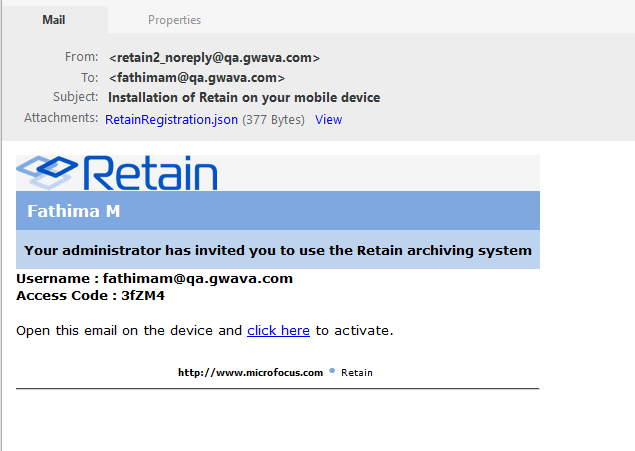
The registration email will contain a RetainRegistration.json file with the registration metadata.
RetainRegistration.json file contains:
-
Timestamp: Time device was add or reregistered in Retain.
-
EnrollmentCode: This is generated when the device is created on the device management page.
-
Tenantid: This is static number for Retain. Displayed on the mobile page from Module Configuration. It is used to identify your system during the registration and data collection processes.
-
Deviceid: This is from the Device Management page.
-
Email: This is from the Device Management page.
-
Name: This is from the Device Management page.
-
RouterURL: This is pulled from the mobile page of Module Configuration.
-
RestServer: This is pulled from the mobile page of Module Configuration.
Email Registration by Link
Retain creates an email which contains an activating link. Users need to open this email and follow the link on their mobile device. The link should be activated through the Retain application on the Android device. Therefore, the RetainService application must be installed on the Android device prior to clicking the activation link.
-
Install the RetainService application on your Android device.
-
Click on Open once the installation is complete.
-
The application has to be launched once in order to be subscribed to notifications. The user/MDM will have to grant all rights to the app:
-
Allow RetainService to make and manage phone calls.
-
Allow RetainService to access your contacts.
-
Allow RetainService to access photos, media and files on your device.
-
Allow RetainService to send and view SMS messages.
-
-
Close the RetainService application and make sure it is not running.
-
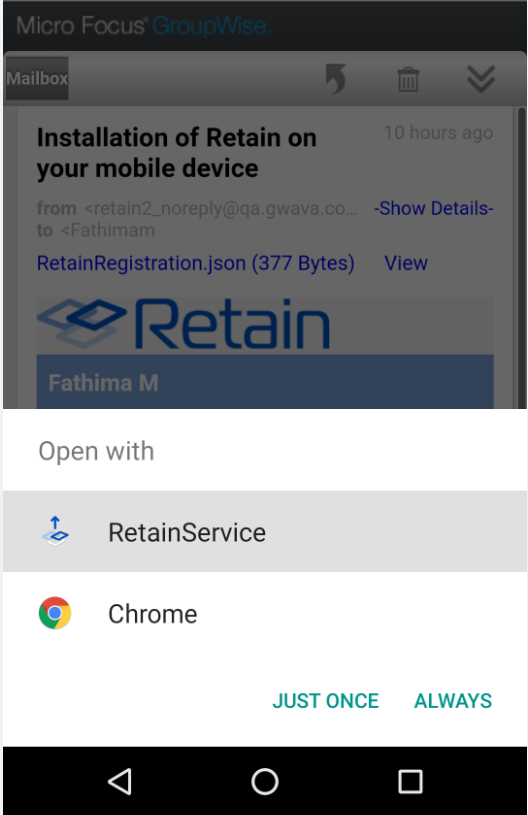
From your Android device, open the registration email sent by Retain.
-
When prompted, click on open with RetainService and then click ALWAYS.
-
Open the RetainService application.
-
Upon successful registration, your main activity screen should display the Tenant ID, DeviceID, UUID and Rest Server URL.
-
You can now begin archiving your SMS/MMS messages as well as phone calls. SMS/MMS messages will appear in the logs under the Messages tab and phone calls will appear under Calls tab.
Customizing the Registration Email
An activation email will be sent to the associated email address. The activation email can be customized. The template from which the email is generated is located in the file:
…\RetainServer\WEB-INF\classes\config\mobile\registeruser.html
The template contains different variables that are distinguished by double brackets “[[ ]]”. The below variables can be customized to adopt the email sent out by Retain to any organization:
-
Product: This is automatically filled out with the Retain product name. Admins may set this to be the company name. This variable is used in the subject and the body of the email message.
-
Retainheader: This is automatically filled with the Retain product logo. Admins may set this to any branding or company image file. This must be an image file.
-
GwavaURL: Automatically filled-in with a link to the Micro Focus website.
-
GwavaURLLabel: This determines text displayed for the GwavaURL link.
-
ProductNameURL: This is automatically filled-in with a link to the product website.
-
ProductNameLabel: This determines text displayed for the productNameURL link.
The below variables cannot be changed. This information is generated by the device management page when the device is added:
-
Name: Each user’s individual user name will be inputted here.
-
ActivateHREF: This is an identification string, a link specific to the user and installation.
-
Username: Applicable for cloud registration only.
-
Password: Applicable for cloud registration only.
Automatic (IMEI) Registration
Automatic registration is done through our Cloud Registration Service (CMS). This registration method requires no end user intervention and ideally, the user should not be aware of the registration process. Automatic registration requires four mandatory values to be provided in the device management page at the time of registration: display name, email address, phone number and IMEI number. Before attempting an automatic registration, ensure that the RetainService application is installed on the Android device.
-
Install the RetainService application on your Android device.
-
Click on Open once the installation is complete.
-
The application has to be launched once in order to be subscribed to notifications. The user/MDM will have to grant all rights to the app:
-
Allow RetainService to make and manage phone calls.
-
Allow RetainService to access your contacts.
-
Allow RetainService to access photos, media and files on your device.
-
Allow RetainService to send and view SMS messages.
-
-
Close the RetainService application and make sure it is not running.
-
In the Retain device management page, add a device that is eligible for automatic registration. Hence, provide display name, email address, phone number and IMEI number. For more information, refer to the device provisioning section of this document.Provisioning Mobile Devices
-
Open the RetainService application.
-
Upon successful registration, your main activity screen should display the Tenant ID, DeviceID, UUID and Rest Server URL.
-
The “Time of Registration” field will updated for your device in the device management table of Retain.

-
You can now begin archiving your SMS/MMS messages as well as phone calls. SMS/MMS messages will appear in the logs under the Messages tab and phone calls will appear under Calls tab.
Re-registering Devices
To re-register a device, navigate to the Device Management page, select the desired device and press the Reregister Devices button. Once pressed, Retain will recreate the enrollment, remove the old Device ID, and resend the registration email. The end user will need to repeat the enrollment process.
NOTE:Important Note Regarding Reregistration. Regardless of the registration method initially used to register the device with Retain Server (email registration or automatic registration), once the Reregister Devices button is clicked, the reregistration will be done through email. The only difference is, if the device was initially provisioned to use automatic registration, the reregistration email sent will contain two new fields: a Username and an Access Code as seen below. In other words, if a device that contains values for display name, email address, phone number and IMEI number has been selected for reregistration, Retain will fall back to the email registration method. The email will always contain the embedded link, .json file and additionally, it will contain the username/access code combination for access through the RetainService UI.
The Username and Access Code provided in the reregistration email can be entered in the first page of the RetainService application to re-register the device with the Retain Server. Once done, click on REGISTER to connect to the Retain Server.
3.6.2 Deleting Mobile Devices
Mobile devices can be selected and deleted from Device Management enrollment by selecting one or more devices and pressing “Delete Device”.