2.6 Moving Retain to a New Server
2.6.1 Moving Retain from Windows to Linux
The easiest method is to re-install everything to the new server and then copy over the archive and configuration files.
These instructions are for moving Retain and maintaining its current version.
Overview
To move Retain, you must move 3 things:
-
Configuration files. Move the ASConfig.cfg, which is stored in a directory off of your Retain installation:
Linux default: /opt/beginfinite/retain/RetainServer/WEB-INF/cfg
Windows default: [drive]:\Program Files\Beginfinite\Retain\RetainServer\WEB-INF\cfg
Indexer configuration files (the entire directory's contents):
Linux default: /opt/beginfinite/retain/RetainServer/WEB-INF/solrweb/WEB-INF/cfg
Windows default: [drive]:\Program Files\Beginfinite\Retain\RetainServer\WEB-INF\solrweb\WEB-INF\cfg
-
Database. Unless it's on a separate server from the Retain server and you are not wanting to move it.
-
Storage. In summary, the storage directories to be copied are:
-
archive (required)
-
backup (optional, although we recommend you skip this since having it on the old server is backup enough until the next Retain maintenance performs a backup on he new server)
-
ebdb (optional)
-
export (optional)
-
index (required in Retain 4, recommended for Retain 3)
-
license (optional)
-
xml (optional)
-
NOTE:If you've added storage partitions in the Retain admin web interface, you must make sure all of those are copied correctly, too.
Preparation
-
Note where your Retain storage directory is located.
To determine what that directory is, log into the RetainServer web interface and click on Server Configuration | Storage. The "Base Storage path" is your Retain storage directory.
-
Download Retain to the new server and prepare it for the installation.
-
Create the download directory.
-
Make the directory for holding the software: md /software
-
Change to that directory: cd /software
-
-
Download the latest version of Retain on the new server. For Retain 2.x customers, migrate your data to Retain 3.x format first; then proceed with moving Retain
NOTE:You can use the wget command to download the software to the Linux server by changing into the software directory you created in step 2.a and running this command: wget '[url]'
-
Get the URL of the most current version of Retain from https://download.gwava.com/download.php?product=Retain&version=current
-
Now use that URL with the wget command on the Linux server inside the software directory you created.
EXAMPLE: wget 'http://download.gwava.com/retain/Retainversion.zip'
-
-
Unzip the file and make the script files (.sh) executable.
-
unzip [retain zip file] -d [retain zip filename, excluding the ".zip" at the end]
Example: unzip Retainversion.zip -d retainversion
The "-d" option causes it to create Note how we kept the "r" in lowercase follwing the "-d" option since Linux is case sensitive when changing directories.
-
chmod +x *.sh
-
-
-
Install Apache2 to the new server.
-
Launch YaST | Software Management.
-
In the search window, type: Apache2.
-
Click on Apache2 (only), click on the Accept button, and accept the defaults.
-
-
(Optional) If you have edited the default properties files under the .../RetainWorker/WEB-INF/classes/config, back up those files and restore them after the final step of the move.
Moving Retain
-
Disable archive jobs and, if applicable, deletion jobs on the old server.
-
For good measure, shut down Tomcat on the old server.
-
Move the MySQL database if it resides on the Retain server; otherwise, proceed to step #4.
-
Install Retain on the new server.
-
Change to your Retain software installation directory (i.e., /software/retain3510ga_262)
-
Execute the installation script: ./RetainInstall.sh
*****************************IMPORTANT**********************************
At a certain point of the installation, you are presented the following prompt:
Will MySQL be running on the same server as Retain?
1) Yes
2) No <---- Select this option even if MySQL is running on the same server
Even if MySQL is running on the same server as Retain, type "2" for "No"; otherwise, it attempts to install and configure MySQL. At this point, you have already installed MySQL and moved your MySQL database to this new server, so selecting option 1 causes problems.
*DO NOT log into the WEB UI at this point, you could damage the database data that you've just moved.
-
Shut down Tomcat on the new server.
-
-
Copy the Retain storage directories from the old server to the new server (see step #1 under the "Preparation" section for the location of this directory). WARNING: This step can take days or weeks depending on the data size.
Because the Windows server is using NTFS as the disk format and Linux something different (ext3, xfs, etc), you'll need to employ an approach where the data on these two distinct disk formats can be read from and written to by the same process.
One approach is to create a CIFS mount from the Linux box to the Windows server. This requires that you first share the parent directory of the "archive" directory on your Windows server housing Retain. Another approach would be to install NFS services on the new Windows server, share the new storage directories, and mount from the old Linux server to the new shared storage directories.
Once that is done, you can now use rsync to copy the files from Retain storage directory on Windows to the new Linux server. To help with this process, you may download and install Support's utility for copying the files/directories.
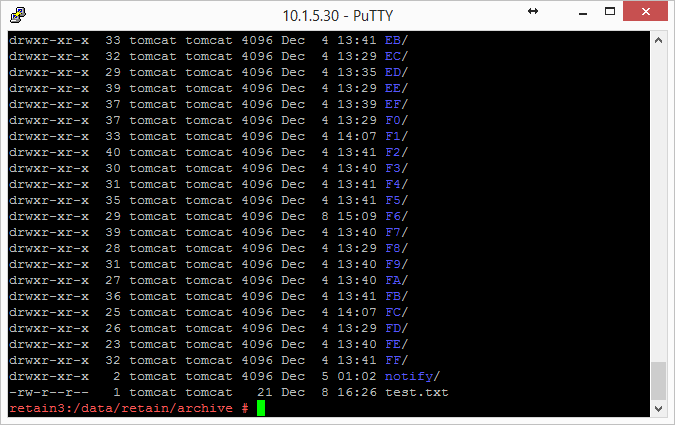
Change to the new archive directory. It should have 256 subdirectories (00 - FF). All those subdirectories must have the ownership of tomcat tomcat.
Windows does not have a file ownership scheme similar to Linux, so once you've copied the storage directories over, you'll need to set the directory/file ownership and permissions. That process can take almost as much time as copying the directories did but it must be done in order for Retain to be able to read from and write to them. To do this, type: chown -R tomcat:tomcat [directory].
EXAMPLE: chown -R tomcat:tomcat archive (performed from the base storage path containing the archive, index, and other Retain storage directories)
-
Copy the configuration files from the old server to the new server and edit the paths referenced in those files to reflect their new locations:
-
ASConfig.cfg, located in [drive]:\Program Files\Beginfinite\Retain\RetainServer\WEB-INF\cfg.
-
Edit the ASConfig.cfg and change several parameters to reflect the storage paths on the new server. Or, you can start tomcat, logon to the Retain Server web admin console, and change the paths under Server Configuration | Storage. If editing the ASConfig.cfg directly, look for these parameters for the storage paths:
-
<basepath>
-
<archivePath>
-
<xmlPath>
-
<indexPath>
-
<backupPath>
-
<licensePath>
-
<EBDBPath>
-
<exportPath>
-
-
RETAIN 4 ONLY:
-
Edit the path the index directory to reflect its new location by opening the zoo.cfg file in ...\index\solrhome\
-
Copy everything from [drive]:\RetainServer\WEB-INF\solrweb\WEBINF\cfg.
-
-
-
Start Tomcat on the new server.
-
Login to the Retain Server web admin console.
-
Replace the existing Worker object. This is for systems where the Worker is on the Retain server or for situations where jobs won't start after moving Retain:
-
Create a new worker web object using the instructions in
Installing and Configuring a Worker
in Retain 4.9.2: Archiving Guide. -
Download the bootstrap file.
-
Edit all jobs assigned to the old worker and re-assign them to the new one.
-
Delete the old worker object.
-
Restart tomcat.
-
From a web browser, go to the RetainWorker and upload the new bootstrap.
http://[Retain server IP]/RetainWorker
-
-
If you backed up any of the Retain Worker properties files (see step #5 under the Preparation section), restore those to their respective directories. This does not apply to most customers - this is very rarely done.
2.6.4 Moving Retain To a Different Linux Server
The easiest method is to re-install everything to the new server and then copy over the archive and configuration files.
These instructions are for moving Retain and maintaining its current version. If your current version of Retain is 2.x and you wish to upgrade afterwards (highly recommended), follow the instructions in the KB article, "Upgrade: Retain 2.x to Retain 3.x (Windows)".
Overview
In order to move Retain there are 3 things that are not optional that MUST be moved.
-
The ASConfig.cfg
-
The Database (unless it's on a separate server in which case it can stay there. That part is up to you.)
-
The archive files. It is recommended that you also copy the indexes. It would be more work not to and would be disruptive to searching.
Everything else can be re-created but can also be copied if you wish. In summary, here are the storage directories to be copied:
-
archive (required)
-
index (recommended)
-
backup (optional)
-
ebdb (optional)
-
export (optional)
-
license (optional)
-
xml (optional)
-
-
For Retain 4 only:
-
.../index/solrhome/zoo.cfg
-
.../RetainServer/WEB-INF/solrweb/WEB-INF/cfg
-
NOTE:If you've added storage partitions in the Retain admin web interface, you must make sure all of those are copied correctly, too.
Preparation
-
Make a note of where your Retain storage directory is located.
To determine what that directory is, log into the RetainServer web interface and click on Server Configuration | Storage. The "Base Storage path" is your Retain storage directory.
-
Download Retain to the new server and prepare it for the installation.
-
Create the download directory.
-
Make the directory for holding the software: md /software
-
Change to that directory: cd /software
-
-
Download the major Retain version you are currently using into the software directory you created on the new server.
If Retain 2.x, download that version. It could be a newer build of that same major version. What you want to avoid is downloading Retain 2.x when your old system is Retain 1.x or downloading Retain 3.x when your old system is Retain 2.x.
Download the same major version of Retain that your are currently using, going with the latest build of that major version (where "major version" is 2.x, 3.x, 4.x, etc):
http://download.gwava.com/download.php?product=Retain&version=versions
NOTE: You can use the wget command to download the software to the Linux server by changing into the software directory you created in step 2.a and running this command: wget '[url]'
EXAMPLE: wget 'http://download.gwava.com/retain/Retain3511ga_53.zip'
-
Unzip the file and make the script files (.sh) executable.
-
unzip [retain zip file] -d [retain zip filename, excluding the ".zip" at the end]
Example: unzip Retain3511ga_53.zip -d retain3511ga_53
The "-d" option causes it to create Note how we kept the "r" in lowercase follwing the "-d" option since Linux is case sensitive when changing directories.
-
chmod +x *.sh
-
-
-
Install Apache2 to the new server.
-
Launch YaST | Software Management.
-
In the search window, type: Apache2.
-
Click on Apache2 (only), click on the Accept button, and accept the defaults.
-
-
(Optional) If you have edited the default properties files under the .../RetainWorker/WEB-INF/classes/config, you may want to back up those files to restore them after the final step of the move. However, you could always access them from the original Retain server if needed.
"Making the Move"
-
Disable all archive and deletion jobs on the old server.
-
For good measure, stop Tomcat on the old server.
-
Move the MySQL database if it resides on the Retain server. See: "Moving MySQL Database to Another Server".
-
Install Retain on the new server.
-
Change to your Retain software installation directory (i.e., /software/retain3510ga_262)
-
Execute the installation script: ./RetainInstall.sh
*****************************IMPORTANT**********************************
At a certain point of the installation, you are presented the following prompt:
Will MySQL be running on the same server as Retain?
1) Yes
2) No <---- Select this option even if MySQL is running on the same server
Even if MySQL is running on the same server as Retain, type "2" for "No"; otherwise, it attempts to install and configure MySQL. At this point, you have already installed MySQL and moved your MySQL database to this new server, so selecting option 1 causes problems.
*DO NOT log into the WEB UI at this point, you could damage the database data that you've just moved. Now is probably the best time to Stop Retain.
-
-
Copy your storage directory contents from the existing server to the new server.
NOTE:This step is made easy by a Linux utility created by GWAVA Support for this very purpose called Retain Auxiliary Tool Set (affectionately referred to as "RATS").
If you wish to manually do this (ok, so you like to do it the hard way), here are the steps:
-
Connect the existing server's storage directory to the new server; or, rsync supports addressing the DNS hostname or IP address of the destination server if you wish to do it that way.
If you decide to mount the new server's storage directory, one way to do this is to create an "export" of the existing server's storage directory and create an NFS mount to a drive from the new server over to the exported drive on the existing server. For sample instructions on how to create an export and how to mount to it, see "How to 'Map' (Mount) Another Server's Linux Directory to Your Server".
-
Change the tomcat userid on the new server to match the tomcat userid on the old server (if necessary).
File ownership and permissions are tied to a userid, not a user name; thus, if tomcat on server A has a userid assignment of 110 and tomcat on new server B has 107, then the files that get copied over come over as being owned by userid 110, not "tomcat". As the files get stored on server B, it looks up userid 110 on its system. If that ID is assigned to another process, say "Puppet", then the files are owned by that program, not tomcat. So, you must check what the tomcat userid is on source server A and and on destination server B and make them match by changing the userid, if necessary, on destination server B.
-
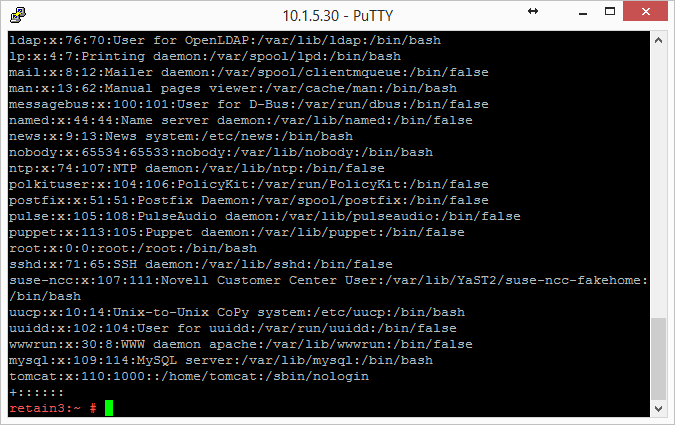
On the old server, type: cat /etc/passwd
This lists all the user accounts on the server, showing their userids and group IDs. In the list in the screenshot, tomcat is listed last and its userid is 110 and its group ID is 1000.
-
Do this same procedure on the new server.
If the userids match for tomcat on both servers, consider yourself fortunate and you are ready for the next step "c"; otherwise, proceed to sub-step "3)".
-
Look at the new server's userid list you obtained.
Determine whether another process on the new server is using the same userid assigned to Tomcat on the old server.
If so, you'll need to change that processes' userid to an unused userid by following the same steps outlined in the following sub-step "4)" for Tomcat's userid change. Then, follow sub-step "4)" to change Tomcat's userid.
-
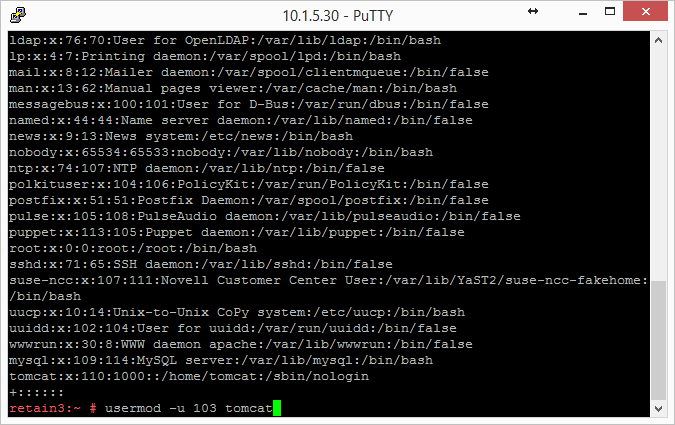
Change a userid by typing this command: usermod -u [new userid assignment] [username getting the new userid]
You can also use vi to edit /etc/passwd and manually change the userids; whichever is easier for you.
-
-
Change to the main Retain storage directory and copy it from the old server to the new server.
We recommend using rsync. Regardless, when copying files on Linux, be sure that whatever method you use copies over the permissions and ownerships.
NOTE:This should carry over the tomcat ownership and proper file permissions; however, if they are not preserved during the copy process for some reason, you need to set them:
chown –R tomcat:tomcat [full path to new storage directory]
chmod –R 744 [full path to new storage directory]
This could take days or weeks to complete since the storage's archive directory contains over 16M subdirectories; thus, it is much better if the permissions/ownership are preserved during the copy process.
-
-
Shut down Tomcat on the new server if you haven't already.
-
Copy Retain configuration file(s):
Again, copy in such a way that you maintain its file permissions and ownership (tomcat:tomcat); otherwise, remember to set the file ownership and permissions afterwards..
-
Copy the /opt/beginfinite/retain/RetainServer/WEB-INF/cfg/ASConfig.cfg
NOTE:If the storage directory on the new server is different from the old server, you must open ASConfig.cfg and change several parameters to reflect the storage paths on the new server:
-
<basepath>
-
<archivePath>
-
<xmlPath>
-
<indexPath>
-
<backupPath>
-
<licensePath>
-
<EBDBPath>
-
<exportPath>
-
-
If this is a Retain 4 system:
-
Copy the .../index/solrhome/zoo.cfg and edit the path the index directory if it has changed.
-
Copy everything from .../RetainServer/WEB-INF/solrweb/WEBINF/cfg.
-
-
-
Start Tomcat on the new server.
-
Login to the RetainServer web interface.
-
For systems where the Worker is on the Retain server, create a new worker object in the RetainServer web interface to replace the old one:
-
Download the bootstrap file.
-
Edit all jobs assigned to the old worker and re-assign them to the new one.
-
Delete the old worker.
-
Restart tomcat.
-
From a web browser, go to the RetainWorker (http://[Retain server IP]/RetainWorker) and upload the new bootstrap
-
If you backed up any of the RetainWorker properties files (see step #4 under the Preparation section), restore those to their respective directories. This does not apply to most customers - this is very rarely done.