Managing Administrative and User Settings
This section provides information on the following:
Understanding the Configuration Hierarchy
You can apply SecureLogin settings to a Container object, a User object, or a workstation.
- Container object
Settings applied to a Container object affect all users and objects in and below that Container object.
- User object
Settings applied to a User object supersede the settings applied to a Container object or to a workstation.
- Workstation
You can give users the ability to apply settings to a workstation. However, any settings applied to a User object supersede settings applied to a workstation.
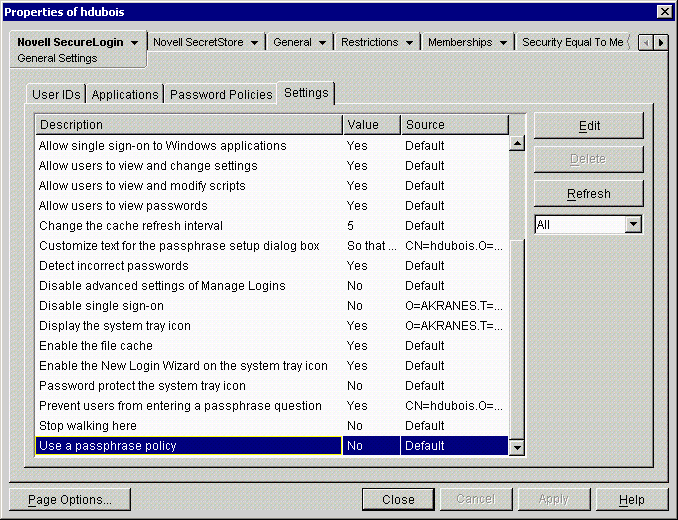
Configuring SecureLogin Settings
You can set up SecureLogin for users by changing default values on the Settings page. Some settings are user settings. Others are administrative settings. Users can change (override) user settings on their workstations. Even if an administrator makes a user setting, users can override it. However, users can't override administrative settings.
-
Click Settings.
-
Click a setting, click Edit, change the value by using the drop-down list, then click OK.
To customize text for the passphrase setup dialog box, type the text. The customized text replaces the default text.
-
Save changes by clicking OK or Apply.
To access the Settings tab for Active Directory:
-
Select a Container or User object from the Active Directory Users and Computers in MMC, then select Properties.
-
Select the Settings tab from the SecureLogin SSO tab of the properties dialog box.
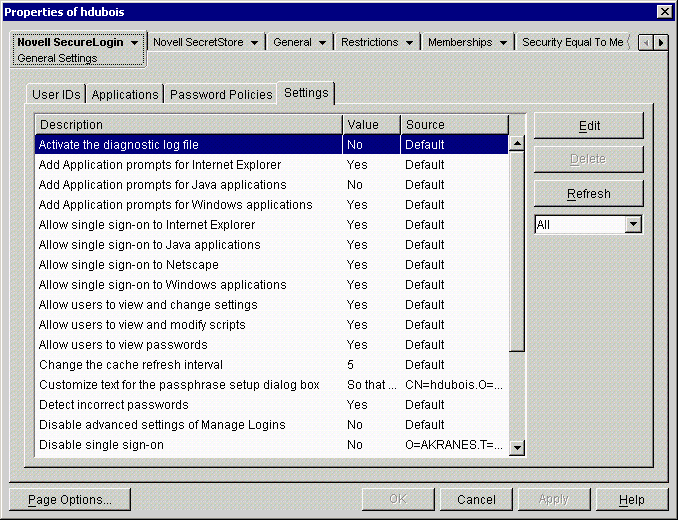
The following table provides information on the settings. If you are running in standalone mode, not all settings are displayed.
Activate the Diagnostic Log File |
Logs the details of use to the hard drive. Because this preference is used for debugging and troubleshooting, the default is set to No. Don't change the value to Yes unless Novell Technical Services advises you to. |
Add Application Prompts for Internet Explorer |
Controls whether the Internet Explorer single sign-on component automatically detects Web application login panels and launches the Add Applications Wizard. To prevent a prompt, change the value to No. |
Add Application Prompts for Java Applications. |
Controls whether the Java single sign-on component automatically detects Java application login panels and launches the Add Applications Wizard. To allow prompts, change the value to Yes. |
Add Application Prompts for Windows Applications |
Controls whether the Windows single sign-on component automatically detects Windows application login panels and launches the Add Applications Wizard. To prevent a prompt, change the value to No. |
Allow Single Sign-on to Internet Explorer |
Enables the Internet Explorer single sign-on features of SecureLogin. To prevent users from being able to single sign-on to Internet Explorer applications, set the value to No. |
Allow Single Sign-on to Java Applications |
Enables the Java single sign-on features of SecureLogin. To prevent users from being able to single sign-on to Java applications, set the value to No. |
Allow Single Sign-on to Netscape |
Enables the Netscape single sign-on features of SecureLogin. To prevent users from being able to single sign-on to Netscape applications, set the value to No. |
Allow Single Sign-on to Windows Applications |
Enables the Windows single sign-on features of SecureLogin. To prevent users from being able to single sign-on to Windows applications, set the value to No. |
Allow Users to View and Change Settings |
Enables users to customize their SecureLogin environment by using the Settings tab to change settings on their workstations. To prevent users from customizing, change the value to No. |
Allow Users to View and Modify Scripts |
Enables users to view and edit scripts, which are SecureLogin's instructions as to what to do concerning the application. When the value is set to Yes, users can use the New and Edit buttons on the Applications page. To prevent users from viewing and modifying scripts, set the value to No. |
Allow Users to View Passwords |
Enables users to check the Display Passwords check box and view passwords that they use to log in to applications. To prevent users (and anyone else) from viewing their SecureLogin passwords, change the value to No. |
Change the Cache Refresh Interval |
Controls the number of minutes that SecureLogin waits between synchronizing the information between the local cache and the Directory. The default is 5 minutes. |
Customize Text for the Passphrase Setup Dialog Box |
Enables you to personalize the text that appears in the Passphrase Setup dialog box that users encounter when they first use SecureLogin. Although you can type 8 lines with 64 characters on each line, limit your text to 415 characters. Otherwise, the text boxes hide the remaining text. |
Detect Incorrect Passwords |
Enables SecureLogin to attempt to detect whether you have given it an incorrect password. SecureLogin can then prompt you to change the password. To disable this feature, set the value to No. |
Disable the Advanced Settings of Manage Logins |
The Advanced option that is available from the SecureLogin system tray icon enables users to change SecureLogin settings, change their passphrases, and refresh the local cache. To prevent users from using this functionality, set the value to Yes. The Settings tab is then unavailable through either the Advanced option on the system tray icon or Manage Logins. |
Disable Single Sign-On |
By default, all users can single sign-on to Windows, Web, and terminal emulator applications. To prevent a user from using single sign-on, select the User object and change the value to Yes. |
Display the System Tray Icon |
To prevent users from displaying and accessing the system tray icon, change the value to No. |
Enable the File Cache |
Enables SecureLogin to use cache files. Usernames and passwords are normally stored in a directory on the server. However, if the server is unavailable, or if you are using a laptop, the cache on the workstation is used. The cache is password protected and encrypted. |
Enable the New Login Wizard on the System Tray Icon |
Enables users to add logins by accessing the New Login Wizard from the system tray. To disable this feature, change the value to No. |
Password Protect the System Tray Icon |
Requires users to provide their passwords before they can access options on the system tray SecureLogin icon. The default is No. To require a password, change the value to Yes. |
Prevent Users from Entering a Passphrase Question |
By default, users can enter their own passphrase question, and then provide an answer. To require users to use a passphrase question that the administrator provides, set the value to Yes. |
Stop Walking Here |
By default, SecureLogin reads its information from the current user's context and then searches up the Directory tree. The default is No. To prevent searching upward, change the value to Yes. |
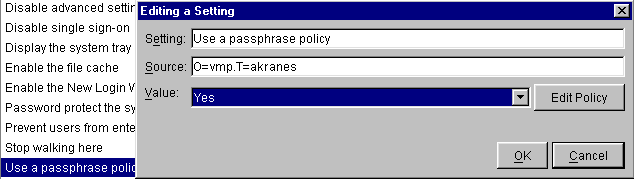
Use a Passphrase Policy |
By default, SecureLogin doesn't require a passphrase policy. To require a passphrase policy, change the value to Yes, then edit and save the policy. |
Preventing Users from Accessing SecureLogin
-
Click Settings.
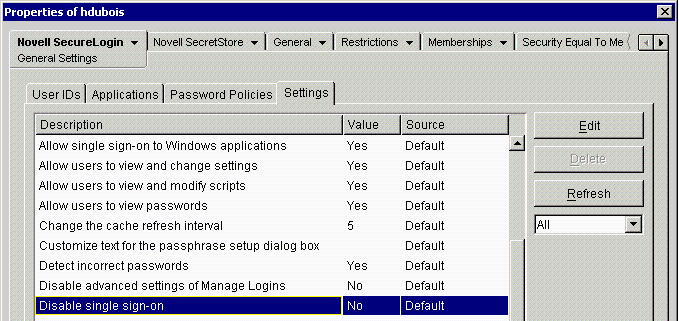
-
Click Disable Single Sign-On, click Edit, then set the value to Yes.
Managing Passphrases
SecureLogin uses an underlying security mechanism, known as a passphrase. A passphrase is actually two parts:
- A passphrase question
The passphrase question should provide a good level of security for the actual answer. For example, a question of "What is 2 times 3?" would obviously not provide a secure passphrase answer. The same could be said for questions that pertain to a user's personal information, such as parents' names.
To apply an acceptable level of security, the SecureLogin administrator can set the passphrase question.
Passphrase questions can have 255 characters.
- A passphrase answer
The passphrase answer is a value that is unique to each user and should only be known by the account owner.
The figure in Entering a Passphrase Question and Answer illustrates the dialog box that collects your passphrase question and answer.
The passphrase should not be confused with the normal login. A passphrase is used to protect the user's single sign-on credential information.
To prevent a rogue administrator from resetting a user's password and attempting to gain access to a user's single sign-on information, SecureLogin prompts for the passphrase whenever SecureLogin recognizes that tampering or an administrative password change has been performed on the user's account.
This passphrase is also used when the user accesses cached login data while not authenticated to the directory.
The passphrase question and answer help you access your login data in the following situations:
- You aren't authenticated to the directory.
- The network connection is lost.
- You are using a laptop computer and are out of contact with the network
- You forget your eDirectory password and have it reset for you.
- Your credential store was locked when an administrator inappropriately reset your eDirectory password.
NOTE: You can't manage passphrase security in standalone mode.
Entering a Passphrase Question and Answer
As the following figure illustrates, a dialog box enables you to provide a passphrase question and answer. You encounter this dialog box after you install and first run SecureLogin.
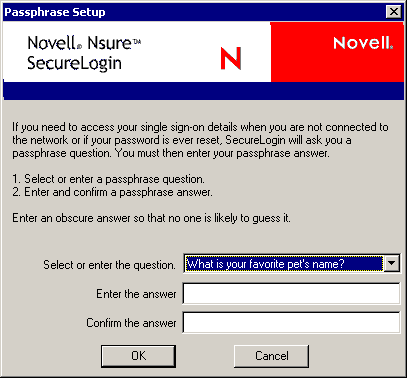
SecureLogin uses the question and answer to ensure that no one else uses your login credentials to access your applications. Choose passphrase information that you'll be able to recall months or years from now.
NOTE: For a passphrase to display properly on multi-byte platforms (for example, Japanese and Chinese), users must use single-byte characters when entering a passphrase.
If you use Novell SecretStore, a specially-designated SecretStore Administrator might unlock your directory-based data stores on your behalf. When you next log in, you encounter a passphrase answer prompt. For more information, see "Setting Up a SecretStore Administrator" in the Novell SecretStore 3.3.0 Administration Guide.
Providing Passphrase Questions
You can provide preset passphrase questions for users to respond to or enable users to enter their own passphrase question.
-
In ConsoleOne, right-click a Container object, then click Properties.
You can provide passphrase questions for User objects, provided a user has used SecureLogin and set a passphrase question.
-
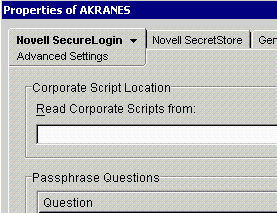
Click Novell SecureLogin, then select Advanced Settings.
-
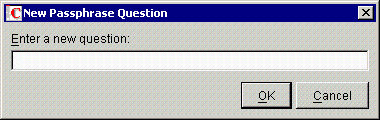
In the Passphrase Questions dialog box, click New.
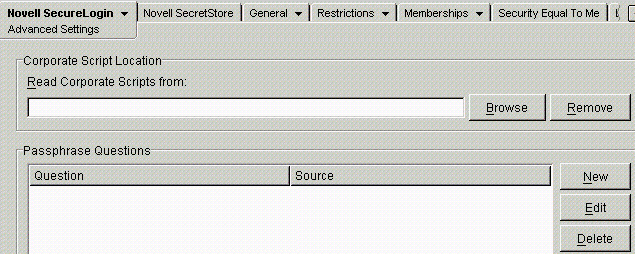
To edit a passphrase question, select it, click Edit, make changes, click OK, then click Apply.
-
Type a question, then click OK.
-
Click Apply.
Disabling User-Set Passphrase Questions
By default, users can enter their own passphrase questions. To disallow user-set questions and require users to select a preset question:
-
In an administrative tool, select Novell SecureLogin > General Settings, then click Settings.
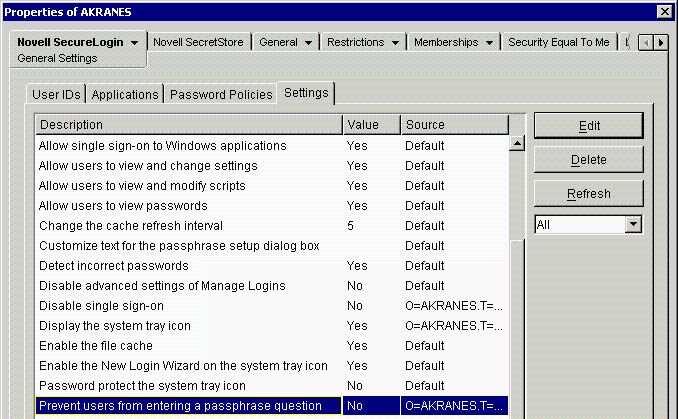
-
Click Prevent Users from Entering a Passphrase Question, click Edit, select Yes from the drop-down list, click OK, then click Apply.
Customizing Introductory Text
When users first encounter SecureLogin, SecureLogin prompts them to enter a passphrase question and answer. See Entering a Passphrase Question and Answer. You can edit that text and provide customized instructions.
-
Click Settings.
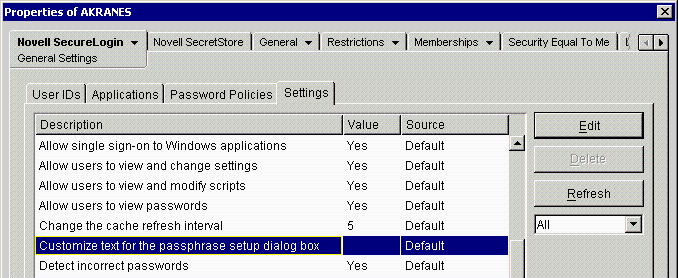
-
Select Customize Text for the Passphrase Setup Dialog Box, then click Edit.
NOTE: Because the primary data store is unavailable in standalone mode, many SecureLogin management features are not available in that mode.
-
Type text in the Value pane, then click OK.
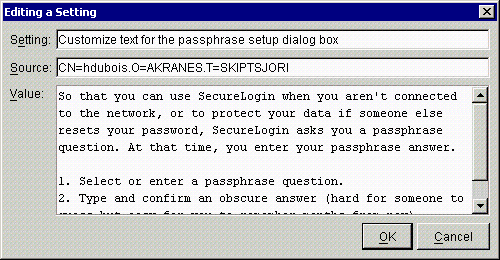
Although your introductory text can have 8 lines with 64 characters in each line, limit your text to 415 characters. If you type too many lines, the text boxes for the passphrase question and answer will hide them.
-
Click Apply.
Using a Passphrase Policy
By default, SecureLogin requires a passphrase that has at least six characters. To set other requirements:
-
Click Settings.
-
Scroll to and select Use a Passphrase Policy.
-
In the Editing a Setting dialog box, require a passphrase policy by changing the value to Yes.
-
(Optional) To edit the passphrase policy, click Edit Policy.
-
Select a setting, then click Edit.
The following figure illustrates some passphrase policy settings that you can change:
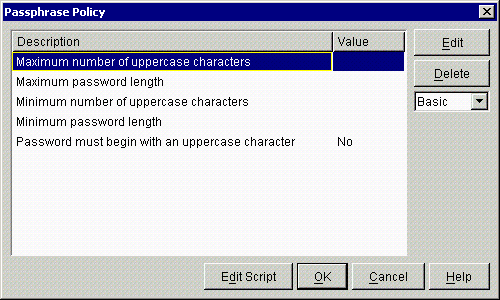
To view all the settings, select All from the drop-down list.
-
In the Editing a Setting dialog box, change the value, then click OK twice.
-
Save the setting by clicking OK twice.
Displaying the System Tray Icon
During installation, you encountered a Post-Install screen that displayed the following options:

If you checked the Start SecureLogin on Windows Startup check box, SecureLogin places the SecureLogin icon on the system tray whenever you start the computer.

To prevent users from displaying and accessing the system tray icon:
-
Click Settings.
-
Select Display the System Tray Icon, then click Edit.
-
Using the drop-down list, change the value to No.
If you turn off the SecureLogin icon on the system tray and then use another tool to change the data, the changes won't take effect until the workstation is restarted.
Disabling the Local Cache
To use login data when you work offline, you can store login data in encrypted files on your workstation. By default, these cache files are located in the \documents and settings\[profile]\application data\securelogin\cache directory.
To disable the cache by using SecureLogin:
-
Right-click the SecureLogin icon on the system tray, select Advanced, then select Change Settings.
-
Select Settings > Enable Cache File.
-
Click Edit, set the value to No, then click OK twice.
To disable the cache by using administrative tools:
-
Right-click the Container or User object, then click Properties > Novell SecureLogin > General Settings > Settings.
-
Select Enable File Cache, click Edit, then set the value to No.
-
Save the changes by clicking OK twice.