Select Setup >Email
> Server
The Email sub-menu option is used to configure the system’s incoming
and outgoing email settings.
The system uses email to notify Customers about:
Login information
Request creation, updates and closure
Contract renewals
Invoice management
Purchase Order creation.
Emails notify Service Desk Users of:
Request allocation
Escalations and SLA reminders, warnings and breaches
Amendments to requests made by other Users
Addition or removal of requests from Groups
Required request approvals.
For detailed information regarding managing requests using email polling see Email Polling and Request Creation in the Appendices of this guide.
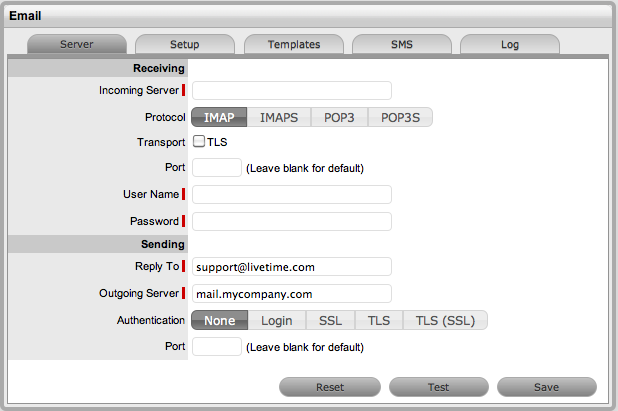
To enter email server details:
Select Setup >Email
> Server
Enter the Receiving
and Sending Details:
Receiving |
|
Incoming Server |
The incoming server used by the system to receive emails. |
Protocol |
The protocol of the incoming email account- IMAP, IMAPS, POP3, POP3S. |
Transport |
This option is visible if IMAP or POP3 has been set for the email account protocol. Select to secure the transport layer to encrypt the whole channel, if relevant to your email server configuration. |
Port |
Can be left blank for the default, or enter a port. |
Interval |
Enter a timing interval if polling is enabled. This will be the period of time the system will use to check if any messages need to be polled. |
User Name |
Enter User Name for the incoming mail server. |
Password |
Enter the account Password. |
Sending |
|
Reply To |
The default system email address and the account that the email polling feature uses. |
Outgoing Server |
The outgoing (or SMTP) server used by the system to send emails. |
Authentication |
If your SMTP server requires sender identification before sending email select between Login, SSL or TLS depending on the server configuration. The User Name and Password fields will be displayed when options other than None are selected. |
Port |
Enter a different port, or leave blank to use the default. |
User Name |
When authentication is required, enter the SMTP authorization details. |
Password |
When authentication is required, enter the account password. |
Click Save.
![]()
To delete the content in all fields within the Server tab, select the Reset button. The system will display a message requiring verification of the Reset selection. Click OK to verify and clear all fields.
To test if the email configuration is correct for sending email, click Test. This will send a message to the Administrator, using the Outgoing Server details that have been provided.