4.3 Integrating Service Desk with ZENworks Configuration Management
Novell Service Desk brings with it a host of new and exciting features. One of these is the ability to leverage the capabilities of Novell ZENworks Configuration Management bundles from within Novell Service Desk’s Web console. For example, Sue from Finance contacts the service desk to request installation of Visio 2010. The service deck technician, Bob, uses the new Bundle Management feature to deliver Visio 2010 to Sue and resolves the call immediately. We can build out from this example to include approvals from Sue’s line manager and even automatic checking of available licenses with initiation of purchasing workflows if required.
This section enables you to achieve an initial integration between the two solutions so that you can start to explore the possibilities. You should try this on a test system, then note your settings and transfer them to your production system when everything is working as you expect.
First we need to ensure a few prerequisites are met before continuing:
-
Section 4.3.2, Switch on Integration within Novell Service Desk
-
Section 4.3.3, Telling Novell Service Desk about your ZENworks Configuration Management System
-
Section 4.3.4, Telling ZENworks Configuration Management about your Novell Service Desk System
-
Section 4.3.5, Importing Assets from ZENworks Configuration Management into Novell Service Desk
-
Section 4.3.6, Create Role for Novell Service Desk Users in ZENworks Configuration Management
-
Section 4.3.10, Verifying that the Remote Control is working
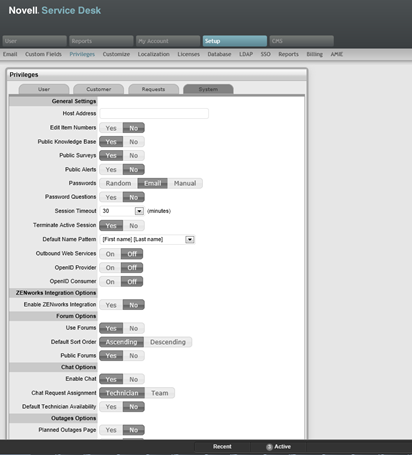
4.3.2 Switch on Integration within Novell Service Desk
-
Log in to the Novell Service Desk as a supervisor or administrator.
-
Click > > .
-
In the General Settings panel, set the option to .
This enables the tab in the Novell Service Desk menu.

4.3.3 Telling Novell Service Desk about your ZENworks Configuration Management System
Automatic Configuration
Automatic configuration is applicable for ZENworks 11.2.3 and higher versions only.
NOTE:For earlier versions of ZENworks, use the Manual Configuration option.
-
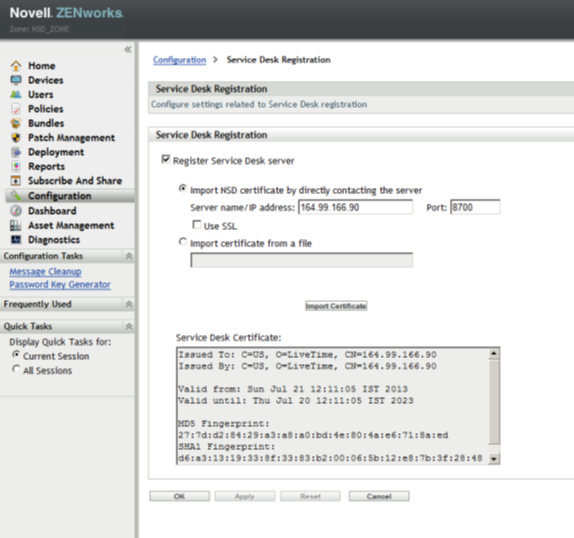
In the Novell Service Desk user interface, click > .
-
In the tab, specify the ZENworks Server address.
-
Select Automatic Configuration to automatically exchange certificates.
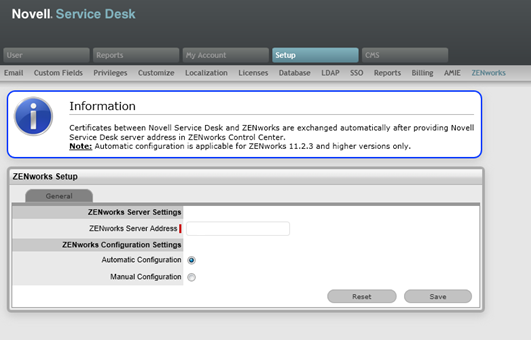
NOTE:
-
The Novell Service Desk and ZENworks certificates need to be exchanged to complete the registration process.
-
Ensure that the system time is in sync of both Novell service desk and ZENworks server.
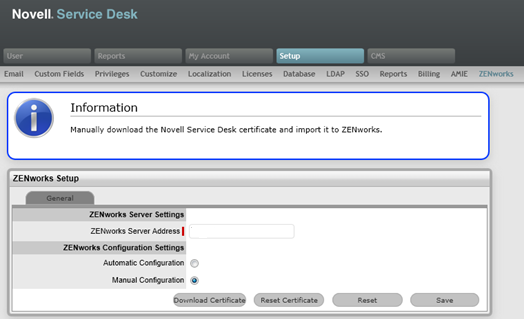
Manual Configuration
-
In the Novell Service Desk user interface, click > .
-
In the tab, specify the ZENworks Server address.
-
Select . Click and store it on the local drive.
4.3.4 Telling ZENworks Configuration Management about your Novell Service Desk System
For ZENworks versions 11.2.3 and above
-
Log in to the ZENworks Control Center, click > > .
-
Select after following the steps described in Automatic Configuration.
-
Provide Novell Service Desk server address in the ZENworks Control Center for automatic exchange of certificates.
-
Click . Once the certificate is imported, click and .
NOTE:You can also upload the NSD certificate from file to ZENworks (versions 11.2.3 & above) by selecting the option.
4.3.9 Verifying that the Integration Is Working
-
Log in to the Novell Service Desk console as a technician.
-
Create an incident.
-
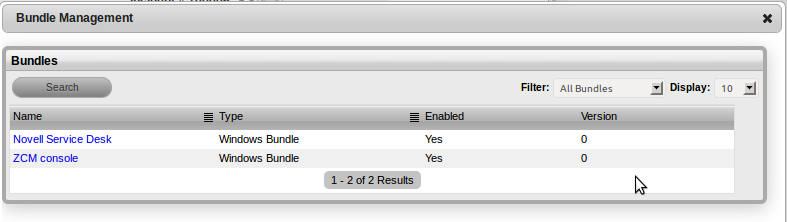
On the incident summary screen, look for a panel on the right side of the page titled ZENworks Tools, with a bundle icon.
-
Click the Bundle icon.
A popup window appears, titled Bundle Management. This takes a few moments to load because Novell Service Desk authenticates to ZENworks Configuration Management, and reads the list of bundles. The window will look similar to this:
-
If you get an error message, verify that the time between ZENworks Configuration Management Primary Servers and the Novell Service Desk Server is within 1 minute of each other. Then verify that your technician has the correct roles and privileges in ZENworks Control Center.
-
Change the filter to .
-
Click the bundle.
-
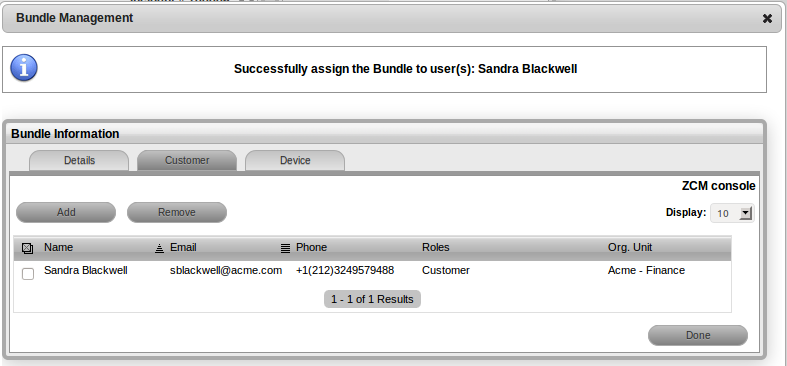
To add the bundle to one or more users, click the tab.
To add the bundle to one or more devices, click the tab.
-
For either option, search for the users or devices that you want to assign the bundle to then, click .
You should see a message confirming the assignment. It will look similar to this:
-
Click .
The bundle is launched and installed the next time that the ZENworks Configuration Management adaptive agent is refreshed.
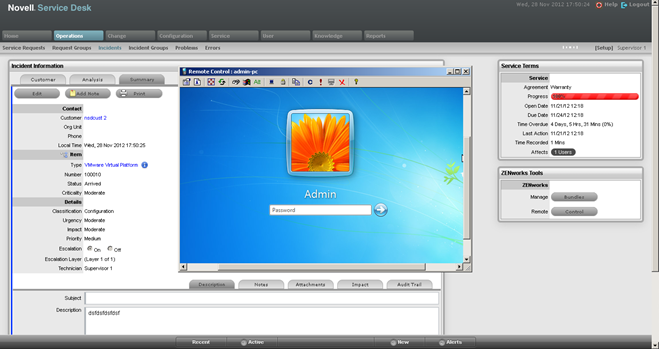
4.3.10 Verifying that the Remote Control is working
-
Log in to the Novell Service Desk console as a technician.
-
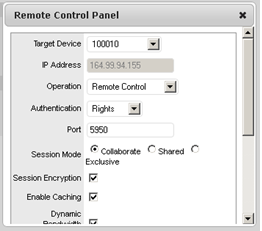
Open an incident. On the Incident Summary screen, you should now see a panel on the right hand side of the page titled ZENworks Tools, with a bundle icon and Remote Control icon.

-
Click the Control icon. A Remote Control panel window appears.
-
Select the required remote operation from Operations list.
-
Click to ensure valid viewer plugins are downloaded and installed.
NOTE:Incase there is an error in performing remote control operation:
-
Verify that the time between ZENworks Configuration Management Primary Servers and the Novell Service Desk Server is within 1 minute.
-
Verify that the technician has the correct roles and privileges in ZENworks Control Center.
-
Verify that the GUID field in the Advanced settings of LDAP configuration is appropriately configured for the LDAP source used.
-
-
Click Start, you will see the screen of the remote machine.