2.9 Configuring the ZENworks Primary Server Details in Novell Service Desk
To allow Novell Service Desk users to use ZENworks Bundle, Remote Management features, or to login to ZENworks Control Center from the Novell Service Desk User Interface, you must configure the details of ZENworks Primary Server.
You can use one of the following options:
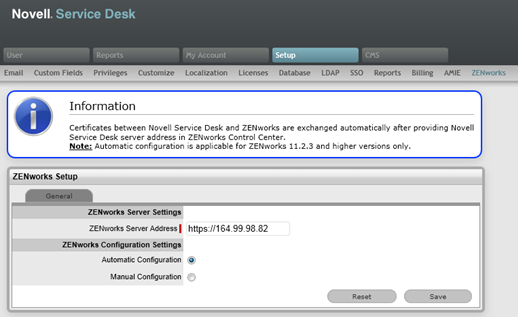
NOTE:Automatic Configuration is applicable for ZENworks 11.2.3 and higher versions only. For earlier versions of ZENworks, use the Manual Configuration option.
2.9.1 Automatic Configuration
-
In the Novell Service Desk user interface, click > .
-
In the tab, specify the ZENworks Server address.
-
Select to automatically exchange certificates.
NOTE:
-
The Novell Service Desk and ZENworks certificates need to be exchanged to complete the registration process.
-
Ensure that the system time is in sync with Novell Service Desk and ZENworks Server.
-
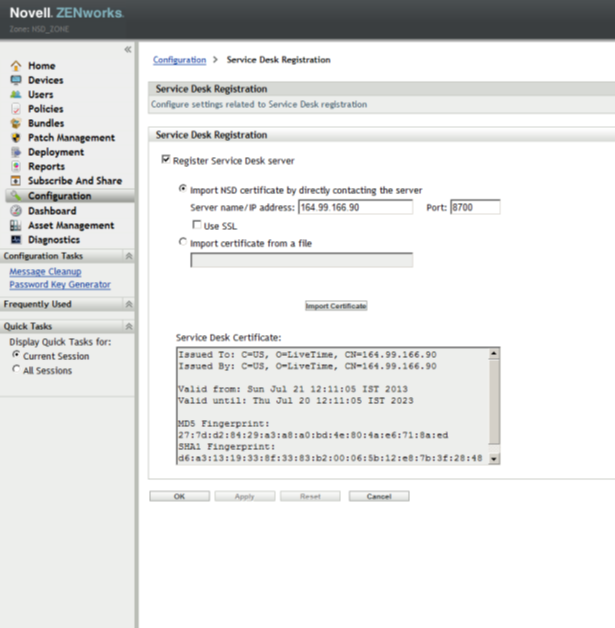
To register Novell Service Desk details in ZENworks
-
Log in to the ZENworks Control Center, click > > .
-
Select Import NSD Certificate by directly contacting the server.
-
Provide Novell Service Desk Server address in the ZENworks Control Center for automatic exchange of certificates.
-
Click .
-
After the certificate is imported, click . Click .
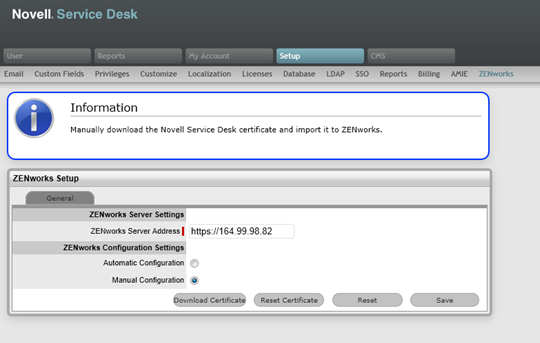
2.9.2 Manual Configuration
-
In the Novell Service Desk user interface, click > .
-
In the tab, specify the ZENworks Server address.
-
Select .
-
Click and store it on the local drive.
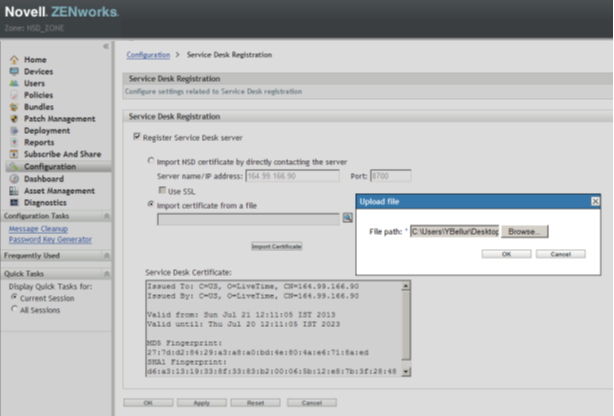
To Register Novell Service Desk details in ZENworks:
-
Log in to the ZENworks Control Center, click > > .
-
Select .
-
Click the browse button, and upload the Novell Service Desk certificate downloaded in Step 4. Click . Click .
Open ID Settings
-
In the Novell Service Desk user interface, click > .
-
Click tab.

-
Read the information displayed in the OpenID Provider panel:
The OpenID Provider panel is displayed only if authentication of Service Desk users through ZENworks has already been enabled. For more information, see Enabling ZENworks Authentication for Service Desk Users.
Name: Displays ZENworks as the OpenID Provider name.
Icon: Displays the ZENworks icon that will be available on the Novell Service Desk login page for the Service Desk customers and users accessing Service Desk.
URL: This field is initially blank. It display the OpenID Provider URL that is automatically generated based on the address specified in the option when you click .
-
Click .
The option in the OpenID Provider panel displays the OpenID Provider URL that is automatically generated based on the address specified in the option.