10.1 Main Tab
The tab provides access to all of the active management interfaces for Novell Storage Manager. You use the tab to create, edit, deploy, and analyze Novell Storage Manager policies.
10.1.2 Engine Status
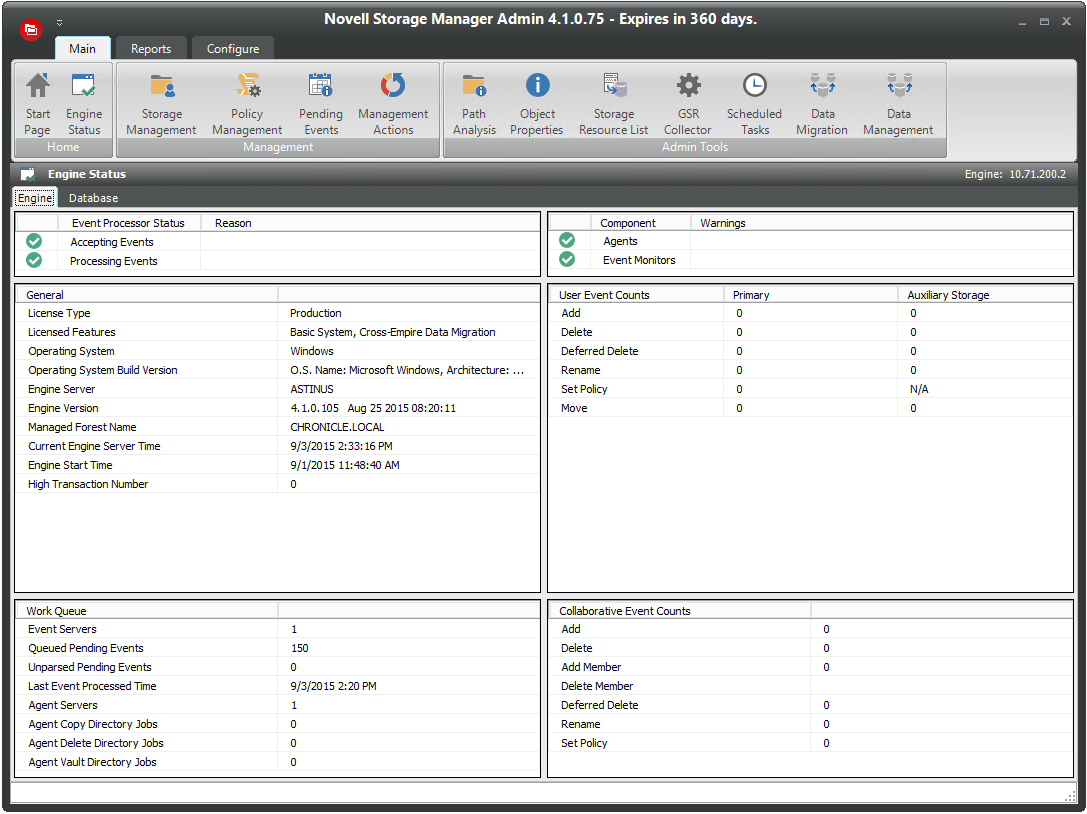
The Engine Status page provides an overview of the current status of the NSM Engine through the tab. If you are not seeing Novell Storage Manager enact actions after events in Active Directory take place, viewing whether the NSM Engine is processing and accepting events through this page is a good first step in troubleshooting.
Expanded details pertaining to events are detailed in different regions of the page. The General region provides general details including naming and version numbers. The User Event Counts region displays user storage actions. The Work Queue region provides details on actions yet to be completed. The Collaborative Event Counts region provides collaborative storage actions.
Figure 10-1 Engine Status Page
10.1.3 Storage Management
The Storage Management tool lets you manage the associations between Novell Storage Manager policies and Active Directory objects such as organizational units, groups and users. This includes creating organizational units, setting context, viewing properties, performing Management Actions, and assigning policies.
Figure 10-2 Storage Management Page
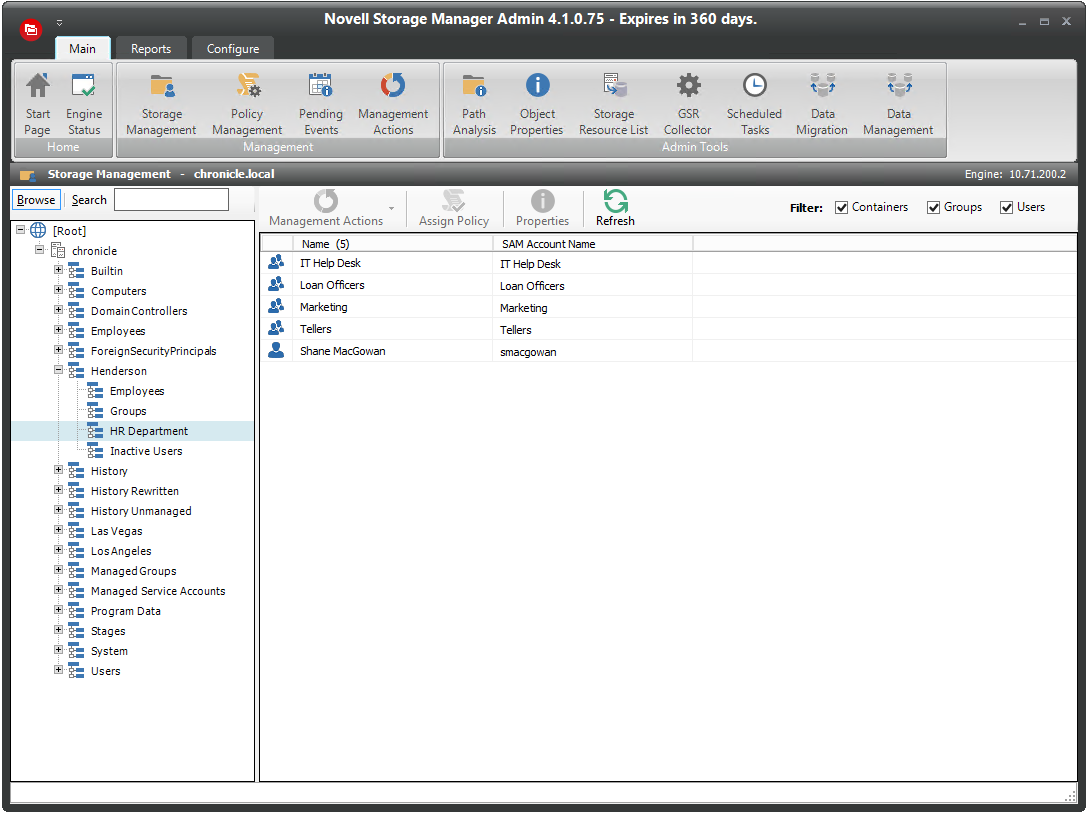
Left Pane
Use the left pane to browse and select organizational units in the directory. Right-clicking an organizational unit in the left pane lets you take additional actions:
-
Create an organizational unit (OU)
-
Set the directory context in the left pane to display the hierarchy from the root or from the selected organizational unit
Right Pane
Use the right pane to view the objects within a selected organizational unit as well as view properties, perform Management Actions, and assign policies. The right pane displays containers (organizational units), groups, and users, according to what you have selected in the Filter check boxes.
IMPORTANT:When you perform actions in the right pane, it is important that you know whether you are performing management specific to users, groups, or organizational units (containers).
10.1.4 Policy Management
The Policy Management page displays all policies, along with a summary of policy details. When you select a policy, applicable tools in the toolbar are activated. A summary of the toolbar follows.
NOTE:All of these tools are also accessible by right-clicking a selected policy.
Manage Policies: Lets you create any of the following policies:
-
User Home Folder policy
-
User Profile Path policy
-
User Remote Desktop Services Home Folder policy
-
User Remote Desktop Services Profile Path policy
-
Group policy
-
Container policy
-
Auxiliary policy
Rename Policy: Lets you rename the selected policy.
Delete Policy: Lets you delete the selected policy.
Edit Policy: Brings up the Policy Editor, where you can edit the selected policy.
Import Policies: Provides the ability to import policies that were previously exported through the menu option.
NOTE:Policy associations are not imported. After policies are imported, you need to associate the policies to containers or groups.
For more information on importing policies, see Section 5.13, Importing Policies.
Export Policies: Provides the ability to export policies so that they can be imported later. For example, many customers first evaluate Novell Storage Manager in a lab environment and create a large number of policies in the process. You can export these policies and later import them into the production environment. All exported policies are saved in a single XML file. For more information, see Section 5.12, Exporting Policies.
Import Upgraded Policies: Provides the ability to import policies migrated from a Novell Storage Manager 2.5x NSM Engine after the NSMAdmin Setup Wizard has been run. This feature is provided in case you chose not to import the policies when you ran the Setup Wizard.
Actions for Auxiliary Policies: Provides menu options that are applicable to Auxiliary policies. To activate this menu, click an Auxiliary policy. Menu options include , > , , , and .
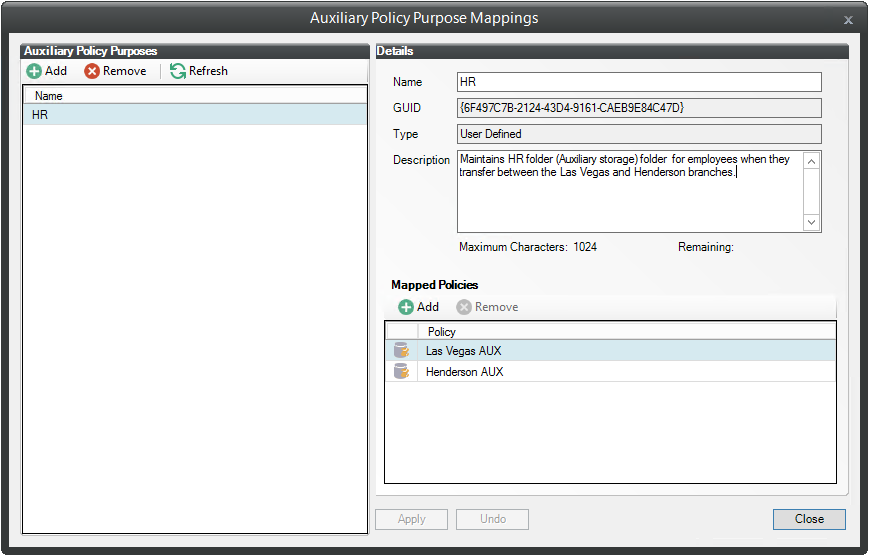
Auxiliary Policy Mappings: Auxiliary policy mappings give you the ability to specify a purpose or classification for auxiliary storage policies. For example, you might want to create an HR purpose for all of the auxiliary storage policies that create HR folders for employees. With each of the auxiliary storage policies that create HR folder assigned the same purpose, it makes it possible for Novell Storage Manager to make intelligent decisions for auxiliary storage when a user is moved.
For example, if a user in the Detroit office transfers to the Dallas office, and the user has a home folder and an auxiliary storage folder in the Detroit office’s HR department, you want to migrate both the home folder and the auxiliary storage folder to correct locations in Dallas. Having the Detroit auxiliary storage policy and the Dallas auxiliary storage policy identified with the same HR purpose, ensures that the user moved from Detroit to Dallas, will have his auxiliary storage properly established with the move.
Redistribute Policy Paths: Allows you to define additional target paths in the policy and then redistribute or load-balance the data among the various paths.
Figure 10-3 Redistribute Policy Paths Dialog Box
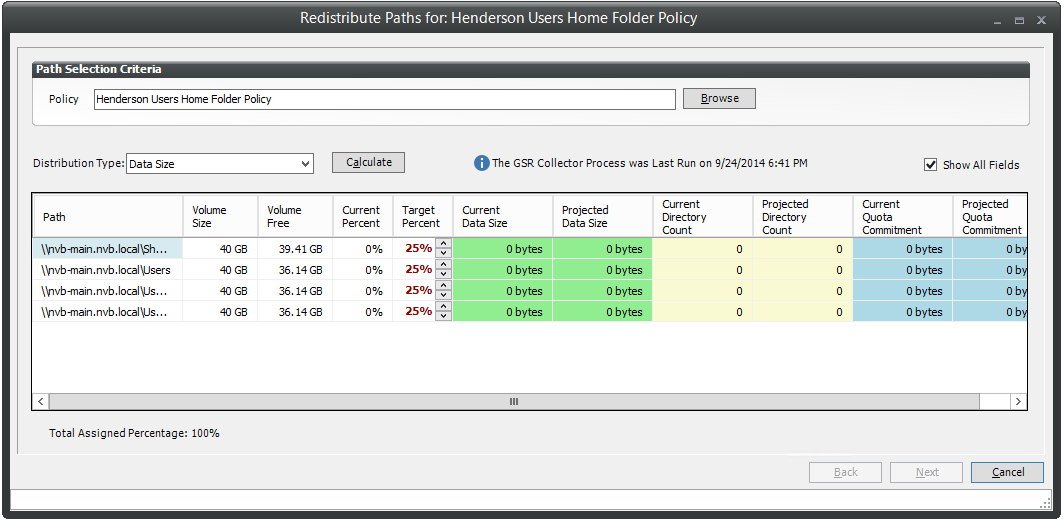
Using the Redistribute Policy Paths dialog box, you can redistribute the user and collaborative storage across the target paths associated with a policy.
NOTE:The data displayed in the dialog box is taken from the most recent report from the GSR Collector.
Use the drop-down menu to view your data distribution according data size, directory count, and quota commitment.
Click to view the current locations of the home folders and collaborative storage folders, and the location where Novell Storage Manager proposes to redistribute the folders. If you want, you can deselect a folder for distribution by deselecting the check box corresponding to the folder. You can also indicate a new target path for the folder by clicking in the column and selecting a new target path.
Clicking begins the process of redistributing the folders.
Report on Policy Paths: If your network includes Novell File Reporter, this button is the means of Novell File Reporter reporting on Novell Storage Manager policy paths.
This capability is particularly powerful because it allows you to specify the target paths where user and collaborative storage resides on the network. Because network user and collaborative home folders tend to be the source of most of the stale, redundant, and non-work-related file types, the Policy Path Reporter can quickly and easily be the means of generating reports on the storage areas that you care about most. For procedures, refer to the Novell File Reporter 1.0 Administration Guide.
Refresh: Refreshes the list of policies.
NOTE:Refreshing locks the database during the refresh operation. For best performance, do not refresh more than is necessary.
Reload Policy Cache: Reloads your policies from the database. For example, you can use this tool if you have a policy that is not displayed in the list.
Check Boxes: NSMAdmin shows only the policy types that are checked.
Filter: Filters policy names as you type.
10.1.5 Management Actions
In managing user and collaborative storage with Novell Storage Manager, there are cases when you need to retroactively apply policies, rights, attributes, and quotas to existing user storage, or perform some administrative corrective action or operation on a large set of users, groups, or containers.
In Novell Storage Manager, performing these types of operations is collectively referred to as performing a Management Action, and is done through the Storage Management page by right-clicking the object and selecting , or clicking the drop-down menu.
You can perform a Management Action on an organizational unit, a Group object, or a User object. Management Action operations on a Group object apply to users who are members of the group. Management Action operations on an organizational unit apply to users in the organizational unit, and optionally to all subordinate organizational units.
IMPORTANT:The Management Actions vary based on whether the selected mode is , , or . For example, if mode is selected, the Management Action will be performed for collaborative storage processing using Dynamic Template processing. If mode is selected, the Management Action will be performed for container based collaborative storage.
Novell Storage Manager analyzes each User object independently, regardless of whether the Management Action is initiated via organizational unit, Group objects, or User objects.
Management Actions Dialog Box
Whenever you initiate a Management Action, you work in a dialog box similar to the one below. A description of the components follows the graphic.
Figure 10-4 Management Action Dialog Box
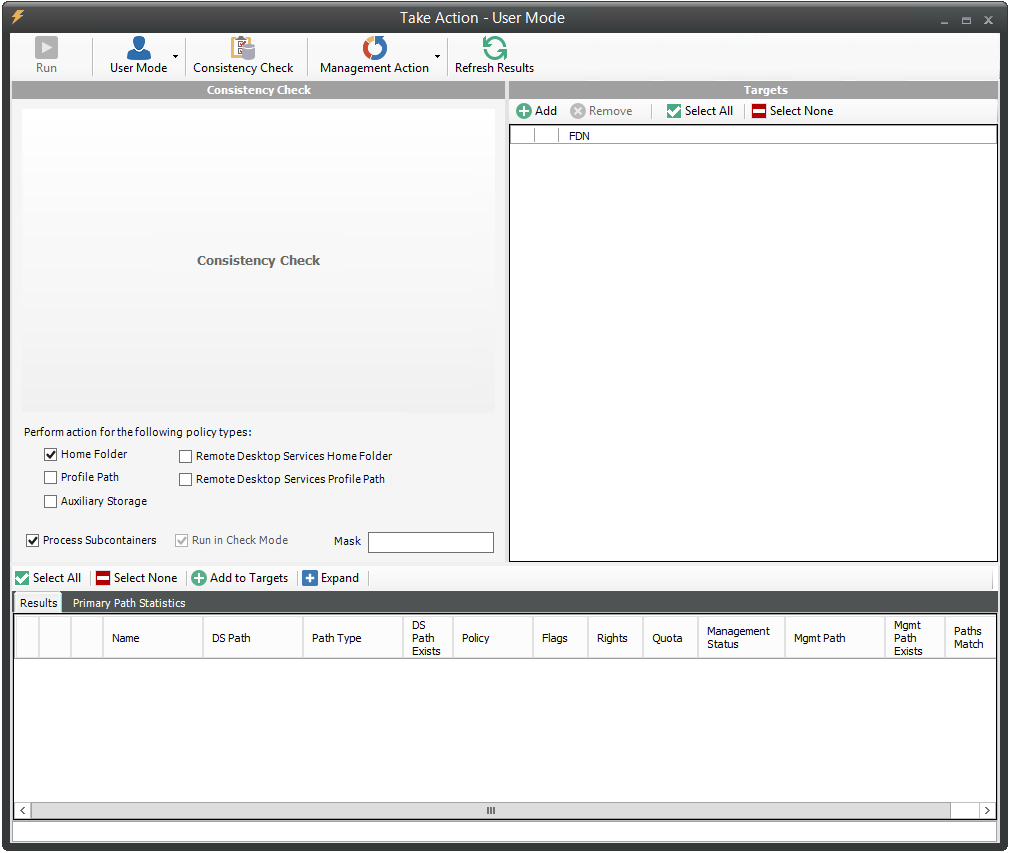
Run: Clicking this button executes the management action.
Mode: This drop-down menu lets you indicate if the Management Action is to apply to User, Group, or Container policy.
Consistency Check: This button lets you perform a consistency check before determining what Management Actions to perform. You can also use the button to view the results after you perform a Management Action.
Management Action: This drop-down menu lets you change from one Management Action to another while you are in the dialog box.
Refresh Results: This button refreshes the results displayed in the bottom pane of the dialog box.
Top Left Pane: The fields, options, and check boxes in this region vary based on the Management Action you are performing. In some cases, there is nothing in this region, because there are no settings to create. This region includes some powerful options for Management Actions, including the following:
-
Process Subcontainers
-
Run in Check Mode
-
Mask
When you perform a Management Action on an organizational unit, Novell Storage Manager applies the action to all subcontainers. If you do not want the action applied to subcontainers, you can deselect the check box.
The check box lets you view the potential outcome of performing a Management Action before you actually perform the action. The action is evaluated and all tasks associated with the action are listed. We recommend that you perform all Management Actions in check mode and observe the outcomes before actually performing a Management Action.
For Management Actions performed on organizational units or Group objects, you can enter a search filter in the field to limit the number of objects that Novell Storage Manager analyzes. You can enter standard wildcard characters with multiple strings separated by the “|” character.
Top Right Pane: This part of the dialog box lets you add, delete, or select objects to which the Management Action applies.
Bottom Pane: This part of the dialog box displays the results after the Management Action has taken place. To expand the viewable area, click .
Available Management Actions
Consistency Check
This Management Action notifies you of inconsistencies or potential problems pertaining to user and group storage being managed through Novell Storage Manager. These potential problems might be missing storage quotas, inconsistent directory attributes, missing and inconsistent managed paths, and more.
In addition to reporting on storage issues, consistency check reports let you review current quota assignments and can help you with the design and planning of storage policies. In Section 4.3, Running Consistency Check Reports on Existing Storage, you ran a consistency check before creating your first primary user policy to help you determine how to configure the policy.
Manage
This Management Action catalogs objects in Novell Storage Manager, putting them in a managed state.
If the existing objects already have established managed paths, attributes, and rights, Novell Storage Manager does not change these settings, nor does it enforce policy paths, grooming, and quota management. If you need to change attributes and rights, or enforce policy paths, grooming, and quotas, you can do so through the specific Management Actions.
If these existing objects do not have established managed paths, Manage creates the managed paths and sets the rights, attributes, quotas, etc. according to the policies that apply to the objects.
Enforce Policy Paths
This Management Action moves data to where the policy’s target path specifies. If you decide to move your user home folders from one location to another, you can simply change the target path in the policy and then run Enforce Policy Paths to move the home folders.
The option lets you copy data without alerting you to failures if there are files open. When a user is moved in Active Directory and the policy dictates that the home folder is to be moved to a new target path, this option allows for all closed files to be moved. At a later time, you can go back and run an Enforce Policy Path Management Action without the check box selected, to move the files that were previously open.
Groom
This Management Action carries out file grooming according to the file grooming specifications in the applied policy.
Apply Attributes
This Management Action lets you apply file system attributes. If you decide to modify the file system attributes in a policy, you can select to immediately apply the new attributes for all of the affected objects.
If you cataloged existing objects with existing managed paths through Manage, the attributes for the managed path are not modified once the object’s managed path attribute is cataloged (see Manage above). If you want to modify the original attributes of the managed path, you can do so through the settings in the in the left pane of the Apply Attributes dialog box.
Apply Home Drive
When the check box is selected, this Management Action changes the home drive letter for the user that is assigned under Active Directory, to the drive letter that is specified in the Novell Storage Manager policy.
If you have a Novell Storage Manager Remote Desktop Services home folder policy and you want to apply the drive letter that is established in that policy, you can select the check box.
NOTE:The new drive letter does not take effect until the user logs out and then logs in again.
Apply Members
This Management Action is included to create the owner folder and personal folders in a collaborative storage area, where these folders did not exist previously. You must first modify the collaborative storage template in the policy to include -OWNER- and -MEMBER-. For more information, see Section 7.0, Managing Collaborative Storage.
If you do have personal folders in the collaborative storage area and you later change the rights on -MEMBER-, you use the Apply Members Management Action to enforce the new rights.
Apply Ownership
This Management Action lets you set ownership of the home folder and home folder contents.
Figure 10-5 Apply Ownership Management Action Page
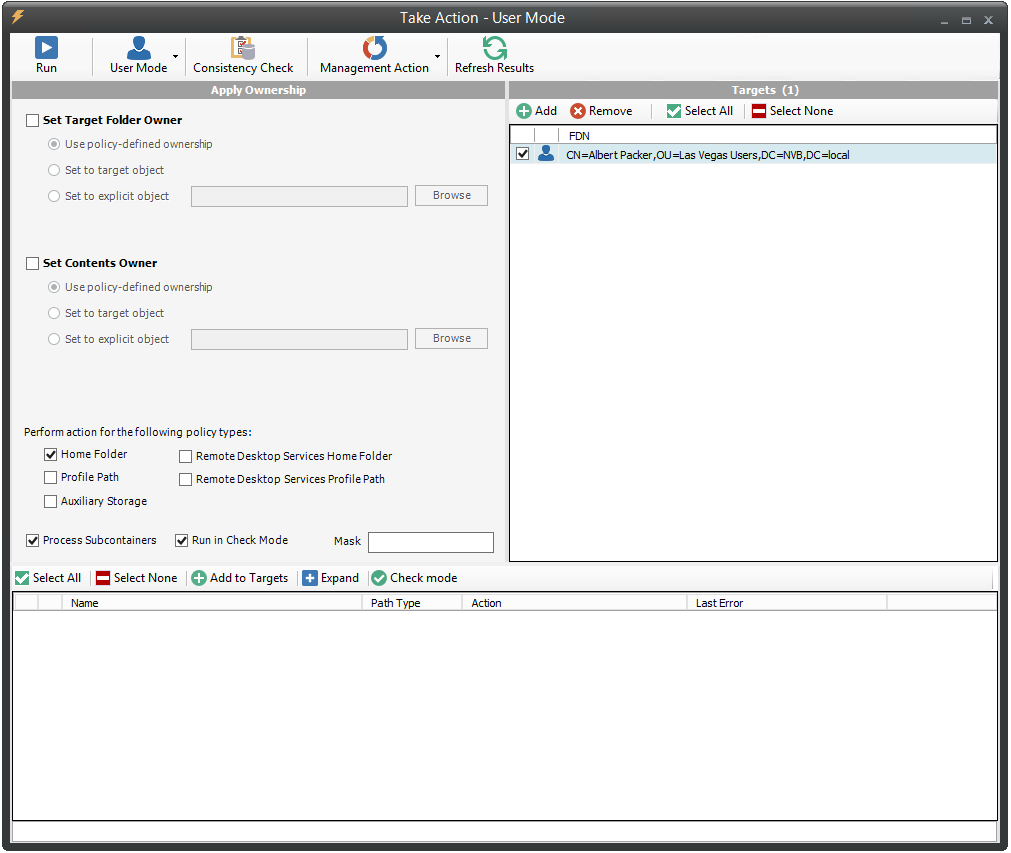
NOTE:The ownership specifications you make on the page shown above are applied to folders and files that exist at the time the Management Action takes place. The ownership of files and folders that are created later is not affected by this action. For example, if a user's home folder is moved due to an Enforce Policy Path action, the ownership of the user’s home folder will be determined by the settings in the policy.
Set Target Folder Owner: Select this check box to specify that the ownership applies only to the home folder and not to any subfolders.
Use policy-defined ownership: This option sets the home folder owner according to the specified owner in the field of the policy.
Set to target object: When this option is selected, each of the selected users’ home folders is set to have that user object as the owner.
Set to explicit object: This option lets you browse to select a specific owner for the home folder.
Set Contents Owner: Select this check box to specify that the ownership applies to the subfolders and files contained in the home folder.
Use policy-defined ownership: This option sets the home folder contents owner according to the specified owner in the field of the policy.
Set to target object: When this option is selected, each of the selected users’ home folders is set to have that user object as the owner.
Set to explicit object: This option lets you browse to select a specific owner for the contents of the home folder.
Perform action for the following policy types: Specify the policy types you want this Management Action to apply to.
Process Subcontainers: Selecting this option specifies that you want the settings on this page to apply to users that reside in the subcontainers within the container where this policy is applied.
Run in check mode: Selecting this check box lets you view the potential outcome of performing a Management Action before you actually perform it. The action is evaluated and all tasks associated with the action are listed. We recommend that you perform all Management Actions in check mode and observe the outcomes before actually performing a Management Action.
Mask: For Management Actions performed on organizational units or Group objects, you can enter a search filter in the field to limit the number of objects that Novell Storage Manager analyzes. You can enter standard wildcard characters with multiple strings separated by the “|” character.
Apply Quota
This Management Action lets you apply managed path quotas. If you decide to modify the quota settings in a policy, you can select to immediately apply the new quota setting to all of the affected users.
If you cataloged existing network users with existing home folders through Manage, there might be no quota settings for the user home folders. Or, the quota settings might be inconsistent with those specified in the policy. If you want to establish or reset the quota for the home folder, you can do so through the settings in the left pane of the Apply Quota dialog box.
Apply Rights
This Management Action lets you apply file system rights. If you decide to modify the file system rights in a policy, you can select to immediately apply the new rights for all of the affected users.
Apply Template
This Management Action lets you apply a template specifying how to provision user or collaborative storage. If you decide to modify the template in a policy, you can select to immediately apply the new template structure to all of the affected users. This can be especially useful if you need to quickly provision a new subfolder with a document, such as a new health benefits document for all employees. All you need to do is modify the template to include the new subfolder and document inside the subfolder and then use Apply Template to provision it to everyone.
If you cataloged existing network users with existing home folders through Manage, the file structure created by the template is not modified after the user and his or her associated home folder are cataloged (see Manage above). If you want to modify the original file structure for the home folder, you can do so through the settings in the in the left pane of the Apply Template dialog box.
Clear Managed Path Attribute
This Management Action allows removes the managed path attribute so you can create a new one. Administrators might find this useful when users have invalid values for their home folder attributes and want to start over by creating new ones.
Recover Managed Path Attribute
If the attribute for a user home folder, profile path, Remote Desktop Services home folder, or Remote Desktop Services profile path ever becomes corrupted, this Management Action can be used to recover an uncorrupted version of the attribute from the Novell Storage Manager database.
Assign Managed Path
You can use this Management Action to assign an attribute to a user folder, profile path, Remote Desktop Services home folder, or Remote Desktop Services profile path.
Directory Merge
This Management Action lets you merge contents of one home folder with those of another. This is especially useful if a user leaves an organization and you want to transition the files from the former user to another user. Another example might be if a user has two home folders and you want to merge the contents into one.
Remove from Database
This Management Action removes object from the Novell Storage Manager database and makes the object unmanaged.
Assign Policy
Lets you easily assign a User, Group, or Organizational Unit object a policy while you are in the Storage Management page. If an effective policy is already assigned to one of these objects, you can assign a new policy, replacing the effective policy with an assigned policy.
Figure 10-6 Policy Selector Dialog Box
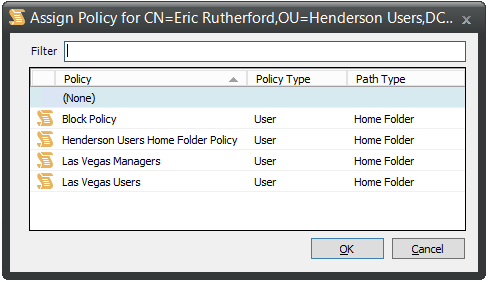
The field filters policy names as you type.
Object Properties
You can easily view an expanded set of object properties in the Storage Management page by right-clicking an object in the right pane and selecting .
The five tabs display the following information:
Properties: Displays Active Directory values and NSM Engine database values. If you are working with a Novell Support representative to resolve a problem, you might need to provide information from this screen.
Effective Policies: Lists all of the effective policies for the selected object. An effective policy is a policy that affects a user either directly through association or inheritance by membership in a domain, container, group, or domain.
Associated Policies: Lists all of the associated policies for an object. An associated policy is an explicitly assigned policy associated with a domain, container, group, or user.
Transactions: Shows pending events for the selected object. If there are many pending events, but you only want to see those pertaining to a particular user, you can see the pending events for the User object.
History: Shows a history of move and rename events that pertain to the selected User object.
Having historical information can be beneficial for a number of reasons. One in particular is for restoring files. Suppose a project manager was working on a project three years ago and then the company decided to discontinue funding the project. After one year, the project manager decided to delete the project files from her personal folder. Now suppose that two years later, a new executive in the organization wants to renew the project. To locate the original project files from backed up storage would be quite time consuming, but by viewing the information in the History tab, you could easily find the original location of the backed up home folder, if it was moved, and if so, where it was moved to, so that you could retrieve the project files.
10.1.9 Storage Resource List
This page lets you rebuild the storage resource cache used in Novell Storage Manager. Because Novell Storage Manager uses the storage resource cache to accelerate operations, there might be times when you need to use this page to populate the cache with new shares.
Figure 10-7 Storage Resource List Page
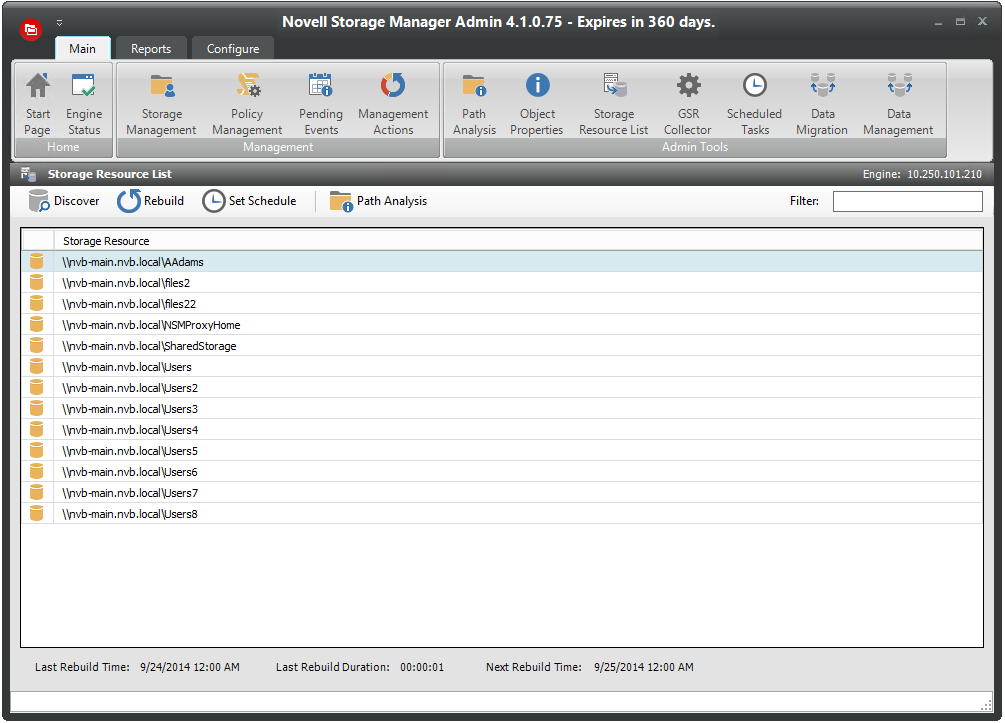
Last Rebuild Time: Displays the last date and time that the storage resource list was rebuilt.
Last Rebuild Duration: Displays the length of time it took to generate the new storage resource list.
Next Rebuild Time: Displays the date and time when Novell Storage Manager next rebuilds the storage resource list. Unless rebuilt through the button, the storage resource list is rebuilt automatically at midnight each day.
Discover: Clicking this button initiates a search within the entire forest domain for any new shares or DFS namespaces. Depending on the size, configuration, and topology of your network, this can take a significant amount of time.
Rebuild: Clicking this button initiates a search within the entire forest domain for all available shares or DFS namespaces. When you create or edit a policy, you might need to rebuild the list if the share or DFS namespace you need does not appear in the storage resource list. Depending on the size, configuration, and topology of your network, this can take a significant amount of time.
Set Schedule: Allows you to set the schedule for rebuilding the storage resource cache.
Path Analysis: Clicking this button opens the path analysis page for the selected share, allowing you to browse it and do path analysis on any folder you select.
Displaying Windows Server Clusters
If a Windows Cluster File Server Resource is not displayed in the Storage Resource List, verify that the field of the cluster file server resource includes the words cluster and virtual. If these two words are not included in the description, Novell Storage Manager cannot see it as a storage resource.
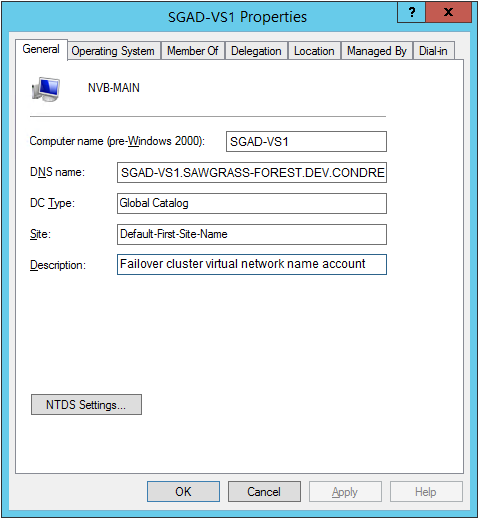
Once you modify the description in the field, you can click to add the resource to the Storage Resource List.
10.1.13 Data Management
Data Management (data copying) lets you copy a specific set of data and its associated rights, ownership, and other metadata from one location to another without requiring a policy. If you choose, you can preserve all of the permissions and quota settings in the process.
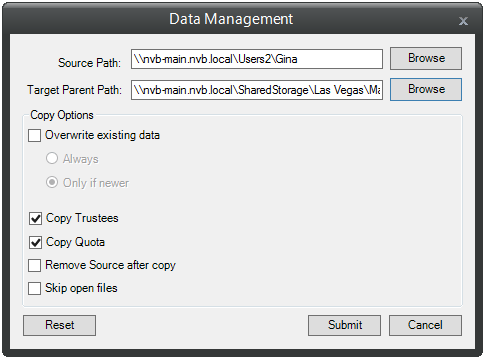
Additional options let you overwrite existing duplicate files or folders, remove files from the source location once they are copied to the target location, and skip open files. If you want Novell Storage Manager to attempt to copy open files after they are closed, leave this option deselected.