10.3 Configure Tab
The tab includes all of the operations to configure Novell Storage Manager.
10.3.1 Engine Config
This page lets you view and set NSM Engine configuration settings.
The tab includes proxy and management access settings. Each of the fields is described below.
Figure 10-14 Engine Config General Tab Settings

Proxy Rights Group: Displays the Proxy Rights Group that you established when you installed Novell Storage Manager.
Admin Users Group: Displays the Admin Users Group that you established during the installation of Novell Storage Manager.
HTTPS Port: Displays the HTTPS port that you chose when you installed Novell Storage Manager.
HTTP Port: If you chose to use an HTTP port during the installation of Novell Storage Manager, the HTTP port is displayed here.
User Session Timeout: Indicates the number of minutes NSMAdmin can be left dormant before you need to reauthenticate.
Proxy Home Path: This path was established during the installation of NSMAdmin. If you need to, you can change the path by using the button.
Reapply Rights: Clicking this button reestablishes the ability of the proxy rights group to manage the Proxy home share. It also reestablishes the group Everyone with the Read right so that its members can read contents. The Read right is needed in case the Proxy home share is being used as the managed path attribute while storage is being moved.
Copy Template: Clicking this button recopies files located in C:ProgramData\Novell\Storage Manager\Engine\data\ProxyHome to the location specified by the share. If the proxy home is not located on the server hosting the Engine, this makes it so you can recopy the template files without having to do it manually.
The tab includes settings specific to log files. Log files are accessible only from the server hosting the Engine at C:\ProgramData\Novell\Storage Manager\Engine\log.
Each of the fields is described below.
Figure 10-15 Engine Config Log Management Tab Settings
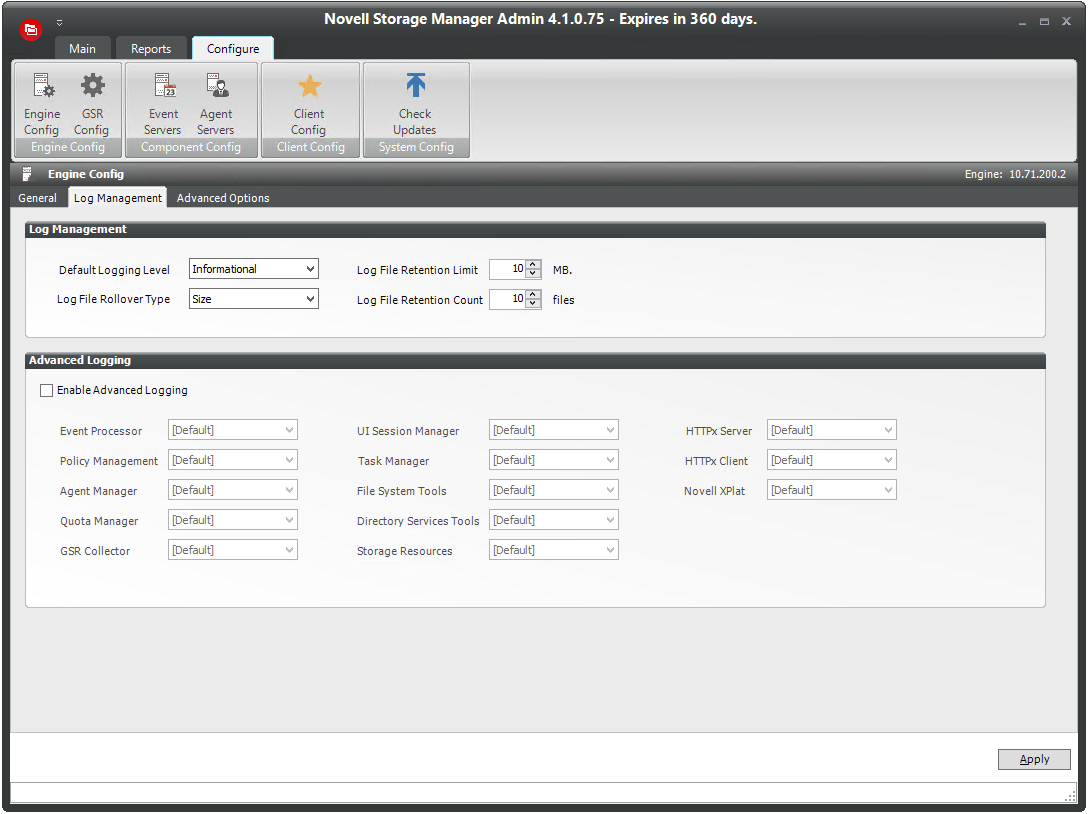
Global Logging Level: By default, the log records warning level details. You can change the log to record the level you want. Be aware that some settings, such as debug or verbose, record much more information and can potentially make the log file much larger.
Log File Retention Count: By default, Novell Storage Manager retains the 10 most recent log files, according to the Log File Rollover Type setting. For example, if the setting is set to , the retained log files are from the last 10 days.
Log File Rollover Type: You can choose whether to have log files roll over daily, hourly, when the log has reached a set size limit, or have no rollover setting. If you select , the same log file is opened each time you start the NSM Engine, and log entries are appended to it.
NOTE:If you delete the log file while the NSM Engine is not running, a new log file is created the next time you start the NSM Engine.
Log File Retention Limit: This field appears only when you select from the field. You need to enter the size limit in MB for the log file before it creates a new file.
Enable Advanced Logging: Selecting this check box activates the Advanced Logging region of the page. This region allows you to specify the output of the log file according to the setting you indicate in each of 12 categories.
The tab lets you view or reconfigure the thread count settings allocated for the actions that Novell Storage Manager performs.
Figure 10-16 Engine Config Advanced Options Tab
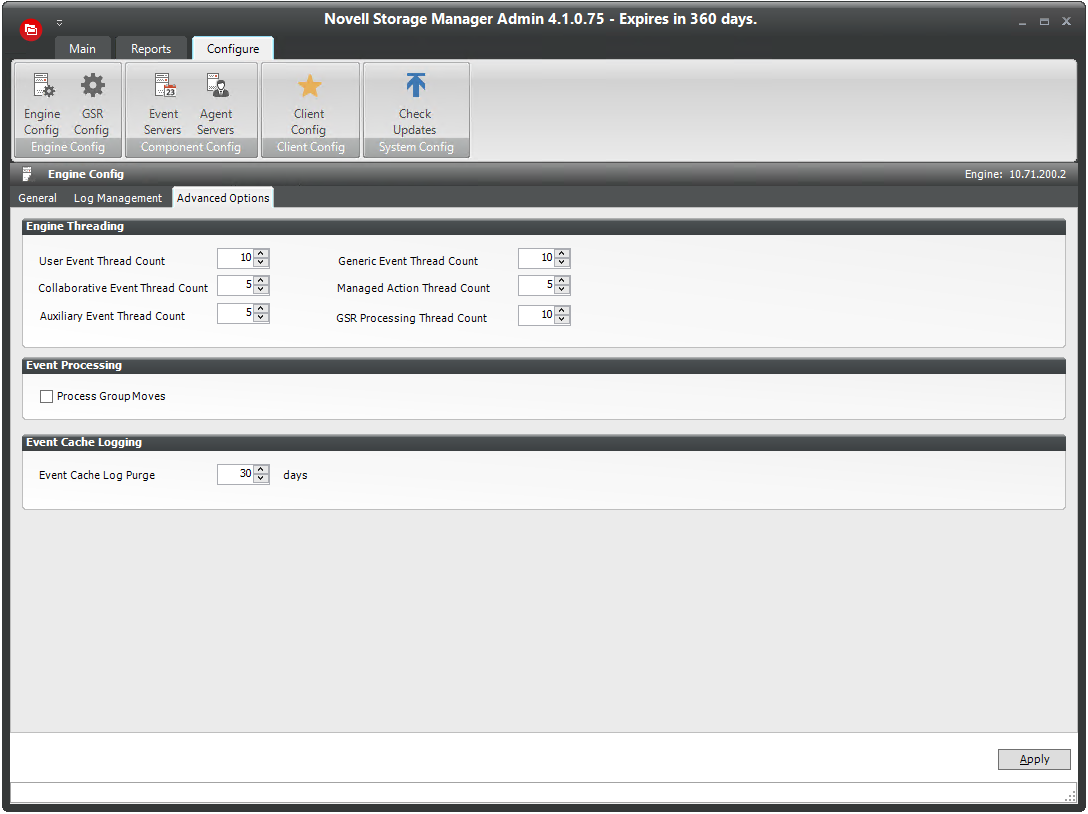
These settings are optimized for a normal Novell Storage Manager workload.
Event Cache Log Purge: By default, Novell Storage Manager keeps the most recent 30 days of event entries in cache. You can adjust the setting in the field.
The event cache can be helpful in providing you a recent history of all of the events that were sent from the Event Monitor.
Display Administrative/Hidden Shares: Selecting this check box displays in NSMAdmin, all administrative and hidden shares.
The tab lets you replace an unexpired license file.
10.3.2 GSR Configure
The GSR Collector can be scoped by File System and Directory Service parameters.
The default configuration of the GSR Collector forces it to behave in a manner consistent with legacy versions of the product. However, it is not optimal for most deployments.
NOTE:For expanded information on GSR Collector configuration, see Section C.0, GSR Collector.
Figure 10-17 GSR Configure File System Tab Settings
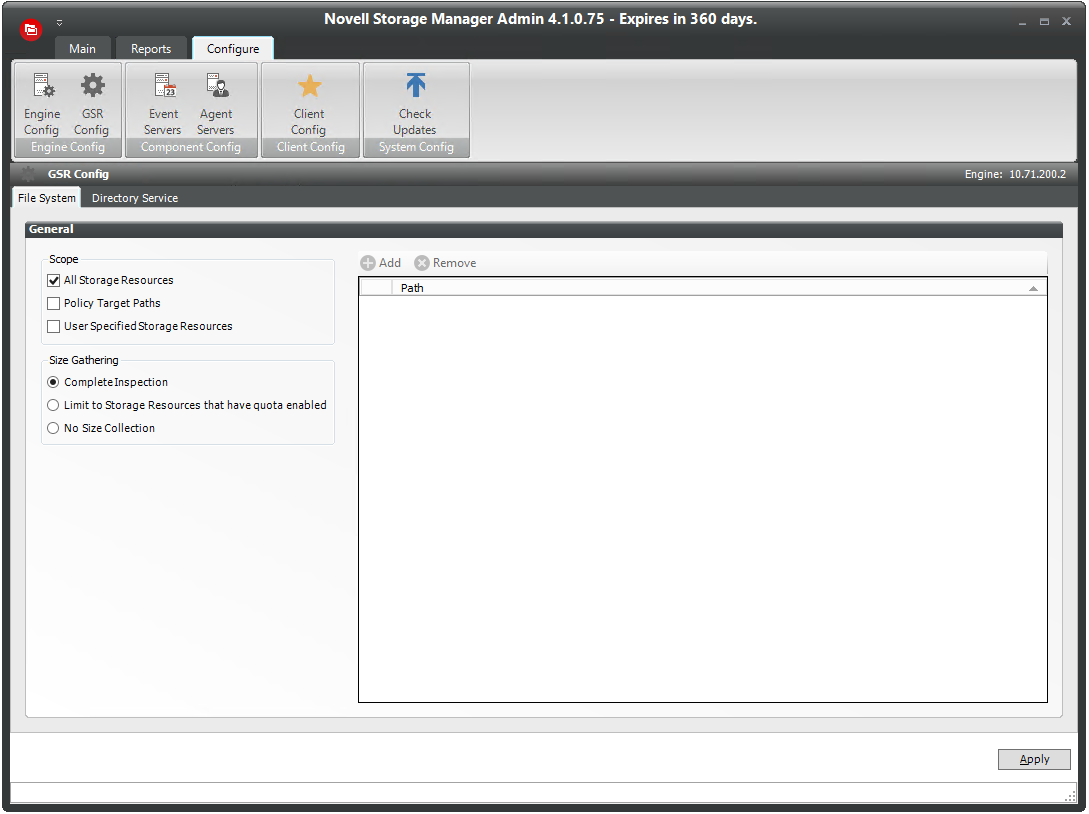
File System - Scope
The file system scope provides the means for you to determine which shares should be scanned by the GSR Collector. The file system scopes are:
All Storage Resources: This is the default option and mutually exclusive of and . This will cause the GSR Collector to scan the root of all shares that appear in Storage Resources for size and anomaly data. This can take a significant amount of time to complete depending on the share type, contents, and the chosen option. In large environments, this is not the recommended configuration.
Policy Target Paths: This option can be checked separately or combined with for greater flexibility. This will cause the GSR Collector to scan only paths defined as policy target paths for size and anomaly data. After you have your storage managed by policy, use this option to limit the scope and provide meaningful size and anomaly analysis data for the storage resources that matter most.
User Specified Resources: This option can be checked separately or combined with for greater flexibility. This will cause the GSR Collector to scan only paths defined by you for size and anomaly data. When running the GSR Collector for the first time, this option serves as the best choice because it allows you to target specific paths and storage resources.
File System - Size Gathering
The size gathering options allow you to control the method by which aggregate size data for global statistics and policy-based path redistribution is collected.
Complete Inspection: This is the default option. To collect size data, folders are checked for quota. If quota is determined to be supported by the hosting server and the folder has a quota, FSRM is queried to obtain the relevant data. In the case where the folder does not have a quota managed by FSRM or it simply has no quota at all, the folder is traversed to collect size data of all files.
Limit to Storage Resources that have quota enabled: If quota is determined to be supported by the hosting server and the folder has a quota, FSRM is queried to obtain the relevant data. The folder must have a quota set to eliminate brute force enumeration to collect size data.
No Size Collection: No size data collection is attempted.
Figure 10-18 GSR Configure Directory Service Tab Settings
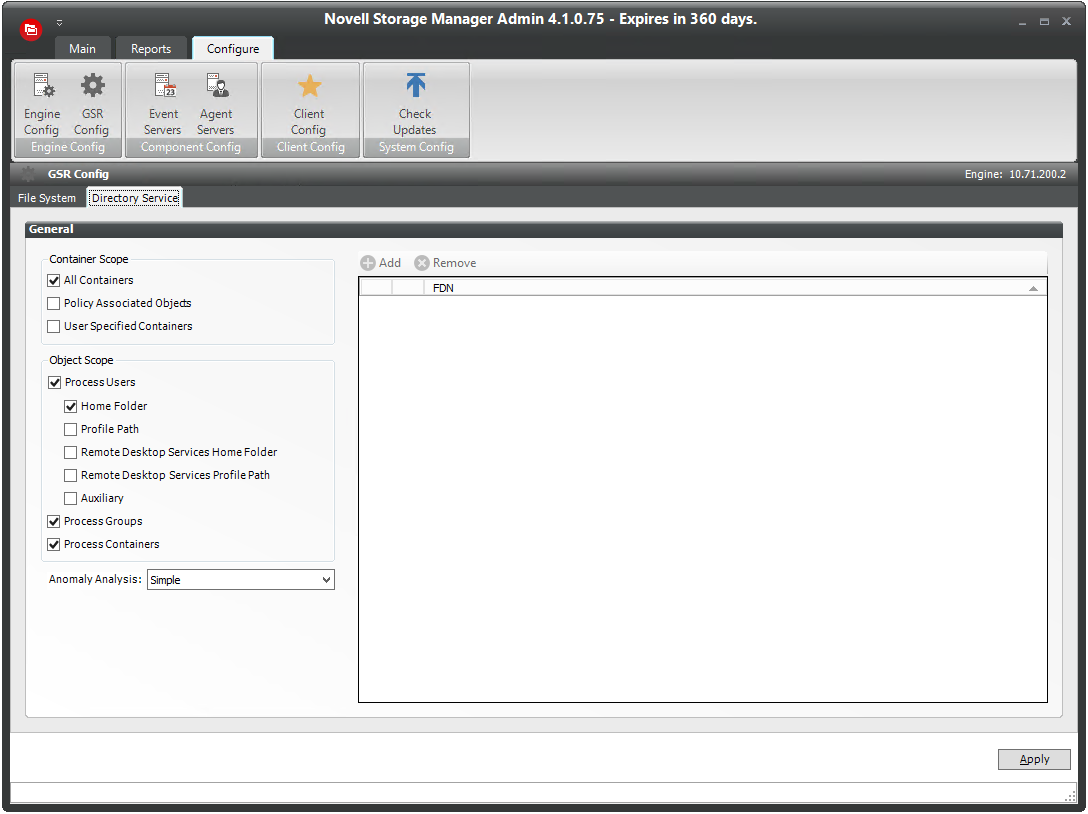
Directory Service - Container Scope
The directory service container scope provides the means for you to determine which containers should be enumerated by the GSR Collector for Anomaly Analysis, Global Statistics, and History. The container scopes are:
All Containers: This is the default option and mutually exclusive of and . This will cause the GSR Collector to enumerate all object types specified by the for size and anomaly data.
Policy Associated Objects: This option can be checked separately or combined with for greater flexibility. This will cause the GSR Collector to enumerate and evaluate only objects that are associated to policies. After you have your objects managed by policy, use this option to limit the scope and provide meaningful anomaly analysis data for the objects that matter most.
User Specified Containers: This option can be checked separately or combined with for greater flexibility. This will cause the GSR Collector to enumerate and evaluate only objects defined by you for size and anomaly data. When running the GSR Collector for the first time, this option serves as the best choice because it allows you to target specific objects for analysis.
Directory Service - Object Scope
The directory service object scope provides the means for you to determine which object types and path types should be enumerated by the GSR Collector for Anomaly Analysis, Global Statistics, and History. The object scopes and path types are:
-
Users
-
Home Folder
-
Profile Path
-
Remote Desktop Services Home Folder
-
Remote Desktop Services Profile Path
-
Auxiliary (ccx-FSFAuxiliaryStorage)
-
-
Groups – Collaborative managed path (ccx-FSFManagedPath)
-
Containers – Collaborative managed path (ccx-FSFManagedPath)
Directory Service - Anomaly Analysis
This provides the means for you to determine the level of Anomaly Analysis. The options are:
-
None – Anomaly analysis will not be performed.
-
Simple – This is the default option and sufficient for most purposes. The following anomalies are reported:
-
Attribute Value Missing – The respective path attribute (e.g. home folder) does not have a value.
-
Path Missing On Disk – The respective path attribute value cannot be found on disk.
-
Path Validation Issue – Attempting to retrieve or verify the existence of the respective path attribute value failed.
-
Name Mismatch – The respective leaf path value does not match the object’s name value.
-
Path Mismatch – The respective path attribute value does not match the last known managed path database entry.
-
DS Path Duplicate Value – Two or more objects have been detected that contain the same path for the respective path attribute.
-
DS Path Crosstalk Parent – The object’s respective path attribute has been detected as being the parent of another object’s path attribute.
-
DS Path Crosstalk Child – The object’s respective path attribute has been detected as being the subordinate of another object’s path attribute.
-
Orphan Candidate –The path is directly subordinate to a path at which other DS-associated paths have been found, but has not been detected as being associated with any DS object via a path attribute.
-
-
Full – Reports additional policy related anomalies.
-
Policy Not Found – The respective auxiliary policy attribute entry references an auxiliary policy that was not found in the database.
-
Policy Object Not Managed – Effective policy calculations indicate that a policy is effective for the respective object and path type, but the object is not known to be managed.
-
Policy Mismatch – The respective path is indicated as being managed in the database, but the policy under which it is currently managed does not match what effective policy calculation indicates it should be.
-
Policy Validation – An error occurred while attempting to calculate effective policy for the object and respective path type.
-
10.3.4 Agent Servers
NSM Agents perform copying, moving, grooming, and vaulting through directives from the Engine. Novell Storage Manager determines which Agent to use based on the target destination of the data or via proxy configuration.
For optimum performance, NSM Agents should be installed on all servers with storage managed by Novell Storage Manager. NSM Agents run as a native service on Windows.
The Agent Server page lets you:
-
Authorize an NSM Agent
-
Verify that NSM Agents are authorized
-
View NSM Agents software versions installed
-
View NSM Agent statistics
-
Remove an NSM Agent
-
Configure a Proxy Agent
The Agent Server page also indicates:
-
Whether the NSM Agent is capable of being utilized in a Cross-Empire Data Migration
-
Whether the NSM Agent is functioning as a Proxy Agent and for which server and share
Procedures for authorizing an NSM Agent are located in Authorizing the Agents
of the Novell Storage Manager 4.1 for Active Directory Installation Guide.
Deleting an Agent
Within NSMAdmin, you can delete a deauthorized NSM Agent. Only deauthorized NSM Agents can be deleted. If you want to remove an NSM Agent, you must deauthorize it first.
NOTE:If an NSM Agent is deauthorized and it hasn't successfully sent a heartbeat within 7 days, it will automatically be removed.
Proxy Agents
For storage resources that do not or cannot host an NSM Agent, for example a NAS (Network Attached Storage) device, Novell Storage Manager can utilize an NSM Agent running on another server to perform the copying, moving, grooming, and vaulting on the server or NAS device. In this type of scenario, the NSM Agent is serving as a “Proxy Agent.”
A Proxy Agent can also be set up to reduce the workload on the NSM Engine. For example, a Proxy Agent can be configured for a server on one side of a WAN environment to move data from one server to another on the same side of the WAN link. This keeps the data from crossing the WAN link only to cross back again.
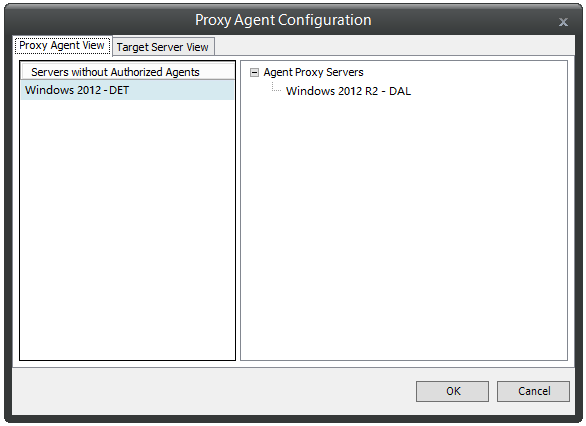
Configuring an NSM Agent to be a Proxy Agent
-
Launch NSMAdmin.
-
Click the tab.
-
Right-click the NSM Agent you want to authorize to be a Proxy Agent and select .
The left side of the Proxy Agent Configuration dialog box shows the list of servers without NSM Agents installed. The right side shows the servers with NSM Agents installed. In the example below, the Agent on Windows 2012 R2 - DAL could be set up to be the Proxy Agent for the Windows 2012-DET server.
-
Click the tab.
-
From the drop-down list, select the NSM Agent server you want to serve as the Proxy Agent for the server on the left.
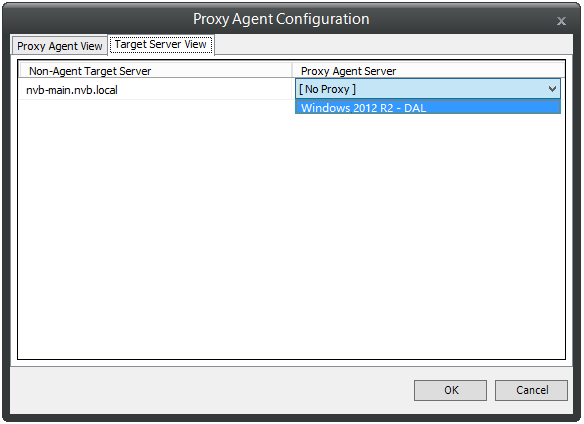
-
Click to save and close the proxy setting association.
10.3.5 Client Config
This page lets you configure various settings within NSMAdmin.
An overview of settings specific to the tab follows the graphic.
Figure 10-19 Client Config General Tab
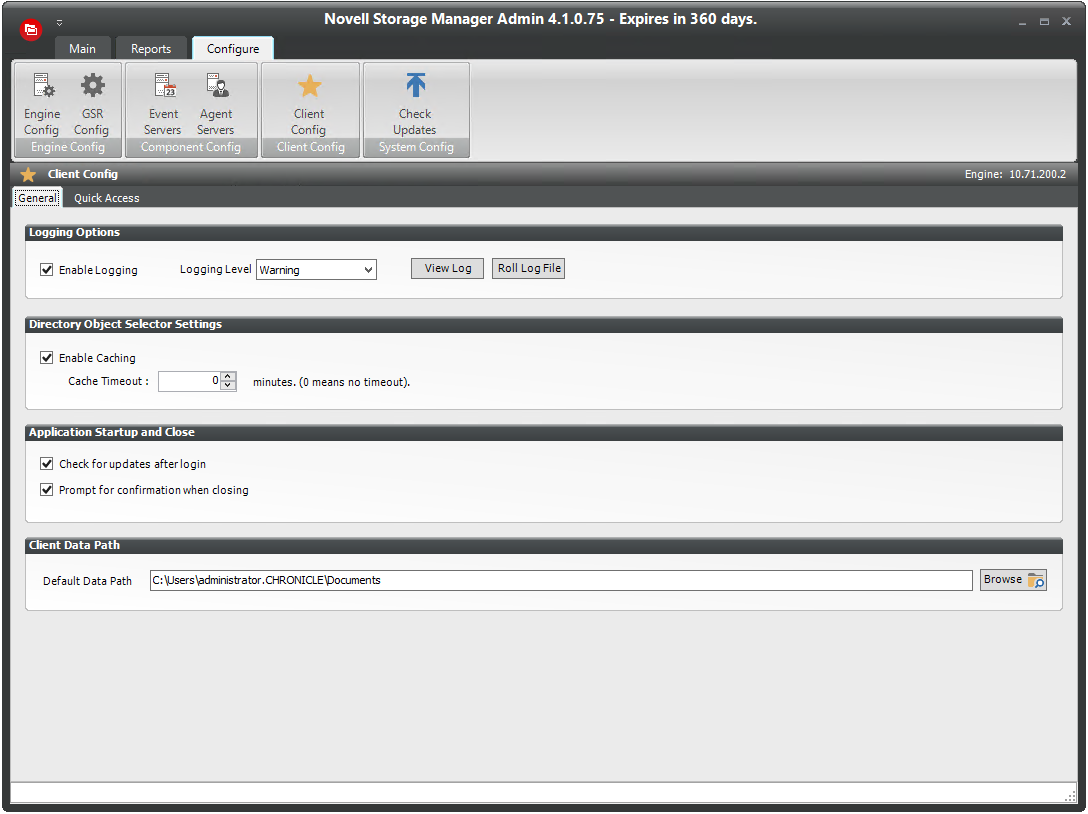
Enable Logging: Selecting this check box enables logging the operations of NSMAdmin and lets you specify the logging level and whether to roll the log or close the old log and start a new log.
Logging Level: This drop-down menu lets you select the classification of entry you want logged.
View Log: Clicking this button opens the log file.
Roll Log File: Clicking this button discontinues entries in the current log file and begins a new log file.
Enable Caching: When you are working in the Storage Management page, selecting this check box enables NSMAdmin to maintain the area of the directory tree that is visible in the right pane, if you move from the page to another. For example, if you locate a Group object in a container and then need to move to another page, when you return to the Storage Management page, you do not need to navigate the directory tree to locate the Group object again.
Check for Updates after Login: Selecting this check box allows NSMAdmin to notify you of the availability of newer Novell Storage Manager components.
Check for Confirmation When Closing: Selecting this check box prompts you with a confirmation of your choice when you close NSMAdmin.
An overview of settings specific to the tab follows:
This page lets you access the items you use most in NSMAdmin from the Quick Access Toolbar. Items can be added or removed from the Quick Access Toolbar by right-clicking the item from its location in the interface, or through the Quick Access page shown below.
Figure 10-20 Client Config Quick Access Tab
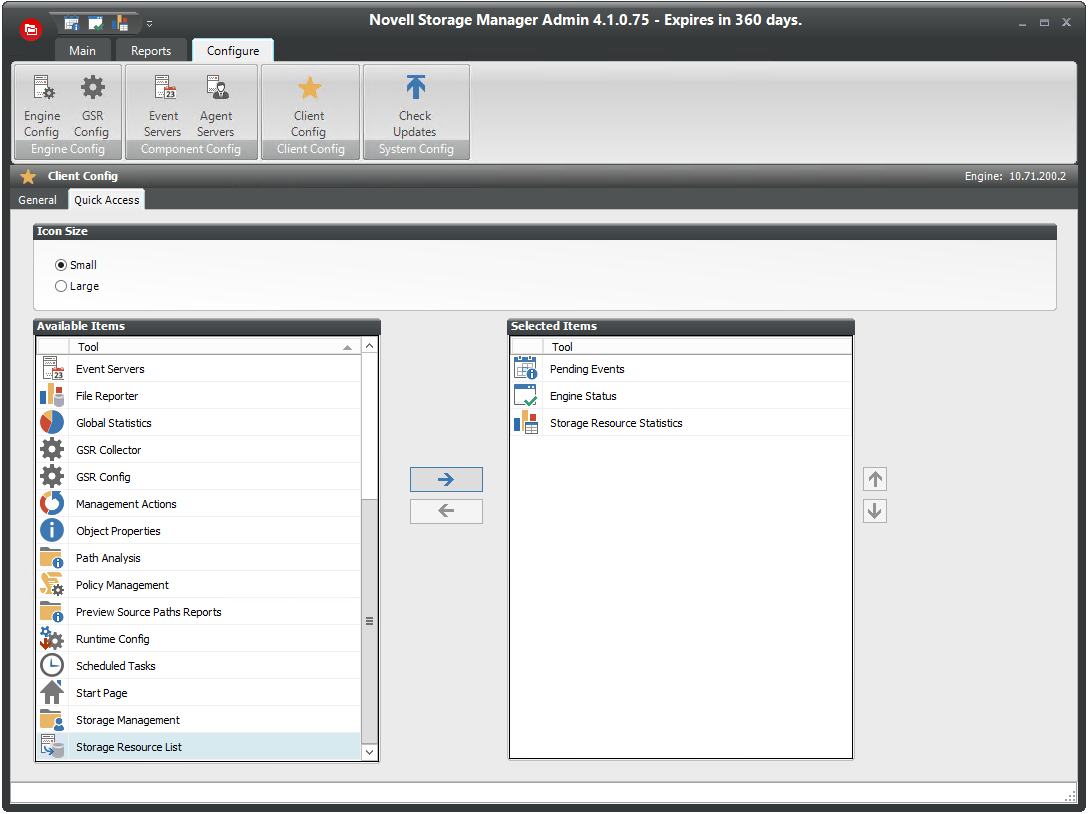
By default, the Quick Access Toolbar is located in the title bar of NSMAdmin, but the location can be changed by using the menu at the end of the Quick Access Toolbar.