9.3 Configure Tab
The tab includes all of the operations to configure Novell Storage Manager.
9.3.1 Engine Config
This page lets you view and set NSM Engine configuration settings.
The tab includes proxy and management access settings. Each of the fields is described below.
Figure 9-15 Engine Config General Tab Settings

Proxy Account FDN: Displays the fully distinguished name that you established when you installed Novell Storage Manager.
Admin Users Group: Displays the Admin Users Group that you established during the installation of Novell Storage Manager.
User Session Timeout: Indicates the number of minutes NSMAdmin can be left dormant before you need to reauthenticate.
HTTPS Port: Displays the HTTPS port that you chose for Novell Storage Manager when you installed Novell Storage Manager.
HTTP Port: If you chose to use an HTTP port during the installation of Novell Storage Manager, the HTTP port is displayed here.
Proxy Home Path: This path was established during the installation of NSMAdmin. If you need to, you can change the path by using the button.
The tab includes settings specific to log files, which are accessible only from the server hosting the NSM Engine. Each of the fields is described below.
Figure 9-16 Engine Config Log Tab Settings
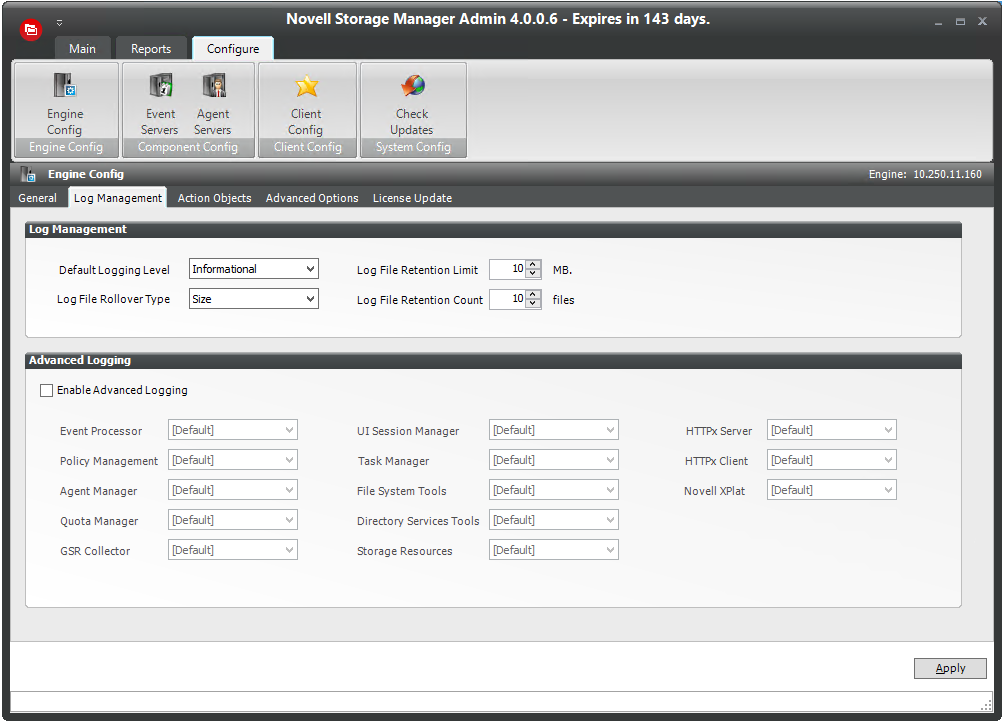
Default Logging Level: By default, the log records informational level details. You can change the log to record the level you want. Be aware that some settings, such as debug or verbose, record much more information and can potentially make the log file much larger.
Log File Retention Count: By default, Novell Storage Manager retains the 10 most recent log files, according to the Log File Rollover Type setting. For example, if the setting is set to , the retained log files are from the last 10 days.
Log File Rollover Type: You can choose whether to have log files roll over daily, hourly, when the log has reached a set size limit, or have no rollover setting. If you select , the same log file is opened each time you start the NSM Engine, and log entries are appended to it.
NOTE:If you delete the log file while the NSM Engine is not running, a new log file is created the next time you start the NSM Engine.
Log File Retention Limit: This field appears only when you select from the field. You need to enter the size limit in MB for the log file before it creates a new file.
Enable Advanced Logging: Selecting this check box activates the Advanced Logging region of the page. This region allows you to specify the output of the log file according to the setting you indicate in each of 12 categories.
The tab lets you lets you enable Novell Storage Manager Action Objects by specifying the container where these Action Objects are located.
The tab lets you view or reconfigure the thread count settings allocated for the actions that Novell Storage Manager performs.
Figure 9-17 Engine Config Advanced Options Tab Settings
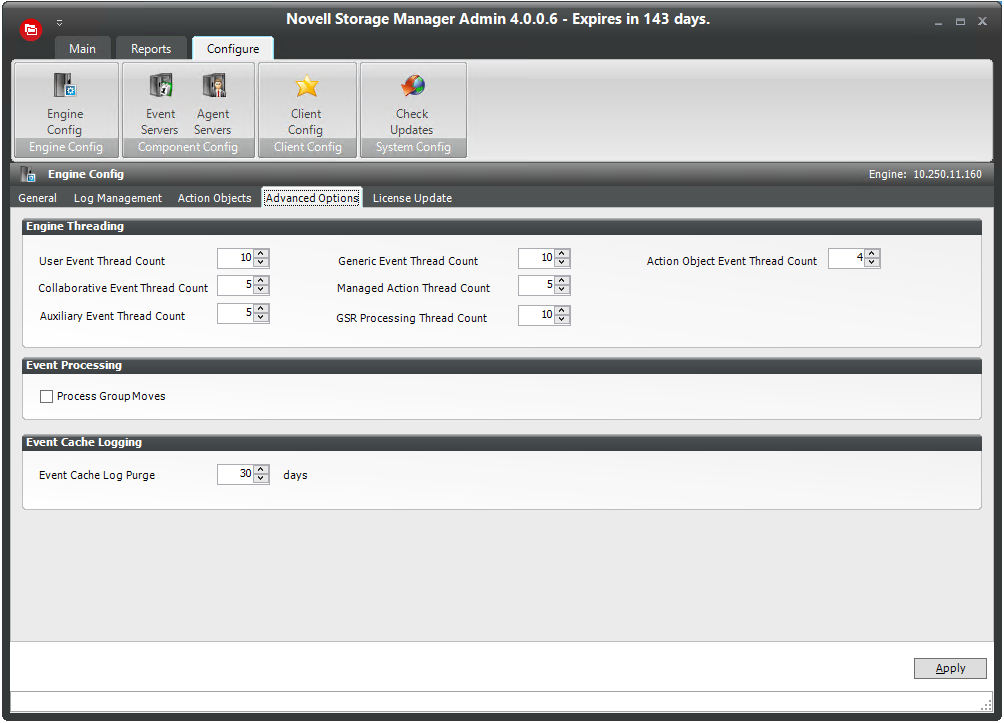
These settings are optimized for a normal Novell Storage Manager workload.
Event Cache Log Purge: By default, Novell Storage Manager keeps the most recent 30 days of event entries in cache. You can adjust the setting in the field.
The event cache can be helpful in providing you a recent history of all of the events that were sent from the Event Monitor.
The tab lets you replace an unexpired license file.
Replacing an Unexpired License File
-
Click to locate and select the new license file.
-
Click .
Replacing an Expired License File
You cannot replace an expired license using NSMAdmin. To replace an expired license file:
-
At the server that is hosting the NSM Engine, go to C:\ProgramData\Novell Storage Manager\Engine\config.
-
Replace the old nsm.lic file with the new one.
9.3.2 Event Servers
The Event Monitor monitors changes to eDirectory based on create, move, rename, and delete events. The host for the Event Monitor is referred to as the Event Server.
The Event Server page lets you:
-
Authorize an Event Monitor
-
Verify that an Event Monitor is authorized
-
View the Event Monitor software version installed
-
View Event Monitor statistics
-
Remove an Event Monitor
The number indicates the total number of events sent from the Event Monitor to the NSM Engine.
Procedures for authorizing the Event Monitor are located in Authorizing the Event Monitor
in the Novell Storage Manager 4.0 for eDirectory Installation Guide.
Deleting an Event Monitor
Within NSMAdmin, you can delete a deauthorized Event Monitor. Only deauthorized Event Monitors can be deleted. If you want to remove an Event Monitor, you must deauthorize it first.
9.3.3 Agent Servers
NSM Agents perform copying, moving, grooming, and vaulting through directives from the NSM Engine. Novell Storage Manager determines which Agent to use based on the target destination of the data or via proxy configuration.
For optimum performance, NSM Agents should be installed on all servers with storage managed by Novell Storage Manager.
NOTE:Novell Storage Manager does not provide NetWare based NSM Agents, NetWare servers need to be managed by Proxy Agents (seeProxy Agents)
The Agent Server page lets you:
-
Authorize an NSM Agent
-
Verify that NSM Agents are authorized
-
View NSM Agents software versions installed
-
View NSM Agent statistics
-
Remove an NSM Agent
-
Configure a Proxy Agent
Procedures for authorizing an NSM Agent are located in Authorizing the NSM Agents
of the Novell Storage Manager 4.0 for eDirectory Installation Guide.
Deleting an Agent
Within NSMAdmin, you can delete a deauthorized NSM Agent. Only deauthorized NSM Agents can be deleted. If you want to remove an NSM Agent, you must deauthorize it first.
NOTE:If an NSM Agent is deauthorized and it hasn't successfully sent a heartbeat within 7 days, it will automatically be removed.
Proxy Agents
For storage resources that do not or cannot host an NSM Agent, for example a NetWare server, Novell Storage Manager can utilize an NSM Agent running on another server to perform the copying, moving, grooming, and vaulting on the server. In this type of scenario, the NSM Agent is serving as a “Proxy Agent.”
A Proxy Agent can also be set up to reduce the workload on the NSM Engine. For example, a Proxy Agent can be configured for a server on one side of a WAN environment to move data from one server to another on the same side of the WAN link. This keeps the data from crossing the WAN link only to cross back again.
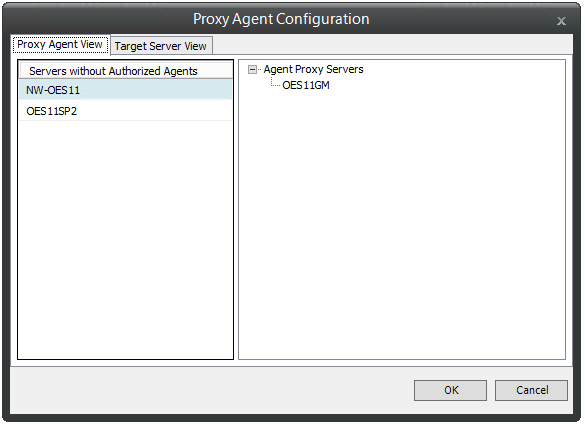
Configuring an NSM Agent to be a Proxy Agent
-
Launch NSMAdmin.
-
Click the tab.
-
Right-click the NSM Agent you want to authorize to be a Proxy Agent and select .
The left side of the Proxy Agent Configuration dialog box shows the list of servers without NSM Agents installed. The right side shows the servers with NSM Agents installed. In the example below, the NSM Agent on OES11GM could be set up to be the Proxy Agent for the NW-OES11 and OES11SP2 servers.
-
Click the tab.
-
From the drop-down list, select the NSM Agent server you want to serve as the Proxy Agent for the server on the left.
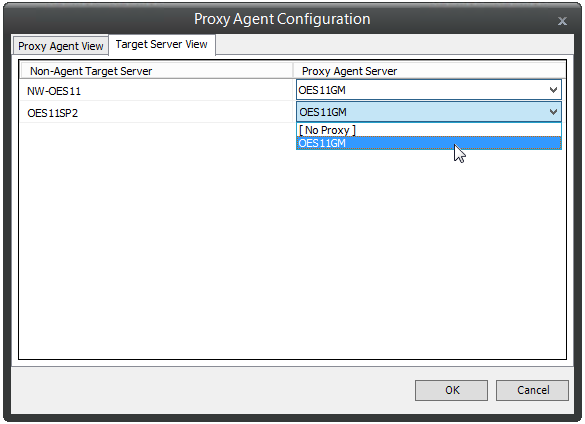
-
Click to save and close the proxy setting association.
9.3.4 Client Config
This page lets you configure various settings within NSMAdmin.
An overview of settings specific to the tab follows the graphic.
Figure 9-18 Client Config General Tab
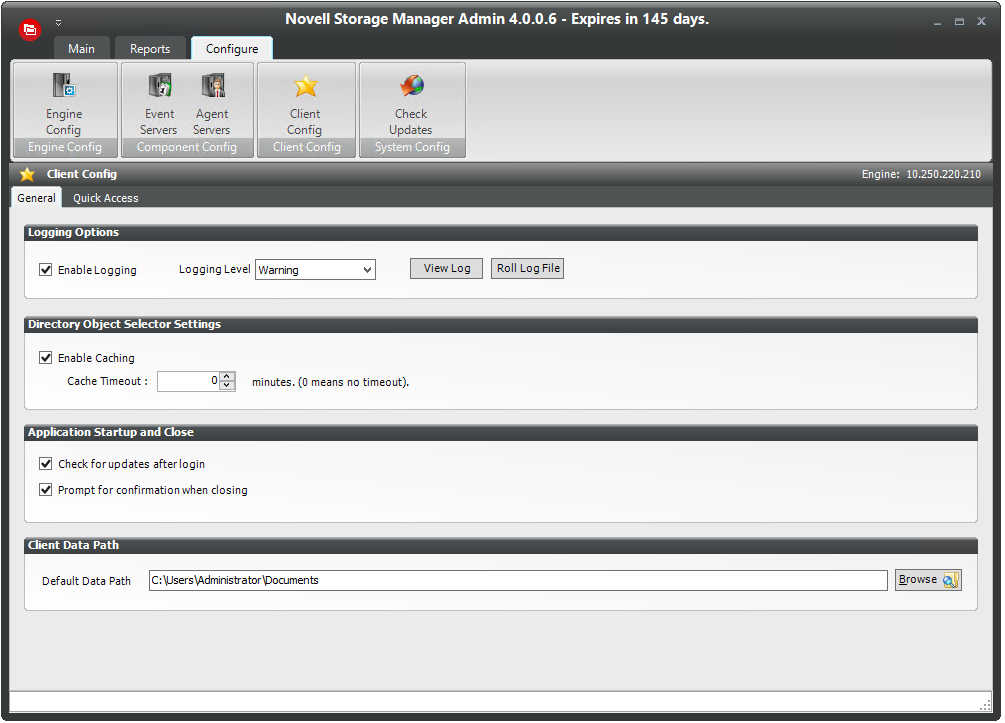
Enable Logging: Selecting this check box enables logging the operations of NSMAdmin and lets you specify the logging level and whether to roll the log or close the old log and start a new log.
Logging Level: This drop-down menu lets you select the classification of entry you want logged.
View Log: Clicking this button opens the log file.
Roll Log File: Clicking this button discontinues entries in the current log file and begins a new log file.
Enable Caching: When you are working in the Storage Management page, selecting this check box enables NSMAdmin to maintain the area of the directory tree that is visible in the right pane, if you move from the page to another. For example, if you locate a Group object in a container and then need to move to another page, when you return to the Storage Management page, you do not need to navigate the directory tree to locate the Group object again.
Check for Updates after Login: Selecting this check box allows NSMAdmin to notify you of the availability of newer Novell Storage Manager components.
Check for Confirmation When Closing: Selecting this check box prompts you with a confirmation of your choice when you close NSMAdmin.
An overview of settings specific to the tab follows:
This page lets you access the items you use most in NSMAdmin from the Quick Access Toolbar. Items can be added or removed from the Quick Access Toolbar by right-clicking the item from its location in the interface, or through the Quick Access page shown below.
Figure 9-19 Client Config Quick Access Tab
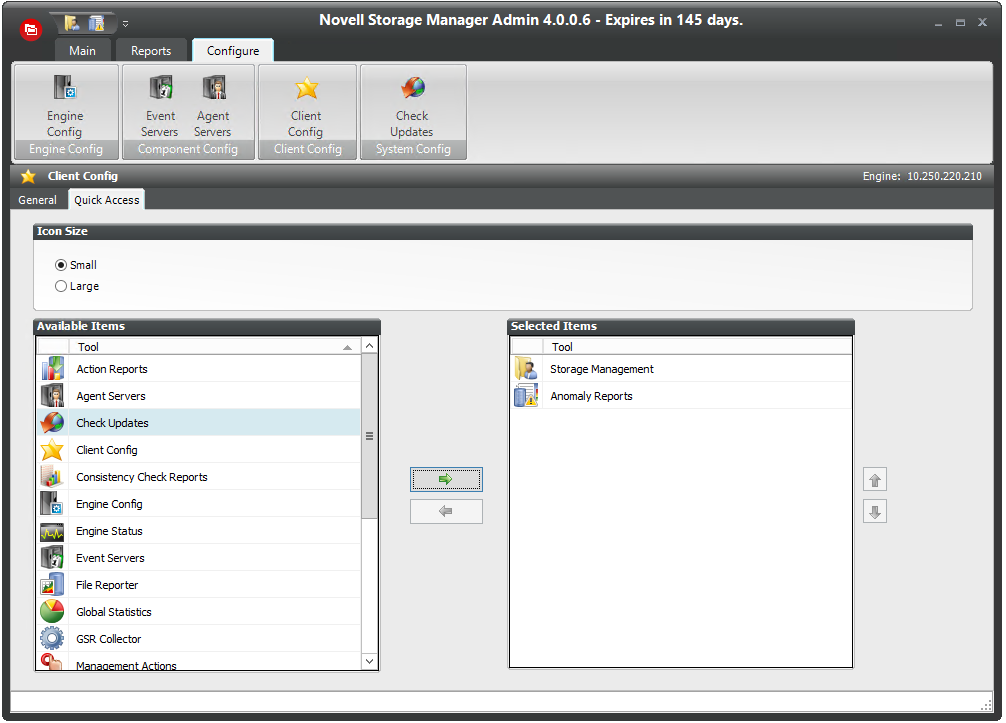
By default, the Quick Access Toolbar is located in the title bar of NSMAdmin, but the location can be changed by using the menu at the end of the Quick Access Toolbar.
A discussion of the settings in the tab follows.
Settings on this page should be changed only under the supervision of Novell Support.
NOTE:Current values on this page are only active during the current session of NSMAdmin and are reset when NSMAdmin is closed or times out.
Bucket Load Parameters
These parameters are for adjusting the settings for the NSM Engine and NSMAdmin during enumeration operations.
9.3.5 Check Updates
This page compares the version numbers of Novell Storage Manager components that you have installed with the latest versions available. It also provides links for downloading the latest versions of each of the components.