11.3 Perform an AD to AD Cross-Empire Data Migration
-
Section 11.3.1, Establish a Forest Trust Configuration in SMAdmin
-
Section 11.3.2, Assign Administrative Rights to the SMProxyRights Group
-
Section 11.3.3, Assign Permissions to the SMProxyRights Group
-
Section 11.3.4, Verify that SMAdmin Can See Shares on the Source Server
-
Section 11.3.8, Generating a Preview Report Before Migrating
-
Section 11.3.9, Determine If You Are Going to Migrate the Data in Two Phases or One
-
Section 11.3.15, Manage the Migrated User Folders through a Storage Manager Home Folder Policy
11.3.2 Assign Administrative Rights to the SMProxyRights Group
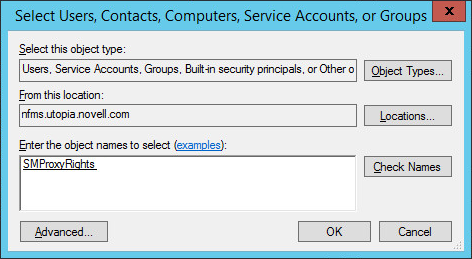
Follow these procedures to add the SMProxyRights group of the target forest as a member of the local administrators group on the server or appliance in the source forest.
-
On the source server, launch Active Directory Users and Computers.
-
From the Builtin directory of the forest, double-click Administrators.
-
Click the tab.
-
Click .
This opens the Select Users, Contacts, Computers, Service Accounts, or Groups dialog box.
-
Click .
This opens the Locations dialog box.
-
Select the target forest and click .
-
In the field of the Select Users, Contacts, Computers, Service Accounts, or Groups dialog box, type smp and click .
This opens the Multiple Names Found dialog box.
-
Select SMProxyRights and click .
-
Click to close the Select Users, Contact, Computers, Service Accounts, or Groups dialog box.
SMProxyRights is added to the list of members in the Administrators dialog box.
-
Click to close the Administrators dialog box.
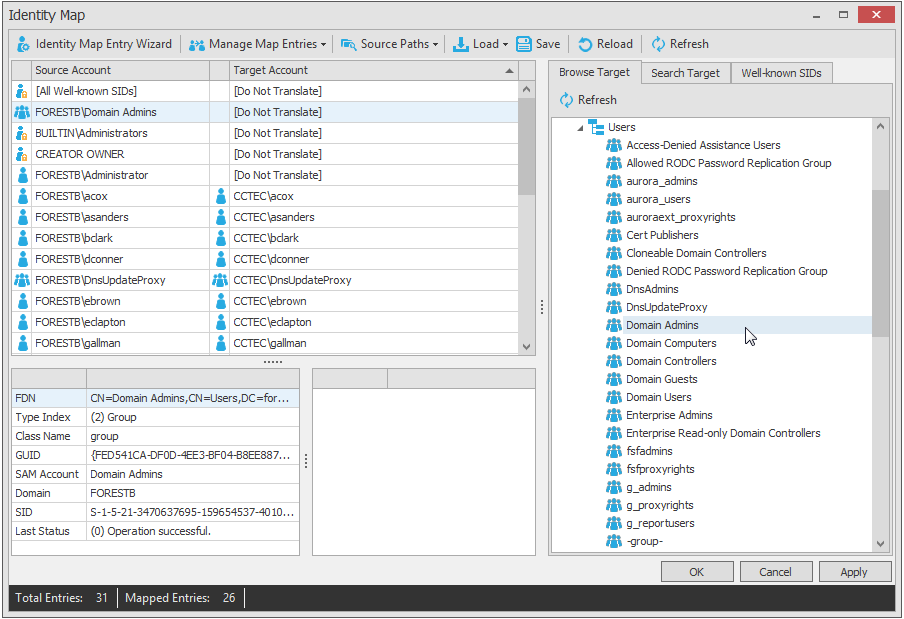
11.3.5 Create an Identity Map
Storage Manager for Active Directory uses an identity map to specify associations between the users and groups of the source forest with the users and groups of the target forest.
As specified in Section 11.2, Prerequisite Tasks, you must create the associated target server users, groups, and shares before you migrate as the AD to AD Cross-Empire Data Migration Solution Pack does not create these associated objects on the target server.
IMPORTANT:If you are creating an identity map of more than 25,000 objects, we recommend 8GB to 12GB of memory for the workstation or server running SMAdmin.
-
Launch SMAdmin and click the tab.
-
Click > .
-
Click .
-
Click .
-
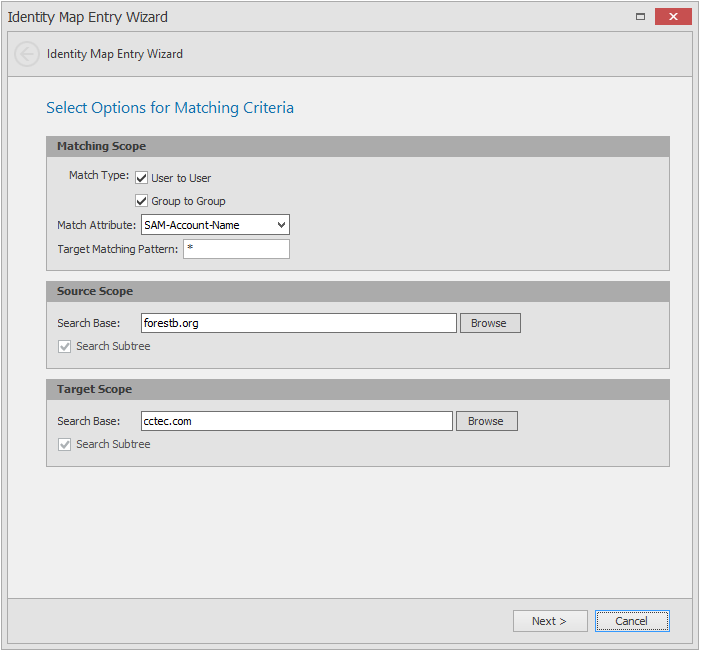
Select both the and check boxes.
-
From the drop-down menu, select on of the following options:
SAM-Account-Name: This attribute can be used when you want to populate the identity map with objects in the source and target forest that have the same corresponding attribute value. By choosing (SAM) as the Match Attribute, (depending on your Source and Target Scopes) the engine will search the source and target forests for objects whose SAM are the same value.
Common-Name: This attribute selection functions in the same manner as the SAM-Account Name, but for Common-Names(CN).
Object-SID: This option is only applicable in the case where accounts have been migrated from the source to the target using a tool such as Active Directory Migration Tool (ADMT). When ADMT is used, you can opt to copy the Object-Sid. This results in the target object containing the Object-Sid of the originating source object in the SID-History attribute.
For more information, refer to these Microsoft documents:
When this Match Attribute is chosen, the engine will enumerate objects in the source and then search for objects whose SID-History attribute contains the source object's Object-Sid. If objects have not been migrated such that the source's Object-Sid is in the target's SID-History, you must use either SAM-Account-Name or Common-Name to populate the identity map.
Well-known SIDS: This option should be used when you want to populate the identity map with well-known SIDs whose relative identifiers (RIDs) are relative to each domain (e.g. chronicle\administrator) and whose domain identifier is not "Builtin" (32).
For more information, refer to this Microsoft document: https://msdn.microsoft.com/en-us/library/windows/desktop/aa379649(v=vs.85).aspx
Builtin well-known SIDs can be added and mapped manually in the Identity Map editor by selecting an object from the Well-known SIDs tab, right-clicking and selecting .
-
Verify that the source forest and target forest in the Source Scope and Target Scope regions respectively, are correct and click .
-
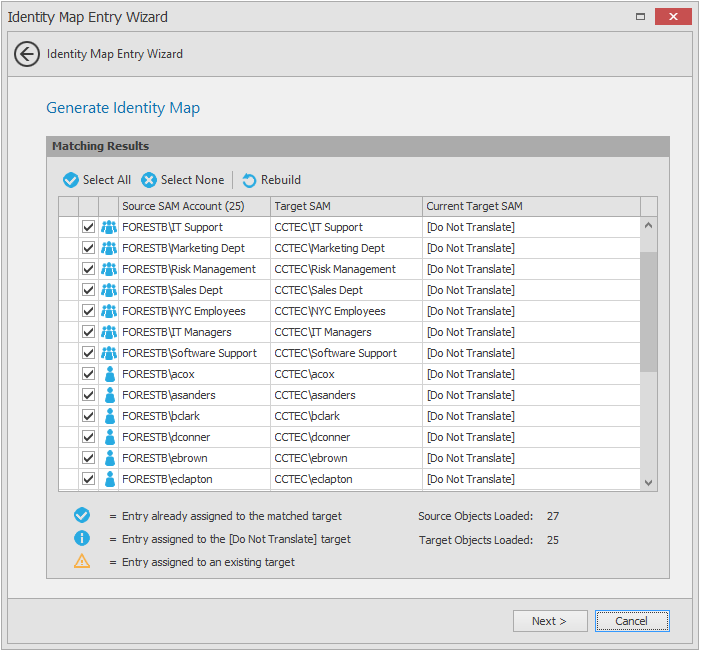
Observe the matching results of source and target groups and users.
-
Click .
-
In the Import Map Entries page, leave the check box selected and click .
The users and groups on the source and target forests are now matched.
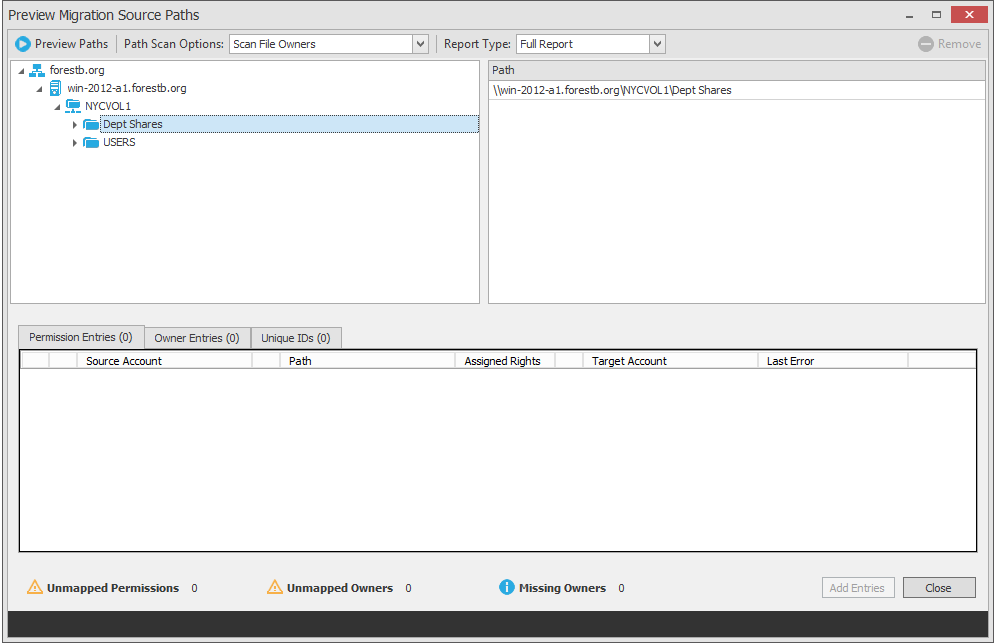
11.3.6 Preview the Source Paths for the Migration
Follow these procedures to preview the migration source paths as well as add and match any missing objects to the identity map.
-
In the Identity Map interface, click > .
-
In the Preview Migration Source Paths dialog box, in the upper left-hand pane, navigate to the desired share and double-click it to add it to the window to the right.
-
From the drop-down menu, select from the following options:
Scan Folders Only: Scans only the folder permissions in the specified paths.
Scan File Owners: Scans the folder permissions and the file owners in the specified paths.
Scan File Owners and Permissions: Scans the folder permissions, file owners, and file permissions in the specified paths.
-
Click .

For ease in identifying all unmapped (orphaned) SIDs, use the sort arrow which is located on the first column heading in the lower portion of the interface.
-
Click the tab and view the orphaned SIDs, meaning all of the folders and files without owners.
-
Click the tab and view the unmatched objects.
These are objects that you will need to add to the identity map.
11.3.7 Add Unmapped Objects to the Identity Map
Follow these procedures to add any unmapped objects listed in the Unique IDs tab to the identity map.
-
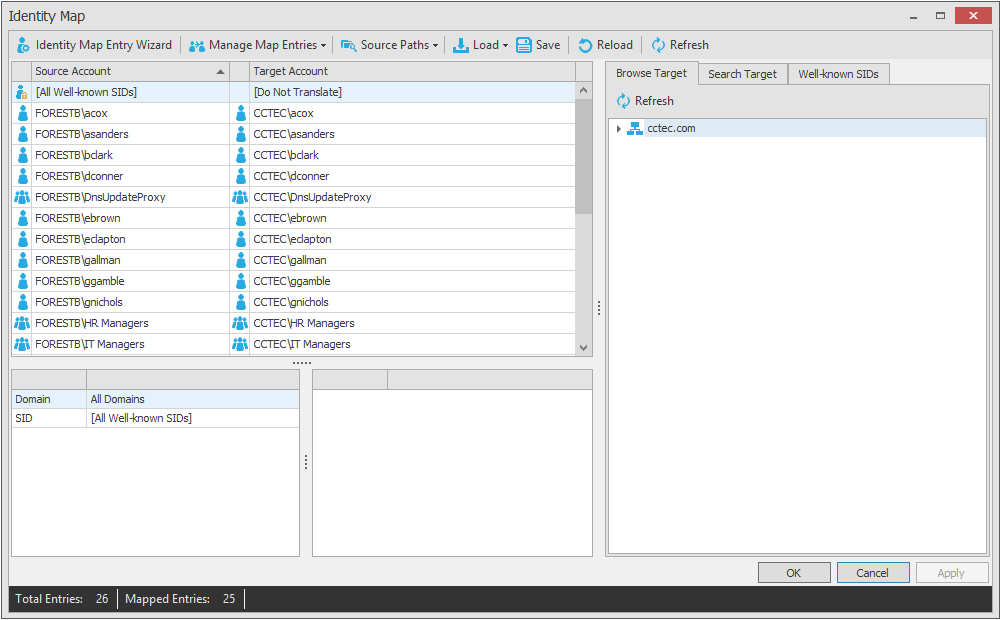
In the identity map, click the column heading to sort unmapped objects so they are all listed as a group at the top of the list.
-
From the tab on the right pane, locate an object you want to indicate as an owner for an unmapped object and drag the object up to the unmapped object’s corresponding column entry.
This changes the unmapped object’s Target Account listing from [Do Not Translate] to the new owner object.
-
When you are finished specifying owners for your unmapped objects, click .
11.3.10 Migrate Group Data
HINT:To view the status of the migration, we recommend that you install and run a Tail program and use it to tail the Agent log path located at: "%programdata%\Micro Focus\Storage Manager\Agent\log\smagent.log”
Follow these procedures to migrate group data from the source forest to the target forest.
-
In SMAdmin, click the tab.
-
Select > .
-
Select > .
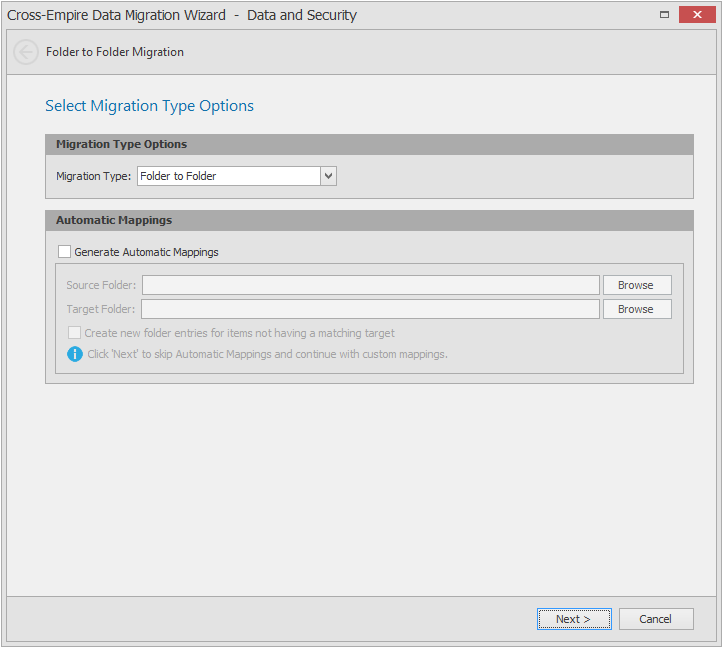
This launches the Folder to Folder Migration wizard.
-
Do one of the following:
-
If you plan to do a two-phase migration by skipping open files, leave the check box deselected and click . Browse to specify the source and target folders and click .
This method will create a single source path and single target path, which alleviates potential problems that can surface when skipping open files during a migration.
-
If you plan to do a single-phase migration, you can select the check box to create any needed subfolders on the target that do not already exist. Browse to specify the source and target folders and click .
-
-
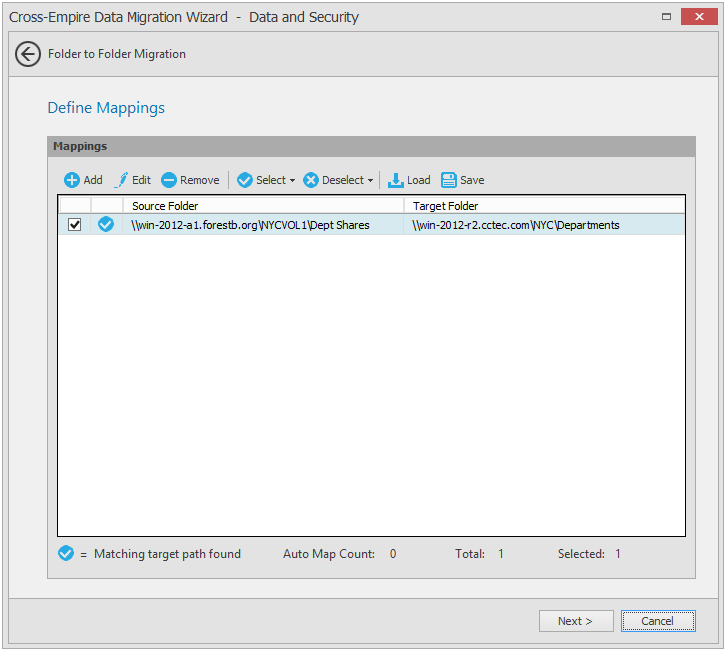
In the Define Mappings page of the wizard, observe the migration events that are now queued up.
-
Click .
-
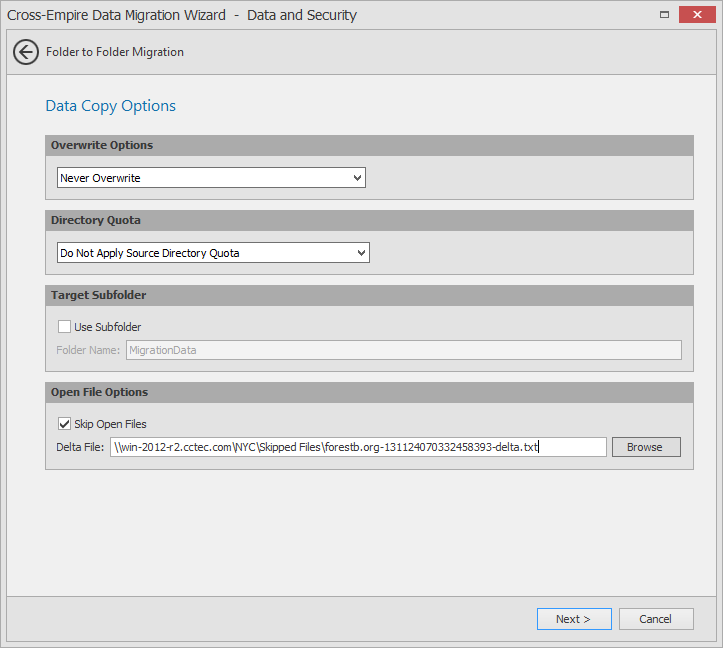
(Conditional) If you are doing a two-phase migration, in the Data Copy Options page, select the check box.
-
Click the button that corresponds to the field and through the path browser, select the folder where you want to store the delta file.
-
Right-click and select and click .
The delta file name is created and displayed in the field.
-
-
Click .
-
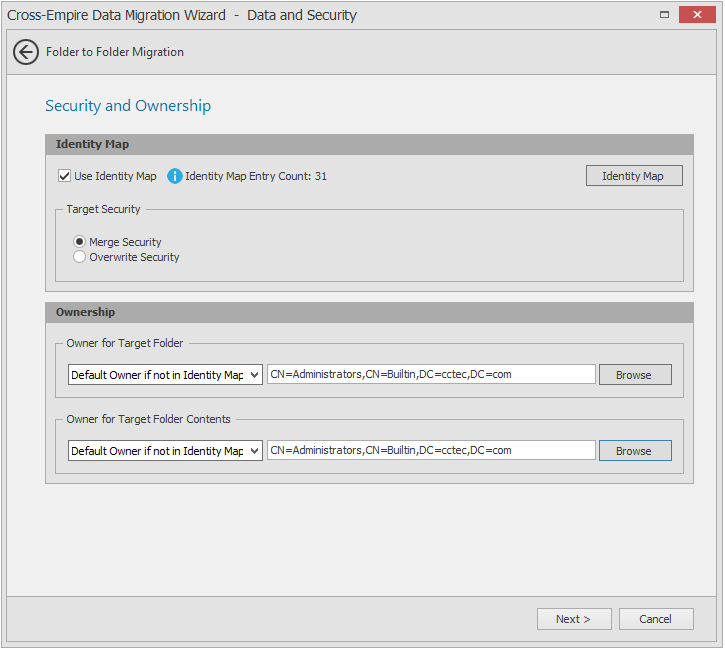
In the Security and Ownership page, select the check box.
-
Select either the or option.
Merge Security: This option merges the permissions of the source folder with those of the target folder.
Overwrite Security: This option overwrites the permissions of the target folder with those of the source folder.
-
From the drop-down menu, select your preferred option.
-
If you select either or browse to assign an owner.
-
-
From the drop-down menu, select your preferred option.
-
If you select either or browse to assign an owner.
-
-
Click .
-
Click .
The queued migration events are listed.
-
Click .
-
In SMAdmin, from the tab, click to view the status of the migration.
-
(Optional) If you have a Tail program, you can view the status of the migration.
11.3.11 Migrate User Data
Use these procedures to migrate user home folders from the source forest to the target forest.
-
In SMAdmin, click the tab.
-
Select > .
-
Select > .
This launches the Folder to Folder Migration wizard.
-
Do one of the following:
-
If you plan to do a two-phase migration by skipping open files, leave the check box deselected and click . Browse to specify the source and target folders and click .
This method will create a single source path and single target path, which alleviates potential problems that can surface when skipping open files during a migration.
-
If you plan to do a single-phase migration, you can select the check box to create any needed subfolders on the target that do not already exist. Browse to specify the source and target folders and click .
-
-
In the Define Mappings page of the wizard, observe the migration events that are now queued up.
-
Click .
-
(Conditional) If you are doing a two-phase migration, in the Data Copy Options page, select the check box.
-
Click the button that corresponds to the field and through the path browser, select the folder of the delta file that you created previously for your group data.
-
-
Click .
-
In the Security and Ownership page, select the check box.
-
Select either the or option.
-
From the and drop-down menus, select .
As a best practice, each user should be established as the owner of their files and folders. For those instances where folders and files that aren’t owned by the users, we will address them later once we create a policy and then perform Management Actions following the migration.
-
Click .
-
In the Copy Filter page, select the check box.
-
Click to create a copy filter of those files you do not want to copy to the target forest.
For example, you probably want to avoid copying .TMP files.
-
Click and observe what will be migrated.
If you observe any potential problems, you will want to correct them at this time.
-
Click .
The queued migration events are listed.
-
Click .
-
In SMAdmin, from the tab, click to view the status of the migration.
-
(Optional) If you have a Tail program, you can view the status of the migration.
11.3.13 Migrate Skipped, Modified and New Files
Follow these procedures to migrate any files that were skipped, modified or that were created since the first phase of the migration.
-
In SMAdmin, click the tab.
-
Select > .
-
Select > .
-
In the Select Migration Type Options page, click .
-
In the Define Mappings page, specify the same source and target paths that you specified in Section 11.3.11, Migrate User Data and click .
-
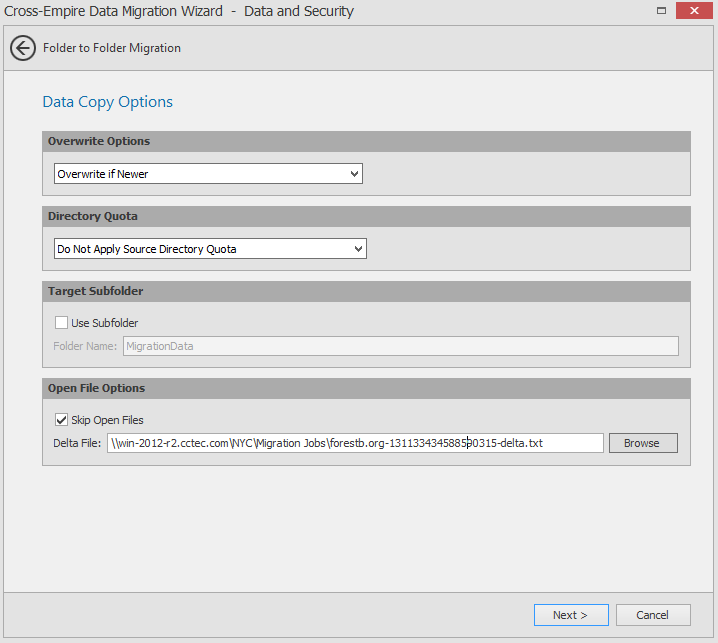
In the Data Copy Options page, from the drop-down menu, select , select the check box, and browse to the location where you stored your original Delta file to create a new Delta file.
-
Click .
-
In the Security and Ownership page, select the check box, and specify the same , , and related paths as you did in Section 11.3.11, Migrate User Data.
-
Click .
-
Click and observe what will be migrated.
If you observe any potential problems, you will want to correct them at this time.
-
Click .
The queued migration events are listed.
-
Click .
-
In SMAdmin, from the tab, click to view the status of the migration.
-
(Optional) If you have a Tail program, you can view the status of the migration.
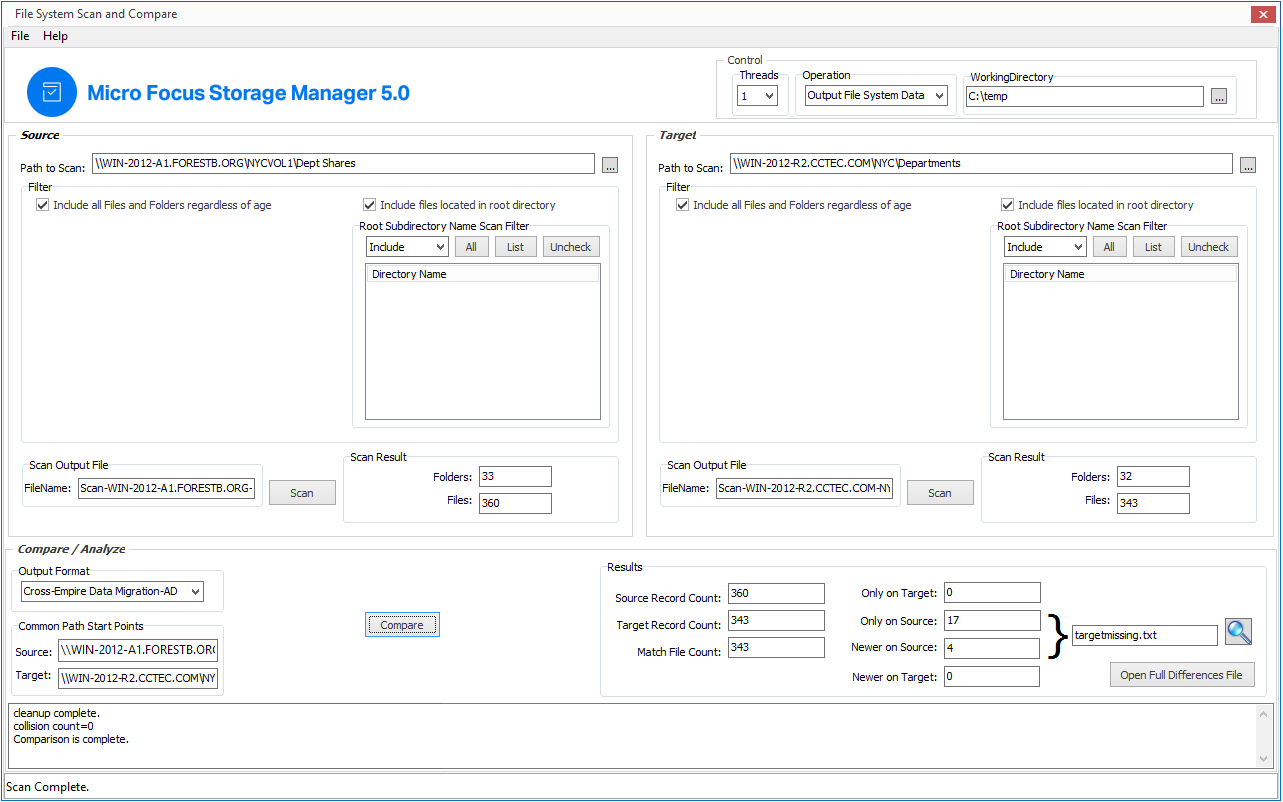
11.3.14 Using CEDMScanCompare.exe to Compare Folders and Files Between the Source and Target
With the skipped, modified, and new files and folders migrated, you are now ready to compare the folders and files between the source and target forests to verify that everything migrated properly.
-
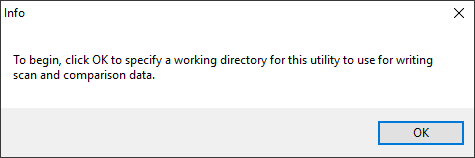
Launch the CEDMScanCompare utility that you copied earlier.
The following message appears:
-
Click .
-
Browse to a folder where you want to store the comparison data and click .
The CEDMScanCompare utility interface is launched.
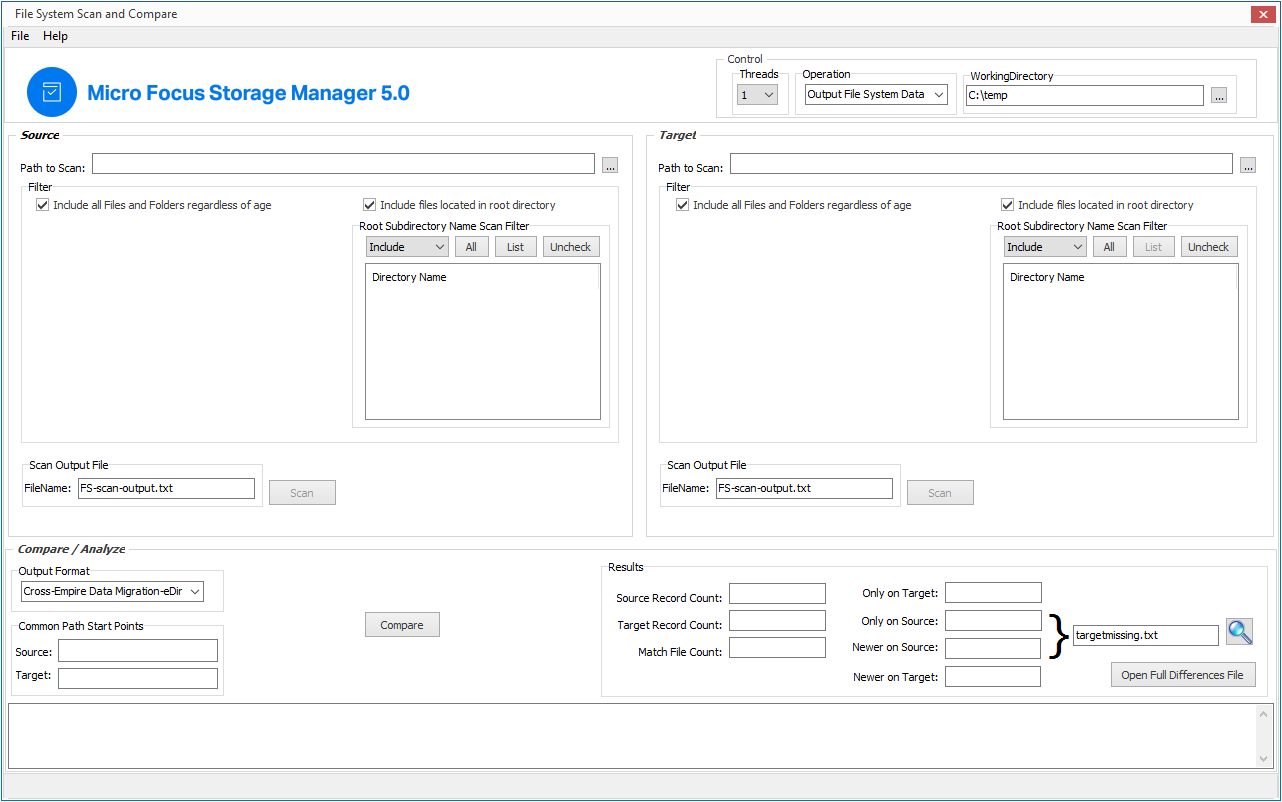
The selected folder location is specified in the field.
-
In the region, for the field, browse to specify the UNC path to the folder in the source forest you want to scan.
For example: \\WIN-2012-A1ForestB.ORG\NYCvol1\DeptShares
-
In the region, for the field, browse to specify the UNC path to the folder in the target forest you want to scan.
For example: \\WIN-2012-R2.CCTEC.COM\NYC\Departments
-
In the region, click .
-
In the region, note the findings in the and fields.
-
In the region, click .
-
In the region, note the findings in the and fields.
-
In the region, from the drop-down menu, select .
-
Click .
-
Do one of the following:
-
If the results show no discrepancies between the source and target, all of the folders and files were migrated. Proceed with Section 11.3.15, Manage the Migrated User Folders through a Storage Manager Home Folder Policy.
-
If the results show discrepancies between the source and target, follow the remaining procedures in this section.
-
-
Click .
A spreadsheet appears listing:
-
All files on the source that are newer than the same named files on the target, along with the source and target path of each file.
-
All files on the source that are missing from the target.
-
-
View the files that are newer on the source server as well as those files on the source server that were not migrated.
-
Have all of your network users close any open files in the source area, and once again, follow the procedures in Section 11.3.13, Migrate Skipped, Modified and New Files.
-
Run the CEDMScanCompare utility again. When the you have verified that all of the folders and files have migrated, proceed with Section 11.3.15, Manage the Migrated User Folders through a Storage Manager Home Folder Policy.