8.5 Setting Up Security for a Collaborative Storage Template

Properly setting security and permissions for collaborative storage in Active Directory can be potentially confusing. For this reason, we are providing an example of the correct way to set up security for a collaborative storage template.

The example provided is for a school class where the instructor is using a collaborative storage folder as the means of distributing assignments to students, as well as the means of retrieving assignments that the students turn in. The students cannot see the personal folders of the other students.

Figure 8-2 Common Academic Setting Collaborative Storage Template Structure

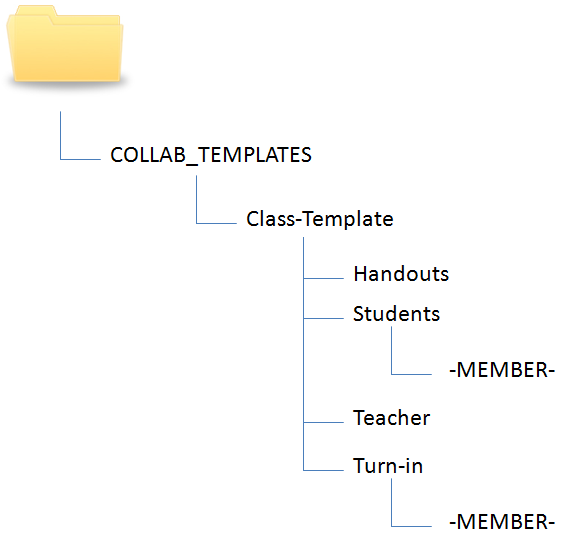
The file structure above is a common structure that can be used as a template for collaborative storage in an academic setting. By establishing the correct permissions, the course instructor can be established as the owner with full control of the collaborative storage area. Students can be provided with personal folders for retrieving and turning in assignments.

The diagram below shows the security permissions that must be established.

Figure 8-3 Security Permissions for Each Folder in the Sample Template

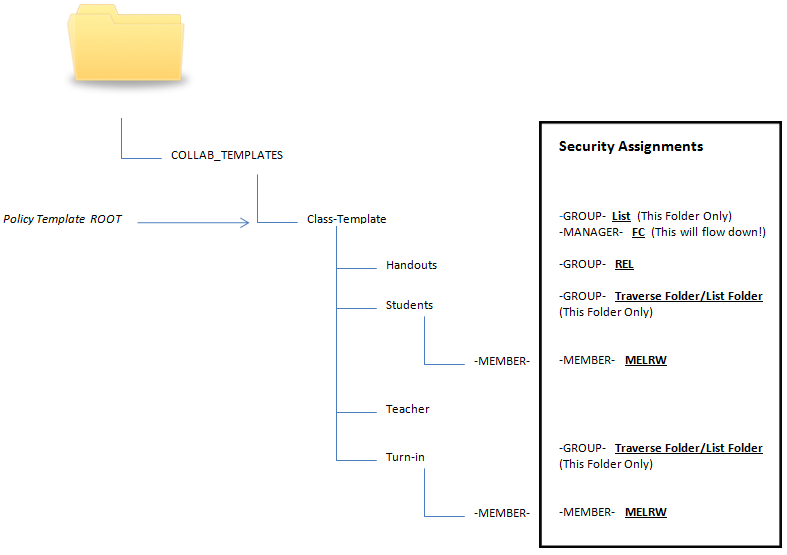
The diagram above shows the security permissions that must be established for each of the folders in the template structure. For example, the -GROUP- object must be given the List permission to the Class-Template folder and the -MANAGER- object must be given Full Control. List, Traverse Folder, and List Folder are all advanced permissions.

IMPORTANT:When you set the provisioning options for the Collaborative Storage policy, you must override the path owner and indicate an owner, unless you want all users in the group to have all rights to the collaborative storage area.

In the example in Figure 8-3, Teacher1 is specified as the owner.

Figure 8-4 Owner of a Collaborative Storage Folder
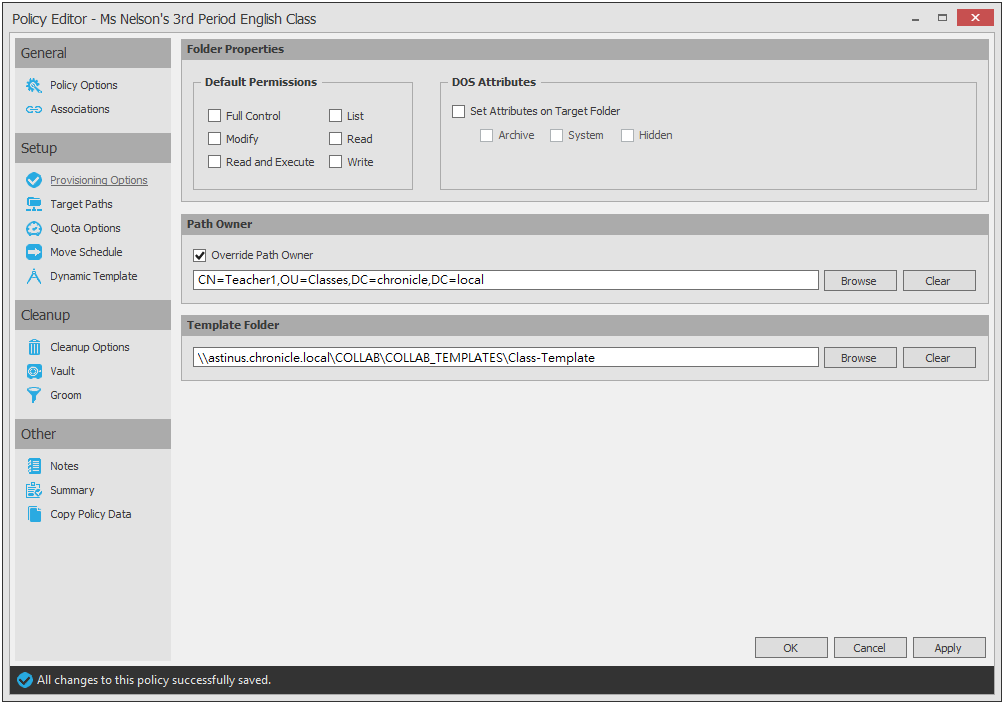
The Override Path Owner check box is selected and the owner of the folder is set to TEACHER1. The template is indicated in the Template Folder region.

You use the Group properties of Active Directory Users and Computers to indicate the group owner in the Managed By screen. In this example, the owner is TEACHER1.

Figure 8-5 An Owner in the Name Field Enables -MANAGER- to Function Properly
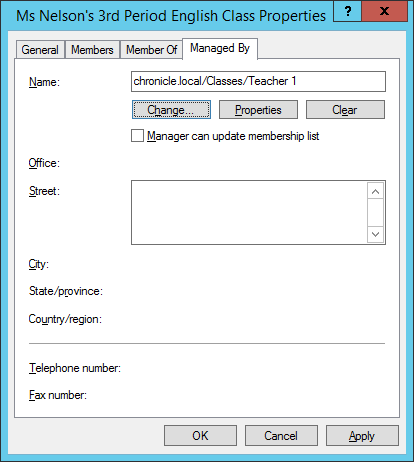
Establishing an owner in the Name field enables the -MANAGER- object to function properly.

8.5.1 Establishing Permissions

You establish the permissions specified for each of the folders in Figure 8-3 through the Windows Explorer Security tab. Permissions such as Traverse Folder, are special permissions.

To set special permissions:

  1. In Windows Explorer, right-click the desired folder and select Properties.

  2. Click the Security tab.

  3. Click Advanced.

  4. Click Change Permissions.

  5. Click Add.

  6. In the Enter the object name to select field, specify the name of the desired user or group and click OK.

  7. In the new dialog box, use the Apply to drop-down menu to select the desired application level, select the check boxes for all special permissions for the user or group, and click OK.

8.5.2 Configuring Permissions for the Group Manager

This procedure grants Manager permissions to the group’s designated manager, meaning that he or she is given all permissions needed to view and modify any document within the structure of the collaborative storage area.

  1. Launch Windows Explorer.

  2. In the file structure that you created earlier, browse to and right-click the topmost folder, then select Properties.

    For example, in the sample work project collaborative storage template example in Figure 8-1, the topmost folder would be the Project folder.

  3. Click the Security tab.

  4. Click Edit.

  5. Click Add.

  6. In the Enter the object names to select field, specify -MANAGER-.

  7. Click Check Names.

  8. Click OK.

  9. In the Permissions dialog box, select the Modify check box and click OK to save the settings.

  10. Click OK to close the Properties dialog box.

8.5.3 Configuring Permissions for the Group Members’ Personal Folders

This procedure grants the permissions needed for group members to work in their personal folders within the collaborative storage area.

  1. Launch Windows Explorer.

  2. In the structure that you created in Section 8.4, Creating a Collaborative Storage Template, browse to and right-click the -MEMBER- folder, then select Properties.

  3. Click the Security tab.

  4. Click Edit.

  5. Click Add.

  6. In the Enter the object names to select field, specify -MEMBER-.

  7. Click Check Names.

  8. Click OK.

  9. In the Permissions dialog box, select the Modify check box and click OK to save the settings.

  10. Click OK to close the Properties dialog box.

8.5.4 Configuring Group Member Permissions to Other Folders

This procedure grants List and Read permissions to other areas of the collaborative storage area.

  1. Launch Windows Explorer.

  2. In the structure that you created in Section 8.4, Creating a Collaborative Storage Template, browse to and right-click one of the subfolders, then click Properties.

    For example, in the sample work project collaborative storage template example in Figure 8-1, a subfolder would be the Documents folder.

  3. Click the Security tab.

  4. Click Edit.

  5. Click Add.

  6. In the Enter the object names to select field, specify -MEMBER-.

  7. Click Check Names.

  8. Click OK.

  9. Click OK to close the Properties dialog box.

  10. Repeat Step 1 through Step 9 for each additional folder where you want to grant users List and Read permissions.