6.1 Configuring a Protected Resource for a Novell Vibe Server
NOTE:The instructions in this section assume that you are using Novell Access Manager 3.1 and Novell Vibe 3.2 with the latest support packs. Future versions of Novell Access Manager and Novell Vibe will require different configuration settings than described in this section.
The following sections explain how to configure the Access Gateway with a domain-base multi-homing service. The instructions assume that you have a functioning Novell Vibe server on Linux and a functioning Access Manager system with a reverse proxy configured for SSL communication between the browsers and the Access Gateway.
The Vibe server needs to be configured to trust the Access Gateway to allow single sign-on with Identity Injection and to provide simultaneous logout. You also need to create an Access Gateway proxy service and configure it.
For information on other possible Access Gateway configurations, see “Teaming 2.0: Integrating with Linux Access Gateway”.
6.1.1 Configuring the Novell Vibe Server to Trust the Access Gateway
To use Novell Vibe as a protected resource of an Access Gateway and to use Identity Injection for single sign-on, the Vibe server needs a trusted relationship with the Access Gateway. With a trusted relationship, the Vibe server can process the authorization header credentials. The Vibe server accepts only a simple username (such as user1) and password in the authorization header.
This section explains how to set up the trusted relationship and how to enable simultaneous logout, so that when the user logs out of Vibe, the user is also logged out of the Access Gateway.
To configure the trusted relationship:
-
Log in to the Vibe server.
-
Stop the Vibe server with the following command:
/etc/init.d/teaming stop
-
Run the installer-teaming.linux script.
-
Accept the license agreement, then select , then click .
-
Confirm that your Vibe server is shut down, then select , then click .
-
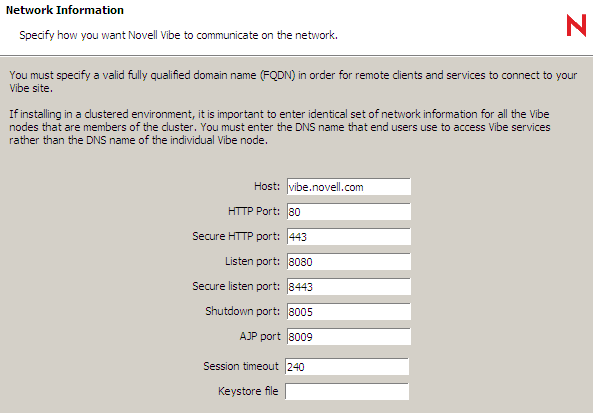
Continue through the installation program until you reach the Network Information page. Ensure that you have a valid Host name specified. You will need this later in the installation.
-
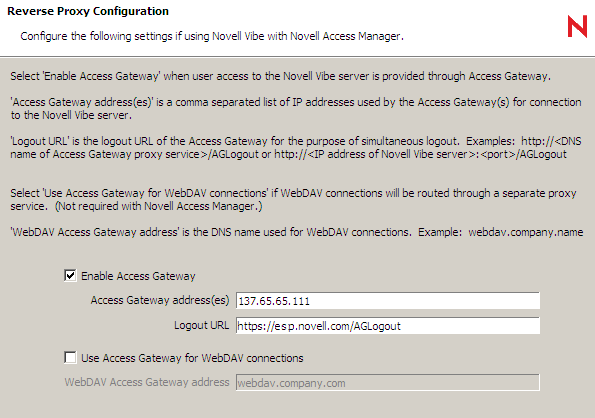
Continue through the installation program until you reach the Reverse Proxy Configuration page. Specify the following configuration options:
Enable Access Gateway: Select this option to enable the reverse proxy access gateway.
Access Gateway address(es): Specify the IP address of the Access Gateway that is used for the connection to the Vibe server.
If the Access Gateway is part of a cluster, add the IP address for each cluster member. Wildcards such as 164.99.*.* are allowed.
When you specify IP addresses in this option, Vibe logins are allowed only from the specified addresses. Also, if Authorization header credentials are not present or are incorrect, the user is prompted for login using Basic Authentication.
Logout URL: Specify the URL of the published DNS name of the reverse proxy that you have specified for the ESP, plus /AGLogout.
You can find the domain used for the ESP by editing the LAG/MAG cluster configuration, then clicking .
For example, if the published DNS name of the proxy service that you have specified for the ESP is esp.yoursite.com, specify the following URL:
https://esp.yoursite.com/AGLogoutUse Access Gateway for WebDAV connections: Leave this option unselected.
-
Continue through the installation program to complete the reconfiguration process.
-
Start the Vibe server with the following command:
/etc/init.d/teaming start
-
Continue with Configuring a Domain-Based Multi-Homing Service for Novell Vibe.
6.1.2 Configuring a Domain-Based Multi-Homing Service for Novell Vibe
The following instructions describe how to set up a domain-based service to protect the Novell Vibe server. In this example, the published DNS name of the service is vibe.novell.com. Users would access the Vibe server with a URL similar to http://vibe.novell.com/vibe. The /vibe path is the default access path for the Vibe application.
To configure a domain-based service for Vibe, complete the following tasks:
Creating a New Reverse Proxy
Before you can configure the domain-based proxy service, you need to create a new reverse proxy. For information on how to create a reverse-proxy, see Managing Reverse Proxies and Authentication
in Configuring the Access Gateway to Protect Web Resources
in the Novell Access Manager 3.1 SP3 Access Gateway Guide.
Configuring the Domain-Based Proxy Service
-
In the Administration Console, click > > , then click the name of the reverse proxy that you created in Creating a New Reverse Proxy.
-
In the , click , then fill in the following fields:
Proxy Service Name: Specify a display name for the proxy service that the Administration Console uses for its interfaces.
Multi-Homing Type: Select .
Published DNS Name: Specify the DNS name you want the public to use to access your site. This DNS name must resolve to the IP address you set up as the listening address. For example, vibe.novell.com.
Web Server IP Address: Specify the IP address of the Vibe server.
Host Header: Select the .
Web Server Host Name: Because of your selection in the field, this option is dimmed.
-
Click .
-
Click the newly added proxy service, then select the tab.
-
Change the to 8080.
If the Vibe server has port forwarding enabled, you do not need to change from the default port 80.
-
Click .
-
Change the value of option to 300 seconds (5 minutes).
-
Click .
-
Continue with Configuring Protected Resources.
Configuring Protected Resources
You need to create two protected resources, one for HTML content and one for WebDAV and AJAX content.
-
In the Administration Console, click > .
-
Select the policy container, then click .
-
Specify a name for the policy, select for the type, then click .
-
(Optional) Specify a description for the injection policy. This is useful if you plan to create multiple policies to be used by multiple resources.
-
In the section, click , then select .
-
Fill in the following fields:
User Name: Select > .
Password: Select > .
-
Click .
-
To save the policy, click , then click .
For more information on creating such a policy, see
Configuring an Authentication Header Policy
in the Novell Access Manager 3.1 SP4 Policy Guide. -
Assign this policy to the protected resources:
-
Click > > > .
-
For each Vibe protected resource, click the link, select the Identity Injection policy, click , then click .
-
Click
-
To save the configuration changes, click > , then click .
-
-
Create a protected resource for HTML content:
-
In the , click , specify a name, then click .
-
(Optional) Specify a description for the protected resource. You can use it to briefly describe the purpose for protecting this resource.
-
Specify a value for For example, select the contract.
-
Click .
-
-
Create a protected resource for WebDAV and AJAX content:
-
In the , click , specify a unique name, then click .
-
(Optional) Specify a description for the protected resource. You can use it to briefly describe the purpose for protecting this resource.
-
Click the icon.
-
In the , click , specify a name, then click .
-
Fill in the following fields:
Contract: Select the contract, which is same contract that you selected for the HTML content protected resource.
Non-Redirected Login: Select this option.
Realm: Specify a name that you want to use for the Vibe server. This name does not correspond to a Vibe configuration option. It appears when the user is prompted for credentials.
Redirect to Identity Server When No Authentication Header is Provided: Select this option.
-
Click twice.
-
For the Authentication Procedure, select the procedure you just created.
-
In the , remove the /* path and add the following paths:
/ssfs/*
/ssf/atom/*
/ssf/ical/*
/ssf/ws/*
/ssf/rss/*
/ssr/*
/rest/*
The /ssfs/* path is for WebDAV content and the /ssf/rss/* path enables non-redirected login for RSS reader connections. Vibe provides authentication for all of the paths listed above.
-
Click .
-
-
In the , ensure that the protected resources you created are enabled.
-
To apply your changes, click > , then click .
-
Continue with Configuring a Rewriter Profile.
Configuring a Rewriter Profile
-
In the Administration Console, click > > > > > .
-
In the , click .
-
Specify a name for the profile, select as the search boundary, then click .
-
In the section, click , then specify the following type:
application/rss+xml
-
In the section, click, then specify the following as the variable to search for:
value
-
Click .
-
Make sure that remains selected.
-
Click .
-
In the , move the Word profile you created to be the first profile in the list, and move the default profile to be the second profile in the list.
-
Click .
-
To apply your changes, click > , then click .