20.1 Synchronizing Users and Groups from an LDAP Directory
Unless you are planning a very small Vibe site, the most efficient way to create Vibe users is to synchronize initial user information from your network directory service (eDirectory, GroupWise, or Active Directory directory service) after you have installed the Vibe software. Over time, you can continue to synchronize user information from the LDAP directory to your Vibe site.
IMPORTANT:The following limitations apply when synchronizing user information to Vibe from an LDAP directory service:
-
Vibe performs one-way synchronization from the LDAP directory to your Vibe site. If you change user information on the Vibe site, the changes are not synchronized back to your LDAP directory.
-
If your LDAP directory contains a multi-value attribute, Vibe recognizes only one of the values. For example, if your LDAP directory contains multiple email addresses for a given user, only one of the email address is synchronized to Vibe.
-
Users that are imported to Vibe via LDAP are always authenticated to Vibe via the LDAP source. If the LDAP source is unavailable for any reason, the LDAP-imported users cannot log in to Vibe.
For information about known issues with LDAP synchronization in Vibe, see LDAP
in the OpenText Vibe 4.0.8 Release Notes.
Table 20-1 shows user synchronization rates based on samples from test labs at OpenText. Results may vary depending on hardware, LDAP server, database, and network topology.
Table 20-1 LDAP Synchronization Performance Rate Samples
|
Number of Users Synchronized |
Time Required to Complete Synchronization |
|---|---|
|
1,000 |
20 seconds |
|
2,500 |
44 seconds |
|
10,000 |
2 minutes |
|
20,000 |
5 minutes |
|
50,000 |
13 minutes |
To synchronize users and groups from LDAP:
-
Log in to Vibe as the Vibe administrator.
-
Launch a web browser.
-
Specify one of the following URLs, depending on whether you are using a secure SSL connection:
http://vibe_hostname:8080
https://vibe_hostname:8443
Replace vibe_hostname with the host name or fully qualified domain name of the Vibe server that you have set up in DNS. If you configured the HTTP ports correctly during installation, you do not need to include the port number in the Vibe URL.
Depending on how you have configured your Vibe system, you might not be required to enter the port number in the URL. If you are using NetIQ Access Manager, the Vibe login screen is not used.
-
-
Click the link in the upper-right corner of the page, then click the icon
 .
. -
Under , click .
20.1.1 Configuring an LDAP Connection
You can configure one or more LDAP connections to your directory.
You should never configure multiple LDAP connections to point to the same location on the same LDAP directory. If you need a failover solution, you should use a load balancer.
To configure an LDAP connection:
-
On the LDAP Configuration page, click the tab.
-
To create a new LDAP connection, click .
or
To modify an existing LDAP connection, click the URL of the connection in the column of the provided table.
-
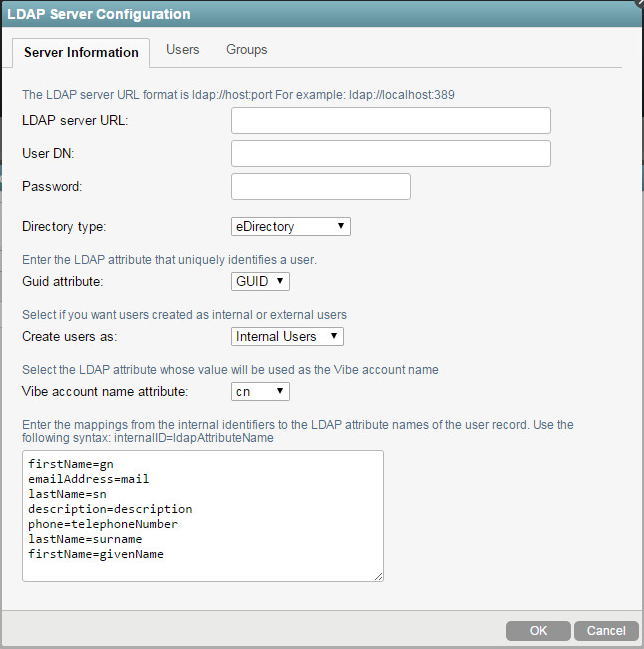
On the LDAP Server Configuration dialog box, specify the information on each tab, as described in the following sections:
Server Information
-
On the tab, click Add.
The LDAP Server Configuration dialog box is displayed.
-
Specify the following information on the tab:
IMPORTANT:When modifying an existing LDAP connection, do not modify the LDAP server URL. Doing so can lead to synchronized users being disabled or deleted.
LDAP Server URL: In order to synchronize initial user information, Vibe needs to access an LDAP server where your directory service is running. You need to provide the host name of the server, using a URL with the following format:
ldap://hostnameIf the LDAP server requires a secure SSL connection, use the following format:
ldaps://hostnameIf the LDAP server is configured with a default port number (389 for non-secure connections or 636 for secure SSL connections), you do not need to include the port number in the URL. If the LDAP server uses a different port number, use the following format for the LDAP URL:
ldap://hostname:port_number
ldaps://hostname:port_number
If the LDAP server requires a secure SSL connection, additional setup is required. You must complete the steps in Securing LDAP Synchronization to import the root certificate for your LDAP directory into the Java keystore on the Vibe server before you configure Vibe for LDAP synchronization.
User DN (proxy user for synchronizing users and groups): Vibe needs the user name and password of a user on the LDAP server who has sufficient rights to access the user information stored there:
Directory Service
Required Rights
eDirectory
-
[All Attribute Rights] - Compare & Read
-
[Entry Rights] - Browse (on the container containing the users that need to be imported into Vibe)
Active Directory
Any authenticated user can be used as the proxy user as long as there are no read restrictions in place on the Organizational Unit (OU) that contains the users
Required rights if OU read restrictions are in place:
-
Read (on the Organizational Unit containing the users that need to be imported into Vibe)
Ensure that is selected in the tab under the advanced options.
GroupWise
GroupWise requires an Admin App user for this. See
Creating an Admin App in GroupWise
in the GoupWise Mobility Service 2014 R2 Administration Guide.You need to provide the fully qualified, comma-delimited user name, along with its context in your LDAP directory tree, in the format expected by your directory service.
Directory Service
Format for the User Name
eDirectory
cn=username,ou=organizational_unit,o=organization
Active Directory
cn=username,ou=organizational_unit,dc=domain_component
GroupWise
cn=admin_app_user,o=system_name
Password: Password for the User DN.
Directory Type: The directory type that you are connecting to. Select , , or .
GUID attribute: Depending on the directory type that you chose, this field is populated with the name of the LDAP attribute that uniquely identifies a user or group. For eDirectory, this value is GUID. For Active Directory, this value is objectGUID. For GroupWise, this value is entryUUID. This attribute always has a unique value that does not change when you rename or move a user in the LDAP directory. It ensures that Vibe modifies the existing user instead of creating a new user when the user is renamed or moved in the LDAP directory.
If this attribute is not set and you rename or move a user in the LDAP directory, Vibe assumes that the new name (or the new location of the same name) represents a new user, not a modified user, and creates a new Vibe user.
For example, suppose you have a Vibe user named William Jones. If William changes his name to Bill, and you make that change in the LDAP directory, Vibe creates a new user named Bill Jones.
If you want to map users to a different attribute, select in the drop-down list, specify the name of the LDAP attribute, then click . Before you do this, ensure that the attribute that you use is a binary attribute. For example, the cn attribute cannot be used because it is not a binary attribute.
Create Users As: Specify whether you want Vibe to treat the users as Internal or External. If you choose , then the attribute will change from cn to mail. All external users use their email address as their login.
Vibe account name attribute: The attribute you choose here depends on the directory type you selected in the drop-down list. If you selected in the drop-down list, you see and as options for this attribute. If you selected in the drop-down list, you see only as an option for this attribute.If you selected or in the drop-down list, you see , , and as options for this attribute. If you select as the value for this attribute, you are prompted to enter the name of the LDAP attribute. The value of the attribute that you enter is used for the Vibe account name.
The Vibe account name attribute has two purposes:
-
Used as the Vibe user name when the user is first provisioned from LDAP. The value of this attribute must be unique.
-
During Vibe login, Vibe uses this attribute to locate the user in the LDAP directory and then tries to authenticate as that user.
LDAP directories differ in the LDAP attribute used to identify a User object. Both eDirectory and Active Directory might use the cn (common name) attribute. A more sure alternative for Active Directory is to use the sAMAccountName attribute. Other LDAP directories might use the uid (unique ID) attribute, depending on the structure and configuration of the directory tree.
You might need to consult with your directory administrator in order to determine which attribute is best to use. In some cases where not all users are imported successfully, you might need to set up two LDAP sources pointing to the same LDAP server and have each source use a different value for the . For example, set up one LDAP source and use cn as the . Then set up a separate source to the same LDAP server and use sAMAccountName as the .
In addition to the attributes already mentioned in this section, other LDAP attributes can be used for the , as long as the attribute is unique for each User object. For example, the mail LDAP attribute on User objects could be used to enable Vibe users to log in to the Vibe site by using their email addresses.
NOTE:Because the login name becomes part of the user’s workspace URL, the at sign (@) in the email address is replaced with an underscore (_) in the workspace URL because @ is not a valid character in a URL.
-
-
Continue with Users.
Users
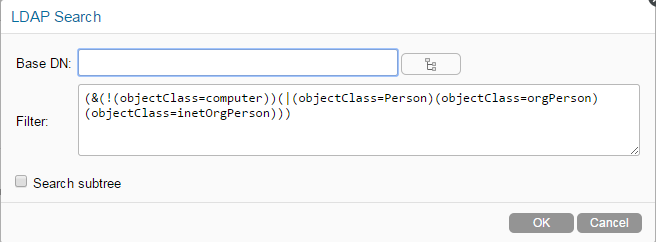
-
On the LDAP Server Configuration page, click the tab, then click .
The LDAP Search dialog box is displayed.
-
Specify the following information n the LDAP search dialog box:
Base DN: Vibe can find and synchronize initial user information from User objects located in one or more containers in the LDAP directory tree. A container under which User objects are located is called a base DN (distinguished name). The format you use to specify a base DN depends on your directory service.
Directory Service
Format for the User Container
eDirectory
ou=organizational_unit,o=organization
Active Directory
ou=organizational_unit,dc=domain_component
GroupWise
cn=admin_app_user,o=system_name
Container names cannot exceed 128 characters. If the container name exceeds 128 characters, users are not provisioned.
HINT:You can use the icon
 next to the field to browse the LDAP directory for the base DN that you want to use.
Filter: If you are using GroupWise, accept the default as is.
To identify potential Vibe users, Vibe by default filters on the following LDAP directory object attributes:
-
Person
-
orgPerson
-
inetOrgPerson
You can add attributes to the user or group filter list if necessary. You can use the following operators in the filter:
-
| OR (the default)
-
& AND
-
! NOT
You might find it convenient to create a group that consists of all the users that you want to set up in Vibe, regardless of where they are located in your LDAP directory. After you create the group, you can use the following filter to search for User objects that have the specified group membership attribute:
IMPORTANT:If you create a filter to search for a specific group to find users, users that are located in any sub-groups to that group are not synchronized.
When synchronizing against Active Directory, you can create a filter that synchronizes users in sub-groups by using the following rule object identifier (OID):
<attribute name>:<matching rule OID>:=<value>
Be sure to include the parentheses in your filter.
Directory Service
Filter to search for User objects
eDirectory
(groupMembership=cn=group_name,ou=organizational_unit,o=organization)
Active Directory
(memberOf=cn=group_name,ou=organizational_unit,dc=domain_component)
GroupWise
Use the default.
Search subtree: Select whether you want Vibe to search for users in containers underneath the base DN (that is, in subtrees).
-
-
Click .
-
Continue with Groups.
Groups
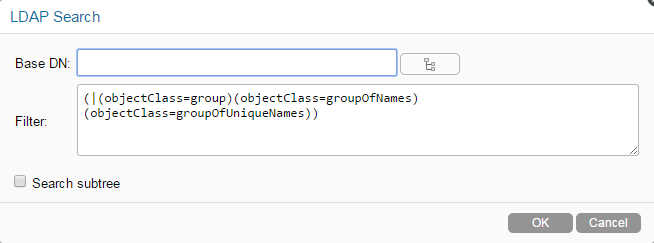
-
On the LDAP Server Configuration page, click the tab, then click .
The LDAP Search dialog box is displayed.
-
Specify the following information on the LDAP Search dialog box:
Base DN: Vibe can find and synchronize initial user information from group objects located in one or more containers in the LDAP directory tree. A container under which User objects are located is called a base DN (distinguished name). The format you use to specify a base DN depends on your directory service.
Directory Service
Format for the Group Container
eDirectory
ou=organizational_unit,o=organization
Active Directory
ou=organizational_unit,dc=domain_component
GroupWise
cn=admin_app_user,o=system_name
Container names cannot exceed 128 characters. If the container name exceeds 128 characters, users are not provisioned.
HINT:You can use the icon
next to the field to browse the LDAP directory for the base DN that you want to use.Filter: For GroupWise, use the default.
To import groups based on information in your LDAP directory, Vibe filters on the following LDAP directory object attributes:
-
group
-
groupOfNames
-
groupOfUniqueNames
You can add attributes to the group filter list if necessary. You can use the following operators in the filter:
-
| OR (the default)
-
& AND
-
! NOT
IMPORTANT:Be sure to include the parentheses in your filter.
HINT:For information about how to import GroupWise distribution lists to be used in Vibe, see the following Cool Solutions article:
Using GroupWise Distribution Lists in Novell Vibe
Directory Service
Filter to search for Group objects
eDirectory
(groupMembership=cn=group_name,ou=organizational_unit,o=organization)
Active Directory
(memberOf=cn=group_name,ou=organizational_unit,dc=domain_component)
GroupWise
Use the default.
Search subtree: Select whether you want Vibe to search for groups in containers beneath the base DN (that is, in subtrees).
-
-
Click , then click again to save the LDAP server configuration.
-
Continue with Configuring LDAP Synchronization.
20.1.2 Configuring LDAP Synchronization
When you configure LDAP synchronization, you configure user synchronization options, groups synchronization options, and the synchronization schedule.
NOTE:Because the synchronization options apply to all LDAP configurations within the same zone, you cannot have customized synchronization settings for each LDAP configuration. However, the Vibe site can have multiple zones. For more information about zones, see Section 18.0, Setting Up Zones (Virtual Vibe Sites).
Configuring User Synchronization Options
-
On the LDAP Configuration page, click the tab.
-
Specify the following information for enabling and configuring user synchronization from your LDAP directory to your Vibe site:
Register LDAP user profiles automatically: Select this option to automatically add LDAP users to the Vibe site. However, workspaces are not created until users log in to the Vibe site for the first time.
Synchronize user profiles: Select this option to synchronize user information whenever the LDAP directory information changes after initial Vibe site setup. The attributes that are synchronized are the attributes that are found in the map box on the tab on the LDAP Server Configuration page.
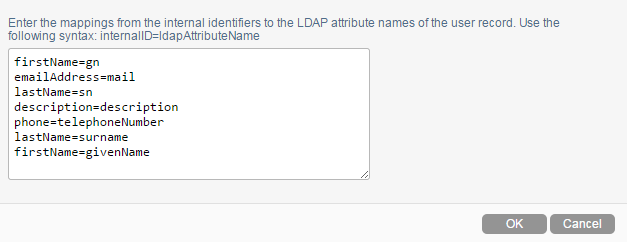
By default, Vibe synchronizes the following attributes from the LDAP directory:
-
First name
-
Last name
-
Phone number
-
Email address
-
Description
For information about how to add additional attributes to be automatically synchronized, see Synchronizing Additional LDAP Attributes.
For user accounts provisioned from LDAP that are no longer in LDAP: Because deleting user accounts cannot be undone, OpenText recommends that you leave selected.
For more information about disabled users in Vibe, see Disabling Vibe User Accounts.
Select only if you are certain that you want to delete users that exist on the Vibe site but do not exist in your LDAP directory. If you do decide to delete user accounts, you can select the option to remove obsolete information along with the user accounts.
IMPORTANT:A deleted user cannot be undeleted; deleting a user is permanent and is not reversible.
If you are sure that you want to automatically delete users that are not in LDAP, this option is designed to be used under the following conditions:
-
You have deleted users from your LDAP directory and you want the LDAP synchronization process to also delete them from Vibe.
-
In addition to the users synchronized from LDAP, you create some Vibe users manually, as described in Creating a New Local User, and you want the LDAP synchronization process to delete the manually created users.
-
In addition to the users synchronized from LDAP, you allow Guest users to self-register, as described in
Allowing Guest Access to Your Vibe Site,
and you want the LDAP synchronization process to delete the self-registered users.
Use the following time zone when creating new users: Select this option to set the time zone for user accounts that are synchronized from the LDAP directory into your Vibe site. The time zone list is grouped first by continent or region, optionally by country or state, and lastly by city.
Common selections for United States time zones:
Time Zone
Continent/City
Pacific Time
America/Los Angeles
Mountain Time
America/Denver
Central Time
America/Chicago
Eastern Time
America/New York
Use the following locale when creating new users: Select this option to set the locale for user accounts that are synchronized from the LDAP directory into your Vibe site. The locale list is sorted alphabetically by language.
-
-
Continue with Configuring Group Synchronization Options.
Configuring Group Synchronization Options
-
On the LDAP Configuration page, click the tab.
-
Specify the following information for enabling and configuring user and group synchronization from your LDAP directory to your Vibe site:
Register LDAP group profiles automatically: Select this option to automatically add LDAP groups to the Vibe site.
Synchronize group profiles: Select this option to synchronize group information, such as the group description, to the Vibe site whenever this information changes in LDAP.
Synchronize group membership: Select this option so that the Vibe group includes the same users (and possibly groups) as the group in your LDAP directory. If you do not select this option, and you make changes to group membership in the LDAP directory, the changes are not reflected on your Vibe site.
If users have rights to files on your OES or Windows file systems through group membership, you must select this option to synchronize group membership to Vibe. If you do not synchronize group membership, users who have access rights to files through membership in a group might not have the appropriate access rights in Vibe.
Delete groups that were provisioned in LDAP but are no longer in LDAP: Select this option to delete groups that exist on the Vibe site but do not exist in your LDAP directory. Use this option under the following conditions:
-
You have deleted groups from your LDAP directory and you want the LDAP synchronization process to delete them from Vibe as well.
-
In addition to the groups synchronized from LDAP, you create some Vibe groups manually, as described in Creating Groups of Users, and you want the LDAP synchronization process to delete the manually created groups.
-
-
Continue with Configuring the Synchronization Schedule.
Configuring the Synchronization Schedule
This section describes how to set a schedule for the LDAP synchronization.
When planning the schedule, take into account how often your LDAP directory user (and, optionally, group) information changes and the server resources required to perform the synchronization for the number of users (and, optionally, groups) that you have.
-
On the LDAP Configuration page, click the tab.
-
Select to enable a schedule for the LDAP synchronization to occur.
-
Select whether to run the LDAP synchronization every day, or select specific days of the week when you want it run (for example, on Monday, Wednesday, and Friday).
You can choose to have it run once a day at a specified time (for example, at 2:00 a.m.), or you can set a time interval, so that it is run multiple times each day (for example, every four hours). The smallest time interval you can set is .25 hours (every 15 minutes).
-
(Conditional) If you want to restrict local users from logging in to the Vibe site, continue with Restricting Local User Accounts from Logging In.
-
Continue with Previewing and Running the LDAP Synchronization.
20.1.4 Synchronizing Additional LDAP Attributes
By default, Vibe synchronizes the following attributes from the LDAP directory:
-
First name
-
Last name
-
Phone number
-
Email address
-
Description
This information displays on each user’s personal user profile.
To synchronize additional LDAP attributes, complete the following sections:
Identifying or Creating a Vibe Field for the LDAP Attribute
Before you can synchronize Vibe user profiles with additional attributes from your LDAP directory, you first need to ensure that there is a corresponding Vibe field for the LDAP attribute that you want to synchronize.
To view the existing fields in the user profile:
-
Navigate to a user profile and see if there is an existing field that corresponds to the LDAP attribute that you want to synchronize.
-
If the appropriate field already exists, continue with Copying the Data Name of the Vibe Field.
If the appropriate field doesn’t already exist, you must create it, as described in Customizing the Default User Profile View.
Copying the Data Name of the Vibe Field
Each field in Vibe has an internal data name, which is added when the field is created. When you create a field by using the Form and View Designers tool, Vibe requires that you enter a data name. This name is how Vibe identifies the field.
To map an LDAP attribute to a Vibe field, you must find the data name for the field.
The following procedure shows how to find the data name for a particular field in the user profile:
-
Log in to the Vibe site as the Vibe administrator.
-
Click the link in the upper right corner of the page, then click the icon
. -
In the section, click .
-
Expand , then click .
-
Expand , expand , then locate the Vibe field that you want to synchronize with an LDAP attribute.
-
Click the name of the field, then click in the dialog box on the right side of the page.
-
Copy the text in the field, then continue with Mapping the Vibe Field to the LDAP Attribute.
Mapping the Vibe Field to the LDAP Attribute
After you have copied the data name of the Vibe field that you want to synchronize with an LDAP attribute as described in Copying the Data Name of the Vibe Field, you can map the Vibe field to the LDAP attribute that you want to synchronize.
-
Log in to the Vibe site as the Vibe administrator.
-
Click the link in the upper right corner of the page, then click the icon
.The Administration page is displayed.
-
In the section, click .
The map box in the section lists the LDAP attributes that are currently being synchronized.
The items in the list have the following format:
vibe_field_name=ldap_attribute_name
-
Add a new line to the list, specifying the Vibe field name to the left of the equal sign (=) and the LDAP attribute name to the right of the equal sign.
The vibe_field_name is the data name that you copied in Copying the Data Name of the Vibe Field, and ldap_attribute_name is the name of the LDAP attribute in your LDAP directory.
-
Repeat Step 4 for each LDAP attribute that you want to add to the user profile.
-
Select , then click .
The status box shows the LDAP attribute information being added to Vibe users.