7.2 Adding and Configuring Satellite Devices
You can create a new Satellite device or configure an existing Satellite with the Authentication, Content, Imaging, and Collection roles, change its default port, and adjust the schedules for the roles. You can also remove roles from an existing Satellite.
IMPORTANT:Before promoting a managed device as Satellite, ensure that the ZENworks 10 Configuration Management version installed on the managed device is same as that of the Primary Server.
-
To add a new Satellite into the Server Hierarchy panel, in ZENworks Control Center, click the tab. In the Server Hierarchy panel, select the check box next to the desired Primary Server, click , then click .
or
To configure an existing Satellite from the Server Hierarchy panel, in ZENworks Control Center, click the tab. In the Server Hierarchy panel, select the check box next to the Satellite that you want to configure, click , then click .
You can only configure one Satellite at a time.
or
To configure an existing Satellite from the device view, in ZENworks Control Center, click the tab, then on the tab, click either or . In the Servers or Workstations panel, select the check box for the Satellite that you want to configure, click , then click .
You can only configure one Satellite at a time.
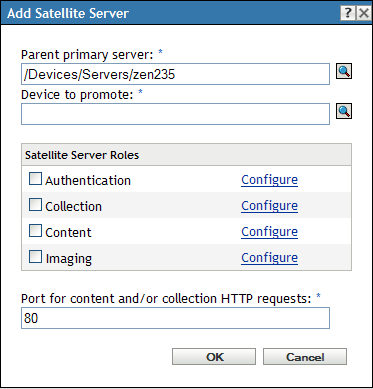
Depending on whether you are adding a new Satellite device or configuring an existing device, the title of the dialog box is different (Add Satellite Server or Configure Satellite Server). The settings and options on each page are similar.
-
(Conditional) To remove Satellite roles from a device, uncheck the desired role in the Satellite Server Roles section, then click .
You can also use the zman satellite-server-delete (ssd) command to remove roles from a Satellite. For more information, see
Satellite Commands
in the ZENworks 10 Configuration Management Command Line Utilities Reference. -
(Conditional) To add a role to a Satellite, select the desired role in the section.
If the link is disabled for any role, that role is disabled for this device. For example, if the Satellite’s parent Primary Server does not have the Collection role, the Satellite’s Collection role is disabled and cannot be configured. Non-configurable roles that a managed device performs are also listed in the dialog box but cannot be edited.
See the following sections for more information about each role:
-
(Optional) In the field, specify the port number.
The default port is 80. Content and Collection servers share the same Web server and the same port. Make sure that the specified port is not in use.
-
(Optional) In the field, specify the port number.
The default port is 443. This is the port on which the Satellite device listens while communicating with the managed devices. Make sure that the specified port is not in use.
-
Click to save your changes and exit the dialog box.
-
Repeat the previous steps to configure other Satellites.
7.2.1 Authentication Role
This role helps speed the authentication process by spreading the workload among various devices and by performing authentication locally to managed devices.
Prerequisites to Configure the Authentication Role on a Satellite
If you are using an external certificate, you must complete the following tasks on the Satellite before configuring the Authentication role on a Satellite:
-
Ensure that the Satellite has its own individual server certificate and the private key.
For detailed information on how to create to an external certificate and generate the private key, see
Creating an External Certificate
in the ZENworks 10 Configuration Management Installation Guide. -
Import the external certificate by using the zac import-authentication-cert (iac) command.
For more information about zac, view the zac man page (man zac) on the Satellite or see the ZENworks 10 Configuration Management Command Line Utilities Reference.
NOTE:You must import the external certificate each time you promote the Satellite to Authentication role.
Configuring the Authentication Role on a Satellite
-
(Optional) To configure the Authentication role on a Satellite, select the check box next to , click to display the Configure Authentication dialog box.
-
Specify the authentication port.
-
Select a user source from the User Source drop-down list.
-
Click to display the Add User Source Connections dialog box.
Fill in the fields:
Connection Name: (Optional) Specify all or part of the name for the connection to the LDAP directory, then click to display the list of connections that match the criteria.
If you have many connections in your ZENworks Management Zone, you can use the field to display only those connections that match the criteria. For example, to display all connections that contain the word “London,” type London in the field, then click .
Connection Address: (Optional) Specify part of the IP address or DNS hostname of the connection to the LDAP directory, then click to display all connections with that IP address.
If you have many connections in your ZENworks Management Zone, you can use the field to display only those connections that match the criteria. For example, to search for and display all connections that have an IP address starting with 172, type 172 in the field, then click .
User Source Connections: Select the check box next to the connection you want to add.
-
Click to return to the Configure Authentication dialog box.
-
(Optional) Reorder the connections in the User Source Connection list by selecting a connection’s check box, then clicking or .
The device uses the connections in the order they are listed to authenticate the device to the ZENworks Management Zone.
-
Click to return to the Add Satellite Server or Configure Satellite Server dialog box.
-
Continue with Step 4.
7.2.2 Collection Role
This role causes the device to collect inventory information, messages (errors, warning, informational, and so forth), and policy and bundle statuses, then rolls that information up to its parent Primary Server, which in turn either writes to the database directly or passes the information to its parent Primary Server, which does the database writing.
-
Select the check box next to , then click .
-
Fill in the field:
Collection Roll-Up Schedule: Specify the number of days, hours, and minutes for how often you want the collected data to be rolled up from the devices that use it as a collection server.
The Collection Roll‑Up schedule determines how often the collected inventory information is rolled up to the parent Primary Server for inclusion in the ZENworks database. When the information is in the database, it is viewable in ZENworks Control Center.
To specify the devices that use the Collection Roll-Up role, configure the setting in the settings on the page.
-
Click .
-
Continue with Step 4.
7.2.3 Content Role
This role enables the managed device to distribute content (bundles, policies, system updates, and patches) to other devices.
When you set up a device to function with a Content role, you must specify a Primary Server as its parent. The device with the Content role receives all content from its parent Primary Server. Any content you want hosted on a Satellite with the Content role must also be hosted on its parent Primary Server. If the content is not hosted on the new Primary Server, it is added.
To specify the devices that need content from this Satellite, configure the setting in the settings on the page.
-
Select the check box next to , click , then click .
Fill in the fields:
Content Type: Select a Content Type (for example, , , or Server).
NOTE:If you choose as the and configure the settings to replicate the Imaging content, these settings are automatically reflected in the Configure Imaging Content Replication dialog box invoked while configuring the Imaging role to the device. Similarly, the Imaging content replication settings configured while configuring the Imaging role to a device are automatically reflected in the Configure Content Type Replication dialog box invoked while configuring the Content role with the Imaging content type to the device.
Throttle (in KB/sec): Select the throttle rate. This rate specifies the maximum rate at which content is replicated. The actual rate can be lower, depending on other factors, including the number of downloads.
Duration: Click the up-arrow or down-arrow to set the content update duration period in minutes. Depending on the Schedule Type and its options you select, you need to be aware of the following:
-
The setting in all three scheduling types (, , and ) is not the true end time when the content update stops processing. The end time specifies the end of the time period during which an update can start.
If you select or and set a random start and end time, the update starts between these times and continues for the specified duration. For example, if the is set at the default of 60 minutes and the update starts 10 minutes before the specified end time, content is updated for the entire 60 minutes. The same concept applies for the schedule. If is set at the default of 60 minutes and the end time does not allow enough time for the specified duration, content is updated for the entire 60 minutes.
-
If the Primary Server contains too much content to update during the specified duration, the update continues at the next regularly scheduled time. Content that already exists on the Satellite device is not updated again. Content that was not updated during the previous update and any new content added to the Primary Server is updated.
Schedule Type: Select a schedule for how often you want the Satellite’s content to be updated from the parent Primary Server:
-
No Schedule: If you select , content is never automatically updated from the parent Primary Server. To manually replicate the content run the zac wake-cdp (cdp) command on the Satellite.
-
Recurring: Select , , or , then fill in the fields. For more information, see Section C.4, Recurring.
Be aware that the cleanup action for content occurs every night at midnight.
If you do not set a schedule for a particular type of content, the schedule applies to all content of that type.
-
-
Click twice to return to the Add Satellite Server or Configure Satellite Server dialog box.
-
Continue with Step 4.
-
(Optional) Specify the content to host on the Content Server. For more information, see Section 28.4, Including or Excluding Content.
If you want to specify the content that the Satellite hosts, you can include or exclude content from being replicated to it.
If you want to include content that its parent Primary Server does not have, you must first add the content to the parent Primary Server.
7.2.4 Imaging Role
Selecting this option installs the Imaging services and adds the Imaging role to the device. With this role, the device can be used as an Imaging server to perform all the Imaging operations, such as taking an image, applying an image, and multicasting an image. However, the ZENworks images are not replicated from the Primary Server to Imaging Satellites.
NOTE:The Imaging role is tied to the state of your ZENworks Configuration Management license. If your license state is deactivated, the Imaging role is disabled. For example, if you have a licensed copy of ZENworks Asset Management and you are evaluating ZENworks Configuration Management, the Imaging role is disabled if your ZENworks Configuration Management license expires. For more information, see Section 32.5, Possible License State Changes.
-
Select the check box next to , then click .
-
(Conditional) Select the check box next to to automatically start the Proxy DHCP service on the device to which the Imaging Server role has been assigned.
To check whether the Proxy DHCP service has been started on the device, review the message log of the device ( tab > folder > click the workstation > > Message Log panel).
-
(Conditional) Select the check box next to if you want the ZENworks image files to be automatically deleted from the device when the Imaging role is removed from the device.
The messages are logged in the Message Log panel if the severity level of the local file and the system log is set to on the Local Device Logging page. ( tab > > ).
This option is available only when you want to remove the Imaging Server role from the device.
-
Click next to to launch the Configure Imaging Content Replication dialog box.
The Configure Imaging Content dialog box lists a default configuration that applies to the imaging content, with a fixed interval schedule of every five minutes, no throttling, and a 60-minute content replication period.
-
Configure the Imaging content replication settings.
-
Select a throttle rate (in KB/sec). This rate specifies the maximum rate at which content is replicated. The actual rate can be lower, depending on other factors, including the number of downloads.
-
Select the duration of the content replication.
When you set the duration, be aware of the following:
-
The setting in all three scheduling options in the Recurring schedule type (, , and ) is not the end time when the content stops replicating. The start and end time settings specify the time period during which a replication can start.
If you select or and set a random start and end time, the replication starts between these times and continues for the specified duration. For example, if the is set at the default of 60 minutes and replication starts 10 minutes before the specified end time, content is replicated for the entire 60 minutes. The same concept applies for the schedule. If is set at the default of 60 minutes and the end time does not allow enough time for the specified duration, content is replicated for the entire 60 minutes.
-
If the Primary Server contains too much content to replicate during the specified duration, the replication continues at the next regularly scheduled time. Content that already exists on the Satellite device is not replicated again. Content that was not replicated during the previous replication session and any new content added to the Primary Server is replicated.
-
-
Select a schedule ( or ).
The Imaging Content Replication schedule determines how often the imaging content is sent down from the parent Primary Server to its child Satellite. Be aware that the cleanup action for content occurs every night at midnight.
If you do not set a schedule, the schedule applies to the Imaging content.
-
Click to save the changes.
NOTE:You can also configure the Imaging content replication settings while configuring the Content role to a device. These settings are automatically reflected in the Configure Imaging Content Replication dialog box invoked while configuring the Imaging role to the device. Similarly, the Imaging content replication settings configured while configuring the Imaging role to a device are automatically reflected in the Configure Content Type Replication dialog box invoked while configuring the Content role with Imaging content type to the device.
-
-
Click .
-
(Conditional) If you configure the Imaging role, the role is immediately added to the device. If the role is not immediately added, it is added only during the next device refresh schedule. If you want to immediately apply the role to the device, manually refresh the device in one of the following ways:
-
In the tab > the , select the check box next to the devices you want to refresh, then click > .
-
On the Windows managed device, right-click the
 icon, then click .
-
On the Linux unmanaged device, open a terminal, change your current working directory to /opt/novell/zenworks/bin/, and execute ./zac ref.
To check whether the Proxy DHCP service has been started on the device, review the message log of the device ( tab > folder > click the workstation > > Message Log panel or tab > folder > click the server > > Message Log panel).
The messages are logged in the Message Log panel only if the severity level of the local file and the system log is set to on the Local Device Logging page. ( tab > > ).
-
-
(Conditional) If the Linux Satellite has the Imaging role configured, turn off the firewall on the device before performing imaging operations.