7.1 Authentication Mechanisms
The following mechanisms can be used to authenticate managed devices to the ZENworks Management Zone:
7.1.1 Kerberos (Active Directory or Domain Services for Windows)
Kerberos, an authentication protocol developed at MIT, requires entities (for example, a user and a network service) that need to communicate over an insecure network to prove their identity to one another so that secure authentication can take place.
Kerberos functionality is included natively in a Windows Active Directory environment.
Kerberos requires the use of a Key Distribution Center (KDC) to act as a trusted third party between these entities. All Kerberos server machines need a keytab file to authenticate to the Key Distribution Center (KDC). The keytab file is an encrypted, local, on-disk copy of the host's key.
IMPORTANT:When attempting Kerberos authentication using smart card, ZENworks login process is attempted through ZENworks Credential Manager. Hence, the following capabilities are not available:
-
Dynamic Local User
-
Windows Roaming Profile Policies
-
Windows Group Policies
When using Kerberos authentication, the Active Directory server generates a Kerberos ticket that Novell Common Authentication Services Adapter (CASA) uses to authenticate the user, rather than using a username and password for authentication.
Setting Up Kerberos in your ZENworks Environment
IMPORTANT:If the Active Directory or Domain Services for Windows user source is configured to use only Kerberos authentication mechanism, ensure that the managed device is added to the user source domain.
-
Create a new user account and set it as the Kerberos service principal account using the following command on the domain controller:
For example, if you created a user called atsserver in your domain, you would run the following command from the command prompt
setspn -A HOST/atsserver.myserver.com atsserver
-
Generate a keytab file for that account.
For more information, see the Microsoft TechNet Web site.
For example, since the user account atsserver is set as the service principal account, you would run the following command from the command prompt:
ktpass /princ HOST/atsserver.myserver.com@MYSERVER.COM -pass atsserver_password -mapuser domain\atsserver -out atsserver.keytab -mapOp set -ptype KRB5_NT_PRINCIPAL
This command creates a keytab file and modifies the user atsserver to be a Kerberos principal. However, if the keytab, generated using the above mentioned command, does not work, then run the following command:
ktpass /princ atsserver/myserver.com@MYSERVER.COM -pass atsserver_password -mapuser domain\atsserver -out atsserver.keytab -mapOp set -ptype KRB5_NT_PRINCIPAL
-
Import the keytab file into ZENworks Control Center.
-
In ZENworks Control Center, click the tab, click , then click .
-
Click
 to browse to and select the keytab file.
-
Click OK to import the file.
-
-
Restart the ZENserver service.
NOTE:Kerberos cannot be configured for Active Directory with multiple domains, since this would require multiple keytab files and ZENworks only supports a single keytab file.
Enabling Kerberos Authentication While Adding a User Source
You can enable Kerberos authentication while adding a user source. For more information see Section 2.1, Adding User Sources.
Enabling Kerberos Authentication on an Existing User Source
You can enable Kerberos authentication on an existing user source.
-
In ZENworks Control Center, click the tab.
-
In the User Sources panel, click the user source, then click next to in the General section.
-
Select the check box, then click .
Understanding How Kerberos Authentication and the ZENworks Login Dialog Box Interact
The following table illustrates the ZENworks user experience using Kerberos authentication with Active Directory:
Table 7-1 ZENworks Kerberos Authentication with Active Directory
|
Windows login matches user source login? |
ZENworks also uses Username/Password authentication? |
Member of same domain? |
Member of different domain? |
Windows and ZENworks credentials match? |
Can log in to Management Zone? |
ZENworks login dialog box appears? |
|---|---|---|---|---|---|---|
|
|
|
|
|
|
Yes |
No |
|
|
|
|
|
|
Yes |
No |
|
|
|
|
|
Yes |
Yes |
|
|
|
|
|
No |
No |
|
|
|
|
|
No |
No |
|
|
|
|
|
No |
No |
|
|
|
|
|
No |
No |
|
|
|
|
|
|
Yes |
No |
|
|
|
|
|
Yes |
No |
|
|
|
|
|
Yes |
Yes |

For example, in the second row, the user’s initial login, user source, and ZENworks login credentials match. As a result, the user can log in to the ZENworks Management Zone and the ZENworks login dialog box does not appear.
As another example, in the third row, the user’s initial login credentials are using credentials from a different domain and are different than the ZENworks login credentials. As a result, the user can log in to the ZENworks Management Zone, but the ZENworks login dialog box appears.
Configuring ZENworks for Performing Kerberos Authentication with Domain Services for Windows (DSfW) Server
This section provides information about the tasks that need to be performed on DSfW and ZENworks Servers to configure Kerberos authentication for ZENworks login. It also includes information about additional settings and workarounds that need to be performed on the DSfW Server to ensure smooth Kerberos authentication for all users.
Pre-requisites
-
Ensure that the installation and configuration of the DSfW Server is done on the OES machine. For detailed information, see .
-
Verify the functionality of the DSfW Server. For more information refer to TID 7001884 in the Technical Support Knowledgebase .
-
Verify and test the features provided in this document, by using:
-
ZENworks Server : ZEN . server
-
OES 11 Server : DSfW services installed and configured
-
Windows Workstation : Windows XP SP3
-
Windows Support Tools : 5.2.x
-
Configuring DSfW Server and Windows Workstation
For example, you can use the credentials provided below to configure the DSfW Server and Windows Workstation.
-
Domain name : cit193.com
-
User name for creating key tab file : mcertuser
-
Users for verifying the setup : muser1, muser2
To configure DSfW Server and Windows Workstation, you need to first add the Windows Workstation to the DSfW domain:
-
Add the DSfW Server as the DNS Server.
-
Select My Computer > Properties, then change the domain for the workstation to the DSfW server's domain.
-
Provide the required credentials to add the workstation to the domain.
-
Restart the client.
-
Install Admin tools and Support tools on the client machine.
-
These tools facilitate the DSfW Server management to create the keytab file. You can find the download details at .
-
Install the ZENworks client on the same client by downloading the appropriate ZENworks client set-up from the http://<ZEN server>/zenworks-setup server.
-
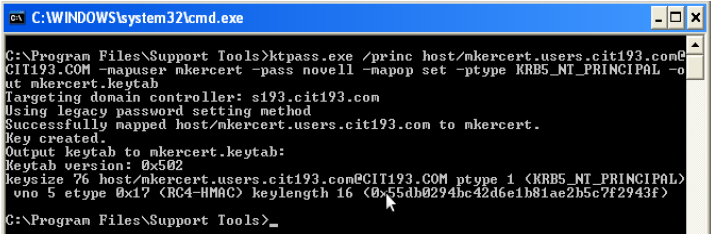
Create a user in DSfW server by using Microsoft Management Console (MMC), which can be associated to the DSfW service by creating a keytab file. In this case, the user for creating the keytab file is mcertuser. The expected result is as shown in figure below.
ZENworks Server Configuration
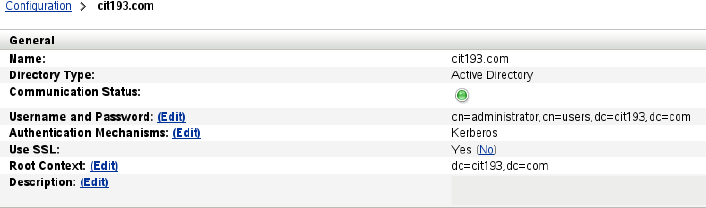
Adding DSfW as a User Source in ZENworks
To add a user source and choose Kerberos as the authentication mechanism, see .
To verify the result, click the user source enabled with Kerberos. The result appears as shown in figure.
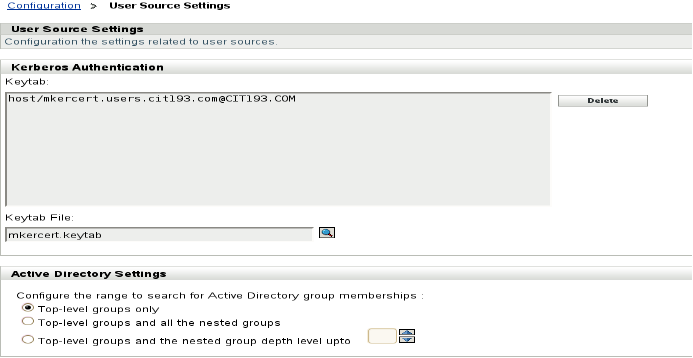
Adding a Kerberos Keytab file
-
Log in to ZENworks Control Center.
-
In , select > .
-
Add the Kerberos keytab file. After the keytab file is you can view the details as shown in the figure.
Kerberos Authentication for Windows Workstation
To verify the settings and to ensure the working of Kerberos authentication on the client machine, login to Windows as any user. For example, you can log in as either muser1 or muser2 created using MMC.
The same login credentials are passed on to the ZENworks client and login happens seamlessly to the Windows workstation with the same user.
NOTE:
-
The user used for creating the keytab file cannot login using ZENworks client as this user is associated with a Service Principal Name (SPN) rather than a User Principal Name (UPN).
-
The UPN attribute is mandatory for a successful ZENworks Configuration Management and DSfW integration. The UPN attribute is created when the user is created by using the MMC.
-
In case of ConsoleOne and iManager tools, the user created will not have the UPN attribute.
Troubleshooting Tips
Issue: A user created by using iManager cannot login seamlessly using the ZENworks client.
The login fails with the error message “Could not attempt login because either username or password is null” as shown in the figure.

Possible Cause 1: The User Principal Name (UPN) attribute is not set for the users created using iManager.
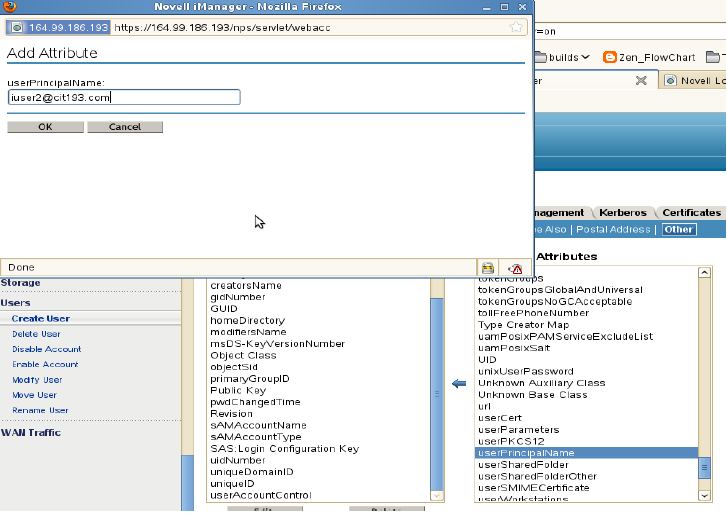
Workaround: Set the UPN attribute by selecting the user to be supported for Kerberos authentication.To set the UPN attribute:
-
Log in to iManager.
-
Select > Also, set this attribute in the tab as shown in the figure.
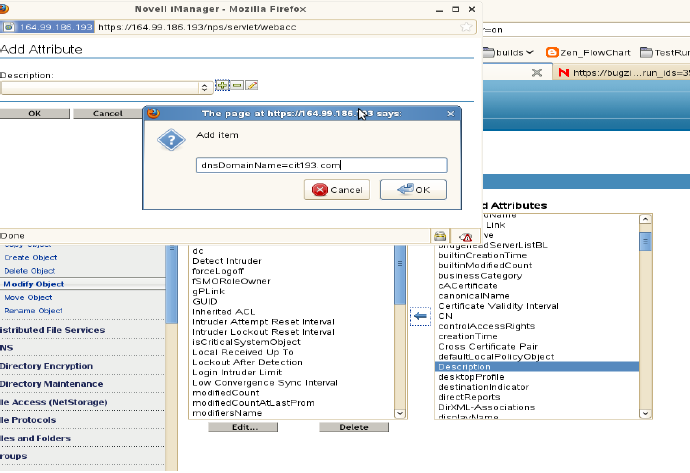
Possible Cause 2: The dnsDomainName attribute is not set at the root level in the DSfW domain.
Workaround: Set the dnsDomainName attribute at the root level of the DSfW domain so that reflects at the user's level.
To set the dnsDomainName attribute:
-
Log in to iManager and select the domain root object. For example you can select cit193.com.
-
Modify the object and add the field.
-
Add the attribute dnsDomainName=cit193.com.
-
Restart the ndsd (Novell Directory) services on the DSfW server.
The existing user once modified and any user objects that you create in future will automatically gets the UserPrincipalName attribute. For more information, see TID 7009221 from the Technical Support Knowledgebase .
Useful Links
-
For enabling CASA logs, see
-
For setting the DNS domain name attribute, see.
-
For verifying the functionality of the DSfW server, see.
7.1.3 Username/Password (eDirectory, Active Directory, Domain Service for Windows)
When using Username/Password authentication with a Novell eDirectory, Microsoft Active Directory, or Domain Service for Windows user source, if the credentials the user specifies to log in to the workstation or to the domain match the ZENworks login credentials, the ZENworks login dialog box does not display and the user is authenticated to the ZENworks Management Zone.
The username and password are also stored in Secret Store. If a user later logs in to ZENworks where no username or password is available (for example, the user logged in using a smart card), the stored credentials are used and the ZENworks login dialog box is bypassed.
Enabling Username/Password Authentication While Adding a User Source
You can enable Username/Password authentication while adding a user source. For more information see Section 2.1, Adding User Sources.
Enabling Username/Password Authentication on an Existing User Source
You can enable Username/Password authentication on an existing user source.
-
In ZENworks Control Center, click the tab, click the user source, then click next to in the General section.
-
In the User Sources panel, click the user source, then click next to in the General section.
-
Select the check box, then click .
Understanding How Username/Password Authentication and the ZENworks Login Dialog Box Interact
The following table illustrates the ZENworks user experience using Username/Password authentication with Active Directory:
Table 7-2 ZENworks Username/Password Authentication with Active Directory
|
Windows login matches user source login? |
ZENworks also uses Kerberos authentication? |
Member of same domain? |
Member of different domain? |
Windows and ZENworks credentials match? |
Can log in to Management Zone? |
ZENworks login dialog box appears? |
|---|---|---|---|---|---|---|
|
|
|
|
|
|
Yes |
No |
|
|
|
|
|
Yes |
No |
|
|
|
|
|
Yes |
Yes |
|
|
|
|
|
|
Yes |
No |
|
|
|
|
|
Yes |
No |
|
|
|
|
|
Yes |
No |
|
|
|
|
|
Yes |
Yes |
|
|
|
|
|
|
Yes |
Yes |
|
|
|
|
|
|
Yes |
Yes |
For example, in the first row, the user’s initial login, user source, and ZENworks login credentials match. As a result, the user can log in to the ZENworks Management Zone and the ZENworks login dialog box does not appear.
As another example, in the second row, the user’s initial login credentials are using credentials from a different domain but match the ZENworks login credentials. As a result, the user can log in to the ZENworks Management Zone, and the ZENworks login dialog box does not appear.