16.0 Enrolling an Email Only Device
This scenario shows you how to enroll a device as an Email Only device in your ZENworks Management Zone. This scenario details the procedure to enroll an iOS device as an Email Only Device.
-
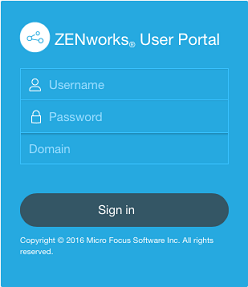
In a browser on the device, enter ZENworks_server_address/zenworks-eup, where ZENworks_server_address is the DNS name or IP address of the ZENworks MDM Server.
The login screen for the ZENworks User Portal is displayed. You use the ZENworks User Portal to enroll the device.
-
Enter the user’s user name and password. If option is selected for the user source to which the user belongs, then the registration domain need not be specified or else specify the registration domain. For information, see Section 6.1, Enabling a User Source for Mobile Device Enrollment. Tap .
NOTE:If the option is not enabled or the registration domain name is not configured, then you can specify the configured user source name in the field while enrolling a device.
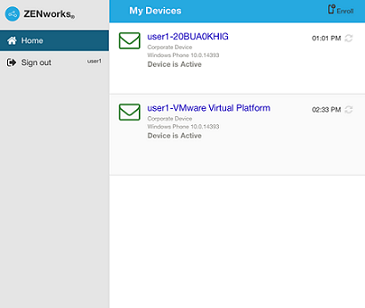
All devices associated with the user, are displayed in the ZENworks User Portal.
-
Tap on the upper-right corner, to display the enrollment options for the device.
The enrollment options are determined by the user’s Mobile Enrollment policy. For details, see Creating and Assigning a Mobile Enrollment Policy.
-
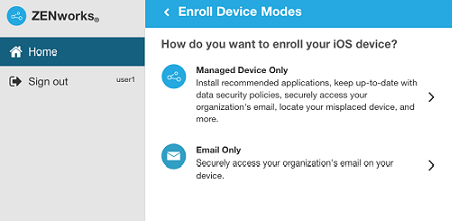
Tap to display the screen. Use the displayed information to create an email account for the user.

-
After the user configures the email account, an email is sent to the user stating that the enrollment process needs to be completed. You can edit the contents of this email in ZCC, by navigating to > > > . Click the relevant email and edit its contents.
To complete the enrollment process, click the link to the ZENworks End User Portal provided in the email or visit the ZENworks End User Portal as described in Step 1.
-
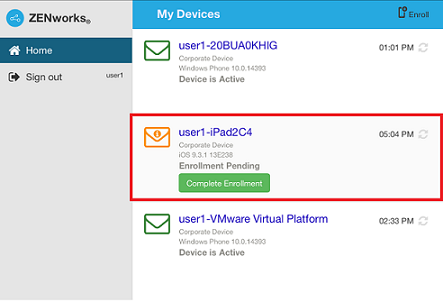
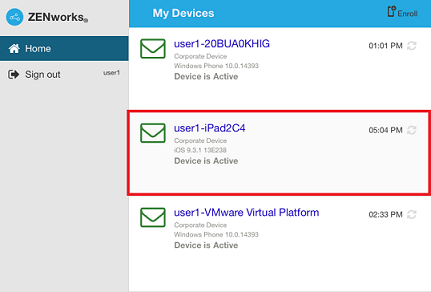
On the ZENworks User Portal, the device is displayed in the My Devices list. At this point, the device has been added to the ZENworks Management Zone but is pending enrollment.
-
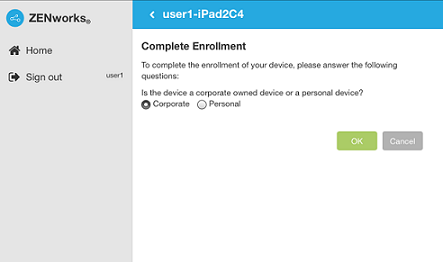
On the device, tap .
If you configured your Mobile Enrollment policy to allow the user to specify the device ownership (corporate or personal), you are prompted for that information. On the device, provide the required enrollment information, then tap .
-
The My Devices list is updated to show that the device is enrolled and active.
-
Verify that the device is receiving emails, by sending an email to the user from another account.
NOTE:If a Mobile Email policy is not assigned to the enrolled Email Only device or is unassigned from the already enrolled Email Only device, then an email is sent to the device stating that the user will be unable to send or receive corporate emails. You can edit the contents of this email in ZENworks Control Center by navigating to > > > . Click the relevant email and edit the contents.
Also, if a Mobile Email policy is not assigned to the device enrolled as an Email Only device, the device can still be managed by the ZENworks Control Center wherein you can apply policies applicable for Email Only devices.
-
After the device is enrolled to the ZENworks Management Zone, the enrollment mode of the device is displayed as on the Device Information page in ZCC. To view the device information, from the left hand side navigation pane in ZCC, click > (or navigate to the folder as configured in the Mobile Enrollment Policy) and select the appropriate device.