4.2 Reconfiguring ZENworks Reporting Appliance
After configuring ZENworks Reporting, you can reconfigure the settings.
To reconfigure the ZENworks Reporting settings.
-
On the ZENworks Reporting Appliance home page, click .
-
In the tab, configure the following required settings, and then click :
The asterisk (*) indicates that one or more configurations are modified. Changes should be applied to take effect.
For more information about the ZENworks Reporting Configuration page, see ZENworks Reporting Configuration.
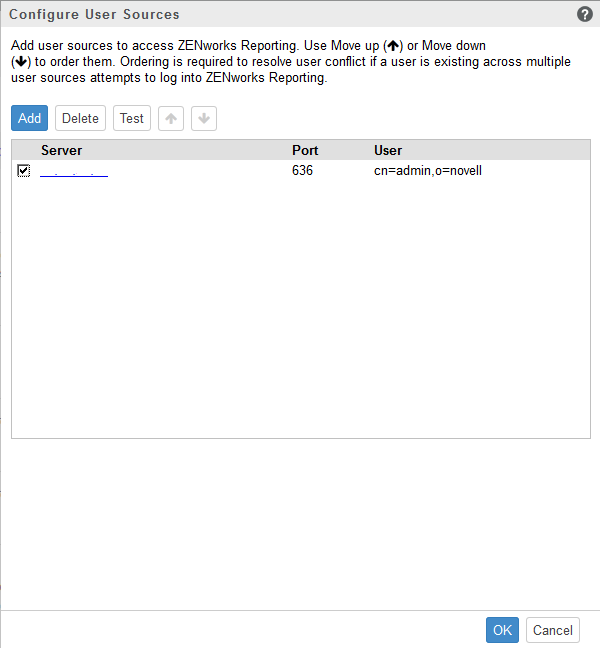
4.2.3 User Source Configuration
Click .
To add or edit multiple user sources.
-
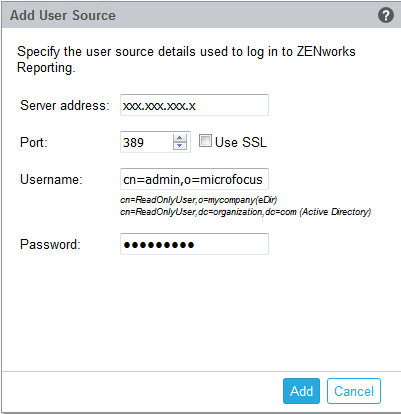
Click to add a user source, specify the following details:
-
Server Address: Specify the Fully Qualified Domain Name (FQDN) or IP address of the User Source, which is used for user authentication.
-
Port: The default port value is displayed based on the selected SSL. The default SSL port is 636 and the default non-SSL port is 389. If the user source is configured with a different port, other than the above mentioned default ports, then the port must be updated accordingly.
-
Username: ZENworks Reporting server needs read-only access to the LDAP directory to authenticate every login attempt. The credentials of this user is used to get read-only access.
Specify the username in distinguished name (DN) format. For example:
-
Novell eDirectory: cn=ReadOnlyUser,o=mycompany
-
Microsoft Active Directory: cn=ReadOnlyUser,cn=users,dc=organization,dc=com
After configuration, if the credentials of this user is modified, ZENworks Reporting server will not be able to access the LDAP directory to authenticate login attempts. You must reconfigure ZENworks Reporting with the new credentials.
Active Directory allows you to create an organization unit (OU) and username with some special characters that are not accepted by the ZENworks Reporting Appliance (the appliance does not proceed further with the unsupported special characters). In this scenario, each of these special characters ; = , + < >" must be appended with a backslash “\”. For example, specify ReadOnly,User as ReadOnly\,User
-
-
Password: Specify the password of the first authentication user.
-
Click to check whether the connection to the user source is established.
If you have enabled the check box, then a certificate popup is displayed. Verify the details, and then click Accept.
-
Click to continue.
-
-
Delete: Select the user source that you want to remove and click . If a user source is deleted, the users from that user sources cannot have access to ZENworks Reporting.
-
Move up: Select the user source that you want to step up in the list. This ensures that the user authentication for this user source is attempted with higher priority than those listed below.
-
Move down: Select the user source that you want to step down in the list. This ensures that the user authentication for this user source is attempted with lower priority than those listed above.
-
Test: Select the user source that you want to test, and then click to check whether the connection to the user source is established.
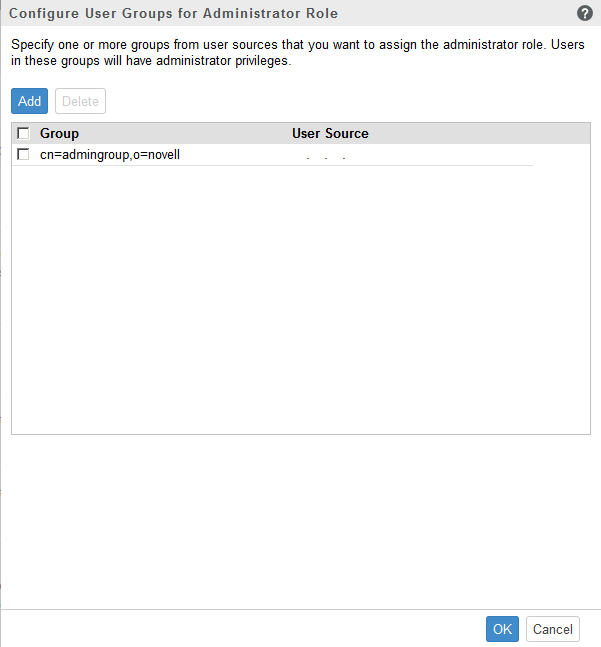
4.2.4 User Group Configuration
To add user groups from the configured user sources so as to get ZENworks Reporting administrator rights for the members of the those groups.
-
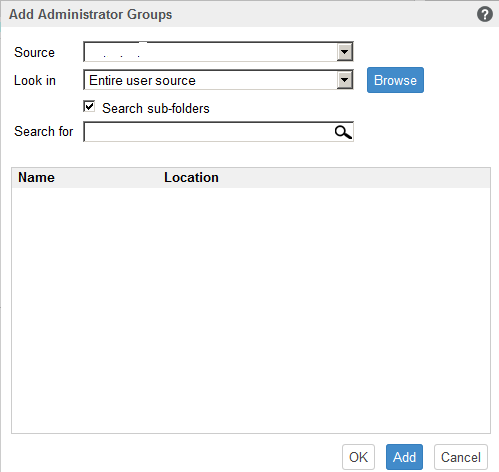
Click and specify the following to add a LDAP group:
-
Source: Select a configured user source.
-
Look in: You can search the entire user source or click to select a specific search container from the user source. Select the check box to search the container recursively.
-
Search for: Specify the name or a few characters that contain the name of the group you want to search and click the search icon. The names of the groups in the search container that contain the search text is displayed. You can select one or more groups from the search results, then click to add user groups. Else, click if you want to configure them and continue.
-
-
Select one or more groups from the list and click to revoke administrator privileges from the users belonging to these administrator groups.
-
Select the check box to select all the groups from the list and delete.
IMPORTANT:
-
Only administrators have access permissions to ZENworks Reporting. The administrator privileges are:
-
View, run, schedule, create, save, and delete various ZENworks Reporting resources (For example: reports, views, domain, and data sources)
-
Assign access permissions (read, write, delete, execute, and administer) for various ZENworks Reporting resources to other users either at a role level or at a user level.
-
Manage ZENworks Reporting server settings
-
Delete users or roles
-
-
If you have selected a parent group (a group containing other sub-groups), note the following:
-
For Active Directory: Users in those sub-groups will not have administrator privileges. To assign these users administrator privileges, configure them individually.
-
For eDirectory: All the sub-groups will also have administrator privileges.
-