10.8 Adding Pre-approved Devices

From ZENworks 2020 Update 2 onwards, you can add the devices to the pre-approved devices list. The pre-approved devices are approved by the administrators to be part of the zone. You can pre-approve devices while bulk registering a known set of devices. It can also be used to allow known devices to reconcile if required. The Pre-Approved Enrollment feature lets you import devices, even before the enrollment is completed. This feature can be used only when you enable the enhanced security feature. For more information on enabling the security feature, see Security Commands in the ZENworks Command Line Utilities Reference.

Assume that a managed device or an inventory-only device (IOA agents) that was previously registered to the zone using the authorization key gets deleted or unregistered from the Management Zone. The next time, if the device must register back to the zone without having the hassle of using or entering the authorization key again, then the devices should be added to the pre-approved devices list. Including the devices in the pre-approved list with specific device details help devices to register back to the zone.

The pre-approved devices can be added manually, imported using a CSV file or using device action (Add to pre-approved devices).

10.8.1 Adding the Pre-approved Devices Manually

If you have obtained a list of devices through your OEM vendor, then you can manually add the pre-approved devices by perform the following steps:

  1. In ZCC, click Devices > Discovered

  2. Click Pre-approved Devices.

  3. In the Pre-approved devices page, click Add.

  4. Specify the following information, and then click Next:

    • Serial Number

    • Mac Address

    • DNS Name

    • Product Name

    • Manufacturer

    • Asset Tag Number

    • Device Type

    • Expiry Date

  5. In the Device Match Setting page, select the attributes that will be used to uniquely identify a device. At least one attribute should be selected. If multiple attributes are selected, then the attributes are matched in the following order:

    • Serial Number

    • MAC Address

    • DNS Name

      If required, you can click override, and based on requirements, you can modify the settings.

  6. Click Finish.

10.8.2 Importing Pre-approved Devices from CSV File

To import the pre-approved devices using a CSV file, perform the following steps:

  1. In ZCC, click Devices.

  2. In the Devices Tasks panel, click Import Pre-approved Devices.

  3. Click Browse and select a CSV file that includes details of the devices that you want to import as pre-approved devices, and then click Next.

  4. Click Add, in the pop-up select the field, associate column name in the CSV file, and then click OK.

    Ensure that you at least associate the Device Type field, and the MAC address, Serial Number, or DNS Name field.

    After associating all the fields, click Ok.

    If required, you can click Verify to check for the associated fields.

  5. Click Finish.

The imported devices will be displayed in the Pre-approved Devices page.

IMPORTANT:You can also import devices to the pre-approved devices list using the zman discovered-import-preapproved-devices command. For more information on the command, see the ZENworks Command Line Utilities Reference.

10.8.3 Adding the Pre-approved Devices using Action

To add the already registered devices to the per-approved devices list, perform the following steps:

  1. In ZCC, click Devices.

  2. Click Servers or Workstations.

  3. Select the required devices, and then click Action > Add to pre-approved devices.

NOTE:If device already exists in the pre-approved devices list, expiry of the device is changed to the default expiry date (2 days), if existing expiry is less than default expiry date or device was already expired.

10.8.4 Adding the Pre-approved Devices while Deleting Devices

In ZENworks 2020 Update 2, the devices that are already managed (registered to the zone) can be added to the Pre-approved devices list while deleting from the zone. The managed device can either be a server or a workstation.

To delete a Server or Workstation, perform the following:

  1. In ZCC, click Devices > Workstations / Servers.

  2. In the Workstations page, select the required devices.

  3. Click Delete.

  4. After clicking Delete, a pop-up is displayed as shown in the below image:

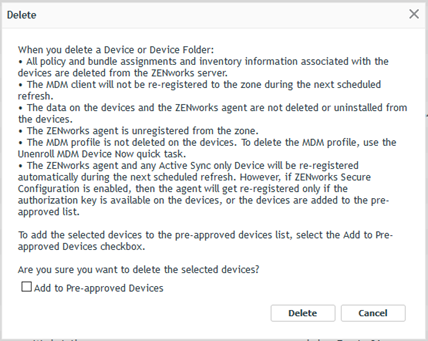
  5. To add devices to the pre-approved devices, select the Add to Pre-approved Devices check box.

  6. Click Delete.