3.6 Configuring the Schedule for Vulnerability Detections
The Vulnerability Detection Schedule page enables you to configure Vulnerability Detection schedules for the devices in your network. You can decide when to run the Vulnerability Detection on network devices as well as specify when to distribute bundle content through Vulnerability Detection.
To configure the Vulnerability Detection Schedule, select in the ZENworks navigation menu, and go to > > .
NOTE:If you want to make changes to the schedule of a DAU Bundle, you should configure it within the Vulnerability Detection Schedule page. If the DAU bundle schedule is modified within any other page of ZCC, such as the Device's Assignments or the Bundle's Relationship page, under Assignment Details, it will be overridden during the next subscription update by the value configured in the Vulnerability Detection Schedule page.
Refer to the descriptions below to understand which configuration options to choose for running Vulnerability Detection:
|
Item |
Description |
|---|---|
|
|
Lets you deploy bundle content immediately. |
|
|
Lets you specify a schedule when Vulnerability Detection bundles will be distributed to devices. |
|
|
Lets you initiate Vulnerability Detection action when the Agents on the managed devices are refreshed. |
|
|
Lets you specify a schedule when the Vulnerability Detection will run. |
Patch Management offers two types of schedules to determine when a Vulnerability Detection is run and bundle content is distributed, and .
-
Date Specific: Select to schedule the deployment to your selected devices according to the selected date.
Set the following options in the Date Specific page:
-
Start Date: Enables you to pick the date when you need to start the desired action. To do so, click the icon to open the calendar and pick the date. To remove the selected date, click the icon.
-
Run event every year: Ensures that the desired action starts on a selected date at a selected time, repeats every year, and if defined, ends on a specific date.
-
Process immediately if device unable to execute on schedule: Ensures that the desired action starts immediately if the device could not execute on the selected schedule.
-
Select when schedule execution should start: There are two options that enable you to select the start time of the schedule execution namely:
-
Deactivates the panel and starts the action at the start time specified. In this option, you must set the start time in the panel:

-
Activates the panel next to the panel. You can specify the end time and the start time so that the action occurs at a random time between them. The panel appears as follows:

In both time panels, the first drop-down list enables you to select the hour, the second drop-down list enables you to select the minute, and the third drop-down list enables you to select and .
Selecting the check box enables you to schedule the desired action at the same time, regardless of time zone differences. Coordinated Universal Time (UTC), also known as World Time, Z Time, or Zulu Time, is a standardized measurement of time that is not dependent upon the local time zone. Deselecting UTC schedules the distribution at the local time.
-
-
-
Recurring: Select to start the deployment on the selected day at a selected time, repeat the deployment every day/week/month, and if defined, end on a specific date.
Set the following options in the Recurring page:
-
When a Device is Refreshed: This option enables you to schedule a recurring deployment whenever the device is refreshed. In this option, you can choose to delay the next deployment until after a specific time.
To set the delay, select the check box, and specify the days, hours, and minutes of the time to delay the deployment:

NOTE:The device is refreshed based on the settings in > menu > (Manual Refresh or Timed Refresh). Alternatively, you can refresh the device by selecting a device in the page and clicking the option in the menu.
-
Days of the Week: This option enables you to schedule the deployment on selected days of the week.
To set the day of deployment, select the button, select the required day of the week, and set the start time of deployment.
If you click the link, additional deployment options appear:
-
Selecting the check box enables you to schedule the deployment of all devices at the same time, regardless of time zone differences. Coordinated Universal Time (UTC), also known as World Time, Z Time, or Zulu Time, is a standardized measurement of time that is not dependent upon the local time zone. Deselecting UTC schedules the distribution at local time.
-
Selecting the check box activates the panel in addition to the panel. You can specify the end time and the start time so that the deployment occurs at any random time between the start and end times.
-
The option enables you to schedule a recurring deployment at the selected time, repeat the deployment on the days specified, and, if defined, end at the specific time. This option also enables you to restrict the deployment to the period between the start date and the end date. To set this option, select the check box, and click the icon to open the calendar and pick a start date or end date.
-
-
Monthly: This option enables you to specify the monthly deployment options.
In the Monthly deployment option, you can specify the following:
-
Enables you to schedule the deployment on a specific day of the month. You can specify any number between 1 and 31.
-
Enables you to schedule the deployment on the last day of the month.
-
Enables you to schedule the deployment on specific days of every month. The valid options for the day are first, second, third, fourth, and fifth. The valid options for the weekday are Sunday through Saturday. To select one particular day of the month, use the drop-down arrows.
To select an additional day of the month, click the icon and use the drop-down arrows in the second row. To remove a particular day from the list, click the icon.
If you click the link, additional deployment options appear.
NOTE:The option enables you to schedule a recurring deployment at the selected time, repeat the deployment on the days specified, and, if defined, end on the specific time. This option also enables you to restrict the deployment to the period between the and the . To set this option, select the check box, and click the icon to open the calendar and pick a start date or end date. Click the button when you have finished selecting the date.
-
-
Fixed Interval: This option enables you to schedule a recurring deployment that runs after a fixed duration on a regular basis. You can choose the number of months, weeks, days, hours, and minutes of the interval and the start date for the deployment schedule, as shown in the following figure:
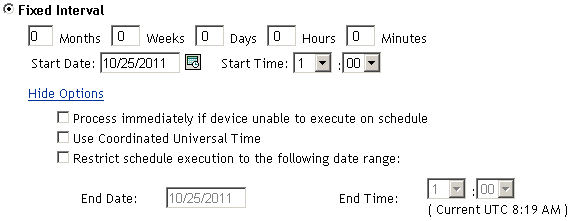
If you click the link, additional deployment options appear.
-