3.1 Managing Remote Sessions on a Windows Device
Review the following sections for information on managing sessions on a Windows device:
3.1.1 Managing a Remote Control Session
Remote Management lets you remotely control a managed device. With remote control connections, the remote operator can go beyond viewing the managed device to taking control of it, which helps to provide user assistance and resolve problems on the managed device. For information on launching a Remote Control session, see Section 2.1.5, Starting Remote Management Operations on a Windows Device.
Using the Toolbar Options in the Remote Management Viewer
The following table describes the various toolbar options available in the Remote Management viewer during a Remote Control session. It also lists the shortcut keys if they are available.
|
Option |
Shortcut Key |
Functionality |
|---|---|---|
|

|
|
Allows you to configure various session parameters such as format and encoding for enhancing the session performance, logging, and local and remote cursor handling. |
|

|
Ctrl+Alt+Shift+I |
Provides the hostname, port, screen resolution, and protocol version of the managed device. |
|

|
Ctrl+Alt+Shift+F |
Allows you to toggle between full screen and normal mode. |
|

|
|
Refreshes the viewing window. |
|

|
Ctrl+Alt+Shift+Del |
Sends the Ctrl+Alt+Del keystroke to the managed device. This option is disabled for Remote View and Remote Diagnostics sessions. The Ctrl+Alt+Del keystroke is delayed in a remote session when used for the first time after rebooting the managed device. However the subsequent Ctrl+Alt+Del keystroke takes less time until you reboot the managed device again. |
|

|
|
Invokes the Start menu on the managed device. |
|

|
|
Clicking this option and pressing the ALT key on the keyboard sends the Alt keystroke to the managed device. |
|

|
Ctrl+Alt+Shift+B |
Blanks or displays the screen on the managed device. When the screen of the device is blanked, the operations performed by the remote operator on the device are not visible to the user at the device. The keyboard and the mouse controls on the managed device also get locked. This option is enabled only if the option is enabled in the Remote Management policy effective on the managed device. |
|
and Mouse 
|
Ctrl+Alt+Shift+L |
Locks or unlocks the keyboard and mouse controls for the managed device. When the mouse and keyboard controls of the device are locked, the user at the managed device cannot use these controls. This option is enabled only if the option is enabled in the Remote Management policy effective on the managed device. |
|

|
|
Launches a session to transfer files to and from the managed device. This option is enabled only if the option is enabled in the Remote Management policy effective on the managed device. For more information on File Transfer, see Section 3.1.5, Managing a File Transfer Session. |
|

|
Ctrl+Alt+Shift+C |
Launches a ZENworks Remote Management Collaboration Session on the managed device, which lets you invite multiple remote operators to join the remote management session. You can also delegate the Remote Control rights to another remote operator to help you solve a problem. For more information on Session Collaboration, see Session Collaboration. |
|

|
Ctrl+Alt+Shift+U |
Launches a Remote Execute session on the managed device, which enables you to remotely launch any executable on the managed device. This option is enabled only if the option is enabled in the Remote Management policy effective on the managed device. |
|

|
Alt+F4 |
Closes the remote session. |
|
|
Ctrl+Alt+Shift+S |
Switches the display on a managed device with multiple monitors. This option is disabled for Remote Diagnostics session. For more information, see Section 1.3.13, Switch Display |
|
|
Ctrl+Alt+Shift+H |
The ZENworks Chat feature provides chat capability during a remote session. It allows you to communicate with the user and other administrators who are connected to the Remote Management session. It is enabled only when either a Remote Control or a Remote View session is initiated. After the remote session is complete, you can access the chat log the Remote Management\chats directory. |
|

|
|
Records the Remote Control session. |
Session Collaboration
The Session Collaboration feature lets you invite multiple remote operators to join the Remote Management session if the remote operators have launched the Remote Management listener to listen to the remote session requests. You can also delegate the Remote Control rights to a remote operator to help you solve a problem and then regain control back from the remote operator. This option is currently supported only on Windows.
If you launch the Remote Control session on the managed device first, then you gain the privileges of the master remote operator. You can use Session Collaboration to:
-
Invite multiple remote operators to join the Remote Control session.
-
Delegate the remote control rights to a remote operator to help you solve a problem and then regain control back from him or her.
-
Terminate a remote session.
To launch Session Collaboration:
-
Launch the Remote Control session on the managed device in collaborate mode.
For information on launching a Remote Control session, see Section 2.1.5, Starting Remote Management Operations on a Windows Device.
-
On the Remote Management viewer toolbar, click
to display the Session Collaboration window.
The Session Collaboration window lists the remote operators added in the Remote Management policy effective on the device. Each remote operator is listed as a separate entry preceded by a colored circle:
-
A gray circle indicates that the remote operator has not joined the session.
-
A red circle indicates that the remote operator has joined the session and is in the Remote View mode.
-
A green circle indicates that the remote operator has joined the session and has been delegated Remote Control rights in the session.
For more information on Adding the Remote Operators, see Section 2.1.2, Creating the Remote Management Policy
The following table lists the actions that you as a master remote operator can perform during session collaboration:
|
Task |
Steps |
Additional Details |
|---|---|---|
|
Invite a remote operator to join a remote session |
|
If the remote operator accepts the request and joins the session, the gray circle for the remote operator changes to red. By default, the new session starts in the Remote View mode. |
|
Delegate Remote Control rights to the remote operator |
|
The selected remote operator is now in Remote Control mode and the red circle for the remote operator changes to green. The master remote operator automatically switches to the Remote View mode. |
|
Regain Remote Control rights from the remote operator |
|
The remote operator switches into Remote View mode and the green circle for the remote operator changes to red. The master remote operator automatically switches to the Remote Control mode. |
|
Terminate the Remote Session |
|
If the selected remote operator is in Remote Control mode, then you will regain the Remote Control rights. The remote operator’s session terminates and the color of the circle for the remote operator changes to gray. |
|
Invite an external remote operator |
|
|
If the master remote operator disconnects the remote session, then all the remote operators are terminated from the session.
In a Remote Control session, if you want the device IP address to be displayed instead of the DNS name, check the Always default to IP address for all devices box.
The values that you provide to access a device while performing a Remote Control operation are saved in the system when you click Ok.
During a Remote Control operation, the following values are saved for an administrator and can be accessed during the next Remote Control operation:
-
Always default to IP address for all devices
-
Certificate Key Pair
During a Remote Control operation, the following values are saved for a device and can be accessed during the next Remote Control operation:
-
Device name
-
Authentication
-
Session Encryption
-
Enable logging
-
Route Through Proxy
3.1.2 Managing a Remote View Session
Remote View lets you remotely connect with a managed device so that you can view the managed device desktop. For information on launching a Remote View session, see Section 2.1.5, Starting Remote Management Operations on a Windows Device.
The following table describes the various toolbar options available in the Remote Management viewer during a Remote View session.
|
Option |
Shortcut Key |
Functionality |
|---|---|---|
|
|
|
Allows you to configure various session parameters such as format and encoding for enhancing the session performance, logging, and local and remote cursor handling. |
|
|
Ctrl+Alt+Shift+I |
Provides the hostname, port, screen resolution, and protocol version of the managed device. |
|
|
Ctrl+Alt+Shift+F |
Allows you to toggle between full screen and normal mode. |
|
|
|
Refreshes the viewing window. |
|

|
Alt+F4 |
Closes the remote session. |
|
|
|
Switches the display on a managed device with multiple monitors. This option is disabled for Remote Diagnostics session. For more information, see Section 1.3.13, Switch Display |
|
|
Ctrl+Alt+Shift+H |
The ZENworks Chat feature provides chat capability during a remote session. It allows you to communicate with the user and other administrators who are connected to the Remote Management session. It is enabled only when either a Remote Control or a Remote View session is initiated. After the remote session is complete, you can access the chat log from the following location: %appdata%\novell\ZENworks\Remote Management\chats |
|
|
|
Records the Remote View session. |
3.1.4 Managing a Remote Diagnostics Session
Remote Management lets you to remotely diagnose and analyze the problems on the managed device. This helps you to shorten problem resolution times and assist users without requiring a technician to physically visit the problem device. This increases user productivity by keeping desktops up and running.
NOTE:After installing ZENworks agent on a Windows XP device, reboot the device to perform remote diagnostics operation.
The following table describes the various toolbar options available in the Remote Management viewer during a Remote Diagnostics session.
|
Option |
Shortcut Key |
Functionality |
|---|---|---|
|
|
Ctrl+Alt+Shift+O |
Allows you to configure various session parameters such as format and encoding for enhancing the session performance, logging, and local and remote cursor handling. |
|
|
Ctrl+Alt+Shift+I |
Provides the hostname, port, screen resolution, and protocol version of the managed device. |
|
|
Ctrl+Alt+Shift+F |
Allows you to toggle between full screen and normal mode. |
|
|
Ctrl+Alt+Shift+R |
Refreshes the viewing window. |
|
|
Ctrl+Alt+Shift+E |
Launches a session to transfer files to and from the managed device. This option is enabled only if the option is enabled in the Remote Management policy effective on the managed device. For more information on File Transfer, see Section 3.1.5, Managing a File Transfer Session |
|
|
Alt+F4 |
Closes the remote session. |
|
|
Record the Remote Diagnostics session. |
|
|
|
Ctrl+Alt+Shift+T |
Toggles the toolbar visibility. |
When you launch a Remote Diagnostics session on the managed device, you can access only the diagnostics applications configured for the device in the Remote Management settings for diagnosing and fixing the problems on the device. During the session, the diagnostics applications are displayed as icons in a toolbar. By default, the following diagnostics applications are configured in the Remote Management Settings.
The following table lists the Remote Diagnostics applications:
|
Icon |
Application |
|---|---|

|
|

|
|

|
|

|
|
You can configure the applications to be launched on the managed device during the Remote Diagnostics session. For more information on configuring the diagnostics applications, see Section 2.1.1, Configuring the Remote Management Settings on a Windows Device.
3.1.8 Recording a Remote Management Session
The recording is supported with Remote Control, Remote View, and Remote Diagnostics.
By default recording is disabled by the agent. To enable it, a Remote Management policy should be assigned.
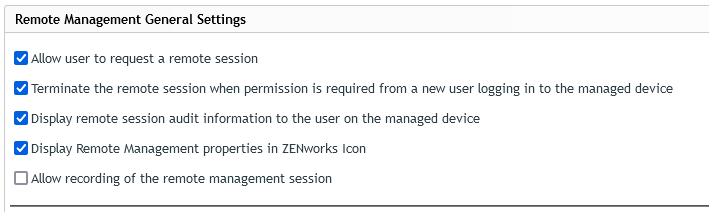
You also need to enable the following options to perform the remote management session recording:
-
Recording audit
To enable, go to > > > , click and select .
If the option is enabled, the audit records will be generated for every remote session performed on the managed device. The recording file URL will be embedded in the recording audit, which could be viewable in the recording audit section in ZCC.
-
Visible signal on the managed device for remote control, remote view or remote diagnostics
By default, this option is selected during policy creation. If it is not enabled in the policy, then select the any of the following options in the policy wizard.
If this option is enabled, a user will be able to check the recording status of a session from the visible signal dialog box.
-
Recording a Remote Management Session
To record a remote management session, perform the following steps:
-
Launch the remote management session. For information on initiating a remote management session, see Section 2.1.5, Starting Remote Management Operations on a Windows Device.
-
Click the
icon in the viewer toolbar.NOTE:
-
In collaboration mode, only the master administrator will have the control to start or pause the recording until the session is delegated.
-
In the shared sessions, all compatible users will have equal rights to start or pause the session recording.
-
The following viewer options are not supported when remote management session recording is in progress. If you select a supported option, the viewer will automatically switch to a supported option.
Format and encoding
-
Preferred encoding: ZRLE
-
256 colors (less traffic)
Mouse Cursor
-
Track remote cursor locally
-
Don’t show remote cursor
-
-
Viewing Session Recordings
To view session recordings, perform the following steps:
-
Navigate to > > > > > > . The recording event will be displayed.
-
Click the recording link in the column to view the recording audit details.
Figure 3-1

-
Click the link to view the recording session details.
Figure 3-2
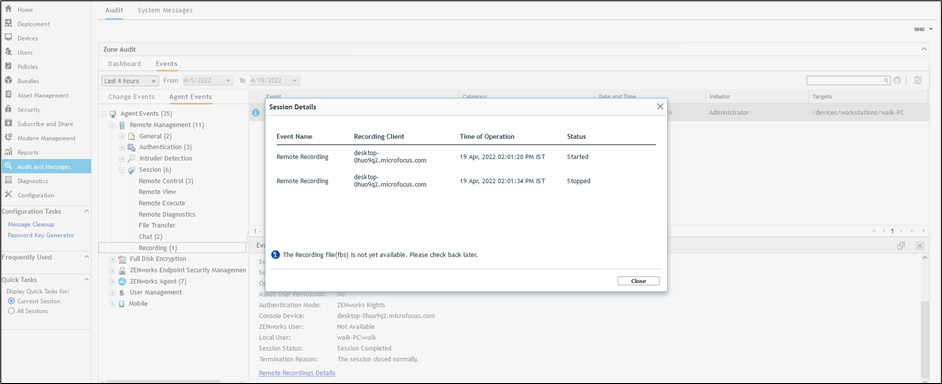
NOTE:When session recording files are uploaded to the server even before audit upload, then uploaded FBS files are moved to the deferred folder until audit entry exists in the database for that recording session. Further, the deferred action will be executed every 30 minutes which will move the FBS file from the deferred folder.
-
Once the recording file is available, click the
 icon to download the FBS file and play the same using the RFB player.
NOTE:To play a .FBS recorded file, download the RFB player from https://www.tightvnc.com/rfbplayer.php.
Run the following command:
java -jar <path_to_file>\RfbPlayer.jar URL file:<path_to_file>\session_recording_filename
where session_recording_filename is the file that you want to play the recording. In this command, full path of Rfbplayer.jar should be provided.
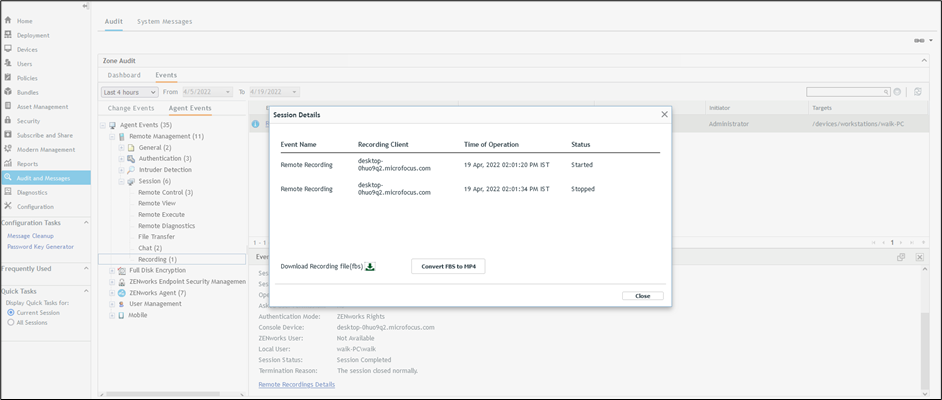
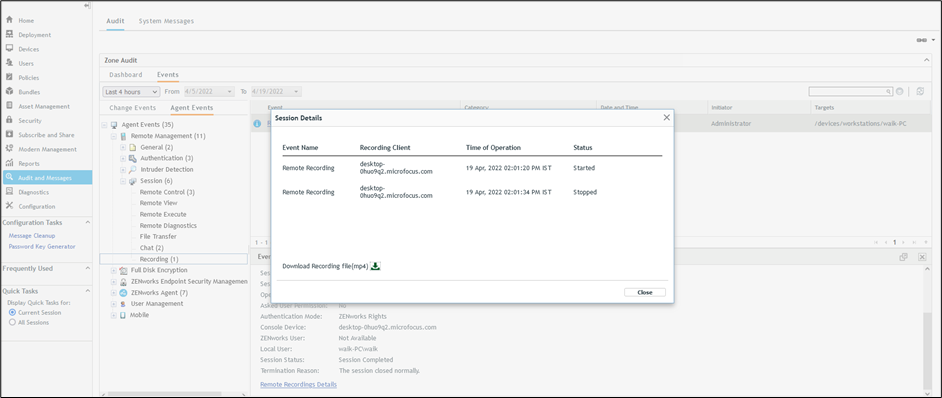
Converting Recording from FBS to MP4 Format
You can convert the FBS recorded sessions to MP4 in the following methods:
-
On-demand conversion (from ZCC)
-
Recursive conversion (by setting the convertAllRecording parameter to true in the FBSConversionHandler.xml file)
On-demand Conversion
To convert the recordings on-demand, perform the following steps:
-
Click the button to convert the FBS file to MP4.
-
Click to download and play the converted file in MP4 format.
Recursive Conversion
You can convert all session recorded FBS files recursively by setting the parameters in the FbsConversionHandler.xml files.
To convert the FBS recorded sessions recursively, perform the following steps:
-
Open the FbsCoversationHandler.xml file from the following location:
-
Windows Server: C:\Program Files(x86)\Micro Focus\ZENworks\conf\loader
-
Linux Server: /etc/opt/microfocus/zenworks/loader/
-
-
Edit the convertAllRecordings parameter to set to true. By default, the convertAllRecordings parameter is set to false.
-
Edit the queueActionStartTimeHours and queueActionStartTimeMinutes parameters to set the time at which the recording should start.
-
Edit the maxConverstionDurationInHours parameter to set the maximum number of hours the recording conversion is allowed. You can use this parameter to limit the number of hours allowed for the files to convert.
Example of parameters,
<Module> <Class>com.novell.zenworks.loader.modules.queue.handlers.FbsConversionHandler</Class> <Parameters> <Parameter Name="convertAllRecordings">true</Parameter> <Parameter Name="queueActionStartTimeHours">20</Parameter> <Parameter Name="queueActionStartTimeMinutes">5</Parameter> <Parameter Name="maxConversionDurationInHours">3</Parameter> </Parameters> </Module>NOTE:It is recommended that you set the recording conversion time at which the server load is not high as converting large amounts of recordings can impact the server’s performance.
The following parameters can be set in the FbsConversionHandler.xml file to configure recording conversion behavior.
Name
Value
Default
convertAllRecordings
true/false
false
queueActionStartTimeHours
0-23
0
queueActionStartTimeMinutes
0-59
0
maxConversionDurationInHours
0-23
3
-
Restart the loader service for the changes to take effect after setting parameters in the FbsConversionHandler.xml file.