6.3 Deploying Patches Manually
To distribute patches manually, use the Deploy Remediation Wizard, which provides an interface to create or edit patch deployment schedules for multiple recipients or devices. The wizard assists in selecting devices, scheduling deployment of patches, and if required, setting recurrence. After completing the wizard, the deployment will be listed in the Bundles page.
NOTE:To deploy a Windows patch, it is recommended that the minimum disk space required is at least 5x the largest available patch. If you are deploying multiple patches, then the minimum disk space required is at least 5x the total size of the patches.
You can access the Deploy Remediation Wizard from the Action menu on one of the following pages:
-
Security > Dashboard > Recently Released Patches
-
Security > Patches
-
Devices > [selected device] > Patches
You can also click the link under Patch Management shortcuts in the navigation menu. These shortcut options appear when the Patch Management > Patches page is open.
If you select multiple patches in the Deployment Remediation Wizard, the wizard automatically selects all the applicable devices and packages. If any device is selected, the wizard automatically selects all patches that are applicable for that device. If a group is selected, the wizard includes all patches applicable for the devices in that particular group.
IMPORTANT:Once you initiate a patch remediation and the patch bundles are created for the remediation, the patch bundles should not be modified. If patch remediation bundles get modified, they may not replicate to Primary servers leaving the intended devices not patched.
6.3.3 Remediation Schedule
In the Remediation Schedule page you configure how a patch is scheduled and deployed for selected devices.
To start setting the remediation schedule, you need to select the schedule type. Patch Management offers three types of schedules to determine when the patches are actually applied to the target device, Now, Date Specific, and Recurring:
-
Now: Schedules the deployment to your selected devices immediately after you complete all the steps in the Deployment Remediation Wizard.
-
Date Specific: Schedules the deployment to your selected devices according to the selected date.
When you select , you can choose from the following schedule options:
-
Start Date: Enables you to pick the date when you need to start the deployment. To do so, click the plus icon
 to open the calendar and pick the date. To remove the selected date, click the minus icon
  .
. -
Run event every year: Ensures that the deployment starts on a selected date at a selected time, repeats every year, and if defined, ends on a specific date.
-
Process immediately if device unable to execute on schedule: Ensures that the deployment starts immediately if the device could not execute on the selected schedule.
-
Select when schedule execution should start: There are two options to enable you to select the start time of the schedule execution using a 24 hour clock, namely:
-
Deactivates the panel and starts the deployment at the start time specified. In this option, you must set the start time in the panel:

-
Activates the panel next to the panel. You can specify the end time and the start time so that the deployment occurs at a random time between them. The panel appears as follows:

Selecting the check box enables you to schedule the deployment of all devices at the same time, regardless of time zone differences. Coordinated Universal Time (UTC), also known as World Time, Z Time, or Zulu Time, is a standardized measurement of time that is not dependent upon the local time zone. Deselecting UTC schedules the distribution at the local time.
-
-
-
Recurring: Starts the deployment on the selected day at a selected time, repeats the deployment every day/week/month, and if defined, ends on a specific date.
By default, the bundle install frequency is set to For a recurring deployment, change it to , after finishing the Deploy Remediation Wizard. For more information, see
Install Action Set Options
in the ZENworks Software Distribution Reference.In the Recurring Remediation Schedule, you can set the following options for a recurring deployment:
-
When a Device is Refreshed: This option enables you to schedule a recurring deployment whenever the device is refreshed. In this option, you can choose to delay the next deployment until after a specific time.
To set the delay, select the check box, and specify the days, hours, and minutes of the time to delay the deployment:
NOTE:The device is refreshed based on the settings in the page under the page. Click the link under to open the page displaying the option for either a or . Alternatively, you can refresh the device by selecting a device under the page and clicking the option under the menu.
-
Days of the Week: This option enables you to schedule the deployment on selected days of the week:
To set the day of deployment, select the button, select the required day of the week, and set the start time of deployment. If you click the link, additional deployment options appear:
-
Select the check box to schedule the deployment of all devices at the same time, regardless of time zone differences. Coordinated Universal Time (UTC), also known as World Time, Z Time, or Zulu Time, is a standardized measurement of time that is not dependent upon the local time zone. Deselecting UTC schedules the distribution at local time.
-
Select the check box to activate the panel in addition to the panel. You can specify the end time and the start time so that the deployment occurs at any random time between the start and end times.
-
The option enables you to schedule a recurring deployment at the selected time, repeat the deployment on the days specified, and if defined, end at the specific time. This option also enables you to restrict the deployment to the period between the start date and the end date. To set this option, select the check box and click the
 icon to open the calendar and pick a start date or end date. Click the button when you have finished selecting the date.
-
-
Monthly: In the deployment option, you can specify the following:
-
Enables you to schedule the deployment on a specific day of the month. You can specify any number between 1 and 31.
-
Enables you to schedule the deployment on the last day of the month.
-
Enables you to schedule the deployment on specific days of every month. The valid options for the day are first, second, third, fourth, and fifth. The valid options for the weekday are Sunday through Saturday. To select one particular day of the month, use the drop-down arrows. An example is shown as follows.

To select an additional day of the month, click the icon and use the drop-down arrows in the second row.
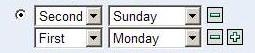
To remove a particular day from the list, click the icon.
If you click the link, additional deployment options appear as shown below.
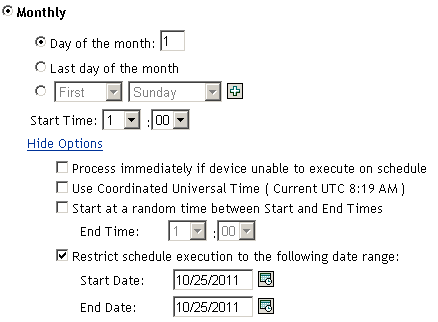
NOTE:The option enables you to schedule a recurring deployment at the selected time, repeat the deployment on the days specified, and if defined, end on the specific time. This option also enables you to restrict the deployment to the period between the Start Date and the End Date. To set this option, select the check box and click the icon to open the calendar and pick a start date or end date. Click the button when you have finished selecting the date.
-
-
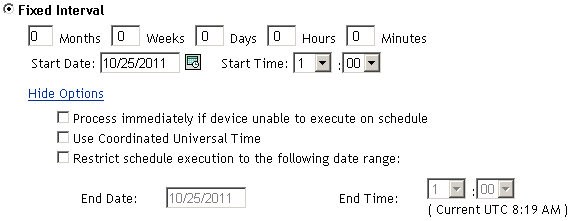
Fixed Interval: This option enables you to schedule a recurring deployment that runs after a fixed duration on a regular basis. You can choose the number of months, weeks, days, hours, and minutes of the interval and the start date for the deployment schedule.
If you click the link, additional deployment options appear:
-
By default, the Device Refresh Schedule is set to twice a day. For testing and demonstration purposes, you could increase the frequency to once every five to fifteen minutes.
All of the schedule settings above also have the option to configure the Wake-on-LAN setting, which can schedule a deployment to devices that are powered off. For more information, see Remediation Schedule: Wake On LAN.
Remediation Schedule: Wake On LAN
The Wake on LAN function is an option in Remediation schedule. It can be used to set a deployment even if the managed devices are powered off. The parameters can be changed by pressing the (options) button, where you can select different servers for the wake up request and wake up broadcast.
NOTE:The default settings for this function are to automatically detect the Primary Server.
To change the parameters:
-
Select the check box.
-
Click . This opens the Wake Up window.
-
Select the desired parameters, and click .
6.3.7 Distribution Schedule
The Distribution Schedule page of the Deploy Remediation Wizard allows you to determine when a patch will be distributed to and installed on the devices. This page is only shown if you have selected the Custom remediation option in Step 5 of the wizard.
To start setting the distribution schedule, you need to select the schedule type. Patch Management offers three types of schedules to determine when the patches are actually distributed to the target device: No Schedule, Date Specific, and Recurring.
-
No Schedule: If you select , the distribution to your selected devices begins immediately after you complete all the steps in the Deploy Remediation Wizard.
-
Date Specific: If you select , the distribution to your selected devices occurs according to the selected date that you set in the wizard’s Distribution Schedule page, as follows:
-
Start Date: Enables you to pick the date when you need to start the distribution. To do so, click the plus icon
to open the calendar and pick the date. To remove the selected date, click the minus icon . -
Run event every year: Ensures that the distribution starts on a selected date at a selected time, repeats every year, and if defined, ends on a specific date.
-
Process immediately if device unable to execute on schedule: Ensures that the distribution starts immediately if the device could not execute on the selected schedule.
-
Select when schedule execution should start: There are two options to enable you to select the start time of the schedule execution namely:
-
Deactivates the panel and starts the distribution at the start time specified. In this option, you must set the start time in the panel:
-
Activates the panel next to the panel. You can specify the end time and the start time so that the distribution occurs at a random time between them. The panel appears as follows:
In both time panels, the first drop-down list enables you to select the hour, the second drop-down list enables you to select the minute, and the third drop-down list enables you to select and .
Selecting the check box enables you to schedule the distribution to all devices at the same time, regardless of time zone differences. Coordinated Universal Time (UTC), also known as World Time, Z Time, or Zulu Time, is a standardized measurement of time that is not dependent upon the local time zone. Deselecting UTC schedules the distribution at the local time.
-
-
-
Recurring: If you select , you can start the distribution on the selected day at a selected time, repeat the deployment every day/week/month, and if defined, end on a specific date.
In the Recurring page, you can set the following options for a recurring deployment:
-
When a device is refreshed: This option enables you to schedule a recurring distribution whenever the device is refreshed. In this option, you can choose to delay the next distribution until after a specific time.
To set the delay, select the check box, and specify the days, hours, and minutes of the time to delay the distribution.
NOTE:The device is refreshed based on the settings in > menu > (Manual Refresh or Timed Refresh). Alternatively, you can refresh the device by selecting a device in the page and clicking the option in the menu.
-
Days of the week: This option enables you to schedule the distribution on selected days of the week.
To set the day of distribution, select the button, select the required day of the week, and set the start time of distribution. If you click the link, additional distribution options appear. Click the link to hide the additional distribution options and show only the default distribution options.
-
Selecting the check box enables you to schedule the distribution to all devices at the same time, regardless of time zone differences. Coordinated Universal Time (UTC), also known as World Time, Z Time, or Zulu Time, is a standardized measurement of time that is not dependent upon the local time zone. Deselecting UTC schedules the distribution at local time.
-
Selecting the check box activates the panel in addition to the panel. You can specify the end time and the start time so that the distribution occurs at any random time between the start and end times.
-
The option enables you to schedule a recurring distribution at the selected time, repeat the distribution on the days specified, and, if defined, end at the specific time. This option also enables you to restrict the distribution to the period between the start date and the end date. To set this option, select the check box and click the calendar icon
to open the calendar and pick a start date or end date. Click the button when you have finished selecting the date.
-
-
Monthly: This option enables you to specify the monthly distribution options, where you can specify the following:
-
Enables you to schedule the distribution on a specific day of the month. You can specify any number between 1 and 31.
-
Enables you to schedule the distribution on the last day of the month.
-
Enables you to schedule the distribution on specific days of every month. The valid options for the day are first, second, third, fourth, and fifth. The valid options for the weekday are Sunday through Saturday. To select one particular day of the month, use the drop-down arrows. An example is shown as follows.
To select an additional day of the month, click the plus icon
and use the drop-down arrows in the second row shown as follows:
NOTE:To remove a particular day from the list, click the minus icon
.If you click the link, additional distribution options appear. Clicking the hides the additional distribution options and shows only the default distribution options.
NOTE:The option enables you to schedule a recurring distribution at the selected time, repeat the distribution on the days specified, and, if defined, end on the specific time. This option also enables you to restrict the distribution to the period between the and the . To set this option, select the check box and click the calendar icon
to open the calendar and pick a start date or end date. Click the button when you have finished selecting the date.
-
-
Fixed Interval: This option enables you to schedule a recurring distribution that runs after a fixed duration on a regular basis. You can choose the number of months, weeks, days, hours, and minutes of the interval and the start date for the distribution schedule.
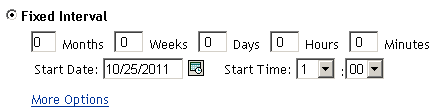
If you click the link, additional distribution options appear as shown in the following figure.
-
By default, the Device Refresh Schedule is set to twice a day. For testing and demonstration purposes, you could increase the frequency to once every five to fifteen minutes.
6.3.8 Notification and Reboot Options
In the Notification and Reboot Options page you can define whether users receive notification of patch deployments and reboots. You can also customize the notification. This page is only shown if you have selected the Custom remediation option in Step 5 of the wizard.
The page provides the following options:
-
Define Reboot Options: Allows you to use the default reboot options you’ve set in options or override them and set them manually for the deployment.
-
Use values assigned to system variables or defaults: Uses reboot options set for deployments.
-
Override Settings: Overrides the default reboot settings and lets you choose from the options below.
-
-
Notify Users: Select this option to notify the user prior to a reboot required for installation of the patch.
-
Description Text: The text of the message that appears before patch installation completes and the computer reboots. You can edit this field only if you override the default settings.
-
Options: When you define reboot options, you can specify whether to use the values in the default settings (the check box) or the custom settings. There are four options:
-
Suppress Reboot: If a patch requires a reboot by default, and no reboot is desired, select the option to stop this action. This will prevent a reboot after installation.
-
Allow User to cancel: On selecting this option, the user is allowed to cancel the reboot option.
-
Allow User to snooze: On selecting this option, the user is allowed to snooze (pause) the reboot for a particular time.
-
The amount of time before a user is prompted again to reboot after snoozing.
-
The amount of time before a user is forced to reboot for the deployment.
-
-
Show tray notification: On selecting this option, a notification for a pending reboot is displayed in the system tray. If you select this option, define the following options
-
Option to select how long the system tray notification is displayed before being hidden.
-
Option for text that appears in the notification.
A a message prompt appears when a reboot is required.
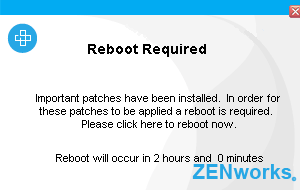
Depending on the notification settings configured, the prompt may include delay and cancellation options.
-
-
Click to define a deployment name.
Variables
The following is a list of the system variables which can be used through the console. These are the calls made to set the defaults. Each Variable has the variable name and the default setting. The values can be set by the user depending on their requirements.
-
ConfigManager.SetDefaultConfigValue(PATCH_MANDATORY_NOTIFY_REBOOT_REBOOT_TIMEOUT, “7200”); Time to do prompts before rebooting, in seconds.
-
ConfigManager.SetDefaultConfigValue(PATCH_MANDATORY_NOTIFY_REBOOT_POPUP_SHOW_TRAY, "true"); Whether to show the popup in the corner.
-
ConfigManager.SetDefaultConfigValue(PATCH_MANDATORY_NOTIFY_REBOOT_POPUP_DURATION, "20"); How long to display the popup, in seconds.
-
ConfigManager.SetDefaultConfigValue(PATCH_MANDATORY_NOTIFY_REBOOT_SNOOZE_INTERVAL, "600"); The time to wait before showing popup again. In seconds.
-
ConfigManager.SetDefaultConfigValue(PATCH_NOTIFY_REBOOT_REBOOT_TIMEOUT,"7200"); The time to wait before the system notifies a time out, in seconds.
-
ConfigManager.SetDefaultConfigValue(PATCH_NOTIFY_REBOOT_POPUP_SHOW_TRAY,"true"); The value indicates whether or not the system will show a popup before reboot.
-
ConfigManager.SetDefaultConfigValue(PATCH_NOTIFY_REBOOT_POPUP_DURATION,"20"); This value indicates the length of time for the popup to remain.
-
ConfigManager.SetDefaultConfigValue(PATCH_NOTIFY_REBOOT_SNOOZE_INTERVAL,"600"); The value sets the length of time for the snooze interval before reboot prompt, in seconds.
-
ConfigManager.SetDefaultConfigValue(PATCH_NOTIFY_INSTALL_REBOOT_TIMEOUT,"7200"); The value shows the amount of time before the system reboots after an install timeout, in seconds.
-
ConfigManager.SetDefaultConfigValue(PATCH_NOTIFY_INSTALL_POPUP_SHOW_TRAY,"true"); The value determines whether a popup appears to notify of install.
-
ConfigManager.SetDefaultConfigValue(PATCH_NOTIFY_INSTALL_POPUP_DURATION,"20"); This value sets the length of time that the popup will show for on install, in seconds.
-
ConfigManager.SetDefaultConfigValue(PATCH_NOTIFY_INSTALL_SNOOZE_INTERVAL,"600"); The value sets the length of time for the snooze interval after install, in seconds.
The following are no longer used:
-
PATCH_NOTIFY_REBOOT_SNOOZE_TIMETOLIVE
-
PATCH_NOTIFY_REBOOT_DIALOG_TIMEOUT
-
PATCH_NOTIFY_INSTALL_SNOOZE_TIMETOLIVE
-
PATCH_NOTIFY_INSTALL_DIALOG_TIMEOUT
-
PATCH_MANDATORY_NOTIFY_ALLOW_SNOOZE
-
PATCH_MANDATORY_NOTIFY_DIALOG_TIMEOUT
-
PATCH_MANDATORY_NOTIFY_DIALOG_TIMEOUT_ENABLED
-
PATCH_MANDATORY_NOTIFY_SNOOZE_HOURS
-
PATCH_MANDATORY_NOTIFY_SNOOZE_MINUTES
-
PATCH_MANDATORY_NOTIFY_SNOOZE_DAYS