6.13 SSO
6.13.1 Single Sign On
Single sign-on (SSO) options are provided for organizations using request header-based, single sign-on technologies such as Shibboleth. These work best with directory server technologies, as they keep the account details synchronized. It should be noted that some of these technologies rely on application server redirects to be implemented, so Administrators are advised to check the documentation of their SSO provider for details on how to activate and use request header-based Single Sign On.
For an overview of SAML-based SSO configuration, see Overview of SAML-based SSO configurations.
When configured, SSO allows Customers and Users who have logged in to their networks using their directory server authentication credentials to automatically access the service management application without re-entering their login details.
To configure SSO:
-
Select Setup > SSO.
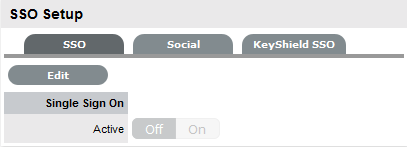
-
Click Edit.
-
Toggle to On.
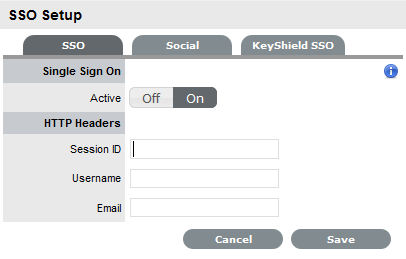
-
Complete all fields:
Fields
Description
Session ID
Enter the name of the HTTP Header that contains the SSO session id. All the Headers can be viewed by clicking
 .
.Username
Enter the name of the HTTP Header that will contain the Login of the User attempting to access the support system.
Email
Enter the name of the HTTP Header that will contain the email address of the User attempting to access the support system.
-
To view all Session Headers, click
. -
Click Save.
For Active Directory: userPrincipalName (UPN) which will be in the format of logon_name@domain_name.
Example: ppedron@opentext.com
For eDirectory: Logon name from the UID
Example: If UID is "cn=ppedron,o=opentext", then the parameter to be passed is just log in name. In this scenario, the login name is "ppedron".
NOTE:If you are using multiple directory servers of different types, then go through the identity provider's documentation on how to pass the attribute differently for different types of directories.
Overview of SAML-based SSO configurations
This document provides an overview of SAML-based SSO configurations. In this scenario, we have used Shibboleth as a SAML service and identity provider. However, similar configurations can be used for other providers that support SAML-based SSO.
Administrators are advised to check the documentation of their respective SSO provider for details on how to activate and use request header-based SAML SSO.
Commonly Used Terminologies
Following are some of the common terminologies that will be used in this document:
-
Reverse Proxy: A web server (Example: Apache or Nginx) acting as a proxy for ZENworks Service. This will be the public-facing access point for the ZENworks Service Desk. Users will never directly interact with the actual ZENworks Service Desk server. You can select any proxy server recommended by the service provider. The reverse proxy should be installed on the same device where the SP is installed.
-
SP: SAML Service Provider (Example: Shibboleth SP). Configured with reverse proxy. Generally, SP can be configured with any IDP supporting SAML.
-
IDP: SAML Identity provider (Example: Shibboleth IDP).
-
User: A Service Desk user.
-
ZSD: ZENworks Service Desk server.
Workflow
The following steps provide a generic SAML-based SSO workflow:
-
Users access the ZENworks Service Desk via reverse proxy.The reverse proxy is protected via SP.
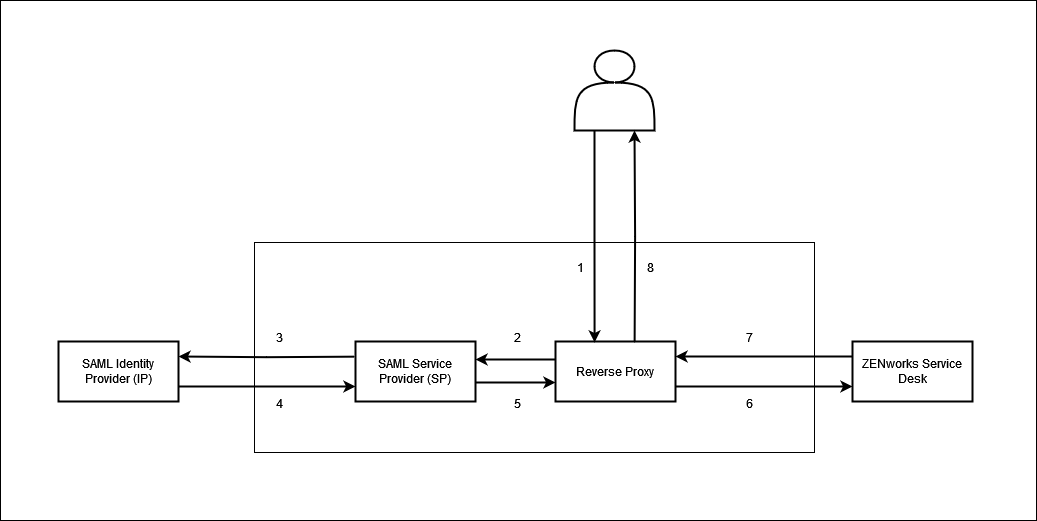
-
The SP detects the user's attempt to access the restricted content within the resource.
-
The SP generates an authentication request, and then sends the request to the user and then to the IDP.
-
The IDP authenticates the user and then sends the authentication response to the user, and then back to the SP.
-
The SP verifies the IDP response and sends the request through to the reverse proxy. The SP adds the required configured HTTP headers to the request.
-
Reverse proxy sends the request to the ZENworks Service Desk.
-
ZENworks Service Desk validates the users based on the HTTP headers and sends back the response to the reverse proxy.
-
The reverse proxy serves the requested content to the user.
Configuration
-
Set up an IDP (The organization can use the existing SAML SSO IDP).
For more information, refer to the respective IDP vendor documentation for the installation and configuration details.
-
Deploy a new device to host reverse proxy and SP.
-
Install the SP of your choice and its supported web server (reverse proxy).
For more information, refer to the respective SP vendor documentation for the installation and configuration details.
-
Configure web server to act as a reverse proxy where request is protected by the SP.
For more information, refer to the respective SP and web server vendor documentation.
-
Configure SP to communicate with IDP for authentication.
For more information, refer to the respective SP vendor documentation.
-
Configure IDP to accept the request from SP or register SP with IDP.
For more information, refer to the respective IDP vendor documentation.
-
On successful authentication, IDP should release the attributes email, and username (UPN in case of AD).
For more information, refer to the respective IDP vendor documentation.
-
SP should inject the SAML session, email, and username attributes to the reverse proxy as an HTTP header.
For more information, refer to the respective SP vendor documentation.
-
Configure SSO on the ZENworks Service Desk to accept the attributes for verification. For more information, see Single Sign On.
Important configuration consideration
Following are some of the important configuration consideration that should be noted while configuing SAML-based SSO:
-
Make sure that the ZENworks Service Desk server is accessible to the public only via the reverse proxy address and not directly. This can be achieved by configuring the firewall.
-
Ensure that the required HTTP header is injected only by the SP running on the same device. Since SP and a reverse proxy are installed on the same device, a simple rule of allowing header injection only by the same IP or local host might be sufficient.
For more information, refer to the respective reverse proxy vendor documentation.
Limitations
Following are some of the Limitations of SAML-based SSO:
-
No common logout. i.e. Logging out from the ZENworks Service Desk will not log out from the IDP-SP session.
-
The ZENworks Service Desk login page can be accessed directly, and the user can directly log into the ZENworks Service Desk. Hence, the SSO configuration should be used for ease of use to leverage SSO login and should not be used to enforce multifactor login.
6.13.2 Keyshield SSO
The Keyshield SSO feature is now integrated into ZENworks Service Desk this feature provides a single sign-on mechanism, and works with other Micro Focus products such as Filr, GroupWise, and Vibe.
KeyShield SSO is a single sign-on that enable users to access their applications without authenticate to each one of them. When configured, Keyshield enables customers and users who have logged onto their networks using their directory server authentication credentials, to automatically access the service management application without re-entering their login details.
To configure KeyShield SSO:
-
Select > > .
-
In the SSO page, click .
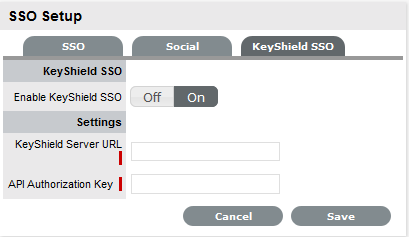
-
, then specify the following settings:
-
KeyShield Server URL: The KeyShield server’s IP address (https://<ipaddress>:<port>).
-
API Authorization Key: The API key generated in the Keyshield server.
-
-
Click .
6.13.3 Social
The Social tab is available when the OpenID Consumer option is enabled within the Setup>Privileges>System tab. This functionality delegates the authentication of Customers and Users when accessing the system to OpenID Providers.
Defining an OpenID Provider
To enter the account details for an OpenID Provider:
-
Select Setup > SSO > Social tab
-
Click New
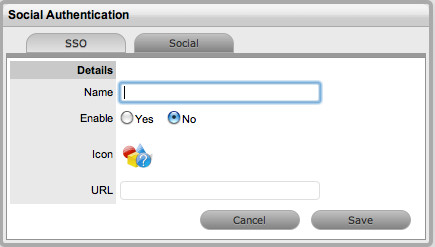
-
Complete the Name field
-
Select Yes to enable the Provider to authenticate Users and Customers
-
Click
 to upload the OpenID's icon that will be displayed on the system Log in page
-
Click Choose File to search for the image file
The image must be 32x32 pixels.
-
Click
 to upload
 -
Define the URL details for the OpenID Provider
-
Click Save.
The icon for the OpenID Provider will now be active on the system Log in page.