Localization
Localization
Regions
This option allows the Administrator to customize the geographic regions or States that are available for each Country. This information is applied to Customers and Org Units when their contact details are being defined. When the Customer or Org Unit "Country" field is completed within the information screen, the States that are displayed are drawn from the Geographic Regions defined here.
To define a State for a Country:
-
Go to Setup > Localization > Regions tab
-
Search and select a Country hyperlink from the list provided

-
Click
 to add another State or region
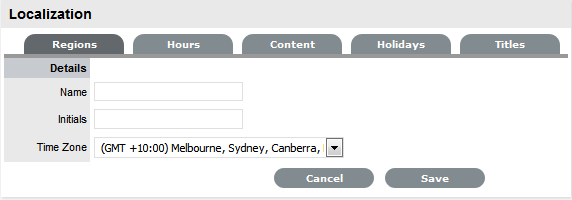
-
Enter the Name, representative Initials and select the relevant Time Zone
-
Click Save
-
Repeat Steps 3 to 5 to add more regions
-
Select Save.
Editing States
A default or customized template can be easily edited:
-
Go to Setup > Localization > Regions tab
-
Search and select a Country hyperlink from the list provided
-
Select the relevant State Name hyperlink.

-
Edit the Name, Initials or Time Zone details
-
Select Save.
Deleting a State
A default or customized template can be easily deleted:
-
Go to Setup > Localization > Regions tab
-
Search and select a Country hyperlink from the list provided
-
Select the relevant State Name hyperlink
-
Select the Delete button
-
Select Save.
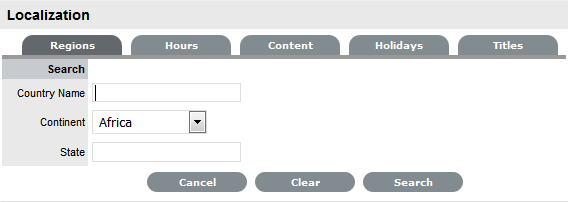
Region Search
To find a Country or State within a Country, the Search facility can be used. To conduct a search:
-
Go to Setup > Localization > Regions tab
-
Select Search
-
Enter the known details
Search options include Country Name, Continent or can also be refined by the State within a Country.
-
Click Search.
Hours
For the ease of configuring the Technician Scheduled hours of work and customizing hours of operation for Service Level Agreements, work hour templates can be created within the Setup>Localization>Hours screen. These templates are then made available throughout the application, wherever hours of operation are defined.
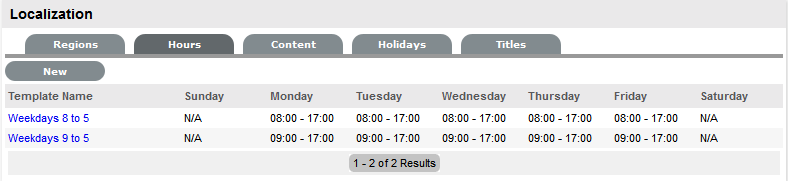
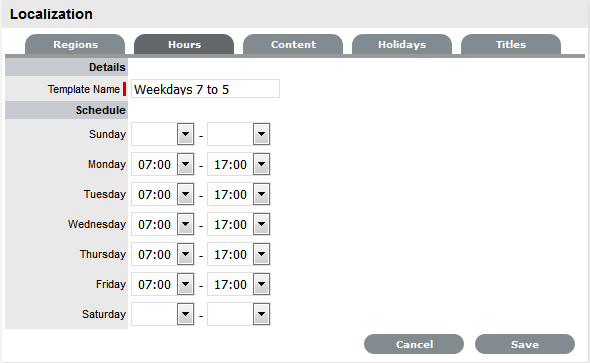
To create a template:
-
Go to Setup>Localization>Work Hours tab
-
Click New
-
Enter the Template Name
(Required.)
-
Set the hours of operation
-
Select Save.
Editing a Template
A default or customized template can be easily edited:
-
Go to Setup>Localization>Work Hours tab
-
Click the relevant Template Name hyperlink
-
Amend the hours, as required
-
Select Save.
Deleting a Template
A default or customized template is deleted from the List View:
-
Go to Setup>Localization>Work Hours tab
-
Click the Template Name hyperlink
-
Select Delete
A warning message will be displayed.
-
Click OK.
Content
The Content tab allows Users to configure automated messages, user interface and system objects content for language files used by the application.
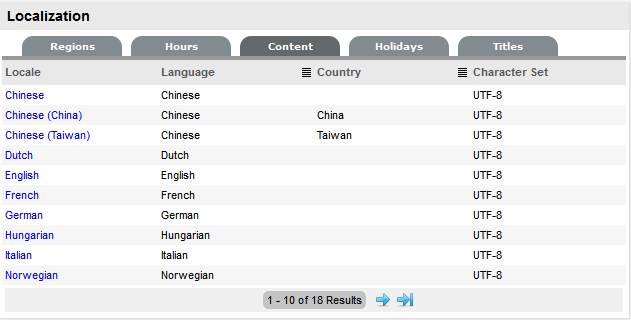
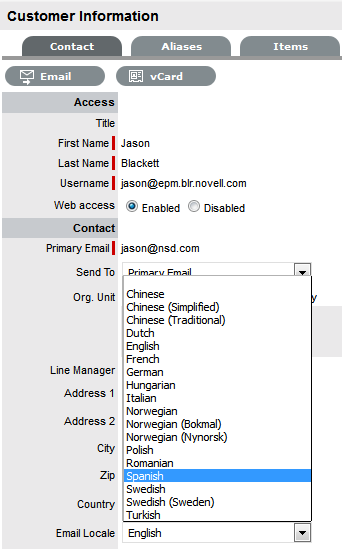
The customized content is applied to Customers and Users by setting the Email Locale option in their account information screen.
Content can be customized across the following elements and messages:
NOTE:It is recommended that the localization of user interface content, email and sms messages be done after they have been configured and reviewed within the Setup>Email and Setup>Customize tabs, respectively.
To customize content:
-
Select Setup>Localization
-
Move to the Content tab
-
Select the Locale link for the language file that is to be edited
-
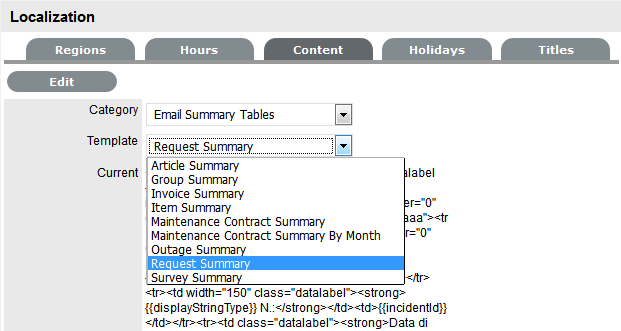
Within the Category field, select the element to be customized
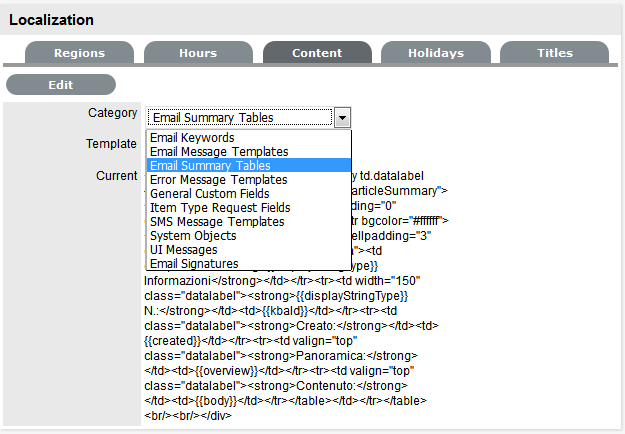
-
Within the default field displayed when the relevant Category is selected, choose the element to be customized
-
Click Edit
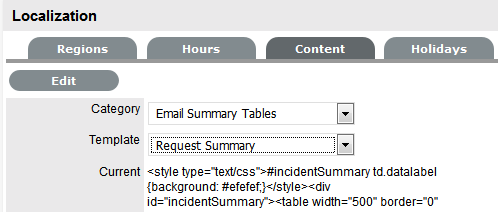
-
Amend the content and format, if required

-
Click Save.
Repeat the above process for all the relevant elements in the default list or select the Content tab to return to the Locale list.
Item Type Request Fields
Within the system, service organizations can refine custom fields made available during the request creation process based on the Item assigned to the request. In the Fields tab a User can create custom fields that apply to the Item Type. Therefore, when a request is logged against an Item that uses an Item Type with custom fields configured within the Fields tab, the Fields are made available within the Details tab of the request creation process.
These fields are in addition to the fields created by the Administrator within the Admin>Setup>Custom Fields, which are created for the specific Process, such as Incident, Problem, Change and Service Requests.
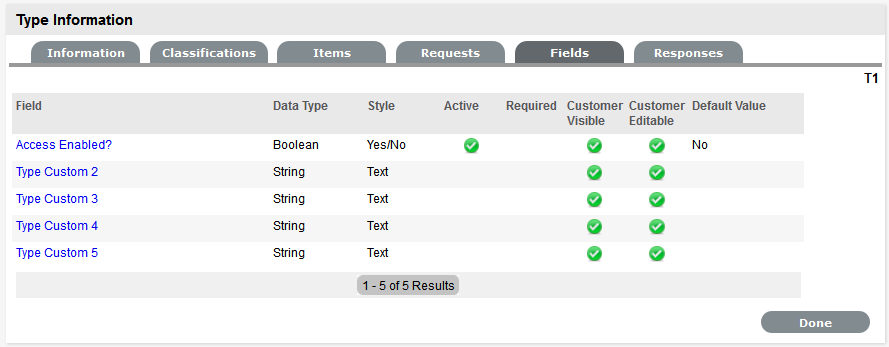
To create Field labels within the Type Information screen:
-
Click the Fields tab
-
Click Edit
-
Select a Field hyperlink
The Custom Field screen is displayed.
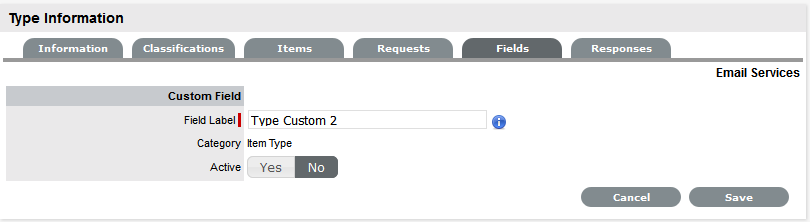
-
Click Yes to activate the Field
-
Complete the following details:
-
Categories Fields
Description
Category
Field Label
The name of the field.
Active
Indicates if the field is active.
Required
Indicates if the field is required or mandatory field.
Customer Visible
Defines if the Customer can see the field within the
Customer Portal.
If Yes is selected, define if the Customer can edit the field information on the Customer Portal.
Data Type
Dictates the field's Data Type. The options available include :
-
String - List or Free Text
-
Number
-
Boolean - radio buttons for Yes/No and True/False
-
Date - creates a date field
-
Currency- creates a currency field
-
Hyperlink.
Style
Defines how the data is recorded or presented in the field. (e.g., String - List or Free Text field.)
See Lists or below for more information about creating a list within the field.
Unique Value
When active, the system prevents the duplication of data within the customized field.
Default Value
Value entered is the default system entry for the field, when the field is not completed manually.
Input Validation
When enabled the Input Mask and User Mask can be defined.
Input Mask : A regular expression to use for data validation of values entered by a User (i.e., Zip/Post Code, telephone no.)
User Mask: A User Friendly representation of the Input Mask that Customers can understand should it appear in a validation error message.
Enable Description
When enabled a Description field appears, allowing the User to enter details of what information is the field is expected to capture. These details are accessible next to the custom field on the relevant screen.
-
-
Click Save
The active Field will now be available during the request creation process, for all Items that use the Item Type.

Data Type - List
When the Data Type String - List is selected the List Contents field is displayed, which provides the facility to create a drop down list to be created as options within the field.
To create a new list entry within the List Contents field:
-
Right click the Entries link
The Create option is displayed
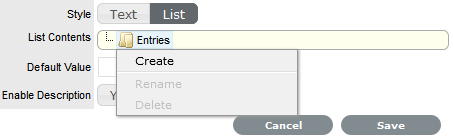
-
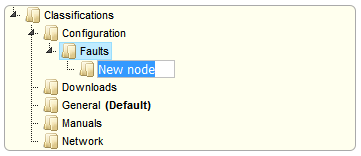
Click Create
A New node link displayed

-
Enter the name of the field
-
Click outside the field to save the entry

-
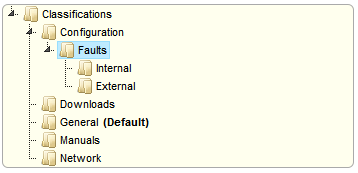
Repeat this process until all list entries have been added
To create a nested list, right click on the relevant list entry and repeat the above process.
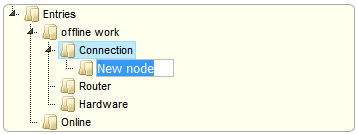
-
To move an existing entry to a new position, select the entry, then drag and drop the entry into its new location
-
When all the relevant details have been defined for the custom field, click Save.
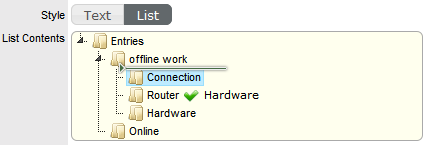
Creating Nested List Entries
List entries can be expanded to include nested options.
To create a nested list:
-
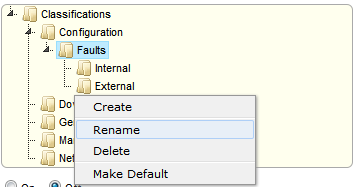
Right-click the relevant list entry header
The Create, Rename, Delete and Make Default options are displayed.
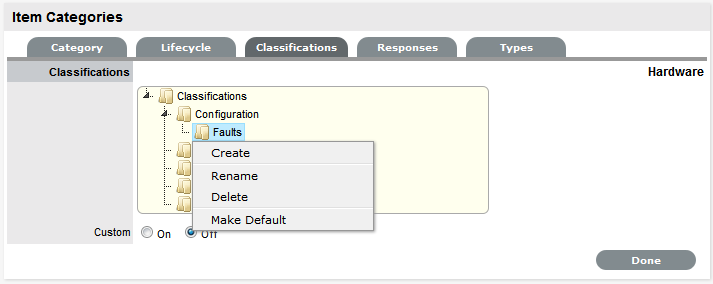
-
Select Create
A text box will appear under the list entry.
-
Enter the name for the list entry
-
Click away from the text box to commit and save the change
-
Move an existing list entry to a new position, if required
Select the entry, then drag and drop the entry into its new location
-
The above steps can be repeated until the nested list is complete.
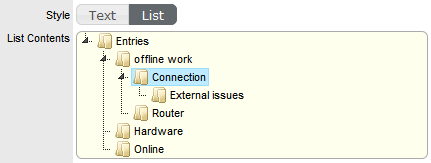
Renaming a List Entry
Any list entry can be renamed.
To rename a list entry:
-
Right-click the list entry link
-
Click Rename
-
Edit the field content
-
Click away from the text field to save the change.
Deleting a List Entry
To delete a list entry:
-
Right-click the relevant list entry
-
Click Delete
-
Click Done when the list is complete.
Priority
The Priority determines the timeframe in which an Incident should be handled and sets the service level targets adopted by the Incident that drive the SLA triggers and actions. It represents the degree of importance of the Incident to the Customer and also indicates the urgency of the request to the Technician.
An Incident can have one of four possible Priorities:
-
Urgent
-
High
-
Medium
-
Low
Setting Incident Priority
The Administrator configures the options for determining the Priority within the Setup>Privileges>Request tab. The Priority options include:
-
Selected Priority - where the system configured default Priority is applied to the request but can be manually adjusted by the User
-
Derived Priority - where the Impact is derived from the Item Criticality and the User enters the Urgency, enabling the system to calculate the Priority.
Urgency: The value selected reflects how quickly a resolution is required
Impact: The value selected indicates the impact the Incident has on the User and Organization. The higher the Impact the higher the Priority to resolve the Incident.
If the Administrator has set the Request Priority option to Derived, the Priority of an Incident results from the Impact being mapped from the Criticality of the Item and then combined with the selected Urgency. However, if required, the Impact can be manually adjusted within the Incident Information screen to affect the Priority.
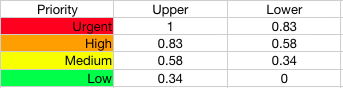
The following table displays the calculations applied by the system using the Item Criticality mapped directly to the Incident Impact, to determine an Incident's Priority:

The above calculations result in the following Priorities:
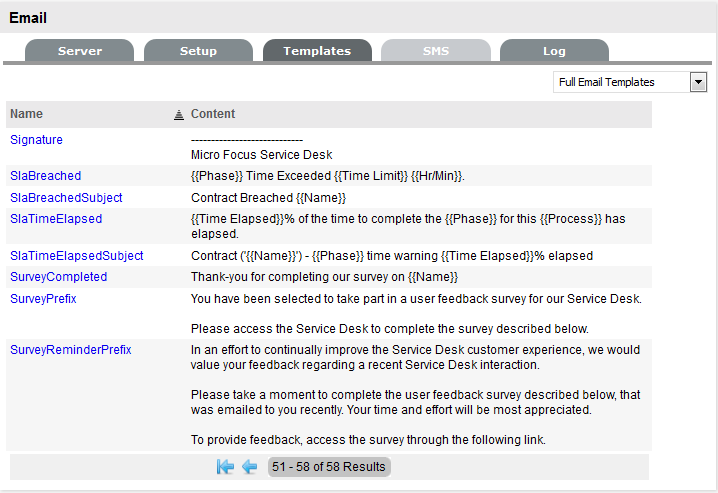
Email Signatures
Email Signatures that are applied at the base of all emails sent by the system are customized within the Full Email Templates filter of the Setup>Email>Templates tab. These can also be customized on a per Team basis using the Localization functionality.
To set the system default Signature:
-
Select Setup>Email
-
Go to the Templates Tab
The Full Email Templates filter view is displayed
-
Click to the final page of the Email Templates
-
Select the Signatures link
-
Edit the content
-
Click Save.
Team Signatures
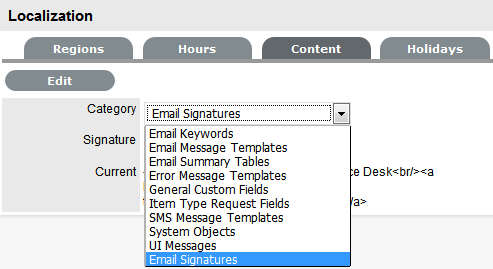
After Teams have been created by the Supervisor in the User>Teams tab, an Administrator can customize the content of the Signature for the Team within the Setup>Localization>Content tab. This function allows individual signatures to be customized for each Team and in the relevant language for Customers.
To amend the Signature details on a per Team basis:
-
Select Setup>Localization
-
Click the Content tab
-
Select the Link of the language file to be customized
To create a signature file for each Team in English, select the English Locale link.
-
In the Category list select Email Signatures
A Signature list is displayed that includes the default Signature and the list of Team names configured in the system.
-
Select the Team Signature within the drop down list
-
Click Edit
-
Amend the signature details
-
Click Save.
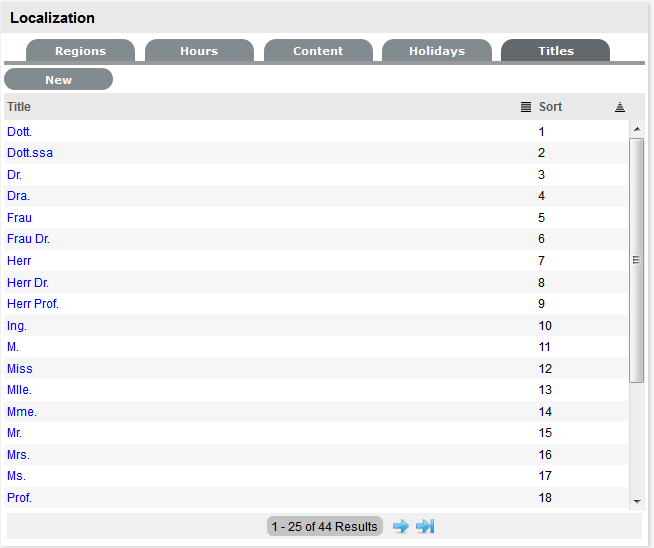
Titles
When the Use Titles option is enabled in the Setup>Privileges>Customer tab, the Titles option is visible within the Setup>Localization screen. Titles configured here become an option within the Customer and User Information screens. When this option is enabled, a list of title options are displayed in the Titles table.
Edit a Title
Titles listed can be re-named or have their sort order changed as required.
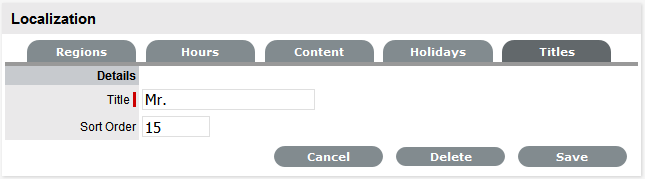
To edit a pre-existing entry in the Titles list:
-
Within Setup>Localization>Titles
-
Select the relevant Title hyperlink
-
Amend the Title detail, if required
-
Update the Sort Order detail, if required
This will change where the Title appears in the drop-down list options when the Title field is included in the Customer Information screen.
-
Click Save.
Alternatively, to remove an entry from the Titles list, select the Title hyperlink and click Delete.
Create a Title
To create an additional Title list option:
-
Within Setup>Localization>Titles
-
Select the New button
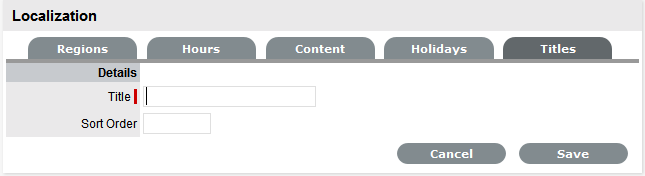
-
Complete the Title details
-
Enter Sort Order number
This will define where the Title appears in the drop-down list options when the Title field is included in the Customer Information screen.
-
Click Save.