2.7 Service
2.7.1 Service Level Management
The goal of Service Level Management is to maintain and improve the alignment between business activities and IT service quality. This is achieved through the cycle of:
-
Agree on service level expectations and record them in Service Level Agreements (SLAs)
-
Monitor the service provided
-
Report actual service delivery results
-
Review IT service delivery results in relation to the SLA, and adjust accordingly.
A Service Level Agreement (SLA) is a formal, negotiated contract that outlines service level expectations and clarifies responsibilities between the Service Desk and its Customers. When unacceptable levels of service are noted throughout the service cycle, action can be taken to re-align expectations with actual service delivery results.
Within the system, SLAs are specific and time-based in order to help monitor and report on performance. They can be applied to any of the following elements within the application:
-
Customers
-
Organizational Units
-
Items.
NOTE:Only Users assigned with the Service Level Management Role can create or modify SLAs.
SLAs are incorporated in the support process when a new Workflow is created. An SLA is assigned to a Workflow and specifies the expected resolution time for a request. To successfully meet SLA expectations, the system allows the Service Desk to associate each Workflow State of a request with an Operational Level Agreement (OLA) or Underpinning Contract (UC).
An OLA is an internally negotiated document that identifies the service level expectations between the Service Desk and the Technical Support Teams. An Underpinning Contract enables the Service Desk to monitor and maintain control of requests that are forwarded to external service and support providers.
To ensure an SLA resolution time is met, the sum of the resolution times for each of the OLAs or Underpinning Contracts assigned to a Workflow Lifecycle must be less than or equal to the SLA resolution time.

SLAs in Action
When a request is logged with the Service Desk, the request adopts the SLA that has been assigned to either the Item, Customer or Organizational Unit. If an SLA has not been allocated to any of these elements, the SLA assigned as the system default within the Admin>Setup>Privileges>Requests tab will be automatically applied to the request.
The SLA allocated to the request determines the Workflow options made available for the lifecycle of the request. The Workflows listed are assigned the same SLA as the request. Before saving the request, the User can adjust the system assigned Workflow if more than one option exists.
Refer to SLM Configuration for more detailed information.
Service Tab
Use this section to create and modify SLAs to provide request lifecycle management capabilities. This section can also be used to create and customize OLAs and UCs. After the individual components of the SLAs have been configured, Workflows can be created and assigned the service level management functionality.
The system also provides SLA-compliance reporting, allowing Managers to define and track availability and performance objectives that reflect business goals. SLAs are used across all processes, and are assigned when requests are created.
Within the Service Tab Users can:
2.7.3 Service
Service Level Agreements (SLAs)

Service Level Agreements (SLAs) are used by organizations to manage the levels of service expected of the IT and to ensure optimal maintenance of critical business systems and services. SLAs are documents that are negotiated between the Service Provider and Customer departments, to identify expectations and clarify responsibilities.
This tab is used to create and modify Service Level Agreements that provide request management capabilities.
SLAs include the following elements:
-
Name
-
Service Level Manager
-
Priority Targets
-
Automated Alert Notifications
-
Pricing (if enabled in Admin>Setup>Billing)
-
Blackout Periods
-
Workflows.
Details
Creating a Service Level Agreement
To create a new Service Level Agreement:
-
Select Service >SLAs
-
Click New
The screen defaults to the Details tab of the SLA Editor screen.
-
Complete the fields, including any custom fields, as required:
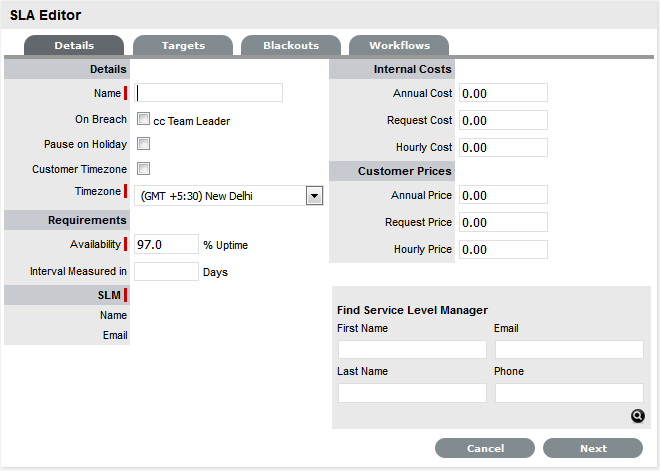
SLA Editor
Details
Name*
The name to identify the SLA.
Review Date
Details are completed based on the Admin default settings but can be edited by the User. An Alert is sent based on the default days set in the Review SLA Alert field in Admin>Setup>Privileges>Requests.
On Breach
Notification can be set to Carbon Copy (CC) an email to the Team Leader when the Warning or Escalation alert is sent to the Technician assigned to the request. It should be noted that the Service Level Manager is also notified when an SLA is breached.
Pause on Holiday
**This option is only displayed if the Observe Public Holidays option has been enabled within the Administrator>Setup>Privileges>User tab.
Enable this option, if the SLA is to be adjusted on designated Public Holidays. The Public Holidays are defined within the Administrator>Setup>Public Holidays screen and associated with requests via the assigned Technician and their associated Country.
Customer Timezone
When enabled, SLA times displayed within the Technician request view uses the Customer timezone.
Timezone
This is visible when Customer Timezone is not set and all SLA dates are calculated based on the Timezone set within this field. This is especially applicable for User Work Hours, Blackouts, which also impacts the SLA Reports.
Requirements
Availability*
Used to state the time an Item under the SLA is required to be online. The default value is set to 97%.
Interval Measured in
Defines the number of days over which the Availability requirement is calculated.
Priority
Process Name
The field is displayed when Workflows have been assigned to the SLA.
If multiple Workflows have been assigned for each Process, this field allows the User to assign a default Workflow for the SLA. When a request is created using the SLA, the default Workflow is assigned to the request.
SLM (Service Level Manager)
Name
Email
Use the Find Service Level Manager search option, to enter the contact details of the Manager who will monitor the performance of the SLA.
This is also the User who is assigned responsibility for managing the performance of external support providers when a request moves into a Workflow State that is supported by an Underpinning Contract .
Internal Cost ^
Annual Cost ^
The SLA cost is calculated on the basis of what is costs the service organization to provide the service agreement, as applied on a yearly basis per User. The figure is associated with Items and used to calculate the cost of supplying a Service. This figure can be used as the basis for setting the Annual Price.
The figure entered should be on a Annual Cost per User basis.
Request Cost ^
Indicates the cost applied on a Per Request basis. This figure can be used as a reference for setting the Incident Price.
Hourly Cost ^
Indicates the cost applied on an Hourly basis. This figure can be used as a reference for setting the Hourly Price.
Customer Pricing ^
Annual Price ^
This is the charge applied to the SLA on a yearly basis and paid by the customer consuming the Service associated with the SLA. (It should be greater than the SLA Cost, as it would include the cost of servicing the SLA plus a profit margin, if relevant.) The figure is associated with Items and used to calculate the price paid by the customer for consuming a Service.
The figure entered should be on a Annual Price per User basis.
Request Price ^
Indicates the price paid by the customer when the SLA is applied on a Per Request basis.
Hourly Price ^
Indicates the price paid by the customer when the SLA is applied on an Hourly basis.
* Denotes a mandatory field
^ Only applicable when SLA Prices are enabled in Setup>Billing
Targets
The Targets tab is used to configure the SLA's priority Response, Restoration and Resolution Times.
To modify a Priority:
-
Select Service > SLAs
-
Select an SLA
-
Select the Targets tab to display the following fields:
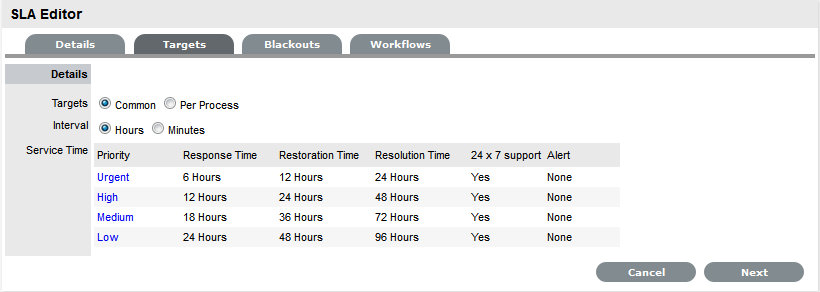
SLA Editor
Targets
Targets
Common: Select Common if the SLA is to apply across Incidents, Requests, Problems and Change Management.
Per Process: If the SLA is specific to a Process, select Per Process and choose a Process displayed in the drop-down list.
Interval
Define if the time is to be calculated in Hours or Minutes.
Service Time
Priority
Urgent, High, Medium and Low.
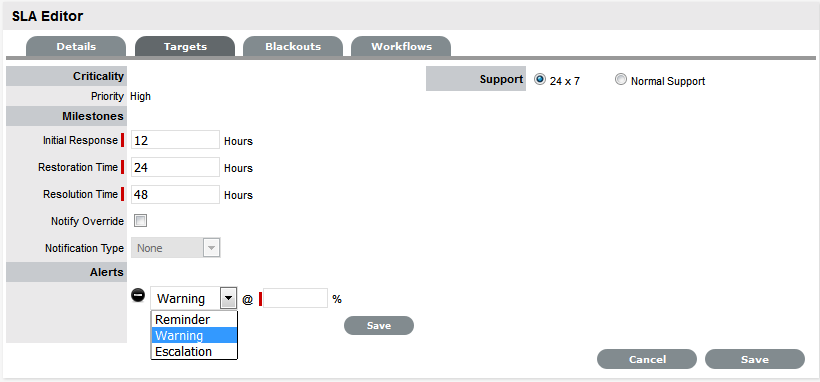
Milestones
Initial Response
The maximum time the Customer would wait from the point of request creation before receiving a Note update for a Technician. The Response trigger is stopped when a Note has been added to the request by the assigned Technician and an email is sent to the Customer. If the Response Time is reached, without a Note being added, the request will be escalated.
Restoration Time
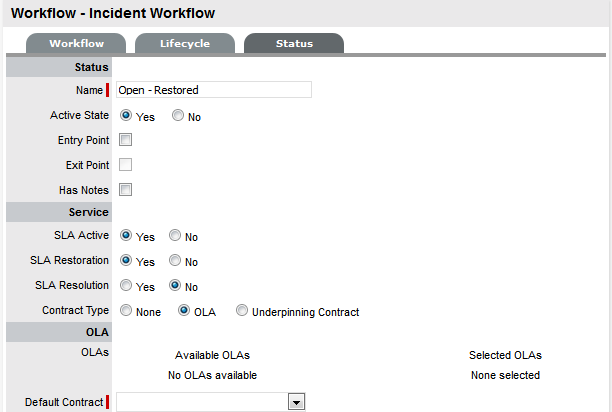
The maximum time the Customer would wait from the time the request was created until a workaround or temporary fix has been implemented. The Restoration trigger stops by assigning the request a Workflow State that has to the SLA Restoration option set to Yes. By default, this Workflow State is Open - Restored.
Resolution Time
The taken time from the point of request creation until it the request is moved to a Workflow State with the SLA Resolution option set to Yes. Any of the default Workflow Exit States stop the Resolution Timer.
Notify Override
If the system is to override the default notification method set for a request when the Priority being edited is assigned to a request, check this option.
Notification Type
Set Email or SMS as the type of notification when the override action is applied to a Priority.
Alerts
Reminder
Sends a reminder email to the Technician when the defined percentage of time elapses for a Response, Restoration or Resolution target that has not been met on a request. Can be set up to 200% of the SLA. Note, Alert intervals are not cumulative.
Warning
Sends a warning email to the Technician when the defined percentage of time elapses for a Response, Restoration or Resolution target that has not been met on a request. Can be set up to 200% of the SLA.
Escalation
Escalates the request to a higher escalation layer when the defined percentage of time elapses for a Response, Restoration or Resolution target that has not been met on a request. Can be set up to 200% of the SLA. It should be noted that the Service Level Manager is also notified when an SLA is breached.
Support
24 x 7
Do not amend if the SLA is to apply 24 hours a day, 7 days a week.
Normal Support
Select if service hours are to be defined for the SLA. When checked, define the service hours by either selecting a template (Templates are configured by the Administrator in the Setup>Localization>Hours tab) or manually define the days and time by making selections within the drop-down lists.
-
Click Edit, if not already in Edit mode
-
Define if the SLA applies across all Processes or to a specific Process
-
Define if the SLA is to be calculated in minutes or hours
-
Select the Priority link to customize Milestones, Alerts and Support hours
-
Modify the Milestone intervals for the Response Time, Restoration Time and Resolution Time, as required
The time will be set in minutes or hours, as defined for the SLA.
Milestone intervals are not cumulative
For example, for the default Warranty SLA, the Priority of Urgent has the default Milestone times of 6, 12 and 24 hours. This means a User has 6 hours to send a response to a Customer before the Response time is breached, 12 hours from the point of request creation to meet the Restoration time, and 24 hours from the point of request creation to meet the Resolution time. It should be noted that requests may be moved to non-SLA timed States during these Milestone periods, so the 12 or 24 hours may not be consecutive hours.
-
Check the Notify Override option, if relevant
Set the type of notification, email or SMS, that is to be used to contact the User assigned to the request with this Priority.
-
Create one or multiple Reminder, Warning or Escalation Alerts, if relevant
Enter the percentage of time to elapse for an Alert to be triggered for a Milestone. Selecting Warning as the Alert will cause a warning e-mail to be sent to the request's Technician when the specified percentage of a milestone has been reached.
Selecting Escalation will trigger a request escalation to the next support layer of the Team. The escalation system will also fire if the SLA threshold is breached.
NOTE:It is recommended that reminders be sent at 50% of elapsed time and escalations at 75-80%
These figures are advisory only. The internal processes of your organization will dictate the appropriate values. The Reminder percentage must be less than the Warning or Escalation percentages.
Alerts can be set to 200% of the SLA time, which ensures notifications can be still be received against breached requests
If Alerts are not customized, the application will automatically escalate the request when the Priority milestone is breached
-
Click Save
-
Modify other Priorities as necessary.
Configuring Support Hours
After the Priority times and Alerts of an SLA have been configured, Support Hours can be defined. These can be set to 24 hours by 7 days a week (24 X 7), or manually adjusted to reflect the support operation open hours.
Under 24 X 7 mode, if the SLA's urgent Initial Response field is set to six hours, and an urgent request that uses the SLA is created at midnight in the assigned Technician's time zone, those six hours will expire by 6:00 AM. This is the option to use if a support operation is staffed 24 hours a day.
If a support operation is not open 24 hours a day, the request timers are not required to run when Technicians are not available. For instance, if the support hours are 9:00 AM to 5:00 PM and the SLA hours reflect this, the SLA timers of the urgent request created at midnight would not start ticking until 9:00 AM the following business day and would expire at 3:00 PM.
To define the SLA support hours:
-
Select Service > SLAs
-
Select an SLA
-
Click the Priority link
This will display the Details tab with Support Hours options of 24x7 and Normal
-
The default setting is 24 X 7, to amend the support hours select the Normal Support option
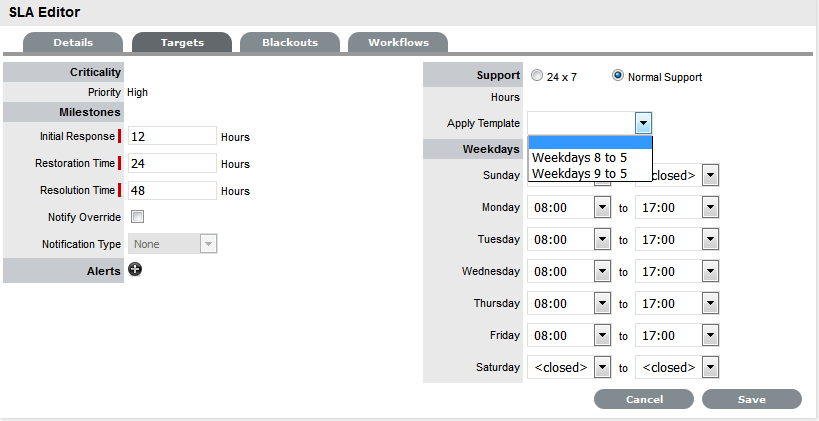
-
Select a template from the Apply Template drop-down options or customize Weekdays manually.
Note that the SLA timers become inactive when the support desk is closed.
-
Click Save.
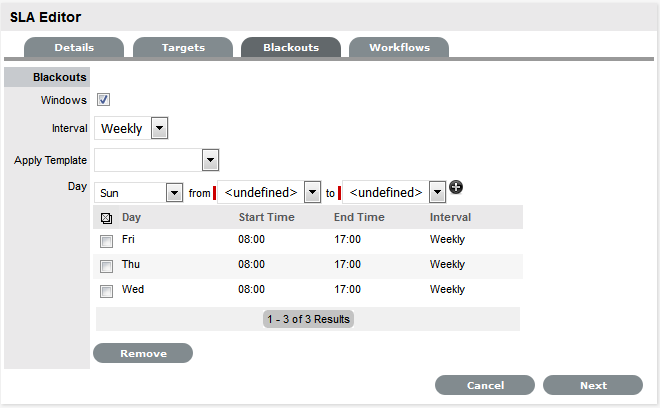
Blackouts
Blackouts are used as part of Change and Configuration Management to advise Users about the appropriate periods of time that an Item associated with an SLA should be scheduled to be taken off-line if an Outage is needed. Within the system, when an Outage is being scheduled (Item>Details>Outages) the Blackout period is displayed, informing the User of the best time to schedule a Planned Outage.
A Blackout Period is based on an agreement between the Customer and the Service Desk regarding set times that the Customer has no service expectations. This can also be the preferred time for Item upgrades and maintenance as they will not affect service availability.
A Blackout Period is specified within an SLA. During this time the SLA is viewed as inactive and its measuring time is stopped. OLAs that underpin a Workflow State that apply an SLA with a Blackout Period, also adopt the Blackout Period.
Specifying an SLA Blackout
To specify an SLA Blackout:
-
Select Service >SLAs
-
Click an SLA hyperlink
-
Click Edit
-
Move to the Blackouts tab
-
Tick the Windows option

-
Set the Interval of weekly or monthly
-
Apply a Template or define the day and time period for the approved Blackout manually, then click

-
Define the preferred Timezone
This is required information to save the Blackout information.
-
Click Save.
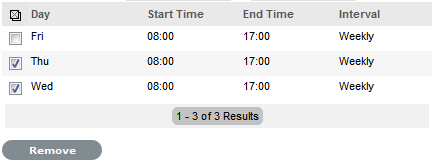
To remove time-frames from the Blackout Period:
-
Select Service >SLAs
-
Click an SLA hyperlink
-
Click Edit
-
Move to the Blackouts tab
-
Check the box next to the Day to be deleted from the Blackout
-
Click Remove.
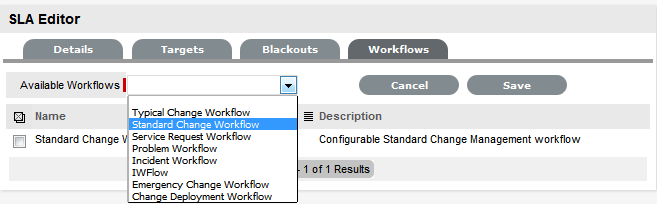
Workflows
Workflows are associated with an SLA through the Workflows tab of the SLA Editor screen or within the Workflow itself. All SLAs assigned to the SLA are listed within this tab and Workflows can be added or removed within this tab, as required.
Assigning a Workflow
To assign a Workflow:
-
Select Service>SLAs
-
Click the relevant SLA link
-
Move to the Workflows tab
-
Click Edit
-
Select Add
The Available Workflow drop-down list will be displayed.
-
Select a Workflow
-
Click Save.
To remove a Workflow assignment, use the checkbox next to the relevant Workflow and click the Remove button.
Default Warranty SLA
The system includes a default SLA that does not include costs, called Warranty. The Warranty SLA can be used or edited as required.
Integration with Request Creation and the Billing System
The prices specified in the SLA provide the basis for fees charged for support on both a Per Request basis and on a subscription basis. The hourly rate is included for reporting purposes. Rather than an Item using an SLA, Items can be covered by maintenance contracts. A contract can cover a particular request, or exist as a subscription.
Maintenance Contracts form part of the request creation process. Requests can be entered into the system without a valid contract, but are flagged as unpaid, and are unable to be worked on until the invoice is processed. There is also a control (configured in the Billing Preferences) for the length of time an unpaid request can exist in the system.
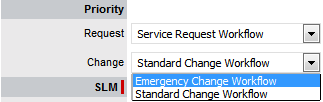
Assigning a Default Workflow to an SLA
If more than one process Workflow is assigned to an SLA, it is required to select a default Workflow. This default Workflow will be the Workflow assigned to a request when the SLA assigned supports more than one Workflow.
To assign a Default Workflow:
-
Select an SLA from the Service > SLA tab
-
Click Edit
Note that the system automatically assigns a default Workflow to an SLA, as Workflows are being assigned.
-
Within the Priority Field, use the drop-down lists to update the relevant Incident, Problem, Change and Service Request default Workflows
-
Click Save to apply the change.
Operational Level Agreements (OLAs)
An OLA is an internally negotiated agreement that identifies the service level expectations between the Service Desk and the Technical Support Teams. OLAs are applied to Workflow States and allow the Service Desk to successfully meet service level expectations. This is achieved by associating an SLA to a Workflow and then assigning, where relevant, OLAs or Underpinning Contracts to separate stages of that Workflow. It should be noted that SLA targets for Response, Restoration and Resolution time must be greater than or equal to the combined OLA and UPC times for each of these targets, to ensure that service level breaches do not occur.
Details Tab
Creating an OLA
To create a new OLA:
-
Select Service >OLAs
-
Click New

-
Enter a Name for the OLA
OLA Editor
Details
Name*
The name to identify the OLA.
Review Date
Details are completed based on the Admin default settings but can be edited by the User. An Alert is sent based on the default days set in the Review SLA Alert field in Admin>Setup>Privileges>Requests.
Pause on SLA Holiday
**This option is only displayed if the 'Public Holidays' option has been enabled within the Administrator>Setup>Privileges>Technician tab.
Enable this option, if the OLA is to be adjusted on designated Public Holidays, when an associated SLA has the Pause on Holiday option enabled. The Public Holidays are defined within the Administrator>Setup>Public Holidays screen and associated with requests via the assigned Technician and their associated Country.
Customer Timezone
When enabled, OLA times displayed within the Technician request view uses the Customer timezone.
Timezone
This is visible when Customer Timezone is not set and all SLA dates are calculated based on the Timezone set within this field. This is especially applicable for User Work Hours, Blackouts, which also impacts the SLA Reports.
SLM (Service Level Manager)
Name
Email
Use the Find Service Level Manager search option, to enter the contact details of the Manager who will monitor the performance of the OLA.
-
Adjust the Review Date, if necessary
(A reminder Alert will be sent to the SLM, based on the default days set in Admin>Setup>Privileges>Request.)
-
Tick the Customer Timezone option, if relevant
Apply this option if the User is to view OLA due dates using the Customer Timezone or complete the Timezone option.
-
Search and select a Service Level Manager.
A Service Level Manager (SLM) is a User that has been assigned with the Service Level Management Process.
-
Move to the Targets tab
-
Complete the following information:
SLA Editor
Targets
Targets
Common: Select Common if the OLA is to apply across Incidents, Requests, Problems and Change Management.
Per Process: If the OLA is specific to a Process, select Per Process and choose a Process displayed in the drop-down list.
Interval
Define if the time is to be calculated in Hours or Minutes.
Service Time
Priority
Urgent, High, Medium and Low
Milestones
Initial Response
The maximum time the Customer would wait from the point of request creation before receiving a Note update for a Technician. The Response trigger is stopped when a Note has been added to the request by the assigned Technician and an email is sent to the Customer. If the Response Time is reached, without a Note being added, the request will be escalated.
Restoration Time
The maximum time the Customer would wait from the time the request was created until a workaround or temporary fix has been implemented. The Restoration trigger stops by assigning the request a Workflow State that has to the OLA Restoration option set to Yes. By default, this Workflow State is Open - Restored.
Resolution Time
The taken time from the point of request creation until it the request is moved to a Workflow State with the OLA Resolution option set to Yes. Any of the default Workflow Exit States stop the Resolution Timer.
Notify Override
If the system is to override the default notification method set for a request when the Priority being edited is assigned to a request, check this option.
Notification Type
Set Email or SMS as the type of notification when the override action is applied to a Priority.
Alerts
Reminder
Sends a reminder email to the Technician when the defined percentage of time elapses for a Response, Restoration or Resolution target that has not been met on a request. Can be set up to 200% of the OLA. Note, Alert intervals are not cumulative.
Warning
Sends a warning email to the Technician when the defined percentage of time elapses for a Response, Restoration or Resolution target that has not been met on a request. Can be set up to 200% of the OLA.
Escalation
Escalates the request to a higher escalation layer when the defined percentage of time elapses for a Response, Restoration or Resolution target that has not been met on a request. Can be set up to 200% of the OLA. It should be noted that the Service Level Manager is also notified when an OLA is breached.
Support
24 x 7
Do not amend if the OLA is to apply 24 hours a day, 7 days a week.
Normal Support
Select if service hours are to be defined for the OLA. When checked, define the service hours by either selecting a template (Templates are configured by the Administrator in the Setup>Localization>Hours tab) or manually define the days and time by making selections within the drop-down lists.
-
Add one or multiple Warning Alerts, if required
NOTE:Trigger intervals are not cumulative
In the default OLA for Warranty, the Urgent default times of 6, 12 and 24, mean 6 hours for the Response stage, 12 hours for Restoration from initial creation, and 24 hours to reach the Resolution from initial creation.
-
Define the support hours
Within 24 X 7, if the OLA's urgent Initial Response field is set to six hours, and an urgent request that uses the OLA is created at midnight in the assigned Technician's time zone, those six hours will expire by 6:00 AM. This is the option to use if your support is staffed 24 hours a day.
Normal support ensure request timers do not run when Technicians are not available. For instance, if the support hours are 9:00 AM to 5:00 PM and the SLAs are as such, the urgent requests' timer would not start ticking until 9:00 AM the following business day and would expire at 3:00 PM.
-
Click Save
-
Click Done.
Now associate the OLA with a Team within the Service tab of the Team Information screen.
The OLA will also be available within the OLA options displayed when OLA is selected as a Contract Type option within the Workflow Status editor screen.
States Tab
The OLA States tab lists the Workflow stages that are assigned to the OLA.
Teams Tab
The Teams tab displays the Team Names and Processes that are assigned to the OLA.
Assigning an OLA to a Team
OLAs are assigned to Teams within the Service Tab of the Team Information screen, when Teams are created or edited. To view OLAs associated with Teams, sort the User>Team List View using the OLA column header. The Lead Technician and Process supported by the Team are also displayed.
OLAs and Blackout Periods
If a request is assigned an OLA State and the request's SLA is in a Blackout Period, the OLA will adopt the SLA Blackout Period. This means that the OLA timers will stop until the Blackout Period has elapsed.
Underpinning Contracts
Underpinning Contracts (UCs) are used to manage support services provided to the Service Desk by external service providers. These Contracts ensure the external parties maintain their service obligations to the Service Desk, which ensures the Service Desk meets the SLA expectations of its Customers.
To successfully meet SLA expectations, the system allows the Service Desk to associate each Workflow State of a request with an Operational Level Agreement (OLA) or Underpinning Contract. It should be noted that SLA targets for Response, Restoration and Resolution time must be greater than or equal to the combined OLA and UC times for each of these targets, to ensure that service level breaches do not occur.
When a request moves into a State that is governed by an Underpinning Contract, for internal contract monitoring, the request can be assigned to a Service Level Manager. This allows the Manager to maintain control of the request and to easily follow up with the external service provider, if required.
Details Tab
Creating an Underpinning Contract:
To create an Underpinning Contract for use within a Workflow State:
-
Select Service>Underpinning Contracts
-
Click New
-
Enter the Contract Name
UPC Editor
Details
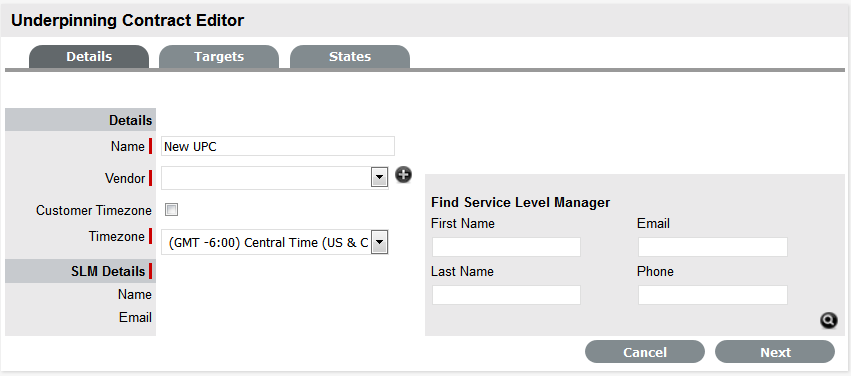
Name*
The name to identify the UC.
Vendor
The name of the service provider supporting the contract. Select from the list or create a new Vendor.
Review Date
Details are completed based on the Admin default settings but can be edited by the User. An Alert is sent based on the default days set in the Review SLA Alert field in Admin>Setup>Privileges>Requests.
Customer Timezone
When enabled, UPC times displayed within the Technician request view using the Customer timezone.
Timezone
This is visible when Customer Timezone is not set and all UPC dates are calculated based on the Timezone set within this field. This is especially applicable for User Work Hours, Blackouts, which also impacts the UPC Reports.
SLM (Service Level Manager)
Name
Email
Use the Find Service Level Manager search option, to enter the contact details of the Manager who will monitor the service provider's ability to meet their contractual obligations .
-
Select a Vendor from the drop-down list or click
to enter new vendor details
-
Adjust the Review Date, if necessary
(A reminder Alert will be sent to the SLM based on the default days set in Admin>Setup>Privileges>Requests.)
-
Tick the Customer Timezone option, if relevant
Apply this option if the User is to view UC due dates using the Customer Timezone or define the UC Timezone.
-
Search and Select a Service Level Manager using the Find Service Level Manager field
-
Move to the Targets tab
-
Complete the following information:
SLA Editor
Targets
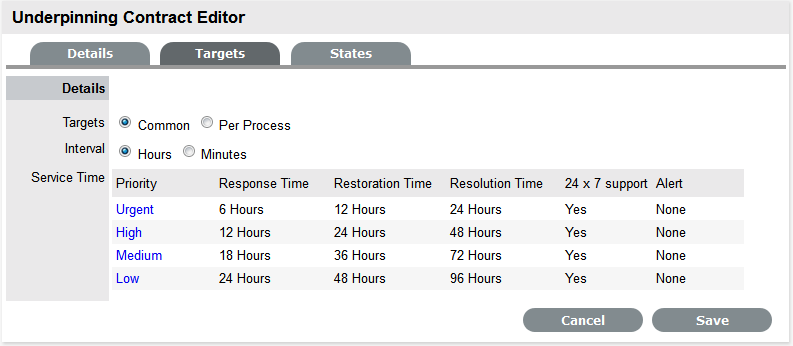
Targets
Common: Select Common if the UC is to apply across Incidents, Requests, Problems and Change Management.
Per Process: If the UC is specific to a Process, select Per Process and choose a Process displayed in the drop-down list.
Interval
Define if the time is to be calculated in Hours or Minutes.
Service Time
Priority
Urgent, High, Medium and Low
Milestones
Initial Response
The maximum time the Customer would wait from the point of request creation before receiving a Note update for a Technician. The Response trigger is stopped when a Note has been added to the request by the assigned Technician and an email is sent to the Customer. If the Response Time is reached, without a Note being added, the request will be escalated.
Restoration Time
The maximum time the Customer would wait from the time the request was created until a workaround or temporary fix has been implemented. The Restoration trigger stops by assigning the request a Workflow State that has to the UC Restoration option set to Yes. By default, this Workflow State is Open - Restored.
Resolution Time
The taken time from the point of request creation until it the request is moved to a Workflow State with the UC Resolution option set to Yes. Any of the default Workflow Exit States stop the Resolution Timer.
Notify Override
If the system is to override the default notification method set for a request when the Priority being edited is assigned to a request, check this option.
Notification Type
Set Email or SMS as the type of notification when the override action is applied to a Priority.
Alerts
Reminder
Sends a reminder email to the Technician when the defined percentage of time elapses for a Response, Restoration or Resolution target that has not been met on a request. Can be set up to 200% of the UC. Note, Alert intervals are not cumulative.
Warning
Sends a warning email to the Technician when the defined percentage of time elapses for a Response, Restoration or Resolution target that has not been met on a request. Can be set up to 200% of the UC.
Escalation
Escalates the request to a higher escalation layer when the defined percentage of time elapses for a Response, Restoration or Resolution target that has not been met on a request. Can be set up to 200% of the UC. It should be noted that the Service Level Manager is also notified when an OLA is breached.
Support
24 x 7
Do not amend if the UC is to apply 24 hours a day, 7 days a week.
Normal Support
Select if service hours are to be defined for the UC. When checked, define the service hours by either selecting a template (Templates are configured by the Administrator in the Setup>Localization>Hours tab) or manually define the days and time by making selections within the drop-down lists.
-
Add one or multiple Warning Alerts, if required.
Enter the percentage of time to elapse for each interval, which will trigger a Warning to be sent via email to the Service Level Manager when the specified percentage is reached.
NOTE:Trigger intervals are not cumulative
For example, the Urgent default times of 6, 12 and 24, mean 6 hours for the Response stage, 12 hours for Restoration from initial creation, and 24 hours to reach the Resolution from initial service request creation.
-
Define the support hours
Within the Targets tab of the Underpinning Contracts Editor screen the default support hours are set to 24x7.
For 24 X 7, if the UC's urgent Initial Response field is set to six hours, and an urgent request that uses the UC is created at midnight in the assigned Technician's time zone, those six hours will expire by 6:00 AM. This is the option to use if your support is staffed 24 hours a day. Normal support ensures request timers do not run when Technicians are not available. For instance, if the support hours are 9:00 AM to 5:00 PM and the SLAs are as such, the urgent requests' timer would not start ticking until 9:00 AM the following business day and would expire at 3:00 PM.
-
Click Save
-
Click Done.
States Tab
The Underpinning Contract States tab lists the Workflow stages that are associated with the Underpinning Contract. This association is made within the relevant States of the Workflow and cannot be edited within this screen.
Workflows
Incident & Problem Workflows
Workflows define the sequence of States to be followed by requests logged with the application. Within the system an unlimited number of Workflows can be configured for Incident and Problem Management.
When deployed, the system includes one fully customizable Workflow for each of the Incident and Problem Management Processes. These can be used immediately, or can be edited to reflect more comprehensively your support service requirements.
SLAs and Workflows
Each Workflow can be associated with one or more SLAs. The SLA provides the contract time that must be met by requests using the Workflow.
For example, if the Service Desk uses one Incident Workflow, which has multiple SLAs assigned to it, logged Incidents follow the same Lifecycle but the time allowed within each stage is based on the SLA contract requirements. The SLA assigned to either the Item, Customer, Organizational Unit or Incident determines which Workflow is selected for the Incident.
Editing default Incident and Problem Workflows
Incident and Problem Workflows can be configured to reflect the organizational Service Desk requirements for these processes. The default Workflows include States that are used by the business logic of the application to maintain control of the request Lifecycle.
It is recommended that the Selected States used by the application, as indicated by an asterisk, not be removed from the Workflow Lifecycle. However, other Available States can be added to the Selected States list.
The following table contains the default Incident and Problem Workflow States.
The * denotes the system-used States.
|
Default State |
Description |
|---|---|
|
Cancelled |
Used to cancel a request when it is no longer to be worked on. |
|
Cancelled Unpaid* |
Used by the system from the Pending - No Contract State when Contracts and Invoices are enabled. |
|
Closed Resolved |
Used when the request has been resolved. This is the Default Closed State for the Incident and Problem Workflows. This start marks the end of SLA timing and is used when measuring SLA times for Reports. |
|
Closed Restored |
Used when the request has been closed and the service restored for the Customer. This start marks the end of SLA timing and is used when measuring SLA times for Reports. |
|
On Hold |
Used when the request is on hold. By default this State stops SLA timing. |
|
On Hold - Client Action |
Awaiting a response from the Customer. When a Note is added to the request by the Customer, the system will change the status to Open. |
|
On Hold - Pending Approval* |
An Incident automatically moves to this State when the "Propose" button is used for sending an Incident Note. This means the CloseRequest email is sent to the Customer asking them to verify the proposed Solution. If the Customer does not respond to the email, the request is automatically closed by the number of days set within the Handshaking Privilege. (The email handshaking option is set by the Administrator in Setup>Privileges> Requests.) By clicking on the URL provided in the email, the Customer ensures the request retains an open and active state. |
|
On Hold - Process Escalated* |
A request moves into this state when a Problem or Change has been created within the Analysis tab of the request. The timer stops and there are no future States as the request will be closed when the related Problem or Change is closed. |
|
Open |
Used to indicate that the request is currently open. |
|
Open Restored |
Used to identify that initial service to the Customer has been restored, or a Workaround is in place but the request is not resolved. This State stops the initial Response Timer if a Note has not been added to the request by a Technician. |
|
Pending |
The default first State for new requests. |
|
Pending - No Contract* |
Used when a request is created but there is no active Contract. A Contract needs to be created for either the Customer, Incident/Problem, Item or Organizational Unit. NOTE:Do not use this State as the Default Open State for a Workflow. |
Editing Template Workflows
Prior to creating or editing existing Workflows, it is suggested that the preferred Workflow Lifecycle be mapped externally to the application.
If States are to be added or removed from the Workflow, it is recommended that all changes be made to the Current States list within a Workflow's Lifecycle tab, prior to mapping the Lifecycle. This ensures that all relevant status options exist in the Available States field, for allocation to the Previous and Next Workflow States.
Once the Workflow Lifecycle has been defined, edit an existing Workflow by:
-
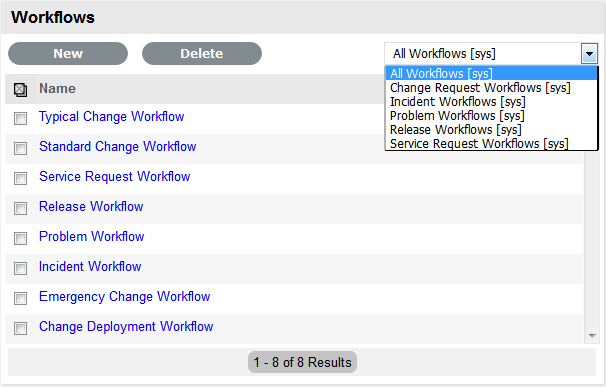
Select Service>Workflows
The Workflows screen appears.
-
Click the Workflow name hyperlink to modify or duplicate an existing template
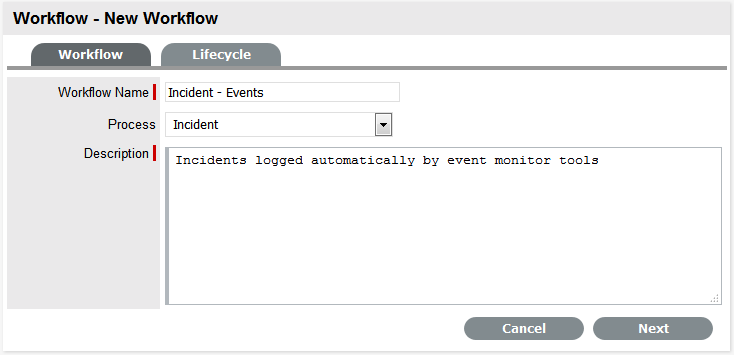
Or, select New to create an entirely new Workflow. The Workflow tab appears and is used to define the Name, select the Process, set the default Open and Closed States for the Workflow. The States available within these lists are all those marked as an Entry or Exit point in the Lifecycle tab
-
Click Edit
The Duplicate button is displayed, select if relevant.
-
Complete the details of a new Workflow
Enter the Name, select the Process and enter a Description and click Next.
-
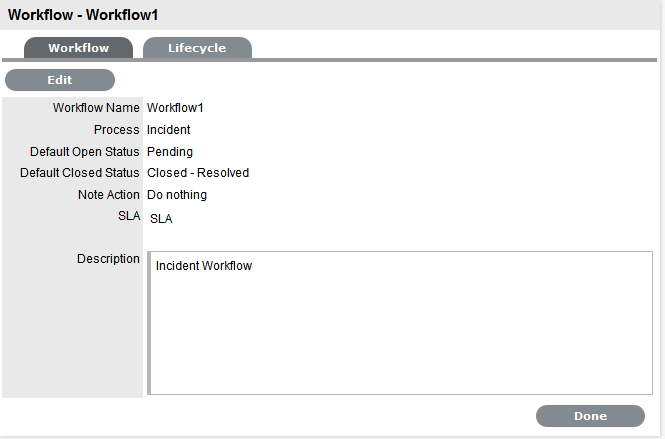
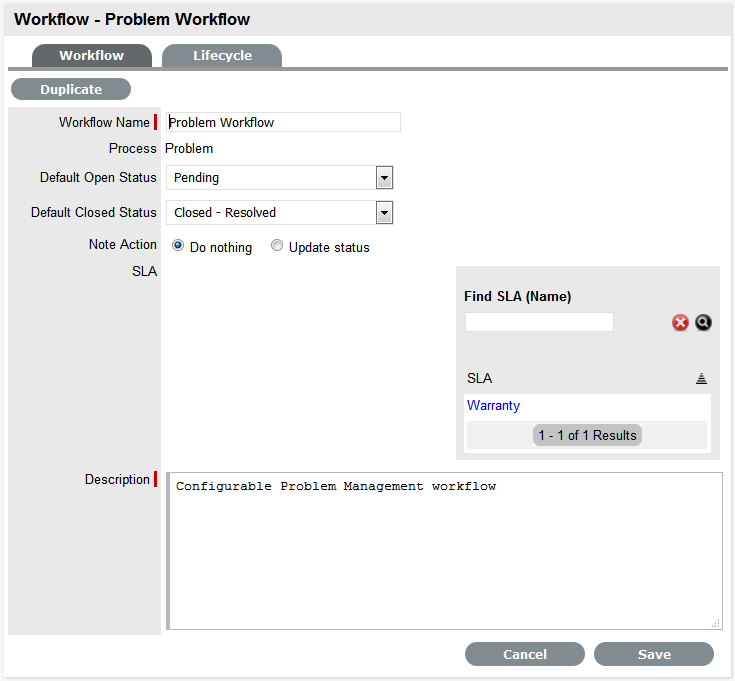
In Edit mode amend relevant details within the Workflows tab:
Field Name
Description
Workflow Name
Enter a relevant name for the Workflow.
Process
Select from the drop-down options the process type of Incident or Problem Workflow.
Default Open Status
The open State that a request adopts when it is assigned the Workflow.
Default Closed Status
The closed State that indicates the request has reached the end of the Workflow Lifecycle.
Email Note Action
This applies to requests that are in an non-active SLA State (i.e., where the SLA Active option is set to No). The option selected here determines the system behavior, regarding an SLA inactive request, when an email is received from a Customer.
-
Do Nothing: Means the status of the request remains the same and the SLA timers are not re-activated. The email is added as a Note and also sent to the Technician.
-
Update Status: Means the status of the request is changed to an SLA Timer Active state, the email is added as a Note and it also sent to the Technician.
Update Status to
This field is displayed when the Update Status option is selected for the Email Note Action field. It allows the User to set a Next State, which is defined as an SLA Timer Active State, where a request will move to after an email has been received from a Customer regarding a request in an inactive SLA State.
SLA
Allows the User to assign an SLA to govern the lifecycle period of the Workflow.(See SLAs & Workflows above, for more information.)
One or more SLAs can be associated with the Workflow.
Description
Defines the purpose of the Workflow
-
-
Use the Find SLA option to change or add SLAs assigned to the Workflow
Click
to access the complete list of SLAs in the system. Refer to the above section for more information regarding SLAs and Workflows.
-
Edit the brief description that explains the purpose of the Workflow, if required
NOTE:The Contract Time field is visible when OLAs and/or Underpinning Contracts are associated with the Workflow States
It displays the accumulated amount of time of the OLAs and/or Underpinning Contract associated with the stages of the Workflow. This contract time cannot exceed the resolution time of the SLA assigned to the Workflow.
-
Click Save
-
Select the Lifecycle tab to define Workflow States
Adding or editing Workflow States:
-
Edit the State details
Click the State name hyperlink in the Workflow map or in the table of States, to display the Status information screen. Or, click New to create a new Workflow State.
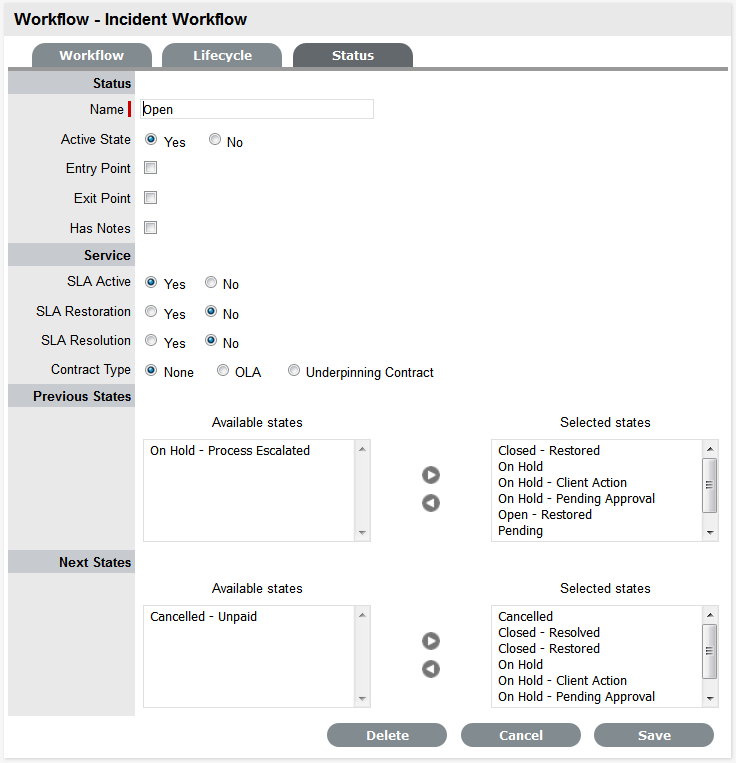
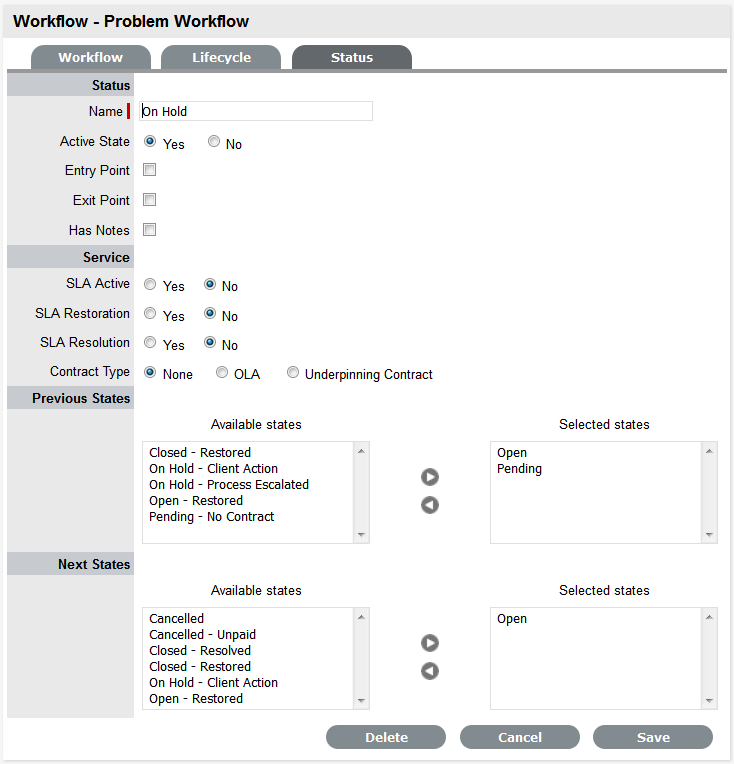
Status
Name
System Required States, the States marked with an asterisk in the States Table, can be re-named if desired. For newly created States, enter a name.
Active State
Assign Yes for requests to be available in the Home tab by default, when assigned to this stage of the Workflow.
Yes should be used for States where the User is actively working on the request or waiting for updates."No" generally applies to Workflow exit points and will only be available by default within the relevant Process tab list view.
Entry Point
An Entry Point is used to indicate the start of a Lifecycle. To make the state a Workflow Entry Point, select the Entry Point checkbox.
As the Entry Point is the first state, the Previous States field will be removed.
Exit Point
Select whether the State will be an Exit Point. An Exit Point is used to indicate the end of a Lifecycle.
NOTE:A Workflow can have only one Entry Point but multiple Exit Points.
Has Notes
Allows the Supervisor to include instructions or add relevant details for requests that move into this State. The information is configured within the Articles tab that is displayed when this option is enabled.
Listener Class
This field is visible if the Outbound Web Services option is enabled in the Admin>Setup>Privileges>System tab.
Complete this field, if assigning this State to a request is to trigger an event in an external system.
This field should contain the name of a Java class that implements the interface com.livetime.ws.listenWorkflowListener that has been compiled into a jar file and added to the LiveTime classpath. Please contact support for further details.
SLA Active
Links the status with timing set within SLAs and OLAs. When the option is set to No, the SLA/OLA timers stop and the triggers for escalations and warnings do not fire.
SLA Restoration
When timing is set using SLAs and OLAs, the SLA Restoration Time trigger is disabled when the request is moved to this state. Restoration Time indicates a Customer has access restored or a temporary workaround. Reports on Restoration Time are measured from when the Restoration Time trigger is disabled.
SLA Resolution
Allows the State selected to be used to mark the SLA Resolution Time. This will be used in SLA reporting.
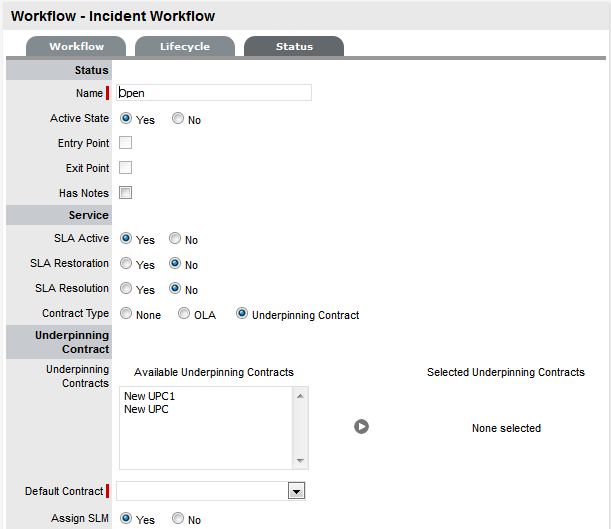
Contract Type
Defines if the Workflow State will be managed by an internal (OLA) or external (Underpinning Contract) support agreement. If OLAs or Underpinning Contracts are assigned to a Workflow Lifecycle, the Workflow SLA Resolution Time cannot be exceeded by the sum of Resolution Times for all Contract Types assigned to the Workflow Lifecycle.
Assign SLM
This field is displayed when an UC is associated with the Workflow State. Use this field to define if the request ownership is to be maintained by the Assigned Technician or moved to the Manager of the SLA associated with the request.
Previous States
If the State is not an Entry Point, use the arrow button to select Previous States from the Available States and choose when this State will appear as a drop-down menu option in the Next Action field.
Next States
If the State is not an Exit Point, use the arrow button to select the Next States. A request can move to, in the Next Action field of a request Information Summary tab.
-
Delete the State if required, or Name/Rename the State
-
Enter all State information up to the SLA Resolution field
-
Save the updated State details
NOTE:It is recommended all States that are to be included in the Workflow be added or re-named now
After all States have been entered in the system, the mapping of the Workflow can be more easily achieved.
-
Continue to edit, add or delete States until all relevant States exist for the Workflow
-
To create the Workflow Lifecycle, States need to be assigned to the transitional states of Previous and/or Next
To move Available States to the Previous State or Next State field, open the Status Details screen by clicking the State object in the Workflow map or select the State hyperlink in the table beneath the Workflow map.
-
Assign States to be Next and/or Previous States
For the Current Status highlight an option in the Available State list and click the right-pointing arrow to move it to the Selected States field.
NOTE:When a State is used as a Previous and a Next State, it allows a request to move forward and backward in a Lifecycle
An Open State cannot have any previous States and a Closed State cannot have any Next States.
-
Click Save to return to the Workflow map and to access other States to build on the Workflow Lifecycle
-
Repeat Steps 14 to 16 until all transitional stages of the Workflow have been mapped
NOTE:To successfully save a Workflow, the sum Resolution Time of the individual Contract Types assigned to each transitional state of the Workflow Lifecycle, must be less than or equal to the Workflow's SLA Resolution Time
-
Click Save.
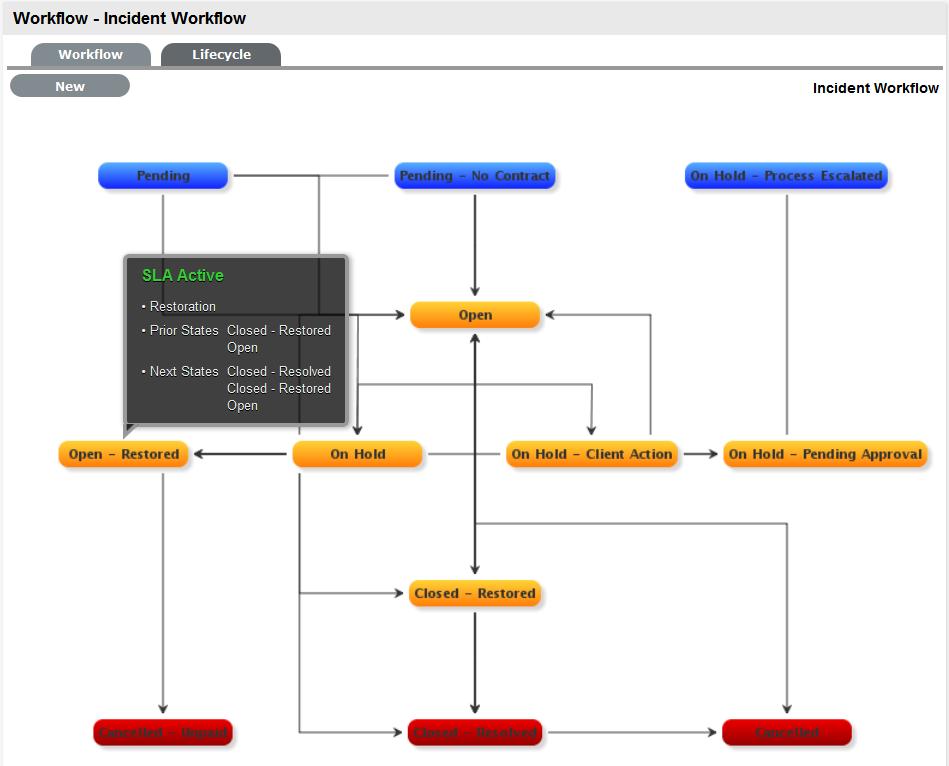
The visual representation of the Workflow is displayed.
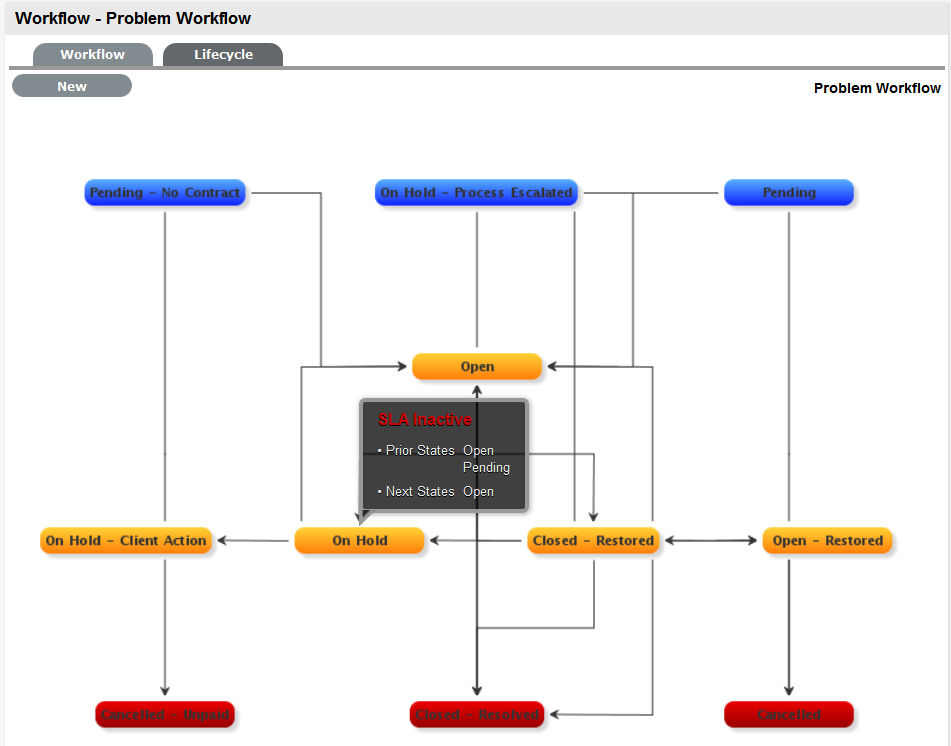
Workflow Map
The Workflow Map is a visual representation of the Workflow Lifecycle. The map displays the relationship between each Lifecycle State by using different colors to represent the type of Lifecycle State.
|
Color |
|
|---|---|
|
Blue |
Indicates the Entry point of the Lifecycle. |
|
Orange |
Is a Transitional stage of the Lifecycle. |
|
Red |
Indicates the Exit point of the Lifecycle. |
Detailed information about a Lifecycle State can be accessed by clicking on the State field within the map.
Deleting a Workflow State
It may be necessary to delete a default State or a State that is no longer in use. Note that a State cannot be deleted if it has been assigned to a request.
To delete an unused State:
-
Select Service>Workflows
-
Click on the Workflow Name hyperlink
-
Click on the State Name hyperlink in the States Table beneath the Workflow Map
-
Click Delete
-
Select Save.
The State will be erased from the States list.
Service Request & Change Management Workflows
Service Request and Change Management Workflows define the sequence of States to be followed by Service Requests and Change Requests (RFC) logged with the Service Desk. These Workflows are unlimited and fully configurable, to cover the diverse range of business change implementations required by an organization.
SLAs and Workflows
Each Workflow can be associated with one or more SLAs. The SLA provides the contract time that a Workflow must adhere to.
For example, if the Service Desk uses a Change Workflow, which has multiple SLAs assigned to it, Change Requests that use that Workflow follow the same Lifecycle but the time allowed within each stage is based on the SLA contract requirements. The SLA assigned to either the Item, Customer, Organizational Unit or Request determines which Workflow is selected for the Change Request.
Approval States
Approval States in Service Request and Change Workflows provide the facility for Customers, Line Managers and Manager Users to accept or reject Request activity. If a State has the Approval State option enabled, the type of Approval determines who, be it a Manager or Customer User, is assigned to the State and it is not possible for other User Roles to also be assigned to the State.
Requests assigned a Customer or Line Manager Approval State can be processed through the Customer Portal or via Email. A request can only be assigned a Line Manager Approval State if the Customer associated with the Request is assigned with a Line Manager within their Customer Information screen. The system will validate this association prior to saving the Request and the User assigned to the Request when moved into the Line Manager Approval State will be the Line Manager defined in the Customer Information screen. When Requests are in a Customer or Line Manager Approval State, the only User who can edit the Request is the Team Lead.
Team Manager Approval States only allow Users with the Manager Role to be assigned to the State. It should be noted that a Technician, Supervisor or Partner User can also be assigned a Manager Role within their User Information screen, which will allow them to be assigned as Managers in the Team and then to Manager Only Approval States. The Managers are associated with an Approval State within the Team Information screen. First, define the Manager Group within the Group tab of the Team Information screen, and then assign that Group to the relevant Workflow State in the States tab of the Team Information screen.
Editing a Default Workflow
To edit a Service Request or Change Workflow:
-
Select Service>Workflows
The Workflows screen appears.
-
Click the Workflow name hyperlink to modify or duplicate an existing template
Or, select New to create an entirely new Workflow. The Workflow tab appears and is used to select the Process, set the default Open and Closed States for the Workflow. The States available within these lists are all those marked as an Entry or Exit point in the Lifecycle tab.
-
Click Edit
The Duplicate button becomes available, select if relevant.
-
Complete the details for a new Workflow
Enter the Name, select the Process and enter a Description and click Next.

-
In Edit mode amend relevant details within the Workflows tab:
Field Name
Description
Workflow Name
Enter a relevant name for the Workflow.
Process
Select from the drop-down options the process type of Change or Service Request Workflow.
Default Open Status
The open state that a Request adopts when it is assigned the Workflow.
Default Closed Status
The closed state that indicates the Request has reached the end of the Workflow Lifecycle.
Email Note Action
This applies to Requests that are in a non-active SLA State (i.e., where the SLA Active option is set to No). The option selected here determines the system behavior, regarding an SLA inactive Request, when an email is received from a Customer.
-
Do Nothing: Means the status of the Request remains the same and the SLA timers are not re-activated. The email is added as a Note and also sent to the Technician.
-
Update Status: Means the status of the Request is changed to an SLA Timer Active State, the email is added as a Note and it also sent to the Technician.
Update Status to
This field is displayed when the Update Status option is selected for the Email Note Action field. It allows the User to set a Next State, which is defined as an SLA Timer Active State, where a request will move to after an email has been received from a Customer regarding a Request in an inactive SLA State.
SLA
Allows the User to assign a SLA to govern the lifecycle period of the Workflow.(See SLAs & Workflows above, for more information.)
Description
Defines the purpose of the Workflow
-
-
Use the Find SLA option to change or add SLAs assigned to the Workflow
Click
to access the complete list of SLAs in the system. Refer to the above section for more information regarding SLAs and Workflows.
NOTE:The Contract Time field is visible when OLAs and/or Underpinning Contracts are associated with the Workflow States
It displays the accumulated amount of time of the OLAs and/or Underpinning Contract associated with the stages of the Workflow. This contract time cannot exceed the resolution time of the SLA assigned to the Workflow.
-
Edit the brief description that explains the purpose of the Workflow, if required
-
Click Save
-
Select the Lifecycle tab to create or modify Workflow States
Adding or editing Workflow States:
-
Click the State field in the Workflow map or State name hyperlink to display the Status information screen
Or, click New to create a new Workflow State.
Status
Name
System Required States, the States marked with an asterisk in the States Table, can be re-named if desired. For newly created States, enter a name.
Active State
Assign Yes for requests to be available in the Home tab by default, when assigned to this stage of the Workflow.
Yes should be used for States where the User is actively working on the request or waiting for updates. No generally applies to Workflow exit points and will only be available by default within the relevant Process tab list view.
Approval State
Sets the Status as an Approval State. This allows a Manager User to be assigned to this State, which enables them to approve or reject a Request when it moves into this stage of the Workflow.
NOTE:An Entry/Exit status cannot be an Approval State.
Item Editable
Select this option to allow the details of an Item to be edited when a Request is moved into this State . When this option is enabled for a Workflow State,
 is visible next to the Item Type link in the Summary tab of the Request.
KBA Approval
Enable this option as part of the KBA Approval process, which displays the Accept, Revise and Reject buttons for the User to publish, advise content revision or reject content.
Enabling this option, removes the Next States fields and requires the User to define where the request will move to if the Accept and Reject buttons are selected. If the Revise button is selected, the Request will move to the "On Hold - KBA Rework" system state.
Entry Point
An Entry Point is used to indicate the start of a Lifecycle. To make the state Workflow Entry Point, select the Entry Point checkbox.
As the Entry Point is the first state, the Previous States field will be removed.
Exit Point
Select whether the state will be an Exit Point. An Entry Point is used to indicate the end of a Lifecycle.
NOTE:A Workflow can have only one Entry Point but multiple Exit Points.
Has Notes
Allows the Supervisor to include instructions or add relevant details for Requests that move into this State. The information is configured within the Notes tab that is displayed when this option is enabled.
Information and attachments included on the Notes tab, are displayed as a scroll-over when the Request moves into the State.
Listener Class
This field is visible if the Outbound Web Services option is enabled in the Admin>Setup>Privileges>System tab.
Complete this field, if assigning this State to a request is to trigger an event in an external system.
This field should contain the name of a Java class that implements the interface com.livetime.ws.listenWorkflowListener that has been compiled into a jar file and added to the LiveTime classpath. Please contact support for further details.
SLA Active
Links the Status with timing set within SLAs and OLAs. When the option is set to No, the SLA/OLA timers stop and the triggers for reminders, escalations and warnings do not fire.
SLA Restoration
If the 'Yes' option is selected for SLA Restoration, it means that Requests that move into this Stage of the Workflow have met the SLA Restoration Time.
SLA Resolution
If the Yes option is selected for SLA Resolution, it means that Requests that move into this Stage of the Workflow have met the SLA Resolution Time.
Contract Type
Defines if the Workflow State will be managed by an internal (OLA) or external (Underpinning Contract) support agreement. If OLA's or Underpinning Contracts are assigned to a Workflow Lifecycle, the Workflow SLA Resolution Time cannot be exceeded by the sum of Resolution Times for all Contract Types assigned to the Workflow Lifecycle.
Assign SLM
This field is displayed when an UPC is associated with the Workflow State. Use this field to define if the request ownership is to be maintained by the Assigned Technician or moved to the Manager of the SLA associated with the request.
Previous States
If the State is not an Entry Point, Previous States can be assigned to the Workflow stage. Highlight the relevant State and use the arrow button to move Available States to the Previous States field. These options designate the Workflow stages a Request can come from, before it arrives in this Workflow State.
Next States
If the State is not an Exit Point, Next States can be assigned to the Workflow state. Use the arrow button to select the Next States from the Available States. These options are included in the Next Action drop-down menu of a Request.
Accept State
Approval
(Visible when the Approval State or KBA Approval option is Yes.)
Displays the States that a Request can move to when a Request action is Accepted. Select the appropriate State, for the system to automatically route the Request when the Accept option is selected.
-
Customer when selected, means the request will be assigned to the Customer associated with the request to accept/reject request activity. The Customer will be able to access the accept/reject icons in the Customer Portal to process the request.
-
Line Manager, select if the request is to be forwarded to a system user with the Customer Role, who will process the approval in relation to the Customer associated with the request. The Customer/Line Manager will be able to access the accept/reject icons in the Customer Portal to process the request.
-
Team Manager select if a single Manager User assigned to the Team is to process the Request.
-
Team Managers# if selected, set the number of Managers that are required to Approve the Request before the system will automatically apply the defined Accept or Reject State.
-
Team Managers% if selected, set the percentage weighting that must be achieved by Managers voting before the system will automatically apply the defined Accept or Reject State. When selected, define the percentage weighting.
Reject State
(Visible when the Approval State or KBA Approval option is Yes.)
Displays the States that a Request can move to when a Request action is Rejected. Select the appropriate State, for the system to automatically route the Request when the Reject option is selected.
-
-
Delete the State if required, or Name/Rename the State
-
Enter all State information up to the SLA Resolution field
-
Save the updated State details
NOTE:It is recommended that all States that are to be included in the Workflow be added or re-named now
After all States have been entered in the system, the mapping of the Workflow can be more easily achieved.
-
Continue to edit, add or delete States until all relevant States exist for the Workflow
-
To create the Workflow Lifecycle, States need to be assigned to the transitional states of Previous and/or Next
To move Available states to the Previous State or Next State field, open the Status details screen by clicking the State field in the Workflow map or select the State hyperlink in the table beneath the Workflow map.
-
Assign States to be Next and/or Previous States
For the Current Status highlight an option in the Available State list and click the right-pointing arrow to move it to the Selected States field.
NOTE:When a State is used as a Previous and a Next State, it allows a request to move forward and backward in a Lifecycle
An Open State cannot have any previous States and a Closed State cannot have any Next States.
-
Click Save to return to the Workflow map and to access other States to build on the Workflow lifecycle.
-
Repeat Steps 13 to 16 until all transitional stages of the Workflow have been mapped.
NOTE:To successfully save a Workflow, the sum Resolution Time of the individual Contract Types assigned to each transitional state of the Workflow Lifecycle, must be less than or equal to the Workflow's SLA Resolution Time.
-
Click Save.
The visual representation of the Workflow is displayed.
Workflow Map
The Workflow Map is a visual representation of the Workflow Lifecycle. The map displays the relationship between each Lifecycle State by using different colors to represent the type of Lifecycle State.
|
Color |
|
|---|---|
|
Blue |
Indicates the Entry point of the Lifecycle. |
|
Orange |
Is a Transitional stage of the Lifecycle. |
|
Red |
Indicates the Exit point of the Lifecycle. |
Detailed information about a Lifecycle State can be accessed by clicking on the State field within the Map.
Deleting an Unassigned Workflow
To delete an unassigned Service Request or Change Workflow:
-
Select Service>Workflow
The Workflows screen appears.
-
Select the checkbox to the left of the Workflow to be deleted
-
Click Delete
The checked Workflow is no longer visible.
NOTE:A Workflow that belongs to a Team cannot be deleted.
Deleting a Workflow State
It may be necessary to delete a system default State or a State that is no longer in use. Note that a State cannot be deleted if it has been assigned to a Request.
NOTE:It is recommended that any States listed in the table of States included on the Life Cycle tab that are not included in the Workflow or used by the system, be removed from the table as all States included here are listed in the States tab when Workflow Technician assignment is being configured. By removing unused States from the table, assigning Technicians to the relevant stages of the Workflow becomes an easier task.
To delete an unused State:
-
Select Service>Workflows
-
Click on the Workflow hyperlink
-
Move to the Lifecycle tab
-
Select the State name link in the table of States included in the Lifecycle tab.
-
Click Delete
-
Click Done.
Release Workflow
Release Workflows define the sequence of States to be followed for Releases logged within the Change>Release tab. By default the system includes one Release Workflow that can be adjusted to suit the service organization's requirements. There is no limit to the number of fully configurable Release Workflows that can be created in the system, so the diverse range of business release implementations required by an organization can be covered by the service and support organization.
Approval States
Approval States in Release Workflows provide the facility for Release Managers that have been assigned to the Approval State, to accept or reject Release activity. If Release Managers are to be assigned to an Approval State, then it is not possible for other User Roles to also be assigned to that State. It should be noted that a Technician, Supervisor or Partner user can also be assigned a Manager Role, which will allow them to be assigned to Manager Only Approval States.
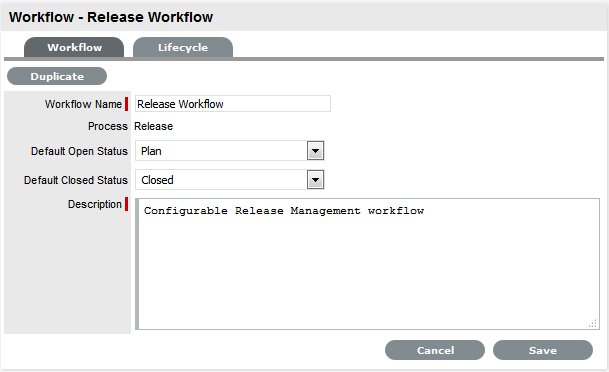
Editing the Default Workflow
To edit or duplicate the default Release Workflow:
-
Select Service>Workflows
-
Click the Release Workflow hyperlink to modify the template details or copy the Workflow
-
Click Edit, to amend or duplicate the Workflow
Fields in the following table are now editable
Field Name
Description
Workflow Name
Enter a relevant name for the Workflow.
Process
Release Management is assigned as the Workflow Process.
Default Open Status
The open State that a Release automatically applies when it is assigned the Workflow.
Default Closed Status
The Exit State that indicates the Release has reached the end of the Workflow Lifecycle.
Description
Defines the purpose of the Workflow.
-
Click Duplicate, if the default Workflow is to be copied
-
Amend the Release Workflow details as required
-
Click Save
-
Select the Lifecycle tab to create or modify Workflow States
Adding or editing Workflow States:
-
Click the State field in the Workflow map or State name hyperlink to display the Status information screen
Or, click New to create a new Workflow State.
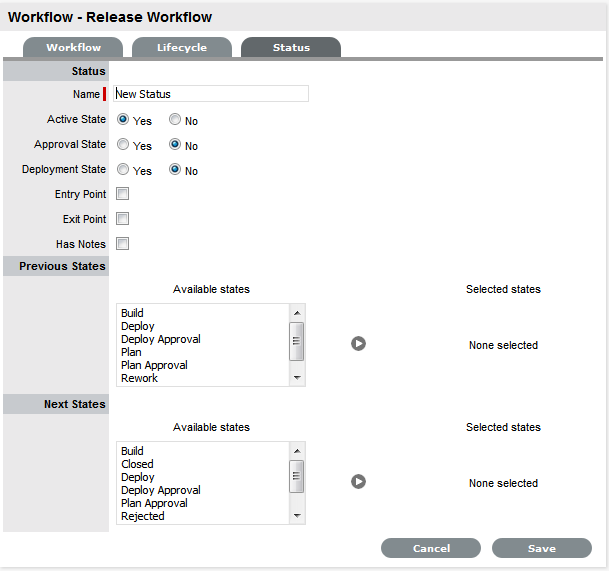
Status
Name
System Default States can be re-named if desired. For newly created States, enter a name.
Active State
Assign Yes for requests to be available in the Home tab by default, when assigned to this stage of the Workflow.
Yes should be used for States where the User is actively working on the request or waiting for updates." No" generally applies to Workflow exit points and will only be available by default within the Release tab list view.
Approval State
Sets the Status as an Approval State. This allows a Release Manager to be assigned to this State and enables them to approve or reject Release Activity when it moves into this stage of the Workflow.
NOTE:An Entry/Exit status cannot be an Approval State.
Deployment State
If enabled for a State, when a Release is assigned this State the Deployment Tasks associated with the Release can be actioned by the Technician Users.
Entry Point
An Entry Point is used to indicate the start of a Lifecycle. To make the State a Workflow Entry Point, select the Entry Point checkbox.
As the Entry Point is the first State, the Previous States field will be removed.
Exit Point
Select if the State will be an Exit Point. An Entry Point is used to indicate the end of a Lifecycle.
NOTE:A Workflow can have only one Entry Point but multiple Exit Points.
Has Notes
Allows the Supervisor to include instructions or add relevant details to the Workflow that is made available when the Release moves into the State. The information is configured within the Notes tab that is displayed when this option is enabled.
Information and attachments included on the Notes tab, are displayed as a scroll-over when the Release moves into the State.
Listener Class
This field is visible if the Outbound Webservices option is enabled in the Admin>Setup>Privileges>System tab.
Complete this field, if assigning this State to a request is to trigger an event in an external system.
This field should contain the name of a Java class that implements the interface com.livetime.ws.listenWorkflowListener that has been compiled into a jar file and added to the LiveTime classpath. Please contact support for further details.
Previous States
If the State is not an Entry Point, Previous States can be assigned to the Workflow stage. Highlight the relevant State and use the arrow button to move Available States to the Previous States field. These options designate the Workflow stages a Release can come from, before it arrives in this Workflow State.
Next States
If the State is not an Exit Point, Next States can be assigned to the Workflow state. Use the arrow button to select the Next States from the Available States. These options are included in the Next Action drop-down menu of a Request.
Accept State
(Visible when the Approval State option is Yes.)
Displays the States that a Request can move to when a Release action is Accepted. Select the appropriate State, for the system to automatically route the Release when the Accept option is selected.
Approval
(Visible when the Approval State or KBA Approval option is Yes.)
Displays the States that a Request can move to when a Request action is Accepted. Select the appropriate State, for the system to automatically route the Request when the Accept option is selected.
-
Team Manager, select if a single Manager User assigned to the Team is to process the Request.
-
Team Managers# if selected, set the number of Managers that are required to Approve the Request before the system will automatically apply the defined Accept or Reject State.
-
Team Managers% if selected, set the percentage weighting that must be achieved by Managers voting before the system will automatically apply the defined Accept or Reject State. When selected, define the percentage weighting.
Reject State
(Visible when the Approval State option is Yes.)
Displays the States that a Release can move to when a Release activity is Rejected. Select the appropriate State, for the system to automatically route the Release when the Reject option is selected.
-
-
Configure the State details, as required
-
Save the updated State details
NOTE:It is recommended that all States that are to be included in the Workflow be added or re-named now
After all States have been entered in the system, the mapping of the Workflow can be more easily achieved.
-
Continue to edit, add or delete States until all relevant States exist for the Workflow
-
To create the Workflow Lifecycle, States need to be assigned to the transitional states of Previous and/or Next
To move Available States to the Previous State or Next State field, open the Status Details screen by clicking the State object in the Workflow map or select the State hyperlink in the table beneath the Workflow map.
-
Assign States to be Next and/or Previous States
For the Current Status highlight an option in the Available State list and click the right-pointing arrow to move it to the Selected States field.
NOTE:When a State is used as a Previous and a Next State, it allows a request to move forward and backward in a Lifecycle
An Open State cannot have any previous States and a Closed State cannot have any Next States.
-
Click Save to return to the Workflow map and to access other States to build on the Workflow lifecycle.
-
Repeat Steps 12 to 14 until all transitional stages of the Workflow have been mapped.
NOTE:To successfully save a Workflow, the sum Resolution Time of the individual Contract Types assigned to each transitional state of the Workflow Lifecycle, must be less than or equal to the Workflow's SLA Resolution Time
-
Click Save.
The visual representation of the Workflow is displayed.
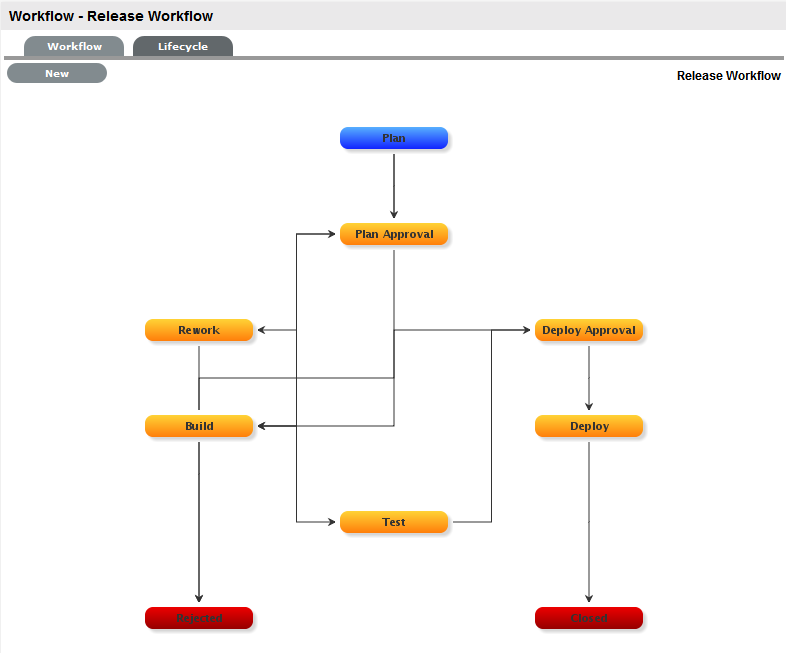
Workflow Map
The Workflow Map is a visual representation of the Workflow Lifecycle. The map displays the relationship between each Lifecycle State by using different colors to represent the type of Lifecycle State.
|
Color |
|
|---|---|
|
Blue |
Indicates the Entry point of the Lifecycle. |
|
Orange |
Is a Transitional stage of the Lifecycle. |
|
Red |
Indicates the Exit point of the Lifecycle. |
Detailed information about a Lifecycle State can be accessed by clicking on the State field within the Map.
Deleting the default Release Workflow
To delete the default Release Workflow:
-
Select Service>Workflow
The Workflows screen appears.
-
Select the checkbox to the left of the Release Workflow
-
Click Delete
The checked Workflow is no longer visible.
NOTE:A Workflow that belongs to a Team cannot be deleted.
Deleting a Workflow State
It may be necessary to delete a system default State or a State that is no longer in use. Note that a State cannot be deleted if it has been assigned to a Release.
NOTE:It is recommended that any States listed in the table of States included on the Life Cycle tab that are not included in the Workflow or used by the system, be removed from the table as all States included here are listed in the States tab when Workflow Manager assignment is being configured. By removing unused States from the table, assigning Technicians to the relevant stages of the Workflow becomes an easier task.
To delete an unused State:
-
Select Service>Workflows
-
Click on the Workflow hyperlink
-
Move to the Lifecycle tab
-
Select the State name link in the table of States included in the Lifecycle tab
-
Click Delete
-
Click Done.
Status Notes
Status Notes can be assigned to Workflow States to provide the User with additional information about a stage within the Workflow Lifecycle. For example, the Status Note may contain conditions or contractual obligations relevant to the stage of the Workflow Lifecycle.
Assign a Status Note
To assign a Status Note to a Workflow State:
-
Select Service > Workflows tab
-
Select a Workflow
-
Click the Lifecycle tab and select a Workflow State
The status editor appears.
-
Select the Has Notes option
An additional Notes tab appears.
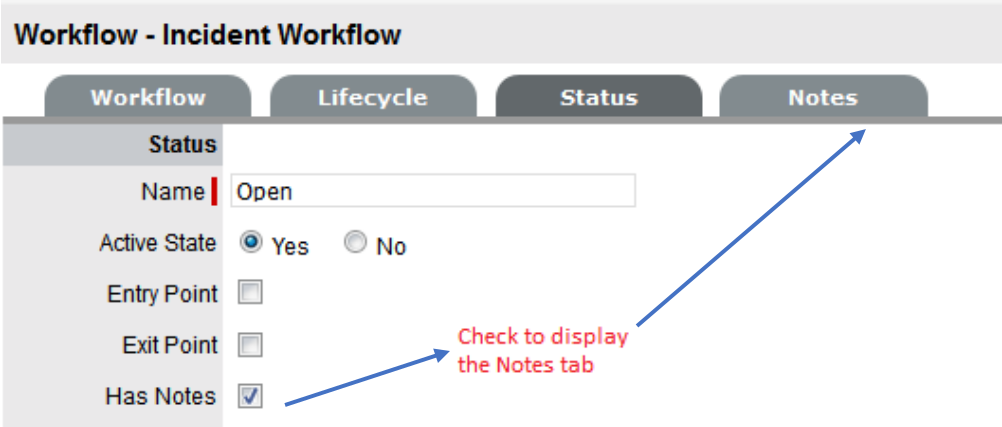
-
Select the Notes tab
-
Enter the Note content
-
Upload attachments, if required
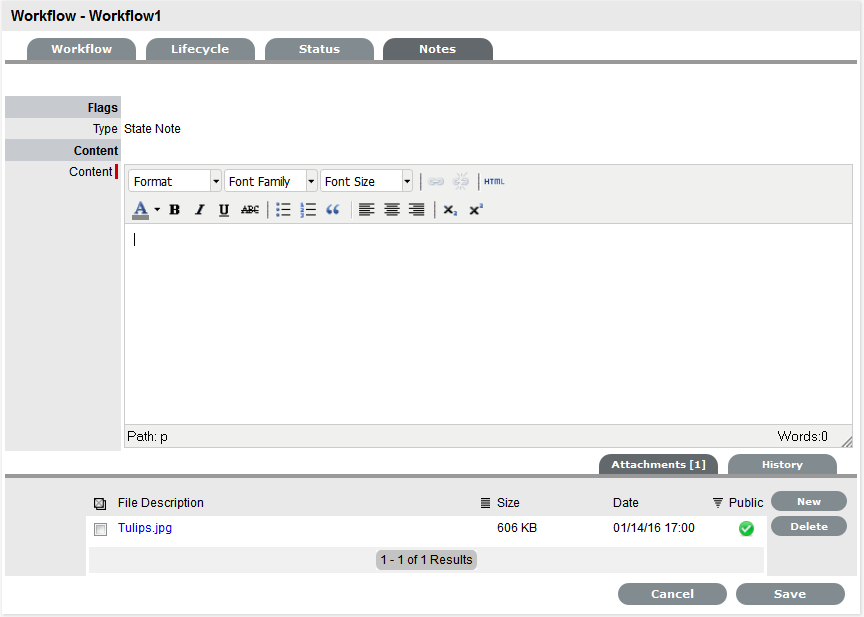
-
Click Save
-
Return to the Workflows > Status tab
-
Click Save to exit the State editor.
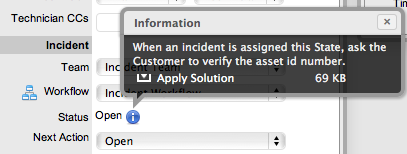
Viewing a Status Note
When requests move into a State with a Status Note,  is displayed beside the Status field within the Summary tab of the request. Scroll over the to view the Status Note and access any attachments.
Building Workflows
The flexibility of the service management system’s fully configurable Workflows can at times provide a challenge for new installations and evolving support environments.
For new installations the default Workflows are generally quite suitable, but as Users become more familiar with the application and look to adapt the Workflow Lifecycle to better reflect the organizational requirements, an understanding of the elements included in the Workflow and how they impact other parts of the system is needed.
When building a new Workflow or adjusting a Default Workflow, it is advised that the Supervisor User map the Workflow Lifecycle outside of the application and define all possible pathways through the different stages of the Lifecycle, before commencing the configuration process in the service management system.
After each stage of the Lifecycle is identified, then consideration needs to be given to the specific requirements of each Workflow State. These include:
Is this an active stage of the Workflow?
If the request assigned this stage of the Workflow is to appear in the My Tasks filter for Technicians, (i.e., on their Home tab), then it should be marked as Active State: Yes.
The Active State flag implies an Open State, so anything in an Active stage of the Workflow will be included in the report results for Open requests. For example, Open Incidents by Priority or Open Problems by Age.
Requests in a Workflow stage assigned an Active State : No are, by default, not visible on the Home tab of Technicians and considered to be Closed from the perspective of the customer. This allows for follow up work to be performed that doesn’t concern the customer.
Is this an Entry Point or Exit Point?
If the stage of the Workflow is to be where the request commences its journey through the Workflow Lifecycle, it is an Entry Point and no Previous stages exist before this State. Once a new Entry Point is saved within the Lifecycle tab, it can be set to the Default Open Status within the Workflows tab.
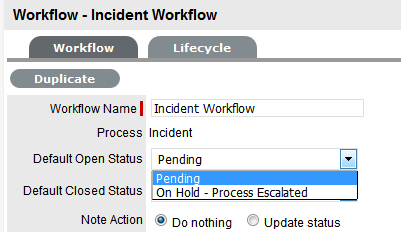
If the stage of the Workflow is to be where the request ends it journey, it is an Exit Point and no Next stages can be assigned to it. This stage can also be defined as the Default Closed Status within the Workflows tab, after it has been created and saved within the Lifecycle tab.
If the stage is a transitionary stage of the Workflow, it is neither marked as an Entry Point nor Exit Point of the Workflow.
Are there special instructions that need to be followed when the request enters this stage of the Workflow?
If the answer to this question is yes, then it is advisable to check the Has Notes option. By doing so, a Notes tab appears, which allows the Supervisor User to enter instructions that will become available to the Technician User when a request moves into this stage of the Lifecycle.
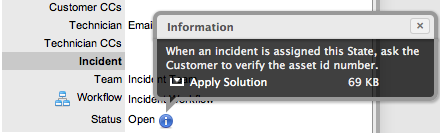
When a request moves into a Workflow stage with a Status Note, is displayed next to the Status field in the request Information screen. Technicians can then view the notes by scrolling over the icon.
Workflows and Service Level Management
The next series of questions that need to be considered relate to Service Level Management.
Is this stage of the Workflow going to be managed by a contract? If so, will it be assigned to an internal support Team or external service provider?
The Contract Type option within the Workflow State allows the Supervisor User to manage each Workflow State with an agreement that specifies the response, restoration and resolution time for an internal or external service provider.
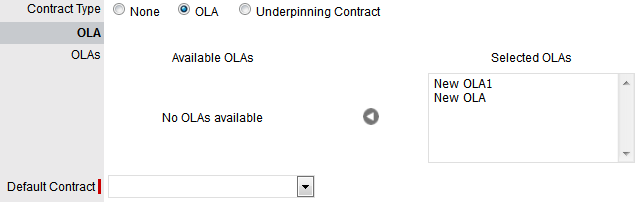
Using this information to configure the Workflow State, you need to consider when the request moves into this stage of the Workflow, will a specific Team of Technicians working within a specified timeframe be responsible for the request. If so, then select the OLA Contract Type.
Based on the understanding that Operational Level Agreements (OLAs) have been created in the application, select the OLA option from the list of configured OLAs that becomes available when the OLA Contract Type option is marked.
The Default Team option is displayed at this point, allowing the Supervisor to select from the Teams that have been assigned within the Teams tab of the OLA Editor screen. This Team is then assigned to the request upon entering this State.
Is this stage of the Workflow going to be outsourced to an external service provider? Have the outsourced service providers been configured in the system?
If the request is to be handled by an external service provider at this stage of the Workflow, then select the Underpinning Contract option. Choosing this option will display a list of pre-configured Underpinning Contracts, which are created within the Underpinning Contracts option of the Service tab.
It should also be noted that when the request moves into this stage of the Workflow, internally the request moves to the responsibility of the Service Level Manager, who is to ensure the external contractors meet their service obligations.
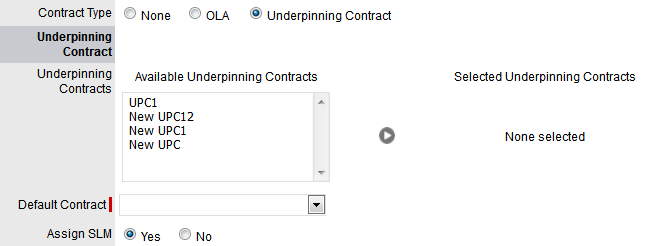
How do SLAs, OLAs, UPCs and Contract Time interact?
You will notice that when an OLA or UPC is assigned to a Workflow State, the State image included in the Lifecycle includes a clock icon. This indicates that it has drawn the resolution time from the OLA or UPC and assigned it to the Contract Time displayed within the Workflows tab. If one or multiple OLAs or UPCs are assigned to the Workflow, the system checks that the SLA resolution time is greater than the sum of all resolution times for the OLAs and UPCs assigned to the Workflow.
The application will not allow a Supervisor to save a Workflow stage, where the OLA or UPC resolution targets cause an SLA breach.
Tip: Before building a Workflow, configure OLAs and Underpinning Contracts within the relevant option of the Service Tab.
Is this stage of the Workflow to be measured by service level timers?
If Yes, set the SLA Active option to Yes, and when a request is in this stage of the Workflow, time will be recorded and measured against the response, restoration and resolution targets for the Service Level Agreement applied to the request.
Warnings and escalations configured for the SLA will be activated when target triggers are reached by the time accumulated in a service timer Active State.
If the SLA Timers are active, has the SLA Restoration time been met?
If the SLA Restoration time for the Priority of the SLA applied to the request has been met when the request enters this stage of the Workflow, this option should be set to Yes. This ensures that automated warnings and escalations are deactivated in relation to the customer’s service being restored.
If the SLA Timers are active, has the SLA Resolution time been met?
If the SLA Resolution target for the Priority of the SLA applied to the request has been met when the request enters this stage of the Workflow, this option should be set to Yes. The SLA Resolution option within the Workflow State will ensure automated warnings and escalations will be deactivated in relation to the customer’s issue being resolved.
Building the Workflow Lifecycle
Once the specific elements of the Workflow State have been configured, you are ready to build the Workflow Lifecycle - that is, map where a request can come from, and where it can go to.
As mentioned at the top of this document, when configuring a new Workflow or adding new Workflow States, the system advises that all stages be created in the system before mapping the Workflow Lifecycle. This will make mapping Previous and Next States a much simpler task.

If this State is a transitionary State (i.e., not an Entry Point or Exit Point), where can the request come from when moving into this stage?
Using the Workflow that has been drafted outside of the system, the Previous States are easily configured by selecting the State(s) where the request can reside immediately before moving into the Workflow State being edited from the Available State list, and moved to the Selected States field.
If this State is a transitionary State (i.e., not an Entry Point or Exit Point), where can the request move to after this stage?
Using the Workflow that has been drafted outside of the system, the Next States are easily configured by selecting the State(s) where the request can move to immediately after the Workflow State being edited from the Available State list, and moved to the Selected States field.
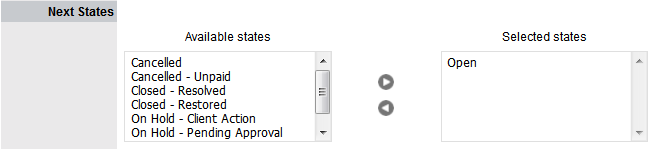
The ability to move a request between two States can easily be achieved by assigning the two relevant States to the Available States list, within the Next States field for each State.
Service and Change Request Workflows
When building a Request Fulfilment or Change Management Workflow there are a couple of additional options that need to be considered, these include:
When a request moves into this stage of the Workflow, does the assigned Technician need to edit the information on the Details tab of the Item associated with the request?
The Item Editable option within a Request Workflow takes into consideration that activities undertaken within this stage of the Workflow may result in the need to amend information recorded against the Item associated with the request. By not allowing items to be edited at every stage of the Request Workflow, greater control is maintained over changes made to the CMDB.
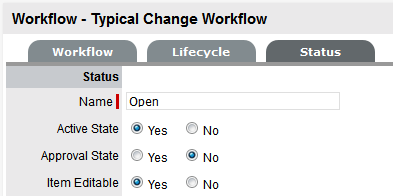
Is management or customer approval required at this stage of the Workflow?
If a Manager User, who typically does not have the ability to edit requests needs to approve or reject activity recorded against a request, the Workflow needs to include an Approval State. Alternatively, if work on a Request needs to be approved by a Customer or Line Manager, then an Approval State is also required.
An Approval State must be neither an Entry nor Exit Point, and when the Approval State option is set to Yes, the Supervisor User must configure the Next States that a request can move to, when accepted or rejected by the Manager, Customer or Line Manager.
After the Accept State is selected, the system provides the option to define the type of Approval State, which includes the option for Customers, Line Managers and one or more Managers to be canvassed for Approval:
|
Approval |
|
|---|---|
|
Customer |
Select if the request is to be assigned to the Customer associated with the request to accept/reject request activity. The Customer will be able to access the accept/reject icons in the Customer Portal to process the request. |
|
Line Manager |
Select if the request is to be forwarded to a system user with the Customer Role, who will process the approval in relation to the Customer associated with the request. The Customer/Line Manager will be able to access the accept/reject icons in the Customer Portal to process the request. |
|
Team Manager |
Select if a single Manager User assigned to the Team is to process the Request. |
|
Team Managers# |
Select if a set the number of Managers are required to Approve the Request before the system automatically applies the defined Accept or Reject State. |
|
Team Managers% |
Select if a set percentage weighting must be achieved by multiple Managers voting, before the system automatically applies the defined Accept or Reject State. When selected, define the percentage weighting. |
Select Team Manager for States that only require one Manager to approve the Request. If multiple Managers or a percentage of Managers in a group need to approve a Request, the number of Approvals or percentage weighting needs to be configured for the Request to be moved to the defined Accept State.
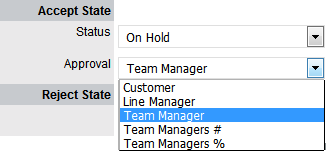
This configuration allows the Customer or Manager to simply reply yes or no to email they receive for approving a request. Alternatively, they can log into the system, add a Note and mark the request as approved or rejected and upon doing so, the system will automatically assign the next relevant state, as dictated by the Workflow.
It should be noted, for Line Manager Approval States to be displayed as a Workflow State Next Action option in the Request Summary screen, the system will automatically check that the Customer associated with the Request has a Line Manager defined in their Customer Information screen.
Tip: After building a Service Request or Change Workflow with a Team Manager Approval State, ensure the appropriate Managers are assigned to a Manager Group within the Team>Groups tab, and this Manager Group is assigned to the relevant State within the Change Workflow of the User>Teams>Team Name>States tab.
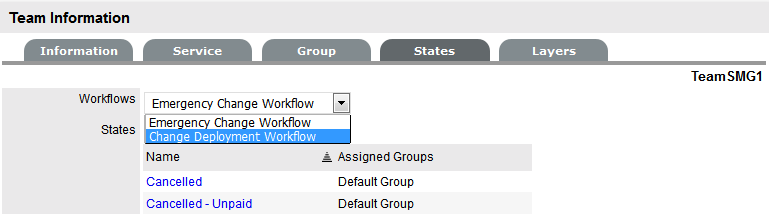
Workflows Applied
The final piece of the Workflow puzzle is to ensure that the correct Workflow is available when a request is created. To achieve this, in addition to assigning the request to the appropriate Team, the following configuration needs to be completed:
-
Assign the relevant SLA to the required Workflow, within the Workflows tab of the SLA Editor information screen
-
Assign the required Workflow to the relevant Team, within the User>Teams>Team Name>States tab
-
Ensure the relevant SLA is applied to either the Item, Customer or Organizational Unit assigned to the request.
NOTE:Note: Failure to assign an SLA results in the system default settings being applied, which are configured in the administration console within the Setup>Privileges>Requests tab.
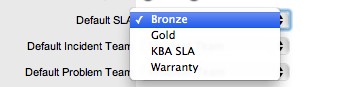
Breach Codes
An SLA breach occurs when a User fails to meet service level targets. When a breach occurs, the User assigned to the request receives an Alert, prompting them to explain the cause of the breach. The User is given the option to select a breach code and provide an explanation for the breach within the Service Level Breach filter view of the Impact tab of the breached request.
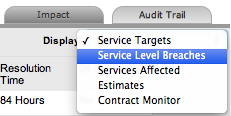
Breach codes are defined by a Supervisor User within the Service > Breach Codes tab.
To create a breach code:
-
Go to Service> Breach Codes
-
Select New
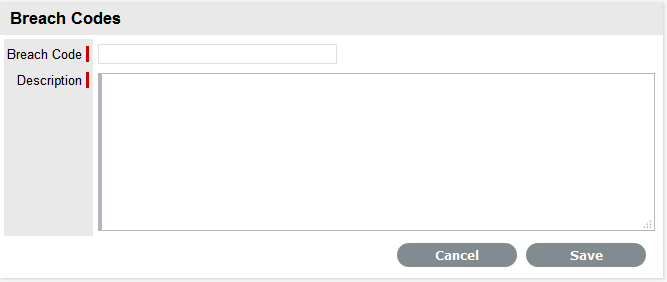
-
Enter a Breach Code label
-
Enter a Description of the breach
-
Click Save.
The System column in the List View includes Yes to indicate a Code that can be edited.
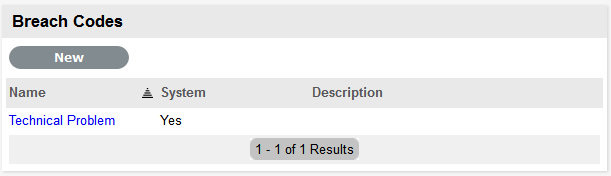
Assigning an SLA
Within the system a Service Level Agreement (SLA) can be assigned to a Customer, Organizational Unit, Item or a request. When a request is created, the system checks if any of these elements have an SLA. The business logic applied to assign an SLA to a request is as follows:
-
If the Customer has an SLA then assign this to the request
-
If the Customer does not have an SLA but the Organizational Unit does, assign this to the request
-
If the Customer or Organizational Unit does not have an SLA but the Item does, then assign this to the request
-
If none of the above elements have an SLA, the system Default SLA as defined by Admin in Setup>Privileges>Requests tab, is assigned to the request.
When Billing is enabled, the system checks that a maintenance contract is in place during the request creation process and assigns a Status of Pending - No Contract when an SLA contract is non-existent or expired. To assign an SLA in this situation, the Technician creates a Per Item or Per Request SLA Contract within the Contract tab of the request Information screen.
Assigning an SLA to a Customer
To assign an SLA to a Customer when Contracts are disabled:
-
Select User>Customers
-
Select the required Customer name link
The Customer Information screen opens.
-
Move to the Contracts tab
-
Click Edit
-
In SLA Details, use the drop-down menu to select the SLA for this Customer
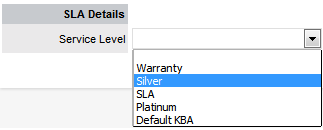
-
Click Save.
Assigning an SLA to an Organizational Unit
To assign an SLA to an Organizational Unit when Contracts are disabled:
-
User>Organizational Units
-
Select the required Org Unit Name
The Org Unit Information screen will open.
-
Select the Contracts tab
-
Click Edit
-
In SLA Details, using the drop-down menu, select the SLA for this Customer
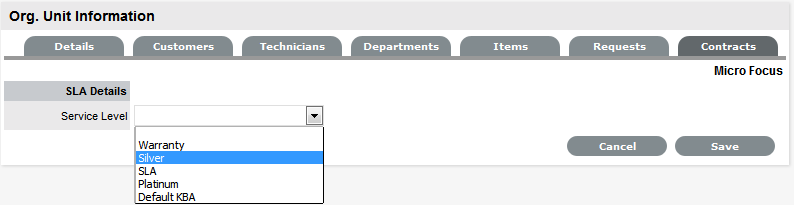
-
Select Save.
Assigning an SLA to an Item
To assign an SLA to an Item when Contracts are disabled:
-
Select Configuration>Items
-
Select the required Item number hyperlink
The Item Information screen will open.
-
Select the Costs tab
-
Click Edit
-
In SLA Details, using the drop-down menu, select the SLA for this Item
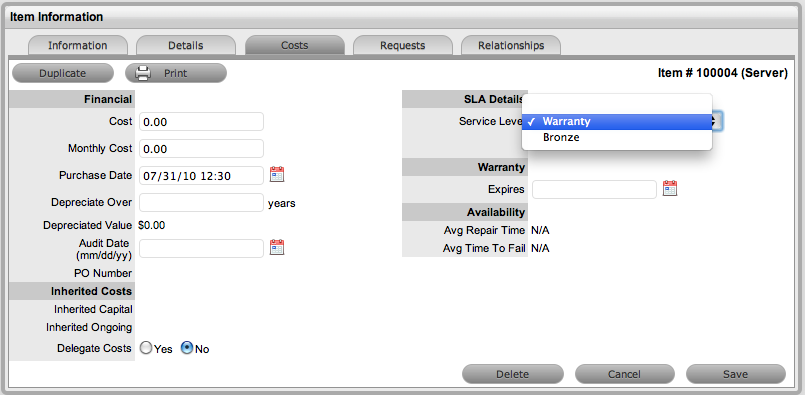
-
Select Save.
Assigning an SLA to a Request - Only when Billing is enabled
When a request is created without a valid contract, the system assigns the request a Pending - No Contract Status. The request is locked and cannot be edited by a Technician until a valid Contract is in place.
2.7.4 Contracts
Contracts

(Contracts menu option is available when Enable Contracts is set to Yes in Admin>Setup>Billing>Setup.)
Contracts within the system allow service and support organizations to manage their Customer support subscriptions relative to the type of service they provide.
For Customer requests to be addressed, all requests must be associated with a valid contract. A Contract consists of a Service Level Agreement (SLA) and a Service Delivery Period (start and end date). A Service Delivery Period is the duration of the contract, such as a month or a year. In the case of individual request Contracts, the Service Delivery Period terminates when the request is closed.
Contracts can be used as a stand-alone function or with the Invoices facility. Service Desks that charge Customers for the service and support they provide, can enable the Contracts and Invoices functionality. Invoice creation within the system is on a per Contract basis.
Contract Types
The Contract Types available within the system include:
-
Per Request - covers the period of time for which the request is open and worked undertaken
-
Per Item, Customer or Org. Unit - covers the Item, Customer or Org.Unit regardless of the number of requests logged against the Item or by the Customer or Org. Unit but can be created on the following basis:
IMPORTANT:Subscription - a contract that covers a specified period of time
Time Limited Subscription - a contract that covers either a specified period of time or number of support hours, whichever limit is reached first
Support Hours - a contract that defines the number of support hours covered
-
Support Hours by Month - a contract that covers a total number of support hours purchased for a defined timeframe and allocated on a per month basis.
Contracts Option
Users must also be assigned the Service Level Management Process within their User account, in order to view the Service Level tab. The Contracts option within the Service tab is visible when Billing>Contracts is enabled by the Administrator. A list of all Contracts generated in the system is listed here and can be viewed through a selection of Filter options.

The following filter list views are provided:
|
Contracts Filter Views |
Description |
|---|---|
|
Active Customer Contracts |
Displays a list of all valid contracts for Customers. |
|
Active Item Contracts |
Lists all valid Item Contracts. |
|
Active Organization Unit Contracts |
Displays all valid Organizational Unit Contracts. |
|
All Agreements |
Lists all Contracts in the system regardless of status. |
|
All Customer Contracts |
Lists all Customer Contracts in the system regardless of status. |
|
All Item Contracts |
Displays all Item Contracts in the system regardless of status. |
|
All Organizational Units |
Lists all Organizational Unit Contracts in the system regardless of status. |
|
All Pending Contracts |
Displays all Contracts with a Pending Status that are waiting to be processed. |
|
Request Contracts |
Lists all Contracts created on a Per Request basis. |
Contract Creation
The Contracts option within the Service tab only provides the list view of Contracts generated in the system. Contracts are created in any of the following screens:
-
Item >Costs >Contracts tab
-
Customer>Contacts tab
-
Organizational Unit >Contracts tab
-
Finance>Invoices tab
-
Request >Contract tab for requests with a Pending - No Contract status.
Contract Fields
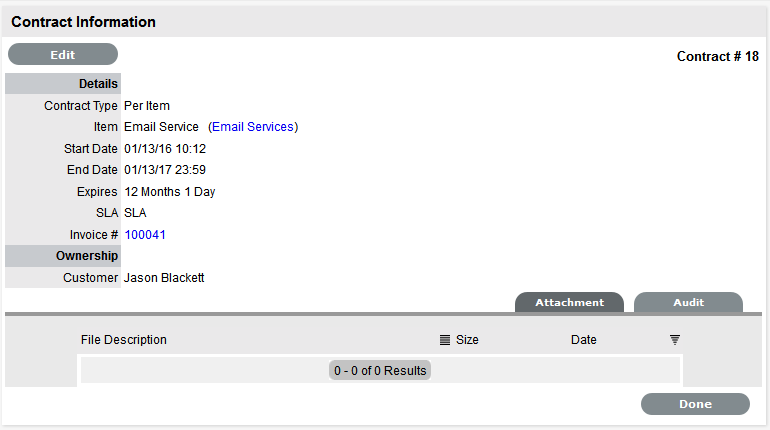
A Contract in the system includes the following fields in the Contract Information screen:
|
Contract Details |
Description |
|---|---|
|
Contract Type |
Subscription or a contract that just covers the current request. |
|
Item, Customer or Org. Unit |
For Subscription contracts, this is the Item, Customer or Org. Unit covered by the Contract. For Per Incident contracts this is replaced by a request ID number. |
|
Start and End Date |
Subscription Contracts default to a one year contract but can be amended. |
|
Expires |
The number of days until the Contract expires. |
|
Hours Purchased |
The number of hours purchased for a Time Limited Subscription or Support Hours Contract. |
|
Time Remaining |
The amount of time remaining for the Time Limited Subscription or Support Hours Contract. |
|
SLA |
The SLA applied to the Contract. |
|
Invoice # |
The Invoice number used to create the Contract. (This is displayed when Invoices are enabled in the system.) |
|
Ownership |
|
|
Customer |
The Customer covered by the Contract. |
Attachment Tab
The Attachment tab allows the User to upload documentation related to the Contract. This facility provides a centralized repository for storing information and obligation details related to the Contract.
Audit Tab
The list of requests with the time recorded against the Contract is displayed within the Audit tab. The Summary view displays the list of requests with total number of Notes and Time allocated to the Contract, while the Detail view includes a breakdown of all Notes and the associated time related to each request.
Contract Validation Process
When a request is created and Contracts are enabled, the system validates the contract status for the Customer, Organizational Unit or Item. As part of the contract validation process, the system selects the first element found on this list:
-
Customer (with a valid contract)
-
Org Unit (with a valid contract)
-
Item (with a valid contract)
-
No contract found, then either a Per Request or Per Item Contract can be created by selecting the Pending - No Contract hyperlink and adding a Per Request or Per Item Contract.
Contract Assignment
Contracts can be assigned to an Item, Customer, Organizational Unit or on a per Incident basis. The following content regarding creating a Contract, assumes that within the system Setup, the Billing>Contracts option is enabled.
When a request is created, the system will check if the Customer has a valid contract. If the Customer is not under contract, the system will check if the Org. Unit is covered, and if not, it will assess the Item contract status. If no contract is in place, the request will be assigned a "Pending - No Contract" Status and locked down until a Contract is created.
An Item, Customer and Organizational Unit can only have one active contract in place at a time but multiple contracts can be queued by assigning a Start Date that falls after an existing Contract's end date. Queued Contracts are visible within the Item, Customer or Org Unit's Contract tab identified by the contract number generated at the point of creation, if Invoicing is not enabled in the system. If Invoicing is enabled in the system and an SLA cost is associated with the contract, a contract number is generated when the invoice payment is processed by a Finance User.
Customer Contracts
Customer contract history is stored within the Contracts tab of the Customer Information screen. All contracts, valid and expired, are listed within the Customer and Items tab of the Contracts screen.
To create a new contract for a Customer:
-
Select User>Customers
-
Select the Customer Name
-
Move to the Contracts tab
-
Click Edit
The Add and Delete buttons become available with the Contracts>Customer tab.
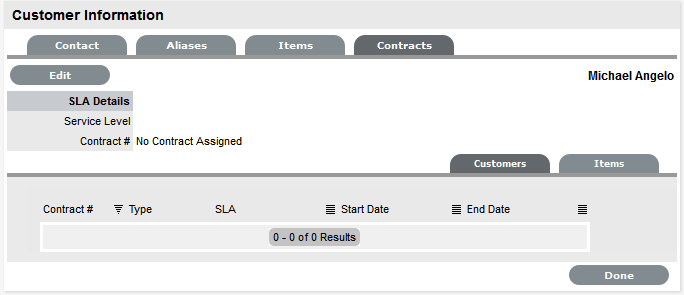
-
Click Add
(If Invoices are enabled in the system, an Invoice number will be automatically generated and assigned to the Contract).
-
Select a Service Level from the list
When selected, the screen expands to display start and end date fields.
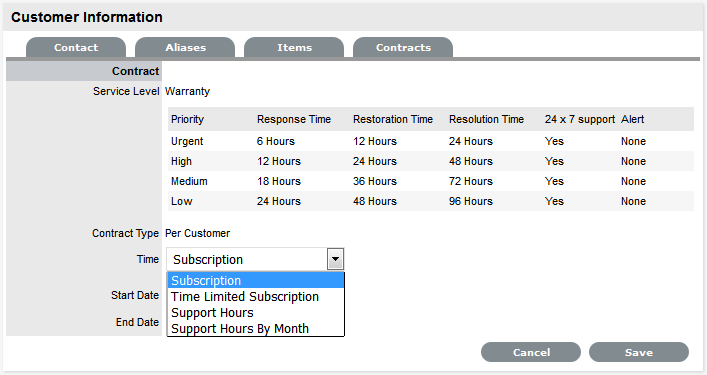
-
Define the Contract Time period
For the Per Customer Contract Type the Time Period for the Contract can be defined as one of the following:
Subscription if selected, the Start and End Dates are automatically set to year from the date of creation, but can be edited if required.
Time Limited Subscription if selected, the Support Hours field is displayed and the number of support hours purchased by the Customer should be entered. Also, the Start Date and End Date fields should be completed manually by entering the length of time for the subscription period, or the system will default to entering a year from the date of creation.
Support Hours if selected, the number of support hours purchased by the Customers should be entered.
Support Hours by Month if selected, set the number of hours purchased per month and define which day of the month contract is to rollover to start the new month. The Total Support Hours will automatically be calculated based on the Start and End Dates set for the Contract.
(If a Contract is forward dated with a Start Date set in the future, the Pending Contract status is assigned.
-
Add any relevant Invoice Notes
-
Check the Taxable box, if the Contract is to be taxed
-
Click Save
If invoices are enabled and a cost is associated with the SLA, a Warning message is displayed prompting that the invoice needs to be processed by a Finance User before the contract will become available in the system. The invoice can be processed in the Finance >Invoices tab.

-
Click Next to continue
The system reverts to the Contracts summary screen
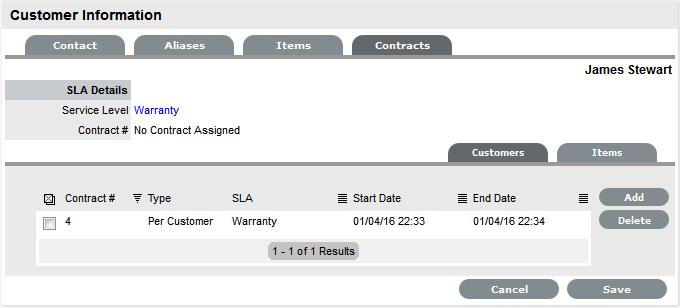
-
Click Save. Click Done.
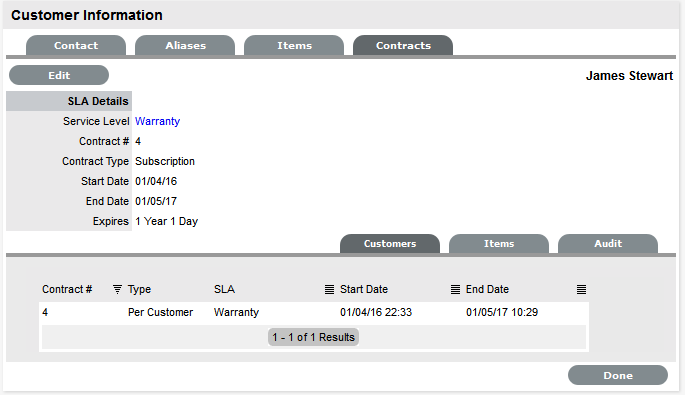
NOTE:If Invoices are enabled, a new invoice is automatically saved within the Finance>Invoices screen for the newly created Contract. If payment is required, a Pending Invoice Number is displayed and once processed, the Contract details will be included in the Customer Information>Contracts>Customer tab.
The Items tab within the Customer>Contracts screen is used to list all the Items with a Contract that are owned by a Customer.
To delete a current Contract, as a Supervisor User, select  next to the Contract Number. Alternatively, to delete a current or queued Contract, within the Contract>Customers tab check the field next to the relevant Contract # and select the Delete button.
Organizational Units Contracts
Organizational Units’ Contract history is stored within the Contracts tab of the Org. Unit Information screen. All Contracts, valid and expired, are listed within the Org. Unit, Customer and Items tab of the Contracts tab.
NOTE:To assign a Contract to an Org Unit, a Primary Contact must be nominated for the Org Unit or the system will prompt the User to assign a Primary Contact during the Contract assignment process. This means, prior to creating the Contract assign at least one Customer to the Org Unit and then designate a Customer as the Primary Contact.
To create a new Contract for an Organizational Unit:
-
Select User> Organizational Units
-
Select the Organizational Unit's Name
-
Move to the Contracts tab
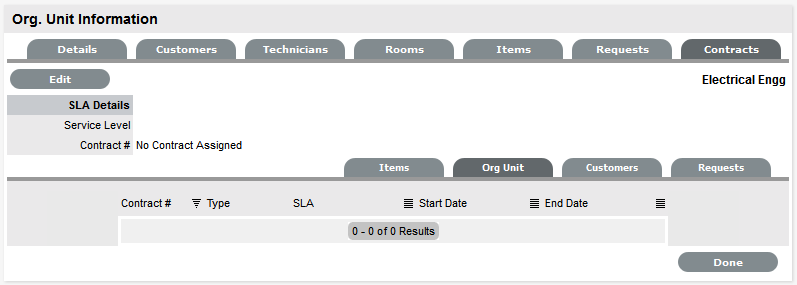
-
Click Edit
The Add and Delete buttons become available with the Contracts>Org Unit tab.
-
Click Add
If a Primary Contact has not been assigned to the Org Unit a system prompt will notify the User to create a Primary Contact.
-
Select a Service Level from the list
When selected, the screen expands to display start and end date fields.
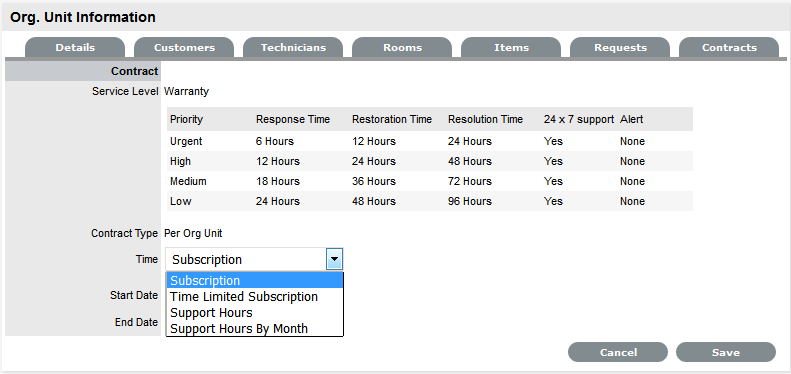
-
For the Per Org Unit Contract Type the Time Period for the Contract can be defined as one of the following:
Subscription if selected, the Start and End Dates are automatically set to year from the date of creation, but can be edited if required.
Time Limited Subscription if selected, the Support Hours field is displayed and the number of support hours purchased by the Customer should be entered. Also, the Start Date and End Date fields should be completed manually by entering the length of time for the subscription period, or the system will default to entering a year from the date of creation.
Support Hours if selected, the number of support hours purchased by the Customers should be entered.
Support Hours by Month if selected, set the number of hours purchased per month and define which day of the month contract is to rollover to start the new month. The Total Support Hours will automatically be calculated based on the Start and End Dates set for the Contract.
(If a Contract is forward dated with a Start Date set in the future, the Pending Contract status is assigned.
-
Click Save
-
Click Next to continue
The system reverts to the Contracts summary screen, if the contract is forward dated and another contract is not already active, the Enable Contract option button will be available. Select this button if the contract is to commence prior to the set Start Date. Alternatively, other contracts can be queued for the Org Unit by selecting the Add button.
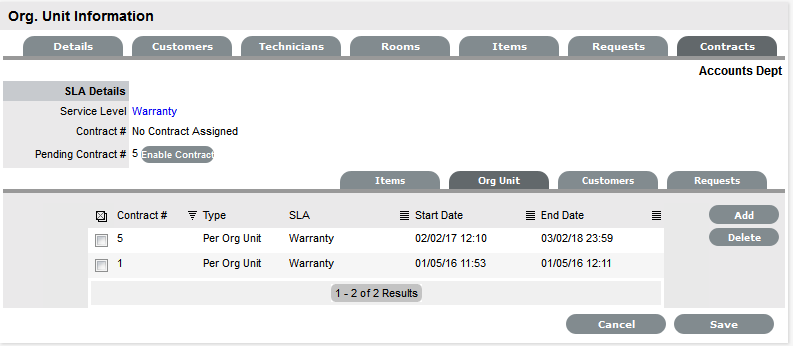
-
Click Save
To process the contract before the set Start Date select the Enable button.
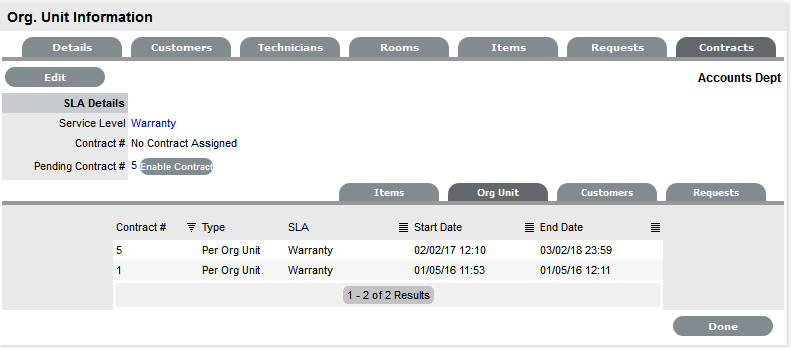
-
Click Done.
A success message is displayed.

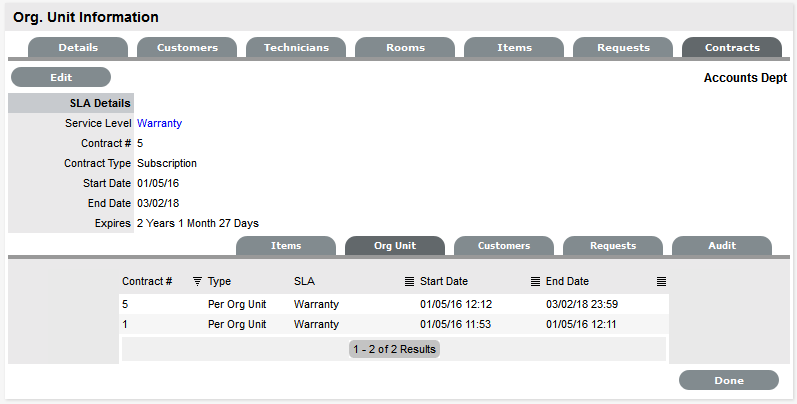
NOTE:If Invoices are enabled, a new invoice is automatically saved within the Finance>Invoices screen for the newly created Contract. If payment is required, a Pending Invoice Number is displayed and once processed, the Contract will be listed in the Org.Unit Information>Contracts>Org.Unit tab.
To delete a current Contract, as a Supervisor User, select next to the Contract Number. Alternatively, to delete a current or queued Contract, within the Contract>Org Unit tab check the field next to the relevant Contract # and select the Delete button.
The Items and Customers tab within the Org Unit>Contracts screen is used to list all the Items and Customers with a Contract that belong to the selected Org Unit.
Item Contracts
-
Select the Item Number within the Configuration>Item screen
-
Move to the Costs tab
The Contracts tab is visible in the bottom right corner of the screen
-
Click Edit
The Add and Delete buttons are made available within the Contracts tab

-
Click Add
(If Invoices are enabled in the system, an Invoice number will be automatically generated and assigned to the Contract).
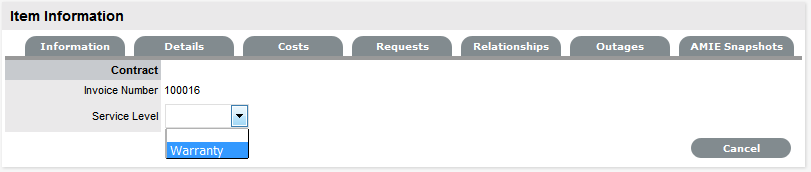
-
Select an SLA from the drop-down option
The screen will display the SLA details and the Contract Type locked to Per Item.
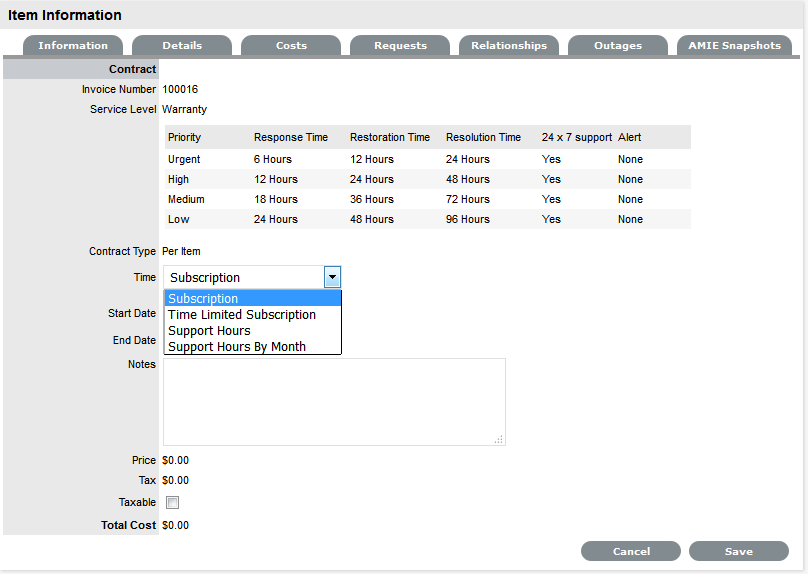
-
Assign the Time period to be covered by the Contract:
If Subscription is selected, the Start and End Dates are automatically completed by the system, but can be edited if required.
If Time Limited Subscription is selected, the Support Hours field is displayed and the number of support hours purchased by the Customer should be entered. Also, the Start Date and End Date fields should be completed manually, entering the length of time for the subscription period.
If Support Hours is selected, the number of support hours purchased by the Customers should be entered.
If Support Hours by Month is selected, set the number of hours purchased per month and define which day of the month contract is to rollover to start the new month. The Total Support Hours will automatically be calculated based on the Start and End Dates set for the Contract.
(If a Contract is forward dated with a Start Date set in the future, the Pending Contract status is assigned.
-
Add any relevant Invoice Notes
-
Check the Taxable box, if the Contract is to be taxed
-
Click Save.
If Invoices are enabled in the system, an Invoice number will be automatically generated for the Contract and made available within Finance>Invoices. Payment will need to be processed by a Finance User before the Contract can be enabled in the system. If invoice payment is required before the contract can be enabled in the system the following Warning message is displayed:

-
Click Next
The Contracts information is only populated after the Invoice has been processed. To process the invoice, as a Finance User move to the Finance>Invoices tab. Once the relevant invoice payment has been processed the Contract details will be visible in the Costs >Contracts tab.

The Costs tab provides a summary of the current Contract details. The Contracts tab within the Costs screen, lists all contracts that have been assigned to this Item.
To delete a current Contract, as a Supervisor User, select next to the Contract Number. Alternatively, to delete a current or queued Contract, within the Costs>Contract tab check the field next to the relevant Contract # and select the Delete button.
Per Request Contracts
When a request is created without a valid contract, the system automatically assigns the request a status of Pending - No Contract. The User can associate a contract to either the Item or request within the Contract tab of the request Information screen. A Request Contract is only valid for the life of the request.
Contracts with Invoices Enabled
When the Invoices option is enabled within the application's setup and a Contract is being created, the system automatically generates a Contract Invoice. For the contract to become active in the system, a Finance User must process the invoice. If no cost is assigned to the Service Level (i.e., Warranty), the invoice is automatically processed and the contract is active in the system.
Canceling Contracts
If a Contract is no longer valid, it can be cancelled at any time during the contract period. A Supervisor can cancel the Contract within the Customer, Org, Unit or Item Contracts screen, by selecting next to the Contract Number. Contracts that are canceled using this option will record the Reason for cancellation as the Supervisor User name who triggered the cancel action.
A User with the Finance Role can delete a Contract within the list view of the Service>Contracts tab.
To cancel a Contract, as a User with the Finance Role:
-
Go to Service > Contracts
-
Select a Contract ID to be canceled
The Contract Information screen will appear.
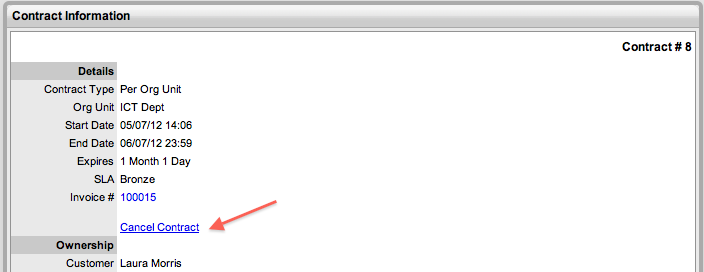
-
Click the Cancel Contract hyperlink
A Cancel Reason text box is displayed.
-
Enter an explanation for canceling the Contract

-
Click Save
The Cancel Reason is assigned to the Contract and the Contract Expiry date will be marked Expired.
-
Click Done.
NOTE:When a Customer Contract is cancelled and the Customer's associated Org Unit has an active contract in place, the Org Unit Contract details will be displayed within the Contracts>Service Level field of the Customer Information screen.
Pending Contracts
Contracts that have been forward dated on creation or that require invoice payment before they can become active in the system, are recorded as Pending Contracts. The list of Pending Contracts can be viewed in the All Agreements filter within the Service Level > Contracts screen.
A Pending Contract will automatically become active in the system on the start date assigned to the contract, if an invoice is not associated with the contract.
To enable a Contract before the start date:
-
Go to the Costs tab of the Item or Contracts tab of the Org Unit or Customer
The tab is available relative to where the contract is being activated. It will be Costs within the Item screen, or Contracts within the Customer or Org Unit Information screen.
-
Select Edit
The Enable button is displayed next to the Pending Contract Field
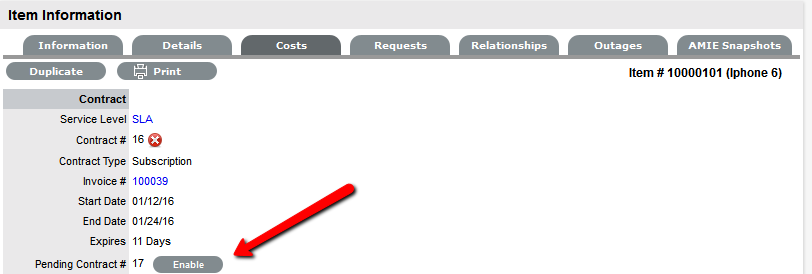
-
Click Enable
The system prompts that the start date will be updated.
-
Click OK
The Contract is created with the new start date.
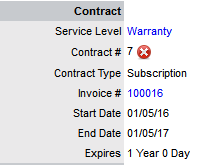
-
Click Save.
NOTE:Requests raised against a Customer/Org Unit/Item with a Pending Contract, are assigned a Pending-No Contracts status. The Item/Customer/Org Unit’s Contract needs to be activated before a Technician can work on the request.