5.4 Privileges
5.4.2 User Privileges
Within the User tab, privileges for Users with the Technician and Partner Role can be configured by customizing the options within the Technicians options list. This also includes enabling functionality related to all User work hours and public holidays. Defaults can also be adjusted for Users across the Knowledge Management and Configuration Management processes.
Specific to Technician Users, the following privileges include the ability to:
-
Create new Customers
-
Create new Items
-
Reassign requests
-
Edit other Technicians' requests
-
Create, edit, publish and delete Knowledge Base Articles by default.
NOTE:Privileges assigned to the Technician Role are also applied to the Partner Role.
Enabling User Privileges
To configure User Privileges:
-
Select Setup>Privileges
The User tab is displayed.
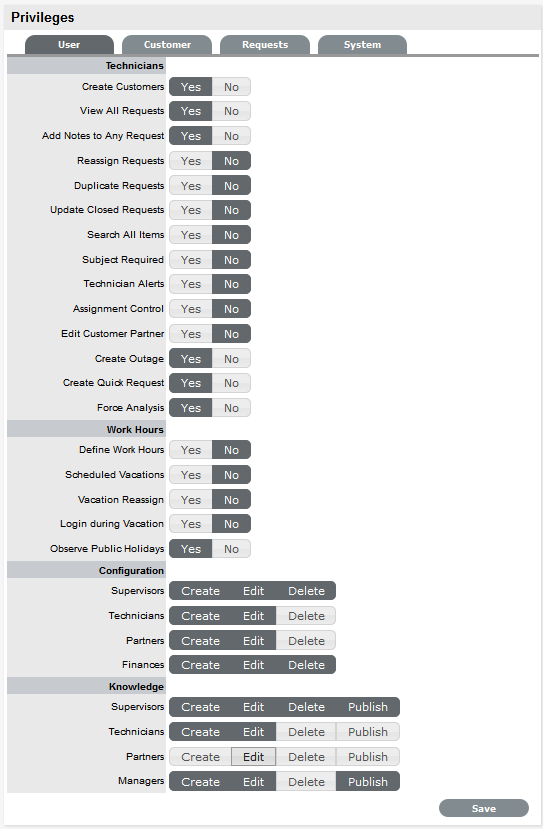
User Privileges
Technicians
Create Customers
Allows Technicians to create Customer Accounts.
Reassign Requests
Allows Technicians to reassign requests to another Technician within the same Team. When disabled, requests can only be reassigned through Escalation or changing the status of the request by the Supervisor.
Duplicate Requests
Allows Technicians to copy requests to fast track request creation. Supervisors have this privilege by default.
Manual Request Time
Disables the timer that automatically monitors and records the time when a request is in Edit Mode.
NOTE:This option is not available when Contracts are enabled in the Setup>Billing tab, as time worked on a request must be added to Notes manually by Users.
View All Requests
Allows Technicians to view all the requests, regardless of Team assignment, logged in the system for the Processes they are assigned.
It also allows Technicians to edit requests that are assigned to fellow Team members.
Update Closed Requests
Set to Yes to enable Technicians to add Notes to requests that are assigned a Workflow Exit State.
Search All Items
Within the Items tab of a request, the All Items option is displayed in the Find Item box for Technician Users, if this option is enabled.
Include Globals Default
By enabling this option, the "Include Global* Options" is ticked by default in the Find Item field, when a User is creating a request.
Subject Required
Allows technicians to enable or disable the subject field in the new end-user portal.
Subject Required
To make the completion of the Subject field mandatory for Users during the request creation process, set the option to Yes.
Technician Alerts
Allows Technicians to create system Alerts.
Work Hours
Define Work Hours
Allows the Technician's availability to be configured within the Users>Schedule tab. This ensures that Requests are only forwarded to the User during the Defined Work hours, unless there are no other Users available.
*If this option is enabled, the Users Work Hours must be defined for each User, otherwise the built-in technician assignment logic will be ignored and all new requests will be assigned to the Team Lead.
Scheduled Vacations
Allows leave to be scheduled for Users, within the Users>Schedule tab. This allows vacations to be planned and automatically detected by the System when the User commences leave. The System will not assign the User new Requests when they are on vacation.
Vacation Reassign
This option becomes available when the 'Schedule Vacations' option is active. When enabled, this option ensures active requests of the User commencing leave are automatically re-assigned to available Technicians within the User's Team.
Login during Vacation
This option becomes available when the option is active. When enabled, users can login into Service Desk and work on requests during vacation. The System will not assign the User new Requests when they are on vacation..
Schedule by Technician
This option becomes available when the option is active. When enabled, users can login into Service Desk and work on requests during vacation. The System will not assign the User, new Requests when they are on vacation.
Observe Public Holidays
This option ensures the System gives consideration to public holidays when calculating SLA times, escalations and breaches.
NOTE:When enabled, the Public Holidays sub-menu option is visible within the Admin>Localization>Holidays tab.
Assignment Control
When enabled provides the Assignment option within the User Information screen. This allows a Supervisor or Administrator to turn request assignment off for a User who is available in the system.
Edit Customer Partner
Allows Customers to be assigned to Partners within the Customer Information tab.
Create Outage
Enables a Technician to create outages for Items.
Force Analysis
The system will propose relevant Solutions within the Analysis tab, during the request creation process.
Configuration
Roles
Set the default privileges for the User Roles' ability to create, edit and delete Item information in the CMDB.
If you change the default privileges, for an existing user the privileges will not be updated. Since, these settings are not system level settings. But when you create a user the default privileges are assigned.
Individual settings below user information section will determine the actual privileges for that user. If you want to change these settings for many users, use the Bulk edit feature.
Knowledge
Roles
Configure the default Knowledge Base authoring permissions for each User Role.
-
Click Yes to enable, or No to disable a Privilege option
-
Click Save
5.4.3 Customer Privileges
Customer Privileges specify the options that are available to Customers within the Customer Portal.
Enabling Customer Privileges
To enable Customer Privileges:
-
Select > >
The Privileges screen is displayed.
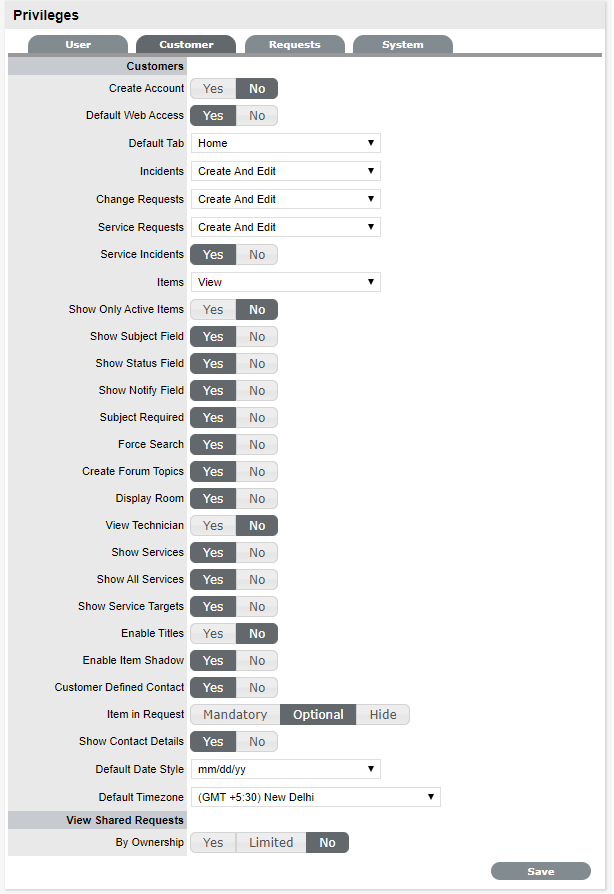
Customer Privileges
Description
Create Account
Allows Customers to create their own account from the Login screen.
Default Web Access
Define the default setting for Web Access on newly created Customer Accounts.
Default Tab
Select the default tab for the customer. By default the selected option will be displayed in the Customer portal.
Generic Requests*
Define if Customers can view, create or edit Generic Requests in the Customer Portal.
Generic Request Type*
This option becomes visible when option is active. Define the type for generic request from Incident, Service Request or Change Request. For example, if your generic request type is set to Incidents, when you create a generic request, the request gets listed as incident in the User portal. Then the technician can include item details.
Incidents
Define if Customers can view, edit, create (create and view), create or edit Incidents in the Customer Portal.
Change Requests
Define if Customers can view, edit, create (create and view), create or edit Change Requests in the Customer Portal.
Service Requests
Define if Customers can view, edit, create (create and view), create or edit Service Requests in the Customer Portal.
Service Incidents
If the option to create Incidents in the Customer Portal is enabled, this can be refined by defining if Incidents can be logged against Service Items. If this option is disabled then Services are not displayed in the Category drop-down list during the Incident creation process.
Also, if a Customer attempts to log an Incident against a Service via email by including the Item# in the Subject line, and this option is disabled, the system will send an error message. The "NoServiceIncidentContent" error message can be customized in the Admin>Setup>Email>Templates>Error Message filter.
Default Request*
Define the default request type from Generic Request, Incident, Service Request, Change Request or Quick Call. The list shows if the options are enabled. For example, if Service Request option is turned off, then Service request option is not shown as an option.
Items
Define if Customers can view, create or edit their own Item details within the Customer Portal.
Show Only Active Items
Allows Customers to only view Items that are marked as Active in the system.
Show Subject Field
Displays the Subject field above the Description field in the Customer Portal.
Show Status Field
Allows to hide or display the Item status in the Customer Portal.
Show Notify Field
Allows customers to view notifications in the customer portal.
Show Priority*
Enables Customers to view and set the Priority of their requests. Alternatively, the Urgency can be shown, which will be associated with the Item Criticality to set the Priority. Select "Off" to disable this functionality completely.
Item ID search*
Allows Customers to search by an Item's ID when creating a new request.
Force Search
When enabled, proposes solutions for Incidents based on the Item Type, Classification and Description provided.
Create Forum Topics*
Allows Customers to create a new Forum topic through the Customer Portal.
Display Room
Displays the Room for an Item when creating a request.
View Technician
Yes allows Customers to view the details of Technician assigned to their request in the Customer Portal.
Show All Services
Enables the Service Catalog link in the Services tab of the Customer Portal. This allows Customers to view and log requests against all Services offered by the support organization (i.e., request access to a service). Services listed here are not assigned an Exit Item Lifecycle State.
Show Service Targets
Displays the Response, Restoration and Resolution targets for the SLA assigned to the request in the Customer Portal.
Enable RSS*
When enabled, provides the RSS Requests Menu option in the Customer Portal.
Enable Titles
When enabled, displays the Titles Tab within the Setup, which can be customized. This list is then displayed in the Title field in the User and Customer Information screen. See Titles.
Enable Item Shadow
When enabled, if requests are logged against an Item on the Customer Portal, Technicians can amend the Item assigned to the request without the Customer seeing the change.
Customer Defined Contact
When enabled, this option allows the Customer to define their preferred method of contact in their Profile or My Account screen. Their preference applies when a Team has the Customer Notification option set to Customer Defined.
Items in Request
If you select Mandatory, then the Item, Item Type and Item Category fields are mandatory when creating a request.
If you select Optional, then the Item, Item Type and Item Category fields are optional when creating a request.
If you select Hide, then Item, Item Type and Item Category fields are not displayed while creating a request and request creation will be similar to creating a Generic Request in the Classic Customer portal.
NOTE:This privilege was known as Items Required in ZENworks Service Desk 8.0 and 8.1.
Show Contact Details
When enabled, allows customers to provide contact details such as Location and Preferred Contact Type and view Line Manager while creating requests.
NOTE:This privilege was known as Show Additional Information in ZENworks Service Desk 8.0 and 8.1.
Default Date Style
Sets the default Date format to be used across the application.
Default Timezone
Sets the default time zone across the application. This can be overridden on a per User basis, by a User who sets their time zone for their log in account
LDAP/AD
(Visible when an LDAP/AD connection is configured.)
Include Customers
Set to Yes if the system is to import Customer details when synched with an LDAP/AD server.
Mixed Mode
Allows Customer accounts to be created directly through the system, as well as being imported via LDAP/AD.
View Shared Requests
(Request visibility options for the Customer Portal.)
By Ownership
Allows requests to be viewed by all Owners of the Item, when logged against a Shared or Global Item.
(See the table below for toggle option outcomes.)
By Org Unit
(This option is visible when the By Ownership is enabled.)
Allows requests to be viewed by all Customers of an Org Unit assigned to the Item, when logged against a Shared or Global Item.
-
Click Yes to enable, or No to disable a Privilege option
-
Click Save.
Setting the View Shared Requests options
When setting the visibility of requests logged against shared Items, refer to the table below to ensure the correct visibility option is configured for your organizational requirements:
|
By Ownership |
By Org Unit |
Shared Request Visibility |
|---|---|---|
|
No |
Only visible to the Customer who logged the request. |
|
|
Limited |
No |
Visible to the Customer who logged the request and other Owners in the same Org Unit, assigned to the Item. |
|
Limited |
Limited |
Visible to Customer who logged the request and members of Org Unit they belong to, if the Org Unit is also assigned to the Item. |
|
Limited |
Yes |
Requests visible to Owners within all Org Units assigned to the Item. |
|
Yes |
No |
Visible to Customer who logged the request and other assigned Owners. |
|
Yes |
Limited |
Visible to Customer who logged the request, other members of the Org Unit the Customer logging the request belongs to and other Owners assigned to the Item . |
|
Yes |
Yes |
Visible to everyone who share the Item assigned to the request. |
5.4.4 Requests Privileges
Requests Privileges allows the Administrator to control the functionality available for requests and set default requirements. These privileges are applied system-wide.
Enabling Requests Privileges
To enable Requests Privileges:
-
Select Setup>Privileges>Requests
The Requests Screen appears.
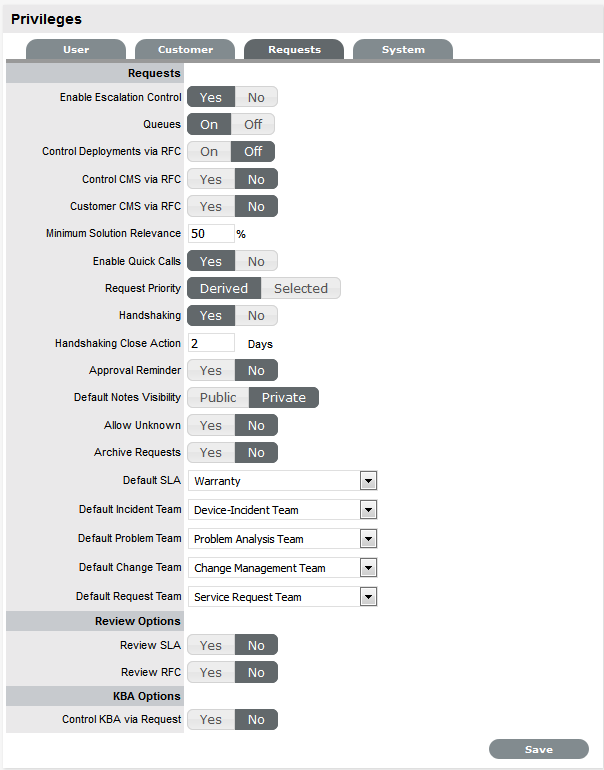
Request Options
Enable Escalation Control
Enables escalation to be enabled or disabled on a per request basis. This option is only available to Supervisor Users.
Queues
Allows Teams to use a holding bay for requests that are received via email or the Customer Portal. The Queues can be enabled within the Team Information screen, on a per Team basis.
Control Deployments via RFC
When enabled, Change Requests are automatically created from newly entered Deployments, and will require approval before work commences on the Deployment.
Control CMS via RFC
When enabled, changes made within the CMDB by a Technician will generate a Change Request requiring approval before the change is implemented.
Customer CMS via RFC
When enabled, Customers creating Items via the Customer Portal generate a Change Request that requires approval before the change is implemented in the CMDB.
Minimum Solution Relevance
Define the minimum degree of relevancy for content included in the Description field of a request, when the system automatically searches the Knowledge Base to propose solutions.
Enable Quick Calls
Enables the functionality that allows the Supervisor to profile Requests using Quick Call Templates. These can be used by other system Users when creating new requests.
Request Priority
(Derived/Selected)
Enable Derived to allow the system to derive the Priority based on Urgency and Impact of the request . Enable 'Selected' to manually apply the Priority from a list of options.
Default Priority
**This option is displayed when the Incident Priority is set to Selected. The selection made from the drop-down menu, is automatically applied as the default Priority for newly created requests.
Handshaking
Enables notifications to be sent to a Customer using the Propose button within an Incident or Request, stating the Incident/Request will be closed if no reply is received from them within a set number of days.
NOTE:Note: The Solution button within an open Incident/Request is not accessible when the Handshaking facility is enabled.
When enabled, if Problems or Changes are closed, any related Incidents or Requests are moved to the Pending - Approval State not to the default Closed State.
Handshaking Close Action
Sets the system default number of days to lapse before an Incident or Request will close if the Customer does not respond to the handshake email notification. This can be adjusted on a per Org Unit basis.
NOTE:Note: To allow Customers to re-open an Incident or Request using the link in the handshake email, the web server must be using Port 80.
Approval Reminder
To automatically send Managers reminder emails regarding Requests requiring their approval, set this option to Yes. When Yes is selected, define the number of days to lapse before a reminder will be sent.
The content of the reminder email is drawn from the ApproveChange or ApproveServiceRequest template. These are configured within Setup>Email>Templates tab.
Default Notes Visibility
Sets the system default visibility of Notes, when added to requests. If it is expected that the majority of Notes are to be emailed to Customers, select Public.
Allow Unknown
When set to No and a User opens a request that is assigned the Unknown Service Item, the User will be prompted to update the Item before saving the request.
Archive Requests
When enabled, the number of days a request is closed before being removed from the List View and archived is to be set.
Requests that are archived are no longer included for searching. However, they can be still accessible for reporting purposes.
If you modify the date range or disable the setting, the archived request that are no longer eligible for archiving will get unarchived.
NOTE:Archiving is reversible. However, if the previous archive task is running, then archive options will be disabled until the current task is completed.
Default SLA
Is used as the Default SLA when a new request is created without an SLA defined for the Item, Customer or Org Unit.
Default Incident* Team (required if using AMIE)
Set the Default Incident Team, which is used for AMIE integration and also set as a default Support Team for Item Types.
Default Problem* Team (required if using AMIE)
Set the Default Problem Team, which is used for AMIE integration and also set as a default Support Team for Item Types.
Default Change* Team (required if using AMIE)
Set the Default Change Team, which is used for AMIE integration and also set as a default Support Team for Item Types.
Default Request Team* (required if using AMIE)
Set the Default Request Team, which is used for AMIE integration and also set as a default Support Team for Item Types.
Review Options
Review SLA
When enabled will display the Review date field in the Service Level Information screen. The default number of days between reviewing SLAs should be set and the number of days before the review date for an Alert Reminder, should also be entered.
Review RFC
When enabled the system will display a Review date in the RFC Information tab. The default number of days between reviewing RFCs should be set and the number of days before the review date for an Alert Reminder, should also be entered.
KBA Options
Control KBA via Request
When enabled, a Request is generated when the KBA is created, deleted or amended and can only be published to the KB by a User with publishing privileges.
Request Type
Specify the type of request to be generated when new or amended KB content is moved to a "Pending Publication" state.
(The options are based on the ownership of Change and Service Request licenses.)
Default SLA
Set the default SLA to be used for when requests are logged regarding updates in the knowledge base. Applying an SLA here, determines which workflow and team will receive the requests for approval, as with any other request logged in the system.
* To be set after Teams have been configured.
-
Click Yes to enable, or No to disable a Privilege option
-
Click Save
5.4.5 System Privileges
The System Privileges screen allows an Administrator to control the following options:
-
Knowledge Base
-
Surveys
-
Forums
-
Chat
-
Outages
-
Other general settings
Enable System Privileges
To enable System Privileges:
-
Select > >
The System Privileges tab is
-
The following information is displayed:
Customer Privileges
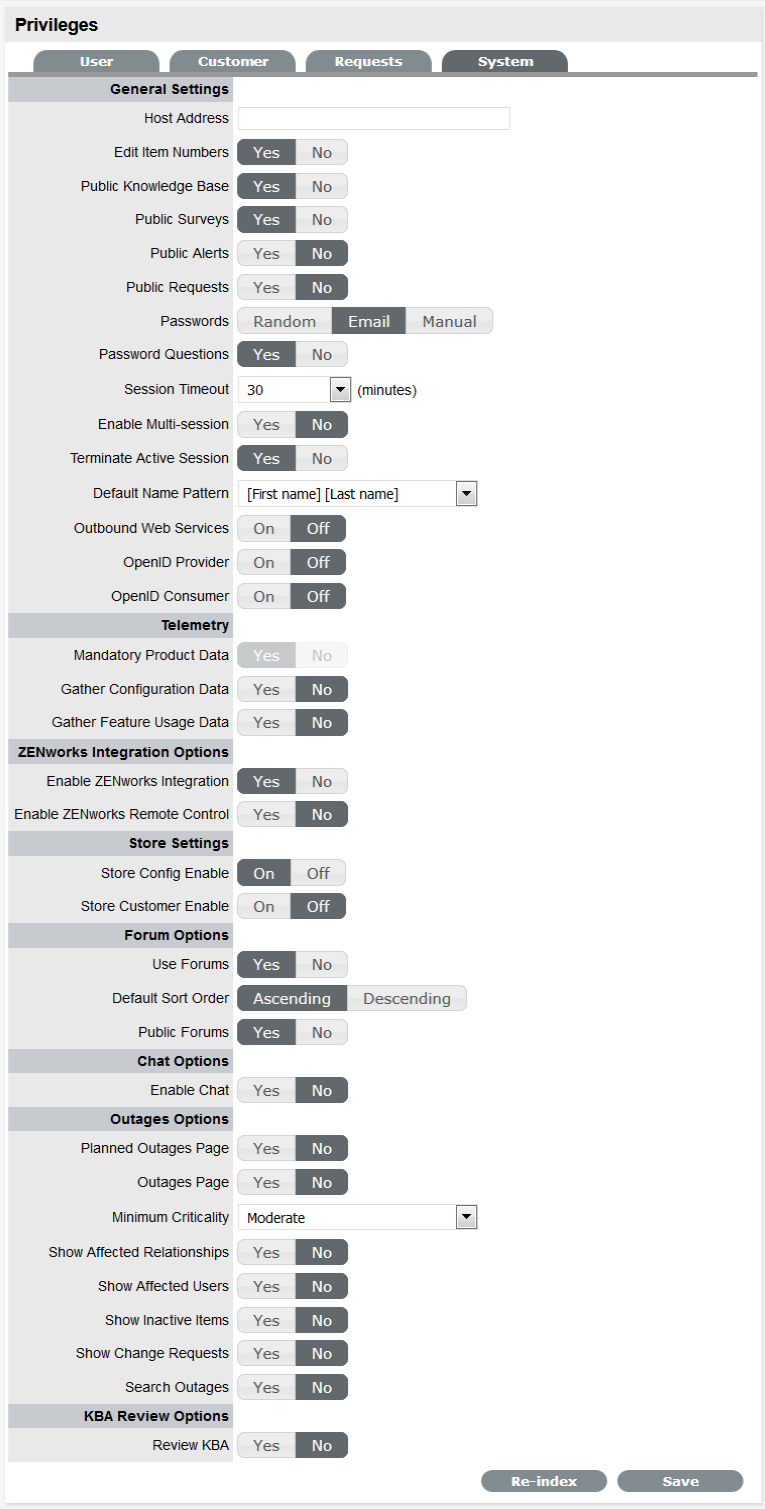
Description
Host Address
To be completed with details of the machine hosting the application, if required.
Edit Item Numbers
Allows users to edit the identification number of an Item.
Public Knowledge Base
Allows access to the Public Knowledge Base on the Login Page.
Public Surveys
Provides access to Public Surveys on the Login Page.
Public Alerts
Alerts with the visibility defined as "Everyone" will be made available on the Login Page.
Public Request
Passwords
When LDAP or Active Directory Authorization is not used internal authentication is used. To define the password type to be used by the system select:
Random: the system will generate a random string whenever a password is reset.
Email: The Users Email Address will be used as the password.
Manual: Allows the User to manually create a password.
Password Questions
Enables the ability to set security questions within the My Account screen for Customers and Users, which are referenced when resetting or re-sending login credentials.
Session Timeout
The number of minutes the system waits before terminating idle sessions.
NOTE:Ensure that the session timeout on the server hosting the application, is equal to or greater than the Timeout option defined in the System Privileges. For changing the timeout option on the server that is hosting the application, edit as follows:
-
For a standalone application: Edit the /<MFSD_server_installation_path>/Server/webapps/LiveTime/WEb-INF/web.xml file.
-
For an appliance: Edit the srv/tomcat6/webapps/LiveTime/WEB-INF/web.xml file.
Enable Multi-session
Enables ZENworks Service Desk users to log into multiple accounts on the same site, simultaneously.
Terminate Active Session
When enabled, if a User attempts to log into the system when they already have an active session, they will be prompted to end the active session to allow for the new login.
Default Name Pattern
Select the order for names being displayed in the system, when the First and Last Name are shown together on a screen.
Outbound Web Services
When enabled, request Workflow States and Item Lifecycle States can be assigned a 'listener', which allows these details to be updated in external systems. (Refer to the Extend section of the LiveTime website for details on how to develop a listener.)
OpenID Provider
Enables the system to function as an OpenID Provider for User authentication across network resources, as the user authentication source.
The OpenIDProvider URL should be:
<PROTOCOL>://<SERVER>/LiveTime/WebObjects/LiveTime.woa/
wa/providerLookup
The Protocol should be set to http or https and the server details should include where the system is hosted.
OpenID Consumer
Enables the system to delegate authentication of Users and/or Customers to one or more OpenID Providers (i.e., Google, Yahoo). OpenID Providers that are to be used as delegates are configured in the Setup>Authentication>Social tab.
Telemetry enables ZENworks to collect statistical data about your usage of Service Desk. This data will enable us to ensure that you have the best possible experience with Service Desk.
Telemetry is scheduled to run once a month.
If your Service Desk server does not have outward connectivity and you want to upload the data manually, then perform the following:
-
Copy the telemetry enc file from the following location:
-
\Program Files\ServiceDesk\LiveTime\Telemetry
-
/usr/local/ServiceDesk/LiveTime/Telemetry
-
/LiveTime/Telemetry
-
-
Using any FTP client connect to productfeedback.microfocus.com with username: anonymous and password: blank (optionally use your email-id).
-
Upload the file to the stats/MFSDTelemetry folder.
Mandatory Product Data
Telemetry collects the following mandatory product data:
-
License type
-
Technician count
-
Customer count
-
ZENworks integration
-
Database type
-
Operating system
Gather Configuration Data
(Optional) This collects the list of categories and count.
Gather Feature Usage Data
(Optional) This collects the following feature usage data:
-
Quick call count
-
Request info and count
-
Process info and count
Use Forums
This option enables and disables all Forums within the system.
Default Sort Order
Sets the default Forum Topic sort order to either ascending or descending.
Public Forums
This option enables Public Forums to be viewed from the login page and does not require an account to view.
Chat Options
NOTE:The Chat feature is no longer supported and might not work. This feature is not available in the new customer portal.
Enable Chat
Select 'Yes' to activate Chat facility within the application.
Chat Request Assignment
Set to Technician if Customers are to be restricted to chatting only with the Technician assigned to their Request. Set to 'Team' to allow Customers to chat with any member of the Team assigned to their request.
Default Technician Availability
Sets the default availability for chat status in newly created Technician Account information screens.
Outages Options
Planned Outages Page
A link to the Planned Outages page is displayed on the Login Screen. Outages can be set within Configuration Item properties to schedule when the item will be off-line.
Outages Page
A link to the Outages Page is displayed on the Login Screen.
Minimum Criticality
Defines the Minimum Criticality required for Items to be displayed on the Outages pages.
Show Affected Relationships
Enables Item from the Outages page to show the Item's Relationships.
Show Affected Users
Allows Item owner's details to be displayed on the Outages page.
Show Inactive Items
Displays inactive Items on the Outages page.
An inactive Item is an Item that is currently not in use by the organization.
Show Change Requests
Allows Customers to view Change Requests related to Outages displayed in the Customer Portal.
Search Outages
Enables Outages to be searched using the Customer email addresses or Item number.
KBA Review Options
Review KBA
When enabled a Review date field is displayed in the KBA Information screen. The default number of days between reviewing KBAs should be set and the number of days before the review date for an Alert Reminder, should also be entered.
-
-
Click Yes to enable, or No to disable a Privilege option
-
Click Save.
NOTE:Note: All Outages options apply to Service Manager only.
Re-Index Button

The Re-Index button at the base of the System Privileges page is used to re-build the system index. If the search engine appears to be failing text searches, this process will re-create the index. The indexing rebuild runs as a background process.
The following content and attachments is re-indexed:
-
Knowledge Base
-
Forums
-
All requests
-
Items