2.9 Knowledge
2.9.2 Content Approval Process
KBA Requests for Approval
To guarantee the validity of content within the Knowledge Base (KB), Organizations can enable the KB control setting within the Administrator portal.
When the Control KBA via Request option is enabled in the Setup>Privileges>Request tab, KB content with a Pending Publication status automatically generates a Request that requires approval by Users with publishing privileges, before the content is accessible in the Knowledge Base.
When the User has completed the content and the Article is ready for publication, it is moved to the Article Status of Pending Publication, which results in the generation of a Request. When the KBA is moved to the Pending Publication state, the content of the Article can no longer be edited.
Published KBA content that is edited, also results in generating a Request for approval but the Article retains its published state and displays the pre-edited content. Upon approval of the new content, the Article is updated.
Setup KBA Approval Process
Requests generated as part of the KB content control process are managed like all other Requests in the system. This means, when a change is made to KB content, be it all new or edited material, a Request is created that must have an SLA assigned to it, to ensure a Workflow and Team manage the process efficiently.
NOTE:Prior to enabling the Control KBA via Request process, define an SLA (For the example below, the KBA Approval SLA was created in the system.)
Steps to set-up KBA Approval Process
The following steps are to be completed to implement the KBA Approval process:
-
Supervisor User: Define the SLA to manage the process
See: SLAs.
-
Administrator User: Enable the "Control KBA by Request" option
Refer below.
-
Supervisor User: Define a KBA Workflow
Refer below.
-
Supervisor: Create KBA Approval Team and assign Workflow States.
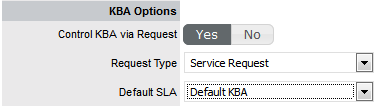
Enable KBA Control
To enable the approval process, as an Administrator:
-
Go to Setup> Privileges >Requests tab
-
Select Yes to enable the option
-
Define the Request Type
The Request Type defined here determines the type of Request that is generated when new content is added to the Knowledge Base. The options displayed are based on the licenses owned. That is, if Change Management and Request Fulfillment licenses are used in the system, both options will be displayed.
-
Set the Default SLA
As Requests are managed based on the SLA assigned to them, setting the default SLA for the KB content control process determines the Team and Workflow options for the Requests created as a result of the KB change.
-
Select Save.
NOTE:When this option is enabled, the On Hold - KBA Rework is activated for KBA Approval Workflows. This State is not visible within the Workflow as it used by the system when the Revise button is selected within a KBA Approval State. It can be re-named within the Workflow State list, but cannot be customized.
Build the KBA Approval Workflow
The Workflow built to manage the approval process should use the Process that is defined as the Request Type in the Administrator Setting for this process. (The example outlined below uses the Service Request Workflow.)
To create the Workflow, as a Supervisor:
-
Select Service > Workflows
-
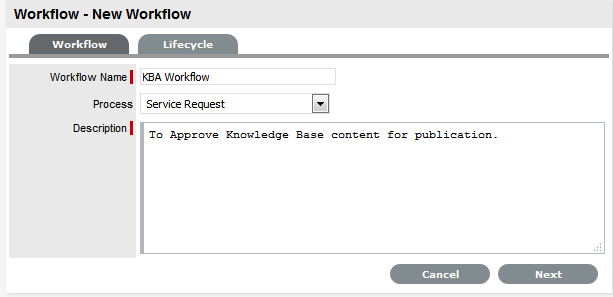
Click New
-
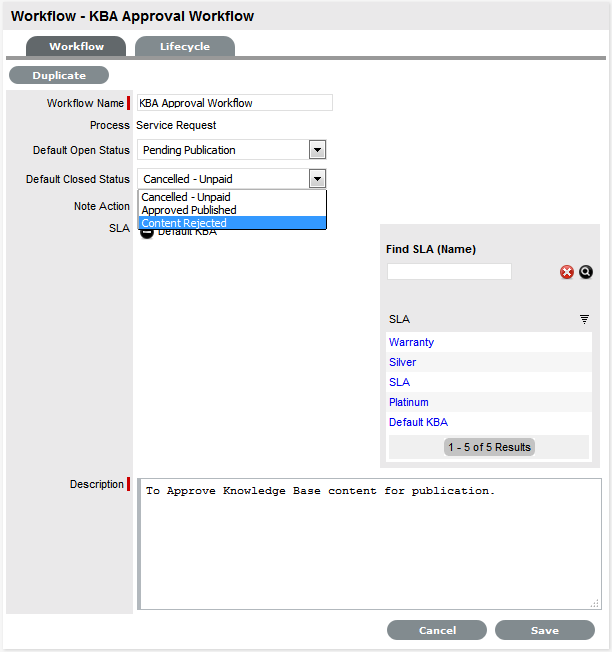
Enter the Workflow Name, define the Process and enter the Description
-
Search and select the KBA Approval SLA
The Default Open Status and Default Closed Status are to be defined after the Lifecycle is built.
-
Click Save
-
Move to the Lifecycle tab
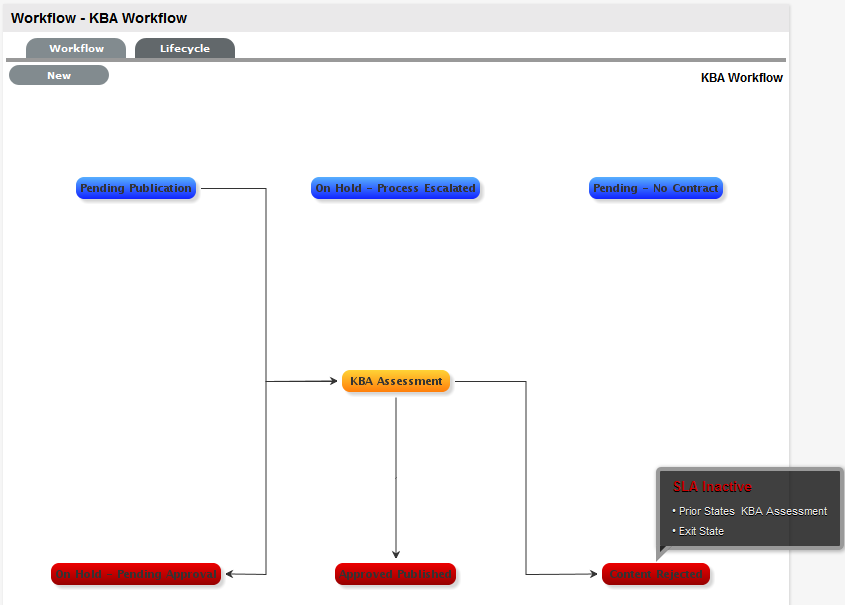
Within this tab the Lifecycle of Pending Publication>KBA Approval>Approved Published/Content Rejected is to be built. Firstly the Pending State will be renamed to Pending Publication, the KBA Approval State will be created, Closed Resolved will be re-named to Approved Published and Cancelled will be renamed to Content Rejected.
NOTE:Default Entry States can be removed from the Lifecycle by opening the State and defining them as neither an Entry Point nor an Exit Point and not mapping Previous or Next States
-
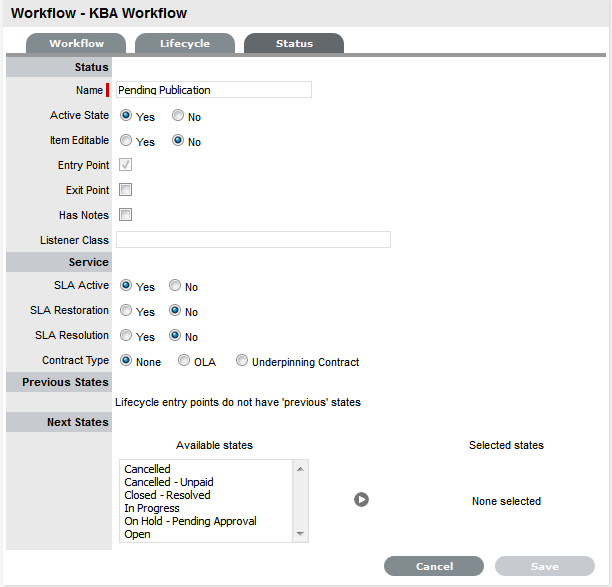
Click the Pending State
This is an Active State defined as the Workflow Entry Point.
-
Set the Name to Pending Publication
If SLA targets are to be monitored and triggers fired when the Request is assigned this Status, set the SLA Active option to Yes. The Next State will be allocated when it is created.
-
Click Save
-
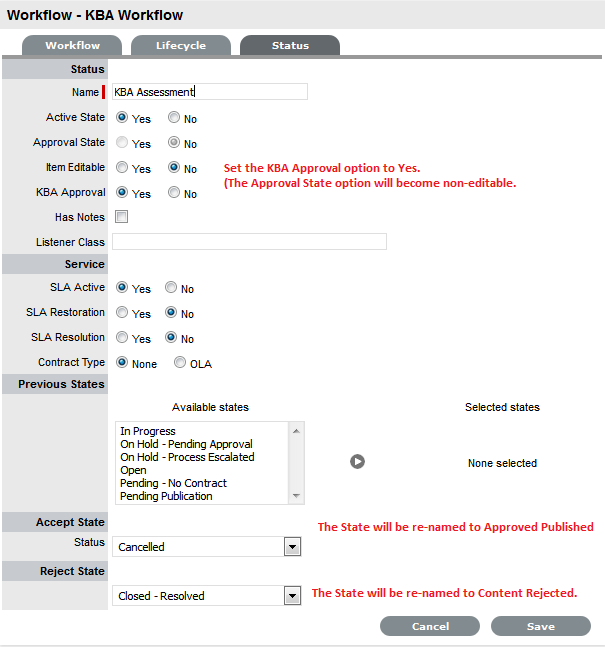
Select New, to create the Approval State
For this example, the State will be labeled KBA Assessment and the KBA Approval option is set to Yes. This will remove the Next State option and replace it with the Accept State and Reject State drop-down list. For this example, set Pending Publication as the Previous State, Cancelled as the Accept State and Closed-Resolved as the Reject State.
When a Request moves into the Pending Publication State three buttons will be displayed in the Request Summary tab Next Action Field:
Status
Description

When selected the new content is approved for publication and the Request is moved to the Accept State. (For this example it will be Approved Published.)
An alert is sent to the KBA author informing them of the successful publication.

When selected, the Request Summary screen displays the Notes field to allow the User to add comments and the Request is moved to the On Hold - KBA Rework state. The KBA is returned to the In Development State.
The KBA author is sent an Alert, notifying them that the KBA requires revision. When the edits have been made and the KBA is returned to the "Pending Publication" Status, the Request is re-activated and set to the Approval State.

This option is to be selected when it is decided that the KBA Content is not suitable for the KB.
The Request moves to the configured Reject State and a Notes field is displayed allowing the User to record the reason for the decision. The KBA returns to the In Development State, which allows the author to delete the KBA, if desired. The KBA author is sent an Alert, notifying them that the content has been rejected.
NOTE:Only one Approval State can be set per KBA Approval Workflow
-
Click Save
The Status window editor screen will close.
-
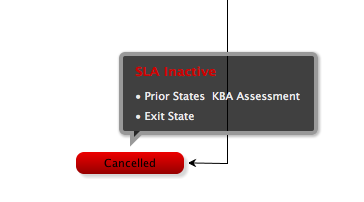
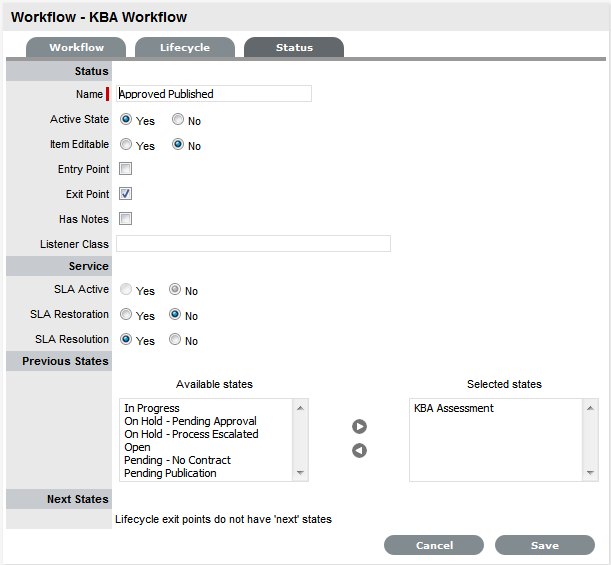
Click the Cancelled link
-
Re-name it to Approved Published
This creates an Exit Point for when content is Accepted/Published and will be the Exit Sate for when content is accepted for publication in the Knowledge Base. For this example the default settings for this State will be the Active State set to No, the SLA Resolution option set to Yes, and the KBA Assessment State mapped as the Previous State.
-
Click Save
-
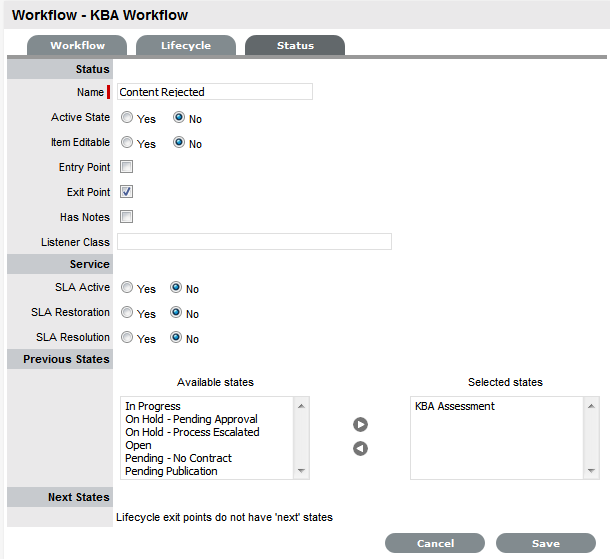
Click on the Closed - Resolved link to rename it Content Rejected
By default the settings on this State will be, the Active State and SLA Active options set to No and KBA Assessment mapped as the Previous State.
-
Click Save
NOTE:The On-Hold - KBA Rework State is not visible in the customized Workflow, but will be automatically used by the system, when the Revise option is selected within the KBA Approval Request
-
Select the Workflow tab
-
Click Edit
The Default Open Status will be set to Pending Publication and the Default Closed Status set to Content Rejected.
-
Refine the Default Closed Status, if desired
If another State is required as a Default Closed State, return to the Lifecycle tab, select New to create a new Default Closed State. Refine the settings to be Active - No, Exit Point - Yes and click Save. Then return to the Workflow tab to set the option in the Default Closed Status field.
-
Click Save
-
Click Done.
Create the KBA Approval Team
When the KBA Approval Workflow has been successfully saved, the Supervisor must create or assign the Change or Service Request Team that is to manage the approval process and allocate the relevant Users to each stage of the Workflow.
-
Go to User > Teams
-
Click New
-
Enter the Team Name
-
Define the Process of Service Request or Change
For this example the Service Request Process is applied.
-
Modify the Team options, as required
-
Assign Technicians, and Managers if required
-
Click Next
The screen defaults to the Service screen
-
Move the KBA Approval Workflow to the Selected Workflows field
The KBA Approval Workflow is automatically set at the Default Workflow.
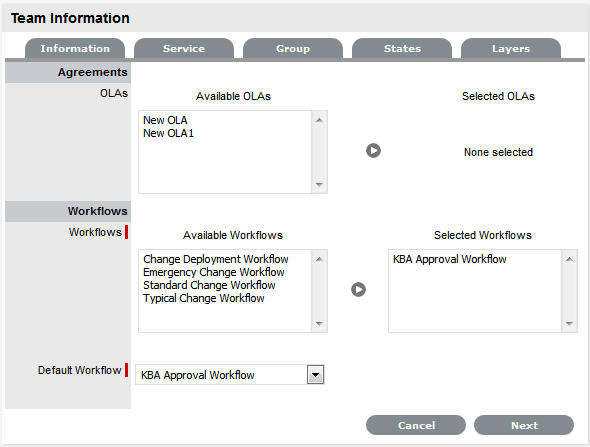
-
Click Next
The system defaults to the Group tab.
-
Select the Default Group link
Rename and assign Users, as required. Create additional Technician Groups, if required.
-
Click Save
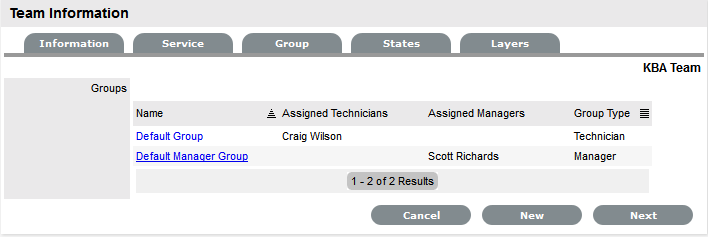
-
Select the Default Manager Group link, if relevant
Rename and assign Managers, as required.
-
Click Save
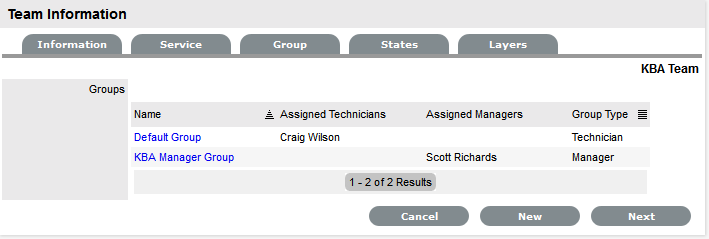
-
Click Next
The screen defaults to the States tab.
-
Assign the relevant Work Groups to the Workflow States
Select the State Name link,
-
Click Next
The screen defaults to the Layers tab. Refine if necessary.
-
Click Done.
NOTE:When all the elements of the KBA Approval Process are in place, see KBA Content Approval for details of how the content approval Requests are managed.
KBA Content Approval
When the Control KBA via Request option is enabled in the Setup>Privileges>Request tab, Knowledge Base content with a Pending Publication status automatically generates a Request that requires approval by Users with publishing privileges, before the content is accessible in the Knowledge Base.
When the User has completed the content and the Article is ready for publication and moved to the Article Status of Pending Publication, a Request is automatically created. When the KBA is assigned the Pending Publication state, the content of the Article can no longer be edited.
Published KBA content that is edited, also results in generating a Request for approval but the Article retains its published state and displays the pre-edited content. Upon approval of the new content, the Article is updated.
Creating KBA Approval Requests
New KB content is initially saved with a status of In Development. When this content is ready to be published and if the Control KBA via Request is enabled, the following steps should be followed:
-
Go to the Knowledge > Articles tab
-
Select the Article No. link
-
Click Edit
-
Move the Status to Pending Publication
-
Click Save
The Request Number that was generated is displayed and the KBA moves can no longer be edited.

-
Click Done.
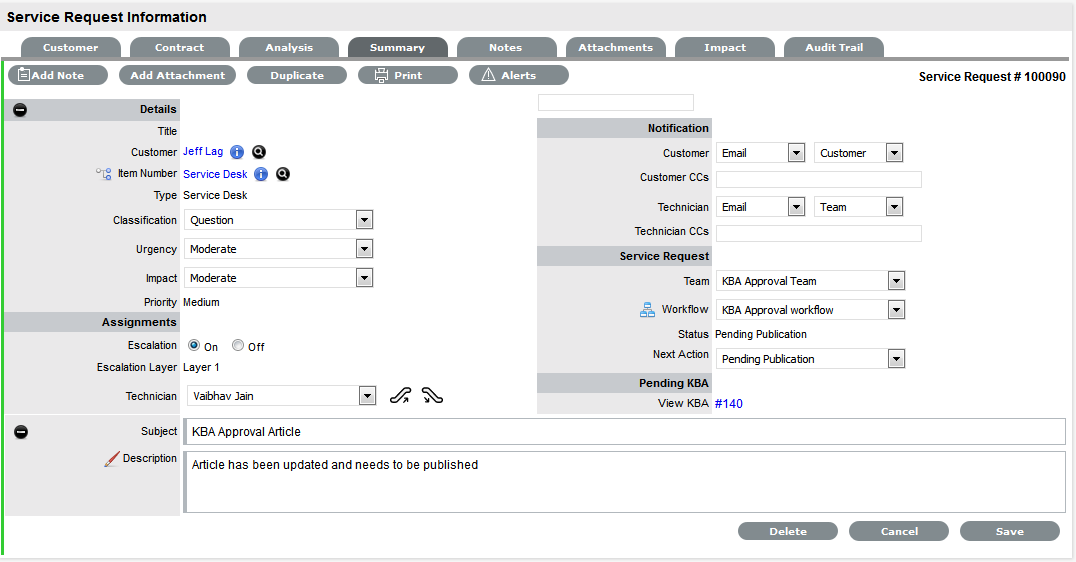
Managing KBA Approval Requests
KBA Approval Requests are found within the Request or Change tab, as defined in the Control KBA via Request customization. To approve new content within the relevant tab:
-
Select the Request # hyperlink
-
Click Edit
-
Select the View KBA link
The contents of the KBA is displayed.
-
Click Done
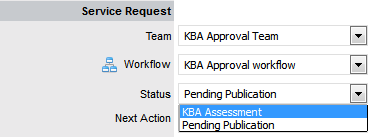
The screen returns to the Summary tab.
-
Move the Request to the Approval State
-
Click Save
-
Click Edit
The Accept, Revise and Reject buttons are displayed.
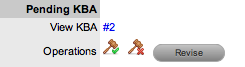
Status
Description
When selected the new content is approved for publication and the Request is moved to the Accept State.
An Alert is sent to the KBA author informing them of the successful publication.
When selected, the Request Summary screen displays the Notes field to allow the User to add comments and the Request is moved to the "On Hold - KBA Revise" State. The KBA is returned to the "In Development" State.
The KBA author is sent an Alert, notifying them that the KBA requires revision. When the edits have been made and the KBA is returned to the "Pending Publication" Status, the Request is re-activated and set to the Approval State.
This option is to be selected when it is decided that the KBA Content is not suitable for the KB.
The Request moves to the configured Reject State and a Notes field is displayed allowing the User to record the reason for the decision. The KBA returns to the" In Development" State, which allows the author to delete the KBA, if desired.
The KBA author is sent an Alert, notifying them that the content has been rejected.
-
Select the appropriate Operations button
A warning message is displayed, select OK. The system will move the Request to the appropriate State defined in the Workflow.
-
Add Note Content, if relevant
Select Add Note button to save Note Content.
-
Click Done.
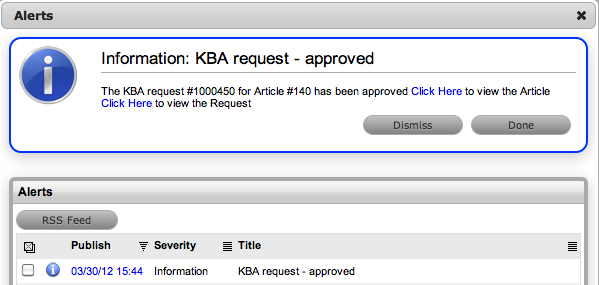
An alert is sent to the author of the KBA Article, notifying them if their KBA has been approved, rejected or requires revision. The Alert includes links to the related Article and Request.
NOTE:If a KBA Approval Request is deleted, the associated content reverts to the In Development status and the relationship between the Request and KBA is removed.
If a KBA is deleted when the associated Request is in the On Hold - KBA Rework system state, the Request moves to the Default Closed State for the assigned Workflow and the relationship between the two elements is deleted.
2.9.3 Articles

The Knowledge Base consists of Articles submitted by Users with Knowledge creation and publication rights. It is also the repository for Solutions, Backout Procedures, Workarounds and general information. Customers and Users can search Articles to find resolutions to common issues in order to handle the support load efficiently.
The Knowledge tab defaults to the Articles sub-menu screen that displays the My Content filter view. This lists all the Articles created by the User logged into the application. The other available filter options include:
|
Filter View |
Description |
|---|---|
|
All Articles |
Lists all Articles, regardless of publication status. |
|
All Backout Procedures |
Lists all Backout Procedures. |
|
All FAQs |
Lists all FAQs, regardless of publication status. |
|
All Solutions |
Lists all Solutions, regardless of publication status. Articles with the Visibility of Assigned Request are included in this filter view. |
|
All Workarounds |
Lists all Workarounds. |
|
My Content |
Lists all Articles created by the logged in User, regardless of publication status. |
|
My Content Under Development |
Lists the User's content with the status In Development. |
|
Pending Content |
Lists the User's content that has a status of Pending. |
|
Published Content |
Lists the User's content, which is approved for publication and accessible via a Knowledge Base search. |
|
Redundant Knowledge |
Lists KBAs that are associated with Items and Item Classifications that have been deleted. |
|
Unused Knowledge |
Lists content that has never been viewed. |
To apply a different filter to the list of Articles displayed, select the relevant option from the Filter drop-down menu. For details about searching the Knowledge Base, see: Knowledge Base Search.
Creating an Article
To create a new Article:
-
Select Knowledge> Articles
-
In the Articles screen, click New
-
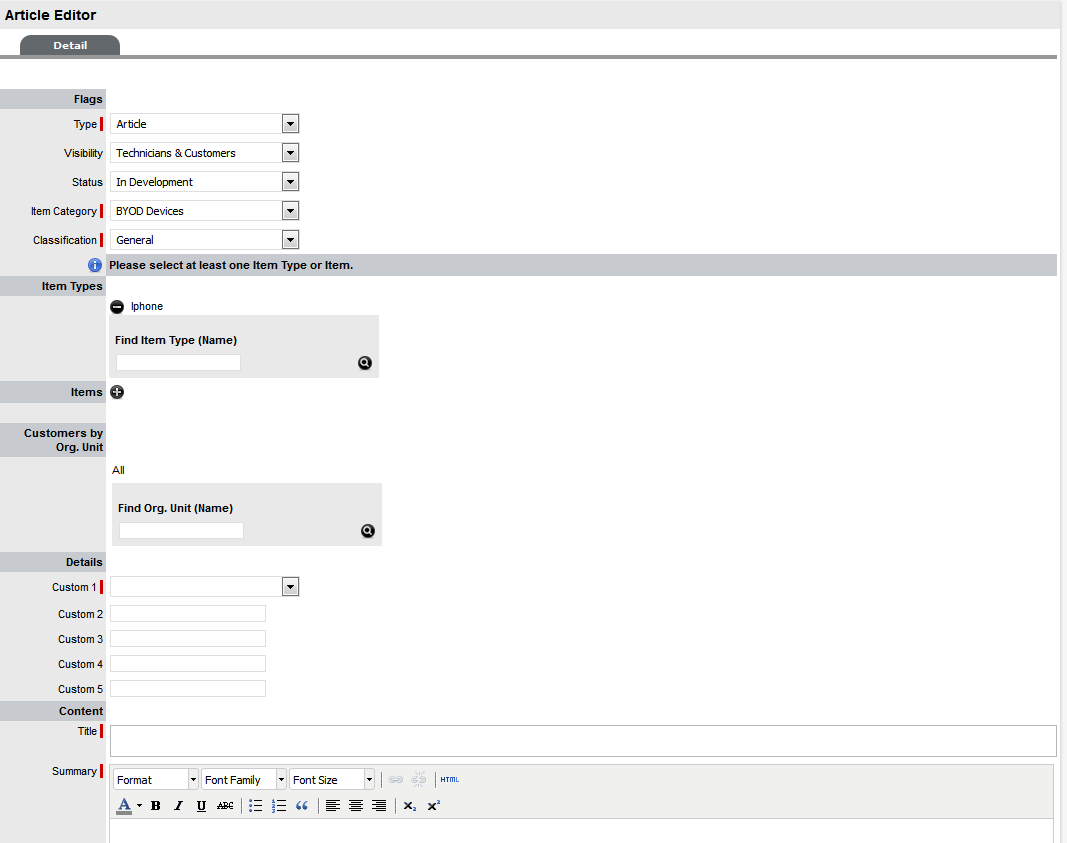
Select the Article Type - Article or FAQ
In this example we will create an Article. For more information about creating an FAQ, see: FAQ's.
-
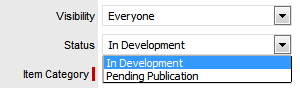
Select the degree of public visibility from the Visibility drop-down menu
Visibility Options
Description
Users
Accessible to internal Users only (i.e., not to Customers).
Users & Customers
Visible to internal Users and Customers logged into the application.
Everyone
Available publicly, without logging into the system.
-
Select the Status of the Article from the drop-down menu options, as follows:
Status
Description
In Development
The Article is under development and is not accessible via a Knowledge Base search.
**If the Control KBA via Request option is enabled this is the only State displayed when an Article is first created.
Pending Publication
The Article has moved from development but requires approval before it is accessible via a Knowledge Base search.
**If the Control KBA via Request is enabled in the application Setup and content is moved to a Pending Publication status, a Request is automatically generated that will require approval for the content to be accessible in the KB.
Published
The Article has been approved and is included in a Knowledge Base search.
Archived
The Article is no longer accessible in the Knowledge Base. Users can search on Archived content and return to a Published state, if required.
-
Select an Item Category
The Item Type search box and Classification list is displayed.
-
Assign the Classification for the Article from the drop-down options
-
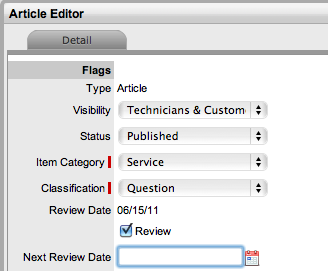
Set the Review Date
This option is displayed if Review KBA is enabled within Admin>Setup>Privileges>System. If the Review Date field is left blank, it will be auto-completed based on the system Setup. To remind Users to review article content, an alert and email will be sent to the author of the Article based on the number of days set for the Review KBA Alert in the system Setup. If the User is no longer active in the system, the reminder will be sent to the Supervisor of the User.
-
Search and select at least one Item Type
-
Enter a Title, Summary and Content for the Article
-
Click Save.
Direct Link
A Direct Link field is displayed when an Article is published and has the visibility defined for Technicians & Customers or Everybody. This link can be sent to system Users as a means of providing instant access to the Article.
Article Statistics
For each Article, the Statistics field shows:
-
when an Article was created
-
when an Article was last reviewed
-
the number of times it has been viewed
-
the date an Article was last viewed
-
an average rating score.

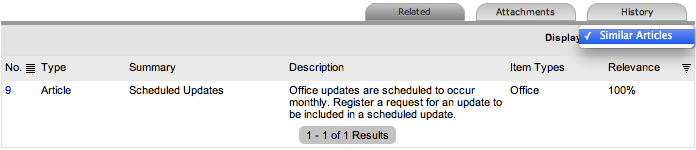
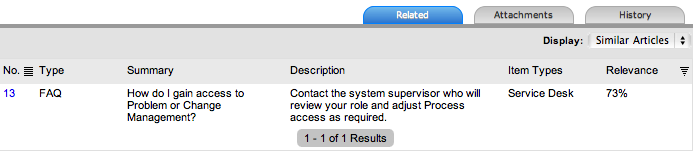
Related Articles
The Related tab lists Similar Articles and the percentage of relevant text contained in the Article. To view the content of an Article included in the Similar Articles screen of the Related tab, with the Article in Edit mode, select the Article No. link.
Article Attachments
Files can be attached to the Article by clicking on the New button under the Attachments tab of the Article editor. Choose the file to be attached and click  . If the attachment is not to be available to Customers, tick the Private field. Stop the upload process by selecting
  .
.

To delete an attachment, tick the box to the left of the attachment link and click Delete.
Article History and Rollback Option
To view the historical changes of a Knowledge Base Article, select the History tab inside the Article editor. The History is an audit trail of the Article, recording all activities from creation to publication of the Article. If changes are made to the Article a historical entry is recorded, and displayed with a Rollback option. This option allows the Article to be returned to a previous state, if the change is not required or permitted.
Rolling back an Article:
To rollback to a previous version of an Article:
-
Select Knowledge > Article
-
Select the article number and click Edit
-
Move to the History tab
-
Select the history ID# hyperlink to view changes to the Article

-
Select the Rollback button to re-enable content in the Article
-
Click Save.
Publishing an Article
By setting the status of a newly created Article to In Development the Article can be held in the author’s Development list until it is ready to be submitted for approval.
When it is ready for approval, the author can move the Article status to Pending Publication. Articles with a status of Pending are accessible in the Pending Articles filter of the Knowledge Base.
Articles are made available for reference in the Knowledge Base when they are assigned a Published status.
When the Control KBA via Request option is enabled in the Setup>Privileges>Request tab, Knowledge Base content with a Pending Publication status automatically generates a request that requires approval by Users with publishing privileges before the content is accessible in the Knowledge Base. (See: KBA Content Approval)
NOTE:Users are designated publishing rights within the User Information screen.
Editing an Article
Users that have the Edit privilege can modify the content of an Article by clicking the number in the Articles list, updating the content and selecting Save.
When the Control KBA via Request option is enabled and published KBA content is edited, a request for approval will automatically be generated when the edited content is saved. However, until the request is approved, the Article retains its published state and displays the pre-edited content.
NOTE:Users are designated editing rights within the User Information screen.
Deleting an Article
Users that have the Delete privilege can delete a published Article by clicking its number in the Articles list and selecting the Delete button.
When the Control KBA via Request option is enabled and a published KBA is marked for deletion, a request for approval is automatically generated. However, until the request is approved, the Article remains accessible in the Knowledge Base.
NOTE:Users are designated deleting rights within the User Information screen.
Automated Article Review Process
When the Review KBA is enabled within Admin>Setup>Privileges>System each new KBA is created with a review date. If the Review Date field is left blank at the point of creation, it is auto-completed based on the system Setup. Article authors are sent an alert and email reminding them to review content when the reminder Alert date is triggered.
To review an Article, within the Knowledge Tab:
-
Open the relevant Article
-
Click Edit
-
Update content in the relevant fields
-
Click Review
-
Complete the Next Review Date field, or leave blank for the system to auto-populate the field based on system settings
-
Click Save
-
Click Done.
When the Control KBA via Request option is enabled in the Setup>Privileges>Request tab, Knowledge Base content with a Pending Publication status automatically generates a request that requires approval by Users with publishing privileges before the content is accessible in the Knowledge Base. (See: KBA Content Approval)
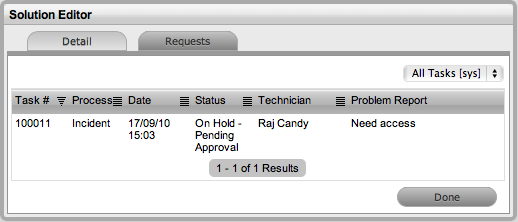
Viewing Requests assigned to Articles
When a Solution or Workaround is assigned within a request, the Article editor will display an additional tab, called Requests. This tab will list all the requests that have been associated with the Article.
Knowledge Base Maintenance
If at any time it is suspected that the catalogue of Articles within the Knowledge Base is corrupted, the Knowledge Base can be re-indexed. The main symptom of corruption is that the results returned by the knowledge search will begin to be irrelevant to the search queries entered. Re-indexing will re-catalogue the Knowledge Base Articles.
Re-indexing the Knowledge Base:
To re-index the Knowledge Base requires the Administrator go to the Setup> Privileges>System tab and click on the Re-Index button. The size of the Knowledge Base will affect the length of time this process takes, so consider selecting a time that is suitable for all Users of the application.
NOTE:The privilege to create, edit, delete and publish Articles is defined for Users within the User Information screen.
For information regarding the implementation of the Knowledge Base content approval process, see: KBA Approval Process.
2.9.4 Knowledge Base Search
Knowledge Base Search
Search Options
A variety of search options, including the ability to search using terms or phrases, can be used to find information in the Knowledge Base. Search options include:
-
A single character wildcard search using the ? symbol
-
A multiple character wildcard search using the * symbol
-
A fuzzy search using the tilde, ~, symbol at the end of a single word. For example, to find words similar to roam, enter roam~ and this will return terms like foam and roams.
When searching using a phrase, the group of words need to be entered in the Text field within double quotation marks, for example, "user account access". Complex searches can be conducted using a combination of phrases or terms with boolean operators.
The boolean operators (i.e., AND, NOT, OR, +) must be entered as uppercase letters. For example:
-
"user" OR "account" returns results related to either word
-
"user" AND "account" returns results with both words
-
"user" NOT "account" returns results including "user" but not "account"
-
+user account returns results that must contain "user" and may contain "account"
-
"user" -"account" returns results that contain "user" but not "account". (Same results as using NOT.)
To further control the boolean logic, more complex searches can be conducted. For example, to search for either "user" or "account" and "access", the search words would be entered as: (user OR account) AND access. This will return results where "access" must be included, while either term of "user" or "account" is found.
Fuzzy logic searches using the '~' (tilde) can be performed on a single word term with the '~' at the end of the word. A value between 0 to 1 can also be applied to the search, where the value closer to 1 ensures terms with higher similarity are matched. If a value is not defined, the default of 0.5 is applied to the search. For example, roam~ should return results with similar spelling, like foam and roams. The search term of roam~0.8 might return words like roams, roamed.
Wildcards can be used to replace single character '?' and multiple characters '*' in search terms. For example, te?t, test* or te*t. Wildcards can not be used as the first character of a search.
Proximity searches can be used to find words in a phrase within a specific distance away from the entered search term. To conduct a proximity search use "~" at the end of the phrase. For example, "user account"~10 will search for results where the word user and account are within 10 words of each other.
Escape character searches are also supported in the system and include: + - & || ! ( ) { } [ ] ^ " ~ * ? : \
An example of using escape characters when searching for (1+1):2, requires the search syntax of \(1\+1\)\:2 to be entered. It should be noted that the '\' must be entered before the escape characters.
Field Searches
Within the system, full text searches can be conducted on specific fields, these include:
|
Search Screen |
Fields |
|---|---|
|
Knowledge Base |
Title, summary, body, attachments, itemtype, classification, and custom 1-5. |
|
Forum |
Title, content and author (last name). |
To search on a specific field, within the Term or All Text field enter the name of the field to be searched on followed by a colon and the term or text. For example, if searching for a specific Title, the Term or All Text search field would be completed as follows for the various search types:
-
single word search - title:canceled
-
phrase search - title:"canceled ticket"
-
multiple word search - title:canceled OR title:ticket.
Searching the Knowledge Base
To search the Knowledge Base:
-
Go to Knowledge>Articles
-
Click Search
The Knowledge Search screen is displayed
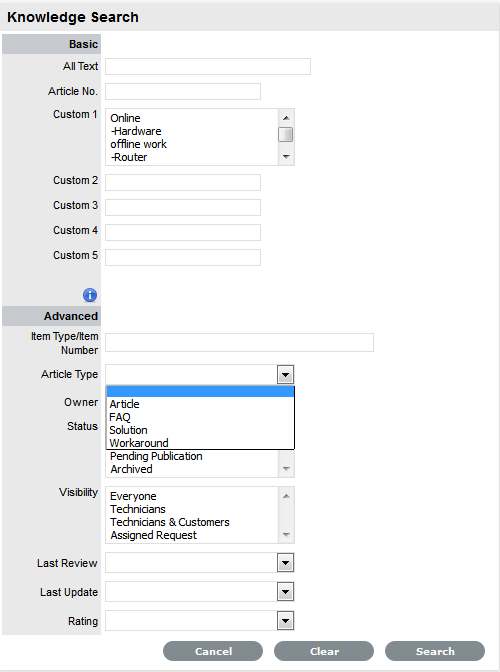
A search can be conducted using the Article Number or the All text field option.
The Advanced option allows searches to be conducted or refined based on specific Article Types (i.e., Articles, Backout Procedures, FAQ's, Solutions or Workarounds), Item Types, Article Status, assigned Visibility, date last reviewed or updated and rating.
-
Enter any term or phrase relevant to your query
-
Click Search
The results will be displayed in a table including the Article number and description.
-
Click on an Article number to display the Article content.
2.9.5 Frequently Asked Questions (FAQs)
Frequently Asked Questions (FAQs) are created by Users for Customers' reference in the Customer Portal.
NOTE:The privilege to create, edit, delete and publish FAQs is defined for Users within the User Information screen.
Creating FAQs
To create an FAQ:
-
Select Knowledge>Articles
-
Click New
-
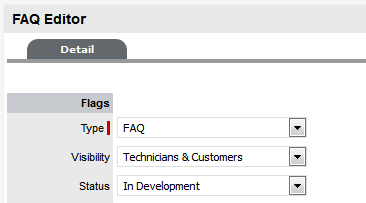
From the Type drop-down list, select FAQ
-
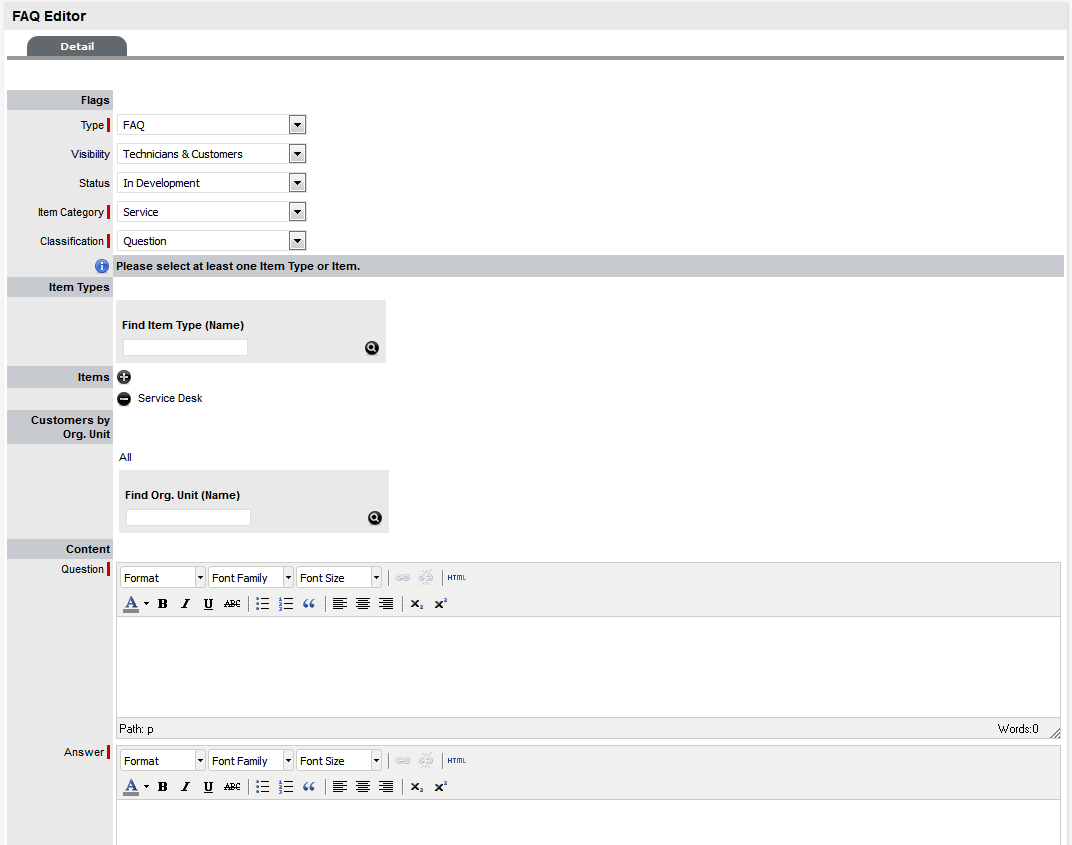
In the FAQ Editor, select a Visibility level
Selecting Everyone will enable the FAQ to be viewed through the Public Access Knowledge Base.
-
Select a Status
-
Select an Item Category
The Item Types and Classification fields appear.
-
Search and select an Item Type
-
Select a Classification
-
Set Review Date
This option is displayed if Review KBA is enabled within Admin>Setup>Privileges>System. If the Review Date field is left blank, it will be auto-completed based on the system Setup. A content review reminder will also be sent to the author of the Article based on the number of days set for the Review KBA Alert in the system Setup. If the User is no longer active in the system, the reminder will be sent to the Supervisor of the User.
-
Enter the question
-
Enter the solution in the Answer field
-
Click Save.
The FAQ will be listed on the Articles List.
FAQ Statistics
For each FAQ, the Statistics field shows:
-
when an FAQ was created
-
when an FAQ was last reviewed
-
the number of times it has been viewed
-
the date an FAQ was last viewed
-
an average rating score.
Publishing an FAQ
By setting the status of a newly created FAQ to In Development the FAQ can be held in the author’s Development list until it is ready to be submitted for approval.
When it is ready for approval, the author can move the FAQ status to Pending Publication. FAQs with a status of Pending are accessible in the Pending Articles filter of the Knowledge Base.
FAQs are made available for reference in the Knowledge Base when they are assigned a Published status.
When the Control KBA via Request option is enabled in the Setup>Privileges>Request tab, Knowledge Base content with a Pending Publication status automatically generates a request that requires approval by Users with publishing privileges before the content is accessible in the Knowledge Base. (See: KBA Content Approval)
NOTE:Users are designated publishing rights within the User Information screen.
Editing an FAQ
Users that have the Edit privilege can modify the content of an FAQ by clicking the number in the FAQ list, updating the content and selecting Save.
When the Control KBA via Request option is enabled and published KBA content is edited, a request for approval will automatically be generated when the edited content is saved. However, until the request is approved, the FAQ retains its published state and displays the pre-edited content.
NOTE:Users are designated editing rights within the User Information screen.
Related FAQs
The Related tab lists Similar FAQs and the percentage of relevant text contained in the FAQ. To view the content of an FAQ included in the Similar Articles screen of the Related tab, with the FAQ in Edit mode, select the FAQ No. link.
FAQ History and Rollback Option
To view the historical changes of an FAQ, select the History tab inside the FAQ editor. The History is an audit trail of the FAQ, recording all activities from creation to publication of the FAQ. If changes are made to the FAQ, a historical entry is recorded and displayed with a Rollback option. This option allows the FAQ to be returned to a previous state, if the change is not required or permitted.
Rolling back an FAQ:
To rollback to a previous version of an FAQ:
-
Select Knowledge > Article
-
Click Edit
-
Select the FAQ number and its History tab
-
Select the history ID# hyperlink to view changes to the FAQ
-
Select the Rollback button to return the FAQ content to the previous state
-
Click Save.
Deleting an FAQ
Users who have the Delete privilege can delete a published FAQ by clicking its number in the FAQ list and selecting the Delete button.
When the Control KBA via Request option is enabled and a published KBA is marked for deletion, a request for approval is automatically generated. However, until the request is approved, the FAQ remains accessible in the Knowledge Base.
NOTE:Users are designated deleting rights within the User Information screen.
2.9.6 Article Groups
Related Articles that are linked and catalogued under one name are displayed within Article Groups. Article Groups are accessed in the Customer Portal when a Customer searches the Knowledge Base. These are presented as search results that contain a likely match to the search criteria, plus any related Articles.
Within the Portal, a list of Related Articles will appear when the Article is selected, if the Article is part of a Group. To view a related Article, the User needs to select the Article ID hyperlink.
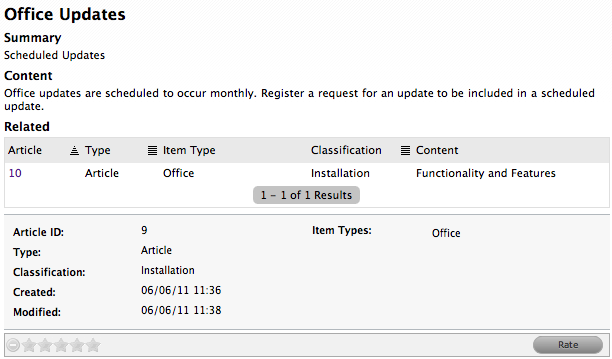
Technicians and Supervisors can also view related Articles if an Article Group exists. When an Article is selected, a Related tab is displayed. To move to a linked Article, select the ID number hyperlink.
Creating an Article Group
To create an Article Group:
-
Select Knowledge>Article Groups
-
Click New
-
Enter the Group Name
-
Enter a Group Description
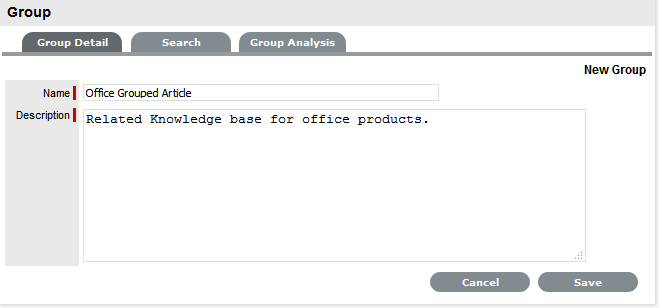
-
Click Save
The Article search screen is displayed.
-
Use the search screen to find Articles to add to the Article Group
For specific Articles use the search criteria, or leave blank for the complete list of Articles to be displayed. See: Knowledge Base Search.
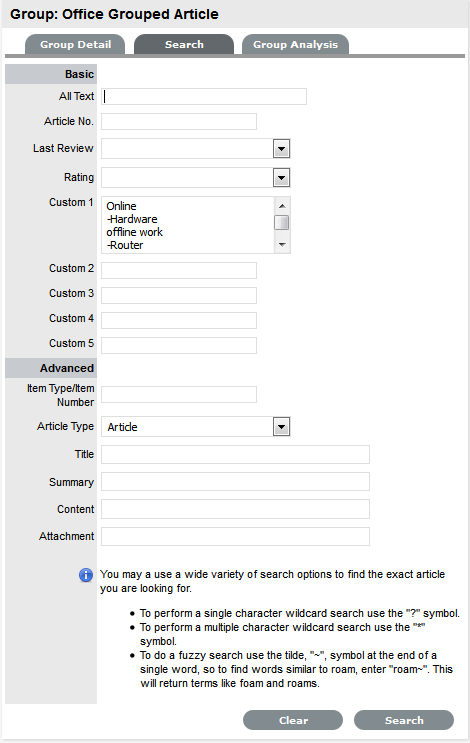
-
Click Search
The search results list only includes Articles assigned the Published state.
-
Check the boxes of related Articles to be linked
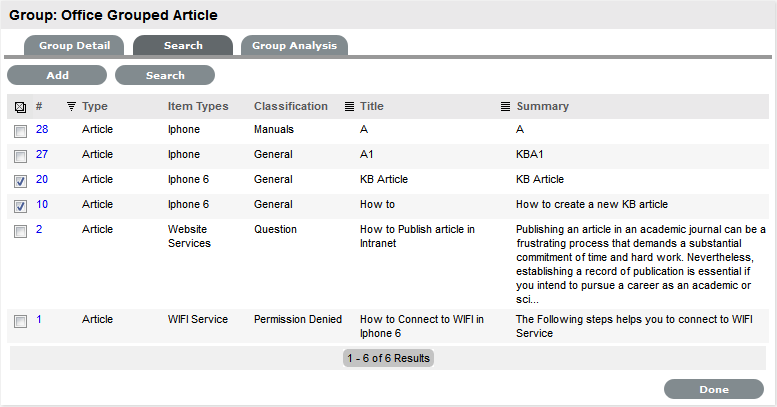
-
Click Add
Continue to select and add Articles as required.
-
Move to the Group Analysis tab to view linked Articles
-
Click Done.
Removing an Article
To remove an Article from a Group:
-
Select Knowledge > Article Groups
-
Select the Article Group name
-
Select the Group Analysis tab
The Remove button is visible.
-
Check the box next to the Article that is to be removed from the Group
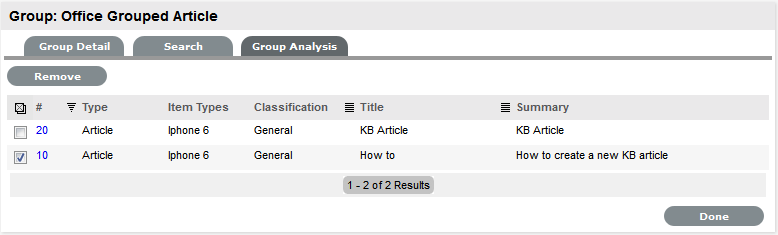
-
Click Remove
-
Click Done.
2.9.7 Forums
The Forums feature is a platform for informal discussions between Service Desk Users, and if enabled, between Users and Customers.
Forum List Features
The Forum List displays a list of Forums that are currently active in the system. Within this screen the User has the ability to:
-
Create new Forums
-
Search Forums
-
Edit Forums
-
Move to bookmarked Forums.
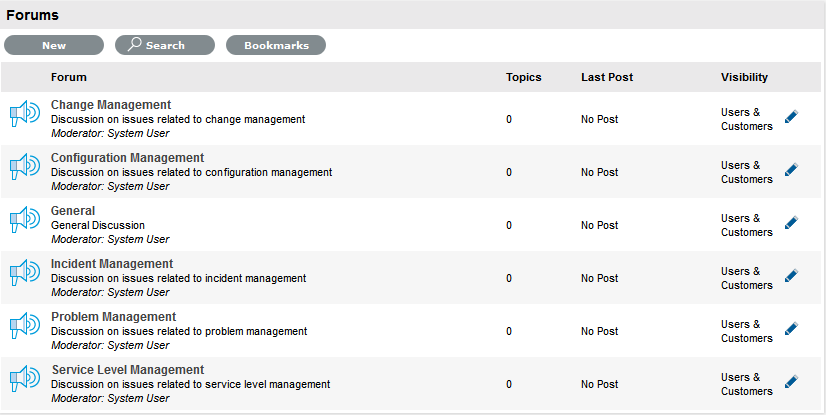
Forum Fields
Description
Forum
Includes the Forum title, the Forum description and Moderator details.
Topics
The number of topics included in the Forum.
Last Post
Date of last posting.
Visibility
Defines the visibility set for this Forum, i.e., who can view it.

Click the icon to Edit the Forum details or to Delete the Forum. This permission is only available to Users assigned the Moderator privilege.
Note: The General Forum can only be re-named and not deleted.

Click to display Forums that have been bookmarked.
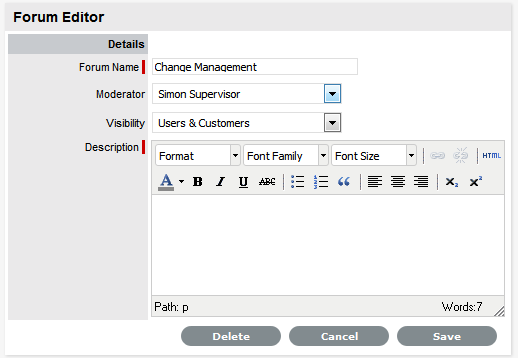
Creating a Forum Topic
A Forum can consist of an over-arching header with sub-categories or Topics.
To create a Forum:
-
Select Knowledge>Forums
-
Click New
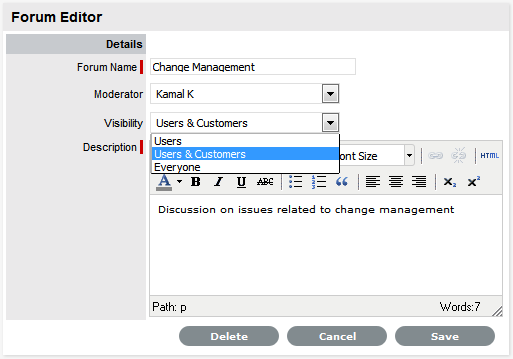
-
Enter the Forum Name
-
Select the Forum Moderator from the drop-down list
This list is generated from Users that have been assigned the Moderator privilege in their User Details form.
-
Define the Visibility:
Visibility Options
Description
Users
Viewable by internal Users only (i.e., not Customers).
Users & Customers
Visible to internal Users and Customers logged into the
application.
Everyone
Available publicly, without logging into the system.
-
Enter a Description for the Forum
-
Click Save
-
Click Done to return to the Forum list.
Editing Forum Details
Users with Moderator privileges can edit Forum details and delete them.
To edit a Forum:
-
Select Knowledge>Forums
-
Click
to open the ForumThe Forum Editor screen is displayed.
-
Click Edit
Fields within the screen move into Edit mode.
-
Enter the required changes
Or, select Delete to discard the Forum.
-
Select Save
The updated information is saved.
Joining a Forum
Users can participate in a Forum by adding sub-categories for discussion called Forum Topics. Or, they can reply to an existing Topic by adding Posts.
To participate in a Forum:
-
Select Knowledge>Forums
-
Click on the Forum name link
The Topic Title screen is displayed.
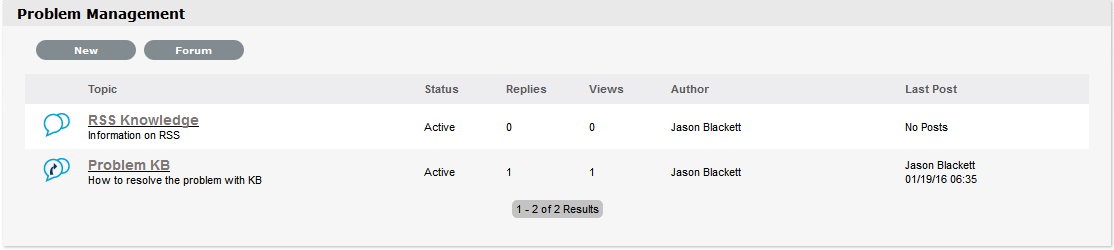
Inside a Forum the following Topic options are available:
Topic Title Buttons
Description

Allows User to add a Forum sub-category called a Topic.

Allows the User to return to the Forum list.

Indicates that the Topic has posts that are no older than 2 days.

Indicates that the Topic has posts that are no older than one week old.

Indicates that the Topic has no posts or that the posts are older than one month.
EditAllows the User to edit Topic details.
Filters
Description
Active Topics
Only displays all the Active Topics.
All Topics
Displays all Topics within the Forum, including Cancelled and Moved Topics.
Cancelled Topics
Displays only the Cancelled Topics.
Moved Topics
Displays the Topics that have been moved to another Forum.
-
Click on a Topic Title to view the thread
The following buttons are available:
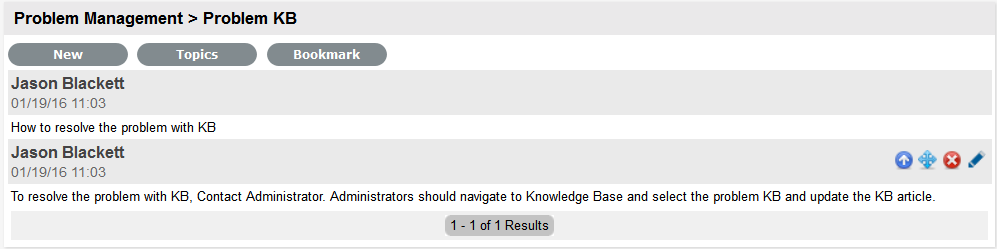
Topic Screen Buttons
Description
Allows the User to reply to the topic by adding a new post. Enter reply and Save.

Returns User to the Forum's Topic Title listing.

Lists the forum on the Forum Bookmarks page. Click Bookmark and the Forum is automatically recorded within the Forum>Bookmarks screen. If a forum has been bookmarked, the Bookmark button is not available.
 Show
Show  Hide
HideWhen selected the option
displays post content to User. When is selected the post content is collapsed and no longer visible on the screen. Move
MoveAllows the User to move the current topic to another Forum.
When selected the option to move just the current post or all trailing posts is displayed. Select the appropriate option, select the new Forum Category, enter a reason for the relocation and select Move.
 Delete
Allows the User to delete the Topic title. This option is only available to Users with Forum Moderator permissions, which is configured within the User Information screen.
When selected, the system prompts for the User to enter a reason for erasing the topic before selecting Delete.
EditAllows User to modify a post to the Forum. When selected, the Comments field is opened in edit mode, which allows the User to make amendments before clicking Update.
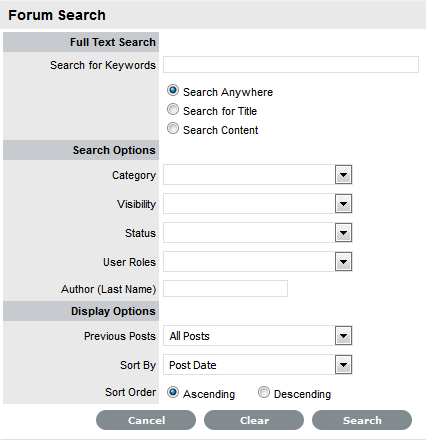
Forum Search
To search the Forums:
-
Go to Knowledge>Forums
-
Click Search
The Forum Search screen is displayed.
-
Enter the relevant search option
For more information regarding using the Keyword search option, seeFull Text Search information.
-
Click Search
The table of results will be displayed with related Forum details.
-
Click on a Forum Topic name to display the Topic screen.
Forum Bookmarks
To view a list of Topics that have been flagged for easy access use the Bookmarks button within the Forums list. Within the Flagged Topics list, Users can set the Email Notification option to Yes for the system to send an email when a new post is added to a Topic.

The Delete option link allows the User to remove the Topic from the Flagged Topics list.
2.9.8 Surveys
The Service Desk can obtain feedback regarding the quality of support provided to Customers and any other issues by distributing Surveys to Service Desk staff and Customers. Surveys within the system can be created for specific Users or User Role groups, Customers who have logged requests and anyone who accesses the Service Desk.
NOTE:Users can only access the Knowledge>Surveys option to create Surveys, if the Survey Manager field has been ticked within the User>Users>User Information screen.
Refer to Surveying Customer Sentiment for additional information about surveys and customer satisfaction.
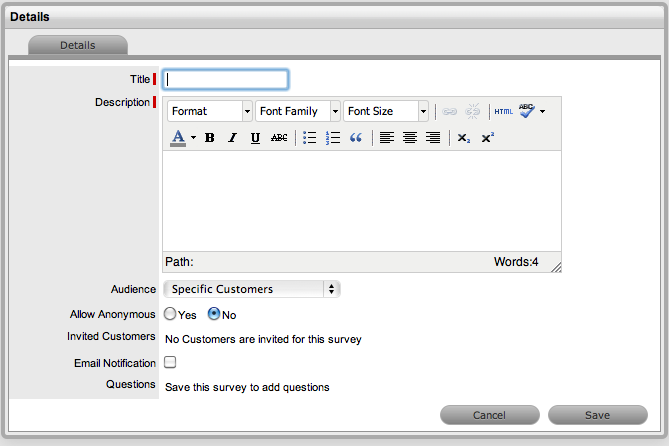
Creating a Survey
To create a new Survey:
-
Select Knowledge > Surveys
-
Click New
-
Enter a Survey Title
-
Enter a Survey Description
-
Select an Audience:
Survey Details
Audience Type
Description
Serviced Customer
Send on Resolution
Send Once Only
A Survey is issued to Customers who have had a request resolved by service desk staff. This Survey type is available to Customers within the Customer Portal.
NOTE:Only one survey for the Serviced Customer audience can be published at a time.
If Serviced Customer is selected as the audience, an option called Send on Resolution becomes visible. When this option is enabled and a request is resolved, an email is automatically dispatched to the Customer asking them to complete a Survey.
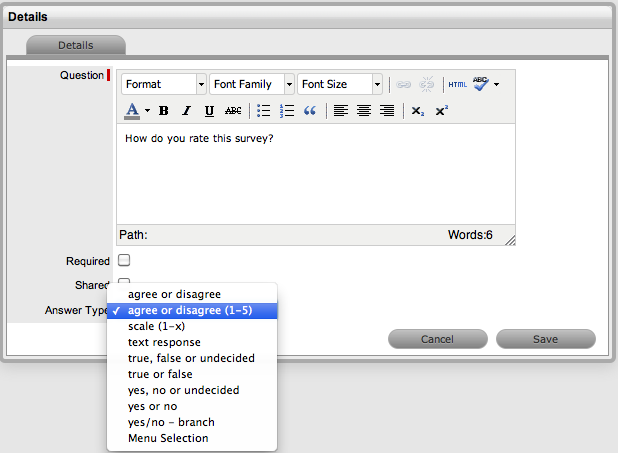
If the Send on Resolution option is left disabled, the email must be sent manually. To send the email, select a closed request and click
 within the Summary Information screen. An email is sent to the Customer with a Survey.
Select this option if you want Customers to receive the Serviced Customer Survey once and not on multiple occasions.
Serviced Customers
(1 in 5)
Sends the survey to one in five Customers who log a request with the service desk.
Everyone
A Survey that is published for all Users groups, including the Public Portal, Technicians and Customers.
When this option is set and the Allow Anonymous option is set to No, the survey will not be available on the Public Survey Portal.
Specific Customer
Email Notification
A Survey generated for a specific Customer/s.
If a specific Customer is selected:
-
Click the add button to invite Customers to the Survey
-
Search and select Customers
-
Select Save, to assign the Customer/s.
To notify the Customer via email, select the Email Notification option. When the Survey is published, an email is sent to the Customer/s.
Roles
Raise Alert
A Survey generated for a specific User Role/s.
If Roles is selected, a list of User Roles is displayed. Select the User Roles to receive the Survey.
To generate an Alert when the survey is published, select the Raise Alert option.
Customers By Org Unit
Selected Org. Units
A Survey generated for Customers within one or more Organizational Units. When selected and saved, the option to assign Organizational Units is displayed.
Click the
 to search and assign Org Units.
Customers By Item Type
Select Item Types
A Survey generated for Customers using one or more Item Types. When selected and saved, the option to assign Item Types is displayed.
Click the
to search and assign one or more Item Types.Allow Anonymous
Allows Customers to complete the Survey without their identity being recorded.
When this option is set to No and the survey audience is set to Everyone, the survey will not be available on the Public Survey Portal.
-
-
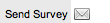
Click Save to add questions to the Survey
-
In the Questions field click
to create a new Survey question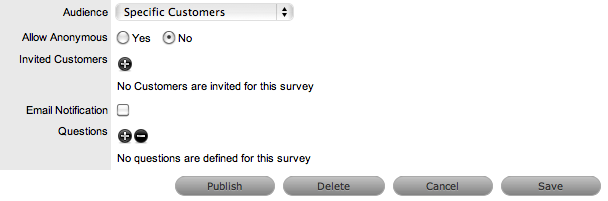
-
Enter the Question text
-
Check the Required option if an answer is mandatory
-
Tick Shared, if this question is to be included in surveys created by duplicating this survey in the future
If selected, these questions cannot be edited in the newly created duplicated survey.
-
Select an Answer Type:
Answer Type
Description
Agree or Disagree
Displays the options to Agree or Disagree.
Agree or Disagree (1-5)
Displays the options to Agree or Disagree on a scale of 1 to 5.
Scale (1-x)
Provides the option to define the rating scale from 1 to 10. When selected, the Scale field is displayed allowing the User to define the range.
Text Response
Provides a text box for text based responses.
True, False or Undecided
Displays the options of True, False and Undecided.
True or False
Displays the options of True or False.
Yes, No or Undecided
Displays the options of Yes, No and Undecided.
Yes or No
Displays the options of Yes or No.
Yes/No - branch
Allows a further question to be asked based on a Yes or No answer given for the current question.
When using this option, it may be necessary to return to the question configured with this selection after all the questions have been created for the survey, so the Branch Question can be configured appropriately.
If End is selected, the User screen will automatically close when the configured selection is made.
Menu Selection
Provides a list of possible responses.
To create a list of responses:
-
Click New
-
Enter a response name
-
Click Save
-
Repeat to add multiple options.
-
-
Click Save
-
Click
to enter additional questions(Refer to Steps 8 to 11 above)
-
Re-order the questions, if required
Check the box next to the relevant question and use
 or
or  to move it in the appropriate direction.
 -
When all questions are entered in the correct order, select Save.
The Survey is now ready for publication.
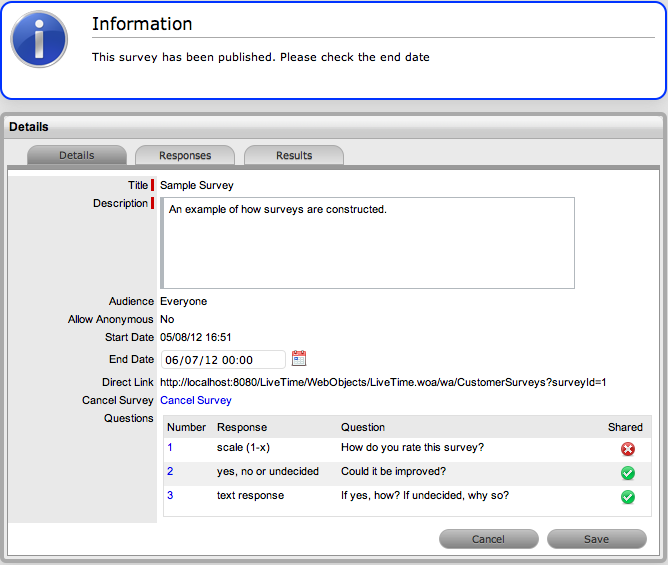
Publishing a Survey
After a Survey has been created, it must be published in order for it to be available to Customers and Users. Published Surveys are accessible through the Feedback tab.
To publish a Survey:
-
Select Knowledge > Surveys
-
Select the hyperlink of an unpublished Survey
-
Click Edit
-
Select

-
Enter an End Date for the Survey
By default the end date is set to one month after the start date. To modify the default end date, select a date within the calender icon. The start date is set to the date the Survey is published.
-
Click Save.
A direct hyperlink is also created and saved with the survey. This can be sent to audience members for direct access to the survey.
NOTE:When a Survey is published it can no longer be edited.
To deactivate a Survey, adjust the End Date or click the cancel link within the Details tab of the Survey.
Duplicating a Survey
Surveys can be duplicated both before or after publication.
To duplicate a Survey:
-
Select Knowledge > Surveys
-
Select the hyperlink of a Survey
-
Click the Duplicate button
The duplicate Survey is displayed.
-
Update the duplicate Survey, as required
-
Click Save.
The Survey is saved and ready to publish.
NOTE:Questions cannot be edited if they are duplicated from a Published Survey.
Completing a Survey
When a Survey is published, it can be completed by Users and Customers.
To complete a Survey as a Supervisor or Technician User, the survey can be accessed within the Home>Feedback screen:
-
Select Home > Feedback
-
Select the Fill Survey hyperlink
-
Complete the Survey
-
Click Done.
To complete a Survey within the Home Page of the Customer Portal:
-
Select Survey within the Menu side-bar
-
Select the Take Survey hyperlink
-
Complete the Survey
-
Click Done.
To complete a Survey as a Public User:
-
At the login page select Public Access Surveys
-
Select the Fill Survey hyperlink
-
Complete the Survey
-
Click Done.
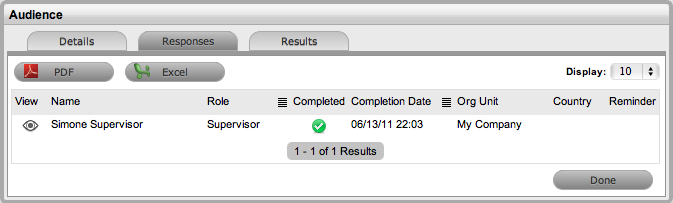
Viewing the results of a Survey
As a Survey is completed, the results are collated on a per User basis and summarized into a chart.
To view the results per User:
-
Select Knowledge > Survey
-
Select the relevant completed Survey's hyperlink
-
Select the Users tab
A list of Survey participants is displayed.
-
Select View to display the full response for each User.
To view a summary of results:
-
Select Knowledge > Survey
-
Select the relevant completed Survey's hyperlink
-
Select the Summary tab
Each Survey question will be summarized and charted.
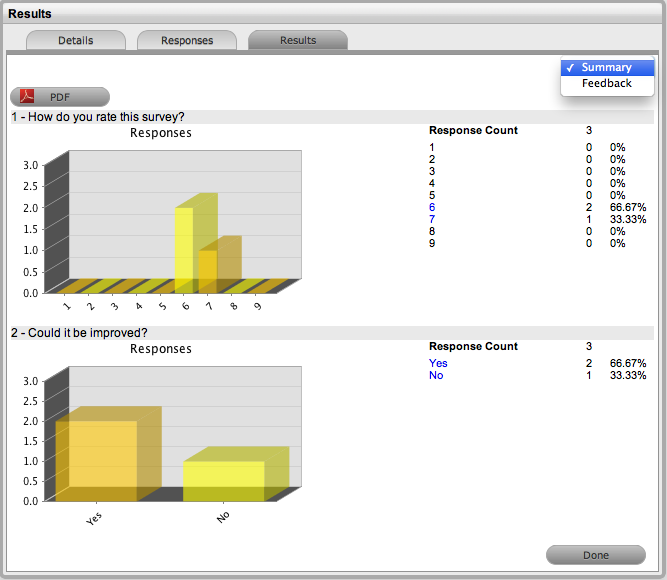
-
For text based questions, select Feedback from the drop-down list provided.
A list of text responses is displayed.
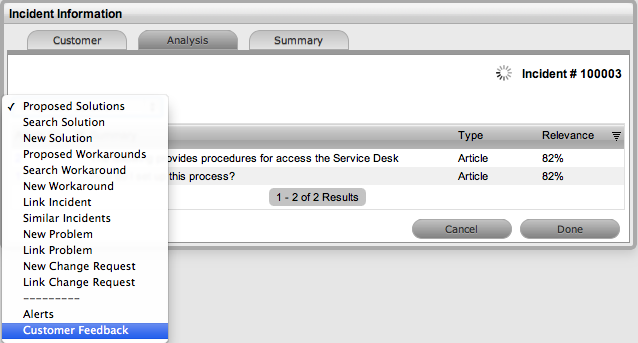
The completed Surveys sent to Serviced Customers upon resolution of an Incident, are also accessible within the Analysis tab of the Incident.
Refer to Surveying Customer Sentiment for indepth information about surveys and customer satisfaction.
2.9.9 Surveying Customer Sentiment
As a support organization that has automated its Service Desk, time has been invested in auditing manual workflow lifecycles and mapping them into the service management system. Consideration has been given to the way support teams work, what are the areas of speciality and by whom they are supported. Service Level Agreements have been agreed on and implemented, hopefully, with contractual obligations being met more often than not. There are very few customer complaints so on the surface of things all is going well, or is it?
System generated statistics capture operational data such as response time and resolution time, which are great for measuring the efficiency of the support service but do not garner the customers sentiment about the support organization (i.e., are they satisfied? Do they have confidence in the support provided?), based on their interaction with the Service Desk.
Service Desk Supervisors who are serious about providing the best possible support and building an environment of continual service improvement must conduct surveys. A variety of surveys should be issued, the results evaluated and action plans adopted relative to the survey response data. To gain a true measure of customer satisfaction with the support service, surveys are a must.
Surveys provide core indicators of satisfaction levels with the service and systems delivered by the Service Desk, and enhance customer satisfaction, support efficiency and cost effectiveness metrics. Measuring end-user satisfaction relative to service desk goals can also assist in determining staff levels and training requirements, budget allocations, outsourcing strategies, IT strategy and rewards for service desk managers and staff.
Good surveys reveal patterns, trends and new information valuable to improving customer service. Three elements that are crucial to successful surveying include:
-
Asking the right questions
-
Asking at the right time
-
Following up feedback.
Even with the first two elements correct, if feedback is ignored, the Service Desk risks alienating its customers and undermining the customer’s confidence in the service.
Real Time Surveys
Gartner Research indicates that 40% of responses are more accurate if customers are surveyed within 24 hours of the service desk interaction. There is also a 10 to 12% increase in response rates with customers who are surveyed immediately after a transaction (Kolsky, 2006). Gartner assessed real-time feedback as ideal and our service management system allows Service Desk operators to survey all customers when a support request is resolved.
The auto-sending of surveys within the system overcomes Gartner’s observed drawbacks of real time surveys being costly and non-scalable.
Customer Satisfaction Surveys
Building on the trends observed by the point-of-delivery surveys, periodic surveys can be used to gain real sense of the customers’ perceived relationship with the Service Desk. This type of survey tends to be a little more complicated, detailed and specific than a transaction based survey. The questions responses can be rated on a numeric scale of 1 to 5, with a maximum of seven questions being recommended, as longer surveys tend to have lower response rates.
The sample size could be determined by the responses received to the point-of-delivery survey, as these customers have proved to be reliable in completing surveys. However, respondent details and activities must be recorded to ensure that the same customers are not always asked to complete surveys.
Surveys to go
Passive surveys can also be used by a Service Desk to provide customers with the opportunity to comment on the service they receive, when the customers feels it is appropriate to do so.
Service Desk Evolution
Transaction based and periodic surveys are great for monitoring day-to-day activities and base-lining trends of the Service Desk. To assist with forward planning and service desk evolution, more in depth surveys are required. Planning surveys may not necessarily be automated through Survey option within the system, in fact focus groups or face-to-face surveying methods may be preferred.
Feedback & Analysis
With the potential of numerous survey responses being received, no matter how short the list of questions, the Service Desk Manager must set time aside to view the response statistics. In fact it has been found that poorly executed surveys that have no follow-up, promote greater customer dissatisfaction. Should negative feedback be received, the Service Desk Manager must have an appropriate escalation policy to manage the information.
Conclusion
The use of surveys by the Service Desk is a positive demonstration to its customers that it is committed to the service it provides. Operational metrics measure the efficiency of the support service but are not a real indicator of customer satisfaction. To effectively monitor customer sentiment, support technicians’ capability and build a culture of continual improvement surveys are mandatory. To this end a variety of survey techniques should be adopted by Service Desk Supervisors, which include point-of-delivery, periodic, passive and planning surveys.
(Reference: Kolsky, E., 2006, “Implement Customer Satisfaction Management Processes to Improve Revenue”, ID No.:G00134295, 2 March 2006, Page 2. Gartner Research; Kolsky,E. & Maoz, M., 2003 “Using Customer Surveys to Improve Business Processes”. ID No.:SPA-19-1128, 7 February 2003, Page 2. Gartner Research.)
Surveys and Service Management
Surveys created within the service management system can be created for serviced Customers, specific Customers, User Role groups, Customers based on Organizational Unit or Item Type ownership, and the General Public. Surveys can be customized to meet the requirements of each audience types. (See: Surveys for detailed information about creation and publication of new Surveys in the service management tool.)
Point of Delivery Surveys
A system Survey Manager can create a point-of-delivery or transaction based survey, within the Knowledge>Survey tab. The Title is completed to reflect the data to be sourced from the customers. The Description that is entered is used to introduce the survey to the Customer when the survey request is emailed to the Customer or accessed on the Customer Portal. From the Audience option, Serviced Customers is selected and the Send on Resolution option is marked to automatically send to the survey to the Customer when their support issue is resolved.
NOTE:Tip: When constructing point-of-delivery or transaction based surveys it is recommended that the survey be short, that is no more than five questions with yes or no answers. Also, to avoid biased results, all customers should be surveyed regarding the service they received.
NOTE:Fact: Only one Point of Delivery Survey can be active within the system at any one time.
Customer Satisfaction Surveys
When a survey is created for Serviced Customers and the Send on Resolution option is not selected, the survey can be sent manually after the Incident is closed. The survey can be emailed from within the Incident Summary screen, by clicking the link that appears when the Incident moves to the status of Closed.
NOTE:Fact: To ensure Customers do not feel bombarded by the Service Desk, the system will not allow the same survey to be sent to the same customer on multiple occasions. There is also the ability to create Serviced Customers (1in 5) surveys.
The completed Surveys sent to Serviced Customers upon resolution of an Incident, are also accessible within the Analysis tab of the Incident.
Public Surveys
Published surveys have the Audience defined as ‘Everyone’ and can be accessed using the Public Surveys link on the system Login page. These ‘surveys to go’ are completed by end-users without logging into the Customer Portal.
NOTE:To allow Customers complete these Surveys anonymously, ensure the Allow Anonymous option is enabled.
Survey Results
urvey Results are visible under the Summary tab of an Active survey.
Graphical indicators and response percentages are displayed within the Summary filter of the Summary screen. If free text fields are used to obtain Customer comments, they can be accessed in the Feedback filter of the Survey Results Summary tab.
See: Surveys for detailed information about creation and publication of new Surveys in the service management tool.