1.4 Basic Procedures
All sections throughout the application use a uniform system for creating, editing and deleting elements. Whether you are working with requests, Customers, Items or Item Types, the procedure for creating, editing or deleting existing elements is the same.
1.4.1 Mandatory Fields
When entering details relating to any element throughout the system, required information is marked with a I.
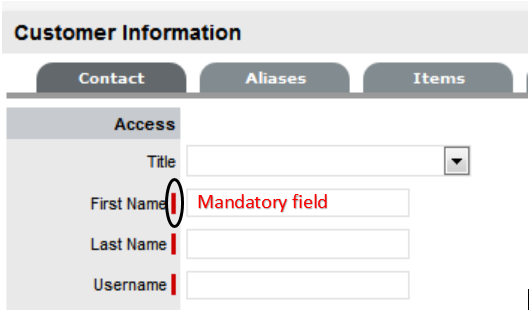
I Denotes Mandatory fields
1.4.2 Creating an Element
To create an element:
-
Navigate to the appropriate section
For example, if you want to create a Customer, navigate to the User>Customers section.
-
Click
 in the upper left-hand corner of the list of Customers
This will open a new Customer window.
-
Fill in the appropriate details
-
Click
 .
.
The new Customer now exists in the system and will appear in the list of Customers.
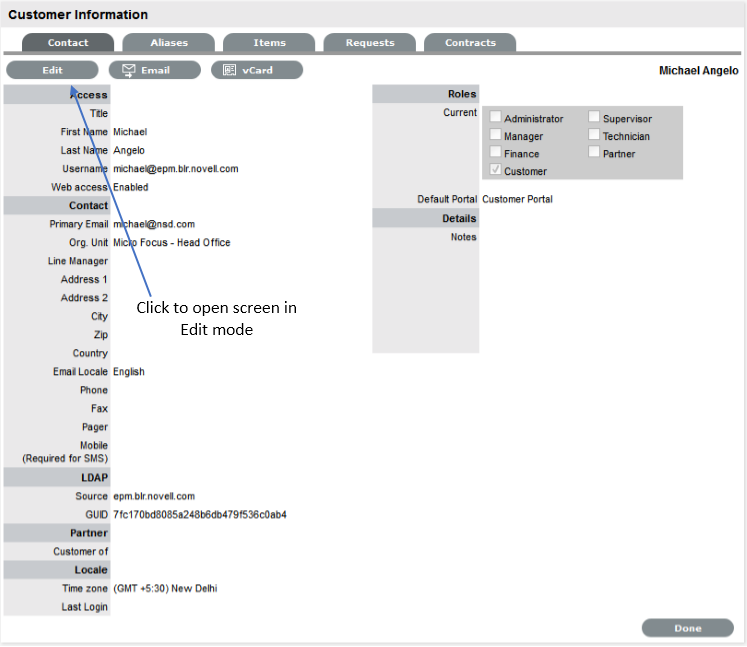
1.4.3 Editing an Element
To edit an element:
-
Navigate to the appropriate section
-
Click the Entry link in the list
For instance, to edit a Customer, navigate to the User>Customers section and click on the Customer name hyperlink. This will open up the Customer's details screen.

-
Click
 in the upper-left corner of the window to enter Edit mode
 -
Update the necessary information
-
Click
 .
.The changes will now take effect and the User will be returned to the list.
1.4.4 Deleting an Entry
To delete an entry:
-
Navigate to the appropriate section
NOTE:Technicians do not have the ability to delete requests or Customers
-
Click the link in the list corresponding to the entry to be deleted
For instance, to delete a Customer, navigate to the User>Customers section and click on the Customer you want to delete. The Information screen opens.
-
Click
in the upper-left corner of the window to enter Edit mode -
Click
 at the bottom of the section.
The entry is now deleted and the User will be returned to the list.
1.4.7 List Views
Application List Views are pre-sorted by ID #, and default to display ten Incidents per batch. A List can be re-sorted by clicking on a column header, and the number of elements displayed per batch can be changed using the Display pop-up option.
List Views allow Users to customize the list displayed for each screen within the application. When a List View is created, the screen editor will display only the relevant columns for the module being customized. For example, when creating an Item List View, the available columns will include only Item information.
The system includes at least one default List View for each screen within the application. These Views cannot be edited, however additional Views can be created.
To access details regarding the List View field options throughout the application, refer to:
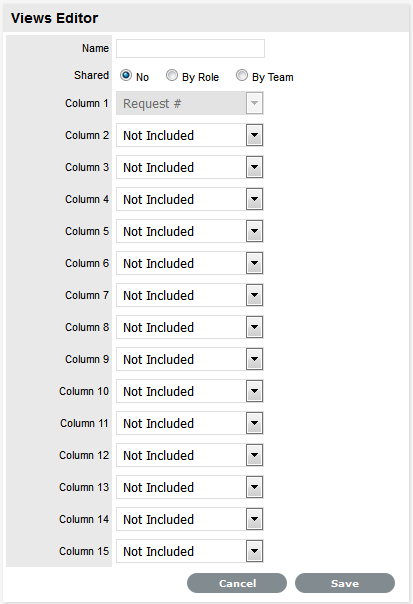
Create a List View:
As an example we will create a List View for the Incident screen.
-
Select Operations>Incident
The Incidents screen appears
-
Select
 available on the far right of the screen
 -
Click New
-
Enter the View Name and specify if the View is to be shared by other Users or between Team members
Shared Views allow other Users to apply the List View to their screen but does not permit them to edit it.
-
Select at least 8 columns
This only applies to the request list screens, all other screens require at least 6 columns.
-
Click Save.
NOTE:Create a List View that includes New Tasks and New Notes to use as the default request screen in order to have a visual cue when new Notes and requests are created.
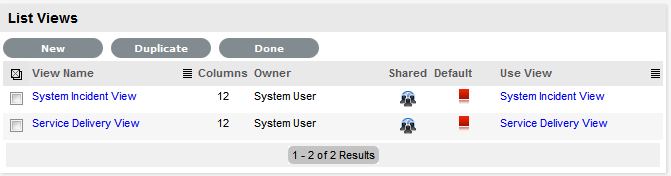
Selecting a List View as the Default View
To use the same List View each time a screen is displayed, select the List View to be the default view. To do this:
-
Select
, displayed on the far right of the screen -
Click the
 button in the Default column
 -
The icon will then change to a
 , indicating that it has become the default
 -
Select Done to view this List.
From this point, this will be the default List View for the selected screen.
Displaying a Different List View
To use a different List View:
-
Select
, displayed on the far right of the screen -
Select the link in the Use View column.
Editing a List View Column
To edit a List View, and change the columns:
-
Select
, displayed on the far right of the screen -
Select the link in the View Name column
-
Make the required changes
-
Click Save.
Duplicating a List View
To fast-track the creation of similar List Views, a List View can be duplicated. To duplicate a List View:
-
Select
, available on the far right of the screen -
Click the checkbox beside the View Name to duplicate
-
Click the Duplicate button
The List View Editor appears with the columns of the original List View.
-
Complete the List View name
-
Modify the columns as required
-
Click Save.
To access details regarding the List View information options throughout the application, refer to:
1.4.8 List View Options for all Request Types
List View Options for all Request Types
The List View options are derived from the database fields and can be customized by selecting  within the My Tasks Home tab, Service Request, Incident or Problems screens within the Operations tab and the Change tab list view.
The options within the Home, Operations and Change tabs are detailed in the following table:
|
Description |
|
|---|---|
|
# Attachments |
Displays the total number of Attachments assigned to the request. |
|
# Notes |
Displays the total number of Notes assigned to the request. |
|
% SLA Remaining |
Displays the percentage of time available before the SLA expires. |
|
Classification |
Shows the Classification assigned to the request. |
|
Client Room |
Displays the Room where the Customer can be located. |
|
Close Date |
Specifies when the request was moved first moved into an Exit State of the Workflow. |
|
Created |
The date when the request was first logged with the system. |
|
Customer |
The name of the person for whom the request was logged in the system. |
|
Customer Item |
The identification number of the Configuration Item associated with the Customer. (This is especially relevant when Item Shadowing is enabled for the Customer Portal and a request is logged against an Item that is different to the Customer's Item.) |
|
Customer Item Type |
The Item Type associated with the Customer Item. |
|
Customer Solution |
Shows the Customer Note when they use the Close option on the Customer Portal. |
|
Description |
Displays the initial information logged for the Customer's request. |
|
Due Date |
Typically based in the SLA and Priority assigned to the request, but in some cases may be manually overwritten. |
|
Escalation |
|
|
Group |
Displays the Group identification number, if the request is assigned to a request group. |
|
IP |
Shows the ITIL process that the request belongs to:
|
|
Identifier |
Shows the Identifier field information of the Item assigned to the request. |
|
Impact |
Shows the Impact associated with the request. This is usually derived from the Criticality of the Item, but can be adjusted manually on a request. |
|
Item |
Shows the identifying number of the Item assigned to the request. |
|
Item Category |
Shows the Category name of the Item assigned to the request. |
|
Item Criticality |
States the Criticality of the Item as defined in the CMDB. |
|
Item Room |
Displays the Room details to which the Item is assigned. |
|
Item Status |
Displays the stage of the Item Lifecycle that the Item is assigned. |
|
Item Type |
Shows the Type name of the Item assigned to the request. |
|
Last Action |
Details the date that action was last recorded against the request. |
|
Layer |
Details the Escalation Layer/level or work group assigned to the request. |
|
Logged Time (mins) |
Shows the total time recorded against the request. |
|
Logged by |
Shows the name of the person logged the request with the system. |
|
New Note |
|
|
New Task |
|
|
Number of Affected Users |
Displays the number of Customers associated with the Item assigned to the request. |
|
Open Date |
Details the date the request was first logged in the system. |
|
Open Time |
Details the time the request was first logged in the system. |
|
Org. Unit |
The name of the Organizational Unit to which the Customer is assigned. |
|
Priority |
Shows the Priority setting for the request. |
|
Request# |
The identifying number for the request. |
|
Restore Date |
Shows the date the request was moved into a Workflow State where the SLA Restoration option is set to Yes. |
|
SLA |
Displays the Service Level Agreement assigned to the request. |
|
Source |
Displays if the request was created via Email, Portal, Widget, Phone (Technician) or Web Service. |
|
Status |
Shows the stage of the request Workflow that the request is assigned. |
|
Subject |
Shows content entered in the Subject field of a request. Usually derived for the Subject line of requests created via email, if not populated manually. |
|
Team |
Shows the Team assigned to the request. |
|
Technician |
Displays the name of the Technicians assigned to the request. |
|
Urgency |
Shows the Urgency associated with the request. |
|
Warning Sent |
|
|
Workflow |
Details the Workflow assigned to the request. |
 is visible when the Escalation option is On for the request.
 is visible when a new Note is added to a request and has not been opened by the assigned Technician.
 is displayed when a new request is added to the List View.
 is visible if an SLA Warning has been sent to the Technician assigned to the request.
If Custom Fields have been enabled for a Request Type in Admin>Setup>Custom Fields, they will also be available in the Views Editor drop-down list options.
List View Options: Configuration Tab
The List View options are derived from the database fields and can be customized by selecting within the Configuration tab.
The options within the Configuration Tab are outlined in the following table.
|
Description |
|
|---|---|
|
# Users |
Displays the number of Users assigned to the Item. |
|
% SLA Uptime |
Displays the percentage uptime expectation of the SLA assigned to the Item. |
|
% Uptime |
Shows the actual uptime of the Item, based on the time the Item is associated with Active Lifecycle States. |
|
Avg Repair Time |
Entries displayed here are automatically calculated based on the average length of time an Item is offline. |
|
Avg Time to Fail |
Figures displayed here are automatically calculated based on the average time between an Item being offline. |
|
Change Team |
Shows the Change Team assigned to the Item. |
|
Child R'Ships |
Displays the number of Child Relationships associated with the Item. |
|
Contract |
Displays the Contract Number associated with the Item. |
|
Contract End Date |
Displays the date a Service Contract period ended. |
|
Contract Expiry |
Shows the date that a Service Contract is due to expire. |
|
Cost |
Displays the value entered in the Costs field. |
|
Criticality |
States the Criticality of the Item as defined in the CMDB. |
|
Current Month Costs |
Uses the Charges figure within the Service Item Costs tab, multiplied by the number of Users and days of month passed, to calculate the month to date cost figure. |
|
Current Month Revenue |
Uses the Revenues figure within the Service Item Costs tab, multiplied by the number of Users and days of month passed, to calculate the month to date revenue figure. |
|
Customers |
Lists Customers assigned to the Item. |
|
Deleted Date |
Shows the date the Item was deleted from the CMDB. |
|
Depreciated Value |
Displays the figure entered in the Depreciated Value. |
|
Identifier |
Shows the Identifier field information of the Item assigned to the request. |
|
Incident Team |
Shows the Incident Team assigned to the Item. |
|
Item Category |
Shows the Category associated with the Item. |
|
Item No. |
Displays the identifying number for the Item. |
|
Item Type |
Shows the Item Type associated with the Item. |
|
Manufacturer |
Displays the Manufacturer name. |
|
Open Requests |
Shows the number of requests assigned an Active Status, associated with the Item. |
|
Org. Units |
Lists the Org. Units associated to the Item. |
|
Parent R'Ships |
Displays the number of Parent Relationships associated with the Item. |
|
Previous Month Costs |
A reference figure for an average monthly cost, based on the previous months costs for the Service Item. |
|
Previous Month Revenue |
A reference figure for an average monthly revenues, based on the previous months revenue for the Service Item. |
|
Problem Team |
Shows the Problem Team assigned to the Item. |
|
Purchased |
Displays the date entered in the Purchased field. |
|
Request Team |
Shows the Service Request Team assigned to the Item. |
|
Room |
Displays the Room associated with the Item. |
|
Service Components |
For Service Items, the Item Number and Type is displayed for other Service Items related as Children for this Item. |
|
Service Level |
Shows the Service Level Agreement assigned to the Item. |
|
Status |
Displays the stage of the Item Lifecycle that the Item is assigned. |
List View Options: Users Tab
The List View options are derived from the database fields and can be customized by selecting within the Customers, Organizational Units, Partner Organizations and Users tab.
The options within the Users Tab are outlined in the following tables:
Customers List View options:
|
Customers |
Description |
|---|---|
|
Contract # |
Displays the Contract Number associated with the Customer. |
|
Country |
Shows the Country assigned to the Customer's account. |
|
Custom 1 to 5 |
Shows the Custom Fields that have been configured in the Admin>Setup>Custom Fields tab for Customer Information. |
|
Customer Name |
Displays the Customer's name. |
|
Date Added |
Displays the date the Customer account was first created. |
|
Email Address |
Shows the Customer's email address as a link that can be clicked to open a New Message email window. |
|
Email Locale |
Displays the language file associated with the Customer for automated system correspondence. |
|
FAX |
Includes the Customer's facsimile number. |
|
Last Login |
States the time and date when the Customer last logged into the system. |
|
Last Logout |
States the time and date when the Customer last logged out of the system. |
|
Ldap Source |
When multiple LDAP servers are synchronized with the system, this will display the LDAP details from where the Customer information is sourced. |
|
Line Manager |
Shows the name of Manager User associated with the Customer, which maybe relevant when seeking approvals for Service or Change Requests. |
|
Local Time |
Displays the local time for the Customer. |
|
Mobile |
Includes the Customer's mobile number. |
|
Notes |
Displays information recorded in the Notes field of the Customer Information screen. |
|
Open Requests |
Shows the number of requests assigned an Active Status, logged by the Customer. |
|
Org. Unit |
Displays the Organizational Unit assigned to the Customer. |
|
Owned Items |
Lists the Item's assigned to the Customer by showing the Item Numbers. |
|
Pager |
Includes the Customer's pager details. |
|
Phone |
Includes the Customer's telephone number. |
|
Roles |
Lists the Roles the Customer has been assigned within the system |
|
Room |
Displays the Room assigned to the Customer. |
|
User Name |
Displays the User Name access credentials for the Customer's account. |
|
Web Access |
Shows the Customer setting for the Web Access option. |
Organizational Units and Partner Organizations List View options:
|
Org. Units |
Description |
|---|---|
|
# Customers |
Shows the number of Customers associated with the Org. Unit. |
|
City |
Shows the City details for the Org. Unit. |
|
Contract # |
Displays the Contract Number associated with the Org. Unit. |
|
Country |
Shows the contact telephone number for the Org. Unit. |
|
Custom 1 to 5 |
Shows the Custom Fields that have been configured in the Admin>Setup>Custom Fields tab for Org. Unit Information. |
|
Name |
Details the Organizational Unit's name. |
|
Org Unit Email |
Shows the Org Unit's email address as a link that can be clicked to open a New Message email window. |
|
Phone |
Shows the contact telephone number for the Org. Unit. |
|
Primary Contact |
Shows the name of the Customer who has been assigned as the point of contact for the Organizational Unit. |
|
Primary Contact Email |
Shows the Primary Contact's email address as a link that can be clicked to open a New Message email window. |
|
Service Level |
Displays the Service Level Agreement assigned to the Org. Unit. |
|
State |
Displays the State information for the Org. Unit. |
|
Website |
Displays the Org. Unit's Website details. |
|
Zip |
Shows the contact telephone number for the Org. Unit. |
Users List View options:
|
Users |
Description |
|---|---|
|
Active Requests |
Shows the number of requests assigned an Active Status, allocated to the User. |
|
Available |
Includes a visual icon to easily identify if the User is available within the system for request allocation:
|
|
Classifications |
Lists any Item Classifications that have been assigned to the User within the Skills tab. |
|
Custom 1 to 5 |
Shows the Custom Fields that have been configured in the Admin>Setup>Custom Fields tab for User Information. |
|
Date Added |
Displays the date the Customer account was first created. |
|
Default Items |
Lists any Items that have been assigned to the User within the Skills tab. |
|
Default Portal |
For Users assigned multiple Roles within the system, this field will display which Portal the User accesses by default when they log into the system. |
|
Email Address |
Shows the User's email address as a link that can be clicked to open a New Message email window. |
|
FAX |
Includes the User's facsimile number. |
|
Last Login |
States the time and date when the User last logged into the system. |
|
Last Logout |
States the time and date when the User last logged out of the system. |
|
Ldap Source |
When multiple LDAP servers are synchronized with the system, this will display the LDAP details from where the User information is sourced. |
|
Line Manager |
Shows the name of Manager User associated with the User, which maybe relevant when seeking approvals for Service or Change Requests. |
|
Mobile |
Includes the User's mobile number. |
|
Name |
Shows the User's name. |
|
Pager |
Includes the User's pager details. |
|
Phone |
Shows the contact telephone number for the User. |
|
Processes |
Lists the ITIL processes the User has access to within the system. |
|
Roles |
List the Roles the User has been assigned within the system. |
|
Supervisor |
Shows the assigned Supervisor for Users assigned a Technician or Partner Role. |
|
Teams |
Lists the service Teams the User has been assigned to. |
|
Username |
Displays the User Name access credentials for the User's account. |
 : The User has the On Vacation option enabled.
Custom Fields
Custom Fields
The Custom Fields function allows screens in the system to be adapted to meet specific requirements of an organization, as additional fields can be created for different parts of the application.
Custom fields can be set for different system screens and include the option to select:
-
Data type
-
Style
-
Defining if the field is required or includes a description
-
Determining whether it can be viewed or edited by the Customer (Incident, Change and Service Request
Custom fields only.)
NOTE:A maximum of 5 fields is allowed for each option.
Enabling a Custom Field
To enable a Custom Field:
-
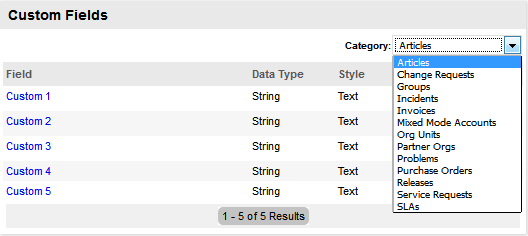
Select Setup>Custom Fields
The Custom Fields screen appears.
-
From the Category Filter drop-down list select the screen option
The displayed list includes all screens where custom fields can be added.
Custom Fields
Custom Field Locations
Articles
Additional field for Articles in the Knowledge Base.
Change Requests
Additional field for a Change Request.
Customers
Additional field for Customer Information.
Groups
Additional field for Service Request, Incident, Problem and Change Groups.
Incidents
Additional field for Incident Information.
Invoices
Additional field for Invoices. (Option visible when Billing>Invoices have been enabled for the system.)
Org Units
Additional field for an Organizational Unit.
Partner Orgs
Additional field for Partner Organization.
LDAP/ADS Accounts
Customized LDAP/ADS fields can be used to map to a Directory Server when importing user account details. See Authentication.
Problems
Additional field for Problem details.
Releases
Additional field for Release Management details.
Service Requests
Additional field for Service Request information.
SLAs
Additional fields for Service Level Agreement Information screen.
Users
Additional field for the Users Information screen.
Purchase
Additional field for Purchase Orders. (Option visible when Billing>Purchase Orders have been enabled for the system.)
NOTE:Problem, Change, Release and Service Requests are in Service Manager only
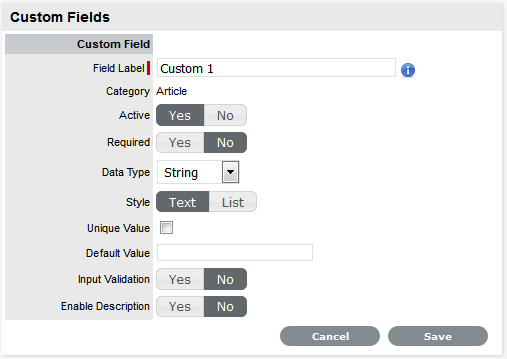
-
To define a custom field, click on the appropriate field label hyperlink
An editable window appears.

-
Toggle the Active field to Yes
Once activated, a list of options is displayed.
Options
Description
Field Label
Edit the Field Label by entering the relevant name. (Required.)
NOTE:The label entered within this field is applied to the English UI. For it to appear in another language, configure this label in the Setup>Localization>Content tab.
Active
Defines the Custom Field visibility.
Required
Defines if the field is mandatory when displayed.
Data Type
The format required for the field.
Select the data type from the following:
-
String (Text or List)
-
Number-Custom Field that requires a number
-
Boolean (Radio Buttons)
-
Date-Custom Field that requires a value in a date format
-
Currency- A currency can be defined for the Field
-
Hyperlink - A URL can be included in the field.
Style
From the options provided, the way the data type will be displayed.
-
String custom field - either an open text field or a list, or
-
Boolean custom field - uses radio buttons to define Yes/No or True/False.
Unique Value
When active, the system prevents the duplication of data within the customized field.
Input Validation
When enabled the Input Mask and User Mask can be defined.
Input Mask : A regular expression to use for data validation of values entered by a User (i.e., Zip/Post Code, telephone no.)
User Mask: A User Friendly representation of the Input Mask that Customers can understand should it appear in a validation error message.
Enable Description
When enabled, a Description field appears that allows the User to enter details of what information the field is expected to capture. These details are accessible next to the custom field on the relevant screen.
-
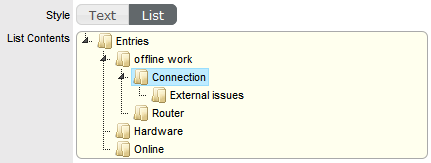
Data Type - List
When the Data Type String - List is selected the List Contents field is displayed, which provides the facility to create a drop down list to be created as options within the field.
To create a new list entry within the List Contents field:
-
Right click the Entries link
The Create option is displayed
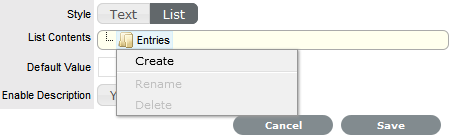
-
Click Create
A New node link displayed

-
Enter the name of the field
-
Click outside the field to save the entry

-
Repeat this process until all list entries have been added
To create a nested list, right click on the relevant list entry and repeat the above process.
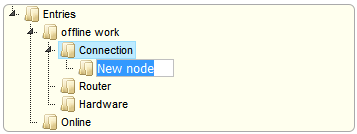
-
To move an existing entry to a new position, select the entry, then drag and drop the entry into its new location

-
When all the relevant details have been defined for the custom field, click Save.
Custom Fields for Incidents, Change and Service Requests
If a custom field is enabled for an Incident, Change or Service Request, additional options are displayed. These include:
|
Description |
|
|---|---|
|
Customer Visible |
The custom field is visible in the Customer Portal, otherwise it can only be viewed via Technician access. |
|
Customer Editable |
Allows the Customer to edit the content within this field. |
|
Default Value |
The custom field will automatically be populated with the value entered here when a request is created. This value can be edited within the request screen, if required. |

NOTE:If Customer Visibility is set to No for a required field, then a Default Value must be defined. This will enable the Customer to save a new request without seeing the relevant field.
LDAP/ADS Accounts Custom Fields
The LDAP/ADS custom fields are used to define specific Customer and User fields configured within LDAP/ADS. The custom fields for Customers and Users are completed when Users and Customers are entered manually or imported using a .CSV file.
If Mixed Mode LDAP is applied, the same set of custom fields are used. These are listed with the label Mixed Mode within the Custom Field Category filter list.
List View Options: Knowledge Tab
The List View options are derived from the database fields and can be customized by selecting within the Knowledge Tab.
The options within the Knowledge Tab are outlined in the following table:
|
Description |
|
|---|---|
|
Age |
Based on when the content was created, shows the age of the Article or FAQ. |
|
Article No. |
The identifying number for the Article or FAQ. |
|
Classification |
Shows the Item Classification assigned to the Article or FAQ. |
|
Created |
Displays the date when the Article or FAQ was created. |
|
Custom 1 to 5 |
Shows the Custom Fields that have been configured in the Admin>Setup>Custom Fields tab for Customer Information. |
|
Item Type |
Shows the Item Type assigned to the Article or FAQ. |
|
Last Updated |
Displays when the Article or FAQ was last updated. |
|
Mean Rating |
Displays the mean score rating for helpfulness of the Article or FAQ. |
|
Owner |
The User who created the Article or FAQ. |
|
Status |
Details the stage of publication the Article or FAQ is assigned (i.e., In Development, Pending Publication, Published or Archived.) |
|
Summary |
Shows the information recorded in the Summary field of the Article, or the Question field of an FAQ. |
|
Title |
Displays the Article Title. |
|
Type |
Shows the Item Type assigned to the Article or FAQ. |
|
View Date |
Displays when the Article or FAQ was last viewed. |
|
Views |
Details the number of times the Article or FAQ has been viewed by a Customer. |
|
Visibility |
Shows who can access the Article or FAQ in the Knowledge Base. |
|
Votes |
Shows the total number of votes recorded against an Article or FAQ. |
If Custom Fields have been enabled for a Articles in Admin>Setup>Custom Fields, they will also be available in the Views Editor drop-down list options.
1.4.9 List Filters
Data within the system can be searched when the Search button appears at the top of the sub-menu screen, next to the New button. Searches that are conducted on a regular basis can then be saved as a List Filter, for easy reference at a later date.
The system includes at least one system defined List Filter for all screens.
To change a List Filter view, select the relevant option from the drop-down menu next to the Filter option. This selection will persist, which allows you to move to another screen or log out and when you return to that screen, it will render with the previously selected Filter view.
To create a List Filter
-
Click the Search button on the relevant screen
-
Define the search parameters
-
Select Search
The search results will be displayed.
-
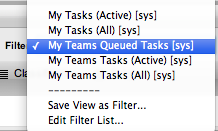
Go to the Filter drop-down menu that is visible in the sub-menu bar
-
Select Save View as Filter
-
Enter the Filter Name
-
If the filtered view is to be used by other Users, tick the Shared option
-
Select the Roles or Team that will share the saved search
-
Click Save.
The saved List Filter is saved within the Filter drop down options.
List Views can be edited and deleted by selecting the Edit Filter List option from the pop-up menu in the Filter option. See: List Views.
1.4.10 Changing Roles
If a User is assigned more than one Role in the application, they can switch to another Role after logging into the system that provides the User access to their assigned Default Portal.
The User Roles of Supervisor or Technician, Finance and Manager are consolidated within one User view. Therefore, if a User is assigned Finance, Manager and Supervisor/Technician access, they can view all functionality related to these Roles within the User view. If the User is also assigned Admin and Customer access, next to their login name, the options of Setup and Customer will be displayed.

The Administrator can access the administrator functionality within the Setup view. If the Administrator is also assigned User and Customer access, next to their login name, the options of User and Customer will be displayed.

Users or Administrators who are also assigned Customer access can view the Customer Portal through the Customer link displayed in the sub-menu bar. Whilst logged in as the Customer, the options of User and Admin Portal will be displayed within the Customer Portal sidebar Menu.

To move to another User Role portal:
-
Log in using the credentials for the default User Role
-
Click on the Setup/User/Customer link, as required.
The screen defaults to the selected functionality.
1.4.11 Buttons
|
Common Buttons |
|
|---|---|
|
|
Create a new request, Item, Customer, etc. |
|
|
Search option provided in List Views across the system. |
|
|
Search button within activities across the system. |
|
|
Add button allows User to add Customers, etc |
|
|
Print screen. |
|
|
Closes the pop-up window. |
|
|
Create a PDF document from screen information. |
|
|
Create an Excel document from screen information. |
|
|
Allows User to subscribe to RSS feeds for information updates. |
|
|
Display a received alert. Click to open the Alert information screen. |
|
|
Remove an Alert. |
|
|
Create a personalized screen list view for all Request Types, Items, Customers and Knowledge tabs. |
|
|
Open object in Edit mode. |
|
|
Delete object when the screen is in edit mode. |
|
|
Rebuilds full text indexes across the application for efficient searching. |
|
|
Move an object between list boxes. |
|
|
Save changes and move out of the edit mode screen. |
|
|
Cancel, not save changes and close screen. |
|
|
Close screen and return to the list view. |
|
|
Add elements to a list- User skill sets, team memberships, email aliases, SLA Workflows. |
|
|
Remove elements from a list- User skill sets, Team memberships, email aliases, SLA Workflows. |
|
|
Apply Spell Checker, after selecting from the drop-down list the relevant language. |
|
|
Indicates a Customer's request to Chat. |
|
Request Buttons |
|
|
|
Indicates an Incident. |
|
|
Indicates a Problem. |
|
|
Indicates a Change Request. |
|
|
Indicates a Service Request. |
|
|
Indicates a Deployment Task. |
|
|
Display the calendar for easy reference. |
|
|
Manually escalate or de-escalate a request. |
|
|
Scroll over to display pop-up information regarding the Item or Status Notes. |
|
|
Add new information when a screen is in Edit mode (i.e., a new Incident Note). |
|
|
Save entry when a screen is in Edit mode. |
|
|
Allows the User to save a Note as a draft, which they can continue working on at a later date. |
|
|
Send a handshake email and move a request to On Hold Pending state. |
|
|
Move a new Note to the Solution tab and convert status to a Pending Approval or Closed Resolved State. For requests with an assigned Solution, a Show Solution button will display the Solution to the User. |
|
|
Allows the User to reply to a Note within the Notes Editor screen. |
|
|
Email saved Notes and login credentials to a Customer/User. |
|
|
Displays Solution Article screen when clicked within the Summary tab of a request that has an assigned Solution. |
|
|
In the Analysis tab, assigns a Solution Article to a request. |
|
|
In the Analysis tab, converts a Solution associated with a request to a Knowledge Base Solution Article. |
|
|
In the Analysis tab, removes the association of a request with an applied Solution. |
|
|
Indicates a Note is private and not visible on the Customer Portal. Toggle to make Public. |
|
|
Indicates a Note public and visible on the Customer Portal. Toggle to make Private. |
|
|
Duplicate creates a copy of the request and links the copy to the original request. The User can then amend the Customer or Item details, if required. |
|
|
Opens the request details and history in a print screen. |
|
|
Allows the User to create an Alert for the request, which is then visible within the Analysis tab. |
|
|
Group requests. |
|
|
Removes a request from a group. |
|
|
Moves the request to the closed accept state and publishes the new Knowledge Base content. |
|
|
Moves the request to the KBA - Rework state and moves the related Knowledge Base content to a In Development state. |
|
|
Moves the request to the closed rejected state and moves the related Knowledge Base content to a In Development state to allow the author to delete. |
|
Item Buttons |
|
|
|
Copy selected Item details when creating a new Item. |
|
|
Allows User to update the ownership status for multiple Items in one transaction. |
|
|
Add a manufacturer or vendor. |
|
|
Information from multiple Snapshots of an Item are to be stored as a single Item record in the CMDB. |
|
|
Cancel icon upload for use in a Relationship map. |
|
|
Upload an icon for use in a Relationship map. |
|
|
Modify a manufacturer or vendor. |
|
|
Remove an owner from an Item. |
|
|
Revert an Item to a previous state. |
|
Group Buttons |
|
|
|
Add the selected request to the Group. |
|
|
Remove the selected request from the Group. |
|
|
Outputs the Change Groups List View in a Projects document format. |
|
Forum Buttons |
|
|
|
Return to the Forums list. |
|
|
Edit a Forum details. |
|
|
Returns User to topics list. |
|
|
Hides posts from the User or Customer. |
|
|
Delete a topic post. |
|
|
Move a topic post. |
|
|
Show a Topic post that has been hidden. |
|
|
Mark the current topic for quick access as a bookmark. |
|
|
Reply to a Forum topic. |
|
Reports Buttons |
|
|
|
Generate a report. |
|
Logging Buttons |
|
|
|
Enter login details to access application. |
|
|
Close out of the application. |
|
Setup Buttons |
|
|
|
Import CSV file of Items, Customers or KBAs. |
|
|
Test email and authentication server set-up. |
|
|
Re-enable a deleted Customer, User or Item. |
|
|
Synchronize the system with LDAP /AD server. |
|
|
Reset password. |
|
|
Open extended database options (i.e. Upgrade, Create and Drop options). |
|
|
Generate a script to create a new database. |
|
|
Migrate database. |
|
|
Tests the connection to the database, based on the details entered. |
|
|
Generate a script to delete a database. |
|
Customer Portal Buttons |
|
|
|
Remove content in search fields. |
|
|
Search content in search fields |
|
|
Close the request in the Customer Portal. |
|
|
Create a new Item through the Customer Portal. |
|
|
Evaluate the usefulness of an Article. |
|
|
Save a request Note. |
|
|
Cancel a request Note. |
|
|
Collapse the request View. |
|
|
Displays the contents of all Notes. |
|
|
Closes the expanded Notes read-only view. |
|
|
Add a new Note or upload an Attachment. |


1.4.12 Online Help
To assist Users when using the system, online help is available throughout the application.
To access information relevant to an opened screen, click the Help button located in the top right corner of the screen, next to the Logout button.

A Help Page is displayed containing information related to the application page that is open. Navigate through the help information as necessary, or click Show to view the entire User Guide.
1.4.13 Remember Login
The Remember login option on the Login Page allows the User to save their login details for when they next access the system. By saving login details, the User can instantly access their Home Page without repeating the login process, if they exit the system without using the Logout button. It should be noted that after 30 days, the User will be prompted to re-enter their login credentials.

To use Remember login functionality:
-
Enter User Name and Password.
-
Tick the Remember Login box.
-
Click Login.
If the User ends a session without using the Logout button, they will gain immediate access to the application when they return to the URL. To prevent the immediate login, end the session using the Logout button.
1.4.14 Working on requests
When a request is created a Customer and Item, be that an actual object or service, are associated with the request. The Customer's concern or query is classified based on a list derived from the Category and Type of the Item assigned to the request. Then based on the system configuration, the request is assigned to a Technician in a Team associated with the SLA and Workflow assigned to the request.
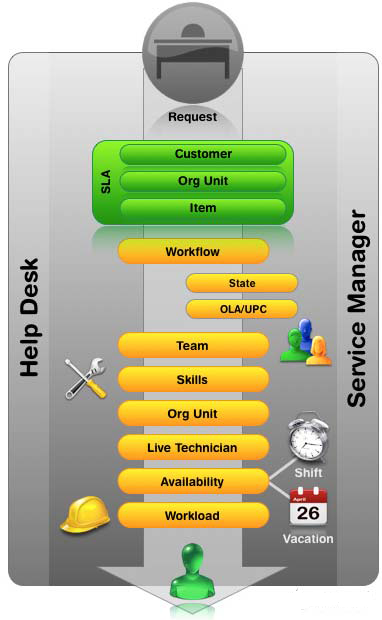
Figure 1: Request assignment logic
After the Team has been assigned to the request, the application goes through the following steps:
-
Checks if the Team has escalation layers and validates the capability of Technicians in Layer One
-
To make an assignment within the layer, the system checks if Technicians are assigned areas of specialty - Skills or Classifications. If so, the system matches the Classification of the Incident with the Classifications supported by the Technician
-
If multiple Technicians are assigned the relevant Classification, or if specific Classifications are not assigned to the Technicians within the Team, then the system verifies if Team members have been assigned to support specific Organizational Units. If so, the application will match the Organizational Unit of the Customer to the Technician
-
If the Team Live Priority feature has been enabled, the system checks for Team Technicians logged into the application. If multiple matches have been made between the Technician Skills and the Incident's Classification, and the Org Unit of the Customer and Technician, the system checks for technicians logged into the application. However, if no match is made between the Skills and Organizational Unit, it will still check for the logged in User if the Live Priority Team functionality is active
-
If there are multiple valid Technicians based on Skill, Org Unit and/or Logged In User, the application will allocate the request to a Technician with the lightest request load.
To work on a newly created or existing request, within the Summary tab you can:
To access a complete summary of Notes in one screen, along with the associated request details select  .
.