5.2 Configuration
5.2.1 Items

Configuration Items within the system are referred to as Items. Items have multiple connections with other elements throughout the application, these may include Customers, Organizational Units and Service Level Agreements. The table below outlines how Items interact with other system elements:
|
Element |
Relationship |
|---|---|
|
Customers |
Each Item must be assigned to one or more Customers who are the Owners of the Item. This Customer may be Everyone, making the Item a Global Item. Only Item Owners are able to raise requests against an Item. See Creating Items. |
|
Service Level Agreements (SLAs) |
Service Level Agreements can be linked as follows:
|
|
Teams |
Within Item Types, Default Teams are assigned to Items. When requests are raised for an Item, they will be assigned to the Default Team. |
|
Technicians |
Technicians can be associated with Skills based on Items, Item Types and Classifications. When a request is raised with the combination of Item Type and issue Classification, it is assigned to that Technician. SeeClassification Tab. |
|
Outages |
Where states in the Lifecycle of an Item Type are defined as Off-line, when an Item is in an Off-line state, it will appear in the Outages page. See Categories LifeCycle. |
An Item record consists of the following attributes:
Options available within the Items screen, include:
Filter views that are available within the Configuration>Items screen include:
|
Filter |
Relationship |
|---|---|
|
All Items |
All Items stored within the CMDB, regardless of the assigned Lifecycle State. |
|
Hardware Catalog |
All Items that use the Hardware Category Template stored within the CMDB, regardless of the assigned Lifecycle State. |
|
Service Catalog |
All Items that use the Service Category Template stored within the CMDB that are in an active Lifecycle State. |
|
Service Pipeline |
All Items that use the Service Category Template stored within the CMDB that are assigned a Pre-production Lifecycle State. |
|
Service Portfolio |
All Items that use the Service Category Template stored within the CMDB, regardless of the assigned Lifecycle State. |
|
Software Catalog |
All Items that use the Software Category Template stored within the CMDB, regardless of the assigned Lifecycle State. |
View an Item
Within the Item sub-menu option, Users can view a list of Items created within the system. To view the details of an Item, select the Item Number hyperlink and the Item Information screen is displayed. The Item Information screen includes tabs for the following information:
-
Attribute details
-
Relevant costs
-
Requests created against the Item
-
Relationships associated with the Item.
Item Information
To create an Item:
-
Select Configuration > Items
-
Click New
The Item Information screen appears
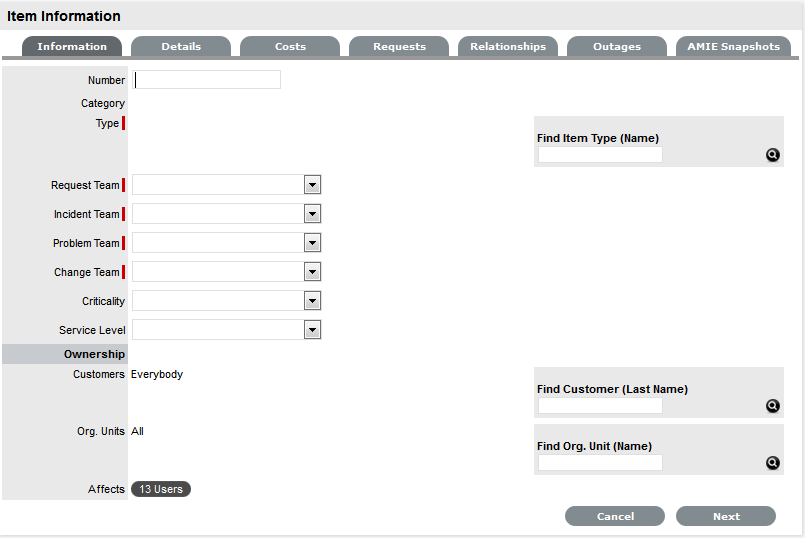
*Denotes mandatory fields.
Item
Description
Item Number*
If the Administrator has set the Item Numbers Editable option in Setup> Privileges> System to Yes, the User will have the option of entering a customized Item number. It may contain numbers and/or letters, and be between 1 and 64 characters in length.
As no two Item Numbers can be the same, the User will be prompted to change the value they have entered if it is already in use. If the Item Number field is left blank, the system will automatically create an Item Number.
If the Administrator has set the Item Numbers Editable option to No, an Item Number will be generated automatically and cannot be edited.
Category*
This is auto-filled, based on the assigned Item Type.
Type*
This is the Item Type that the Item represents. Click the Search button to view the list of available Item Types.
Team*
This is the Technician Team that will be assigned to support the Item.
Status*
Select the status from the drop-down options displayed after the Item Type has been assigned.
Criticality*
Rates the degree of importance of an Item Type within an organization. The 'Impact' of a request is initially pulled from the Criticality of the Item, but can be adjusted within the request Information screen if required. Requests logged through the Customer Portal, use the Criticality of the Item to determine the Priority of the request. (See additional information below.)
Service Level
Select the Service Level Agreement from the drop-down list, if required.
Ownership
Customers
These are the Customers who own the Item. A single Customer, a group of Customers or all Customers in the application can be assigned to an Item.
-
Enter a Customer last name, or leave blank then click the Search button to view a list of all available Customers.
-
Click on the hyperlink for the relevant Customer name or names to assign them to the Item.
If no specific Customer is allocated to the Item, it becomes a Global Item and is assigned to Everyone.
Org Units
These are the Org Units who own the Item. The Item can be assigned to one or multiple Organizational Units.
To assign an Org Unit:
-
Enter an Org Unit name, or leave blank then click the Search button to view a list of available Org Units.
-
Click on the hyperlink for the relevant Org Unit name or names to assign them to the Item.
NOTE:If Billing is enabled an owner must be assigned to the Item. The owner can be either a Customer or an Org Unit, but only Org Units that have a Primary Contact, will be displayed in the Org Unit Search list. (See: Primary Contact.)
Notification
Method
This field is visible when an active Item moves into an offline State and allows the User to define who (Primary Contact or All Owners of the Item) and how (Email or SMS), Customers will be notified that the Item is not available.
-
-
Search and select an Item Type
-
Select a support Team for each process
-
Select the Item's Status and Criticality
(Refer below for further details about Item Criticality.)
-
Assign a Service Level
If Contracts are enabled for the system, the assignment of an SLA will result in an annual service contract automatically being applied to the Item. If an SLA is not assigned, a Contract can be created for the Item within the Costs tab.
-
Search and select a Customer and/or an Organizational Unit owner
-
Click Next to view the Details tab
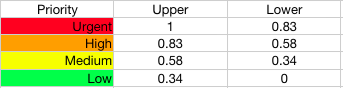
Item Criticality
The Item Criticality is used to identify the degree of importance of an Item to an Organization.
When the Incident Priority is set to Derived in the Administrator Setup, the Impact of a request is mapped from the Criticality of the Item associated with the request and then combined with the selected Urgency, which derives the Priority of the request. If required, the Impact can be manually adjusted within the request Information screen. Requests logged through the Customer Portal, use the Criticality of the Item to determine the Priority of the request, which can be manually adjusted by the Technician User.
The following table displays the calculations applied by the system to the Item Criticality, which is mapped to a request's Impact to determine a request's Priority:

The above calculations result in the following Priorities:
The Incident Analyzer, if enabled by the Administrator in Setup>CMS>Incident Analyzer, can apply the Criticality to automatically detect Problems. The minimum Criticality level can also be used to determine which off-line Items are displayed on the Outages pages, when the Outages pages are enabled by the Administrator in Setup>Privileges>System.
Create an Item with Contracts Enabled
When Contracts are enabled with Billing, Items, Customers and Organizational Units can be linked together using a service contract. To automatically apply the system default support contract when creating an Item, simply select an SLA and an annual contract is applied. However, if an SLA is not required but a service contract is, the contract can be created within the Costs tab of the Item. See:Costs Tab.
Details
Once the basic information for an Item has been completed, additional details can be defined for the Item. The Details tab displays a list of custom fields set for the Item's Category. The information to be completed within this section is configured by the Supervisor when customizing the Item Type templates in Configuration > Categories. Fields marked as Required, must be completed for the Item Details of the Item to be saved successfully.
For more information about Item custom fields, see: Categories.
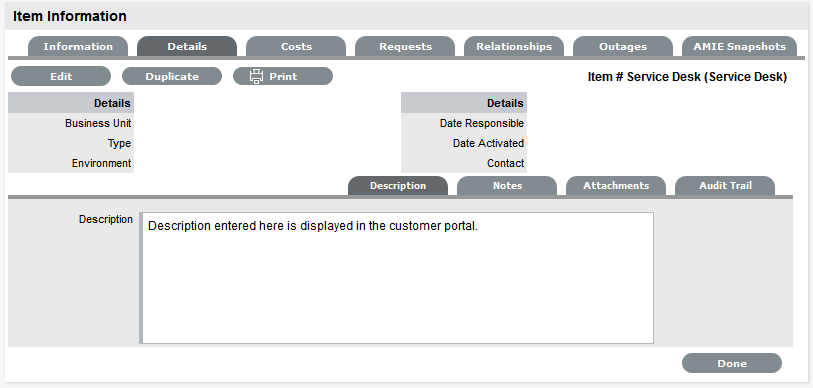
Clicking Save at the far bottom of the page after the Details tab has been completed, will create the Item and save it to the database.
NOTE:Items can be duplicated at any time by clicking the Duplicate button. A new Item is created with properties that are identical to the original Item (with the exception of the Item Number, as this must be unique and is generated automatically).
Item Description
Content entered in the Description field is made available on the Customer Portal in the expanded information window of an Item. For Service Items included in the Service Catalog tab of the Customer Portal, information about the Service can be included within the Item Description field. The Service Item information can be further defined by completing Item attribute fields that are configured as Customer Visible within the Category Information screen, and therefore also displayed in the Customer Portal.
To add an Item Description, within the Item's Details tab:
-
Click Edit
-
Move to the Description tab
-
Add information in the Description field
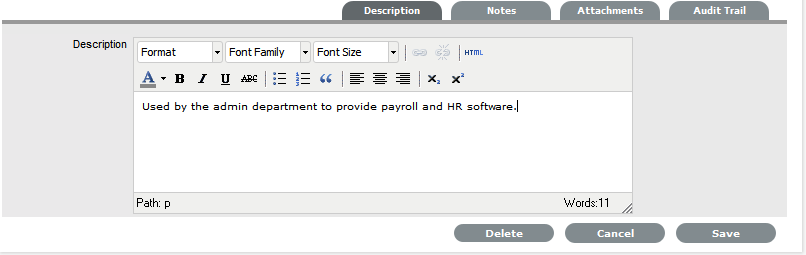
-
Click Save.
Item Notes
To add Notes to an Item, under the Item's Details tab:
-
Click Edit
-
Select the Notes tab

-
Click New
-
Enter details in the Notes field
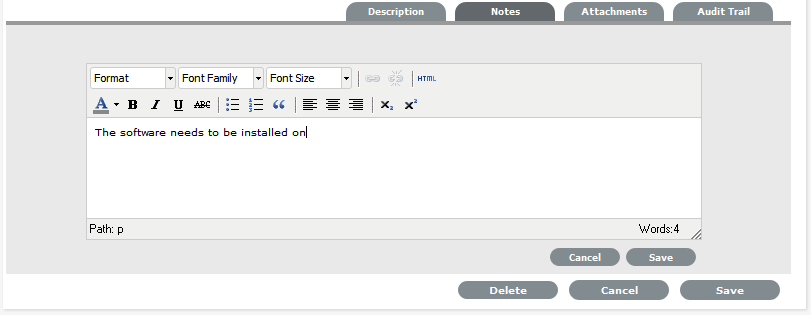
-
Click Save.
The Note will be allocated an identification number hyperlink for access. It will also be time- and date-stamped.
Item Attachments
To add Attachments to an Item, within the Item's Details tab:
-
Click Edit to display the Attachment tab New button
-
Click New

-
Browse and select a file
-
Enter a Description, if required
-
Adjust Private and Public option, if relevant
Selecting Public will make it accessible on the Customer Portal, when the Item is in a Customer Visible state.
-
Click
 .
.
Item Audit Trail
The Audit Trail tab records all changes that are made to fields within the Item Information and Details screens. These entries are made to record all the alterations made to Items and the CMDB.
To view an audit trail entry, under the Item Details tab:
-
Select the Audit Trail tab
-
Click on the identification number hyperlink to display the entry details.

Rollback Option
All changes recorded in the Audit Trail can be rolled back to reinstate information recorded against an Item.
To return Item details to previously saved information:
-
Click Edit
-
Select the identification number hyperlink of the entry to be reversed
-
Click the Rollback button
-
Save the Item.
The Item details will revert to information recorded before an update was made.
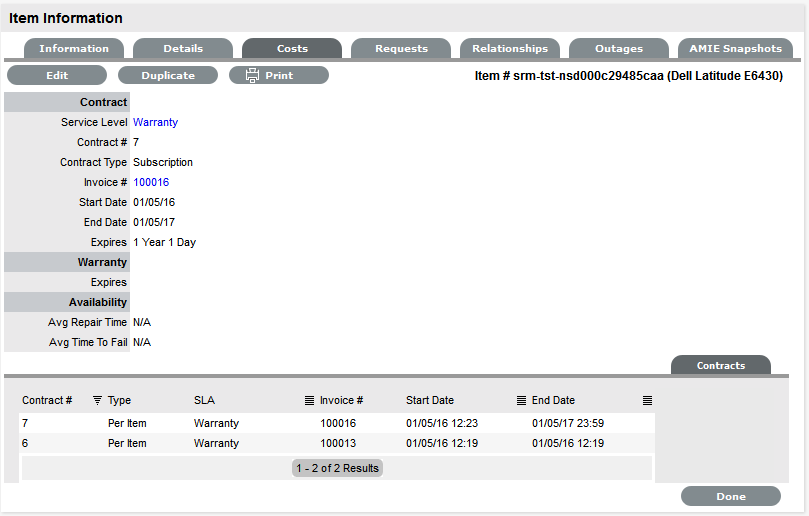
Costs
For Users who are not assigned the Finance Role, the Costs Tab displays SLA Details and Item Availability information. Users who are assigned the Finance Role, also have access to the Item's financial and contractual details. The following Item Costs details include:
-
Base cost
-
Purchase date and related information
-
Depreciation data
-
Inherited costs
-
SLA and Contract details
-
Availability statistics.
Completing the Depreciate Over field causes the application to automatically keep track of the Item depreciation over the specified number of years. The current value of the Item after depreciation is displayed at Depreciated Value. The Audit Date field is used to record the date when the Item was last audited.
For Service Items see: Service Item Costs Tab
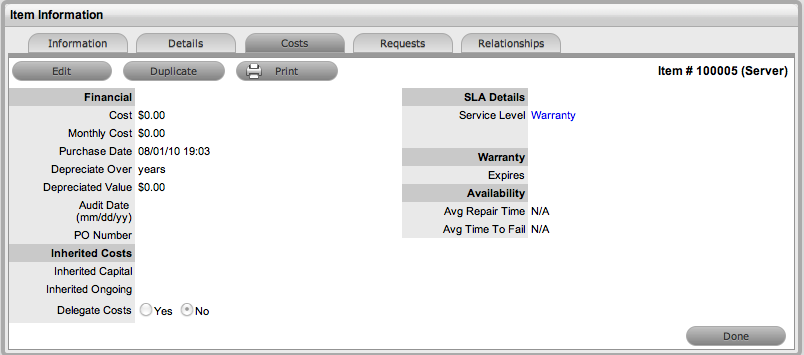
The Financial Costs and Inherited Costs fields allow the support organization to assign costs across related Items and charge Users and/or Organizational Units appropriately.
|
Financial |
Description |
|---|---|
|
Cost |
The financial investment made to purchase the Item. This figure is also used when the Delegate Costs is enabled for allocating costs across related Items. |
|
Monthly Cost |
The amount invested on a monthly basis to maintain the running of an Item. This figure is also used when the Delegate Costs option is enabled for allocating costs across related Items. |
|
Purchase Date |
The date the Item was purchased. |
|
Depreciate Over |
Enter the number of years the Item is to be depreciated over, if required. |
|
Depreciated Value |
The system calculates the current value of the Item based on the Purchase Date and the number of years the Item is to be Depreciated Over. |
|
Audit Date |
Set the date the Item is next to be audited. |
|
PO Number |
If Purchase Orders are enabled for the system, the field is visible and automatically populated with the PO number generated by a User within the Finance>Purchase Orders tab, when the Item order was recorded in the system. |
|
Inherited Costs |
|
|
Inherited Capital |
Total infrastructure costs of parent CI's that directly contribute to the cost of the current CI. This figure is derived from all the Cost fields within the Item Information>Costs tab of related Parent Items. |
|
Inherited Ongoing |
Running costs of all associated Items that enable the current CI to continue to function. This figure is derived from all the Monthly Cost fields within the Item Information>Costs tab of related Parent Items. |
|
Delegate Costs |
To enable cost delegation across the relationship map allowing associated Items to inherit the costs of the current CI, select Yes. This will take the figures from the Cost and Monthly Cost fields for the Item and spread them across related Child Items. Define the technique to be used to evaluate the cost split: Child Count:Costs are split by percentage based on the number of child CI's the costs are being delegated across. User Count:Costs are split proportionally based on the number of users of the child CI's the costs are being delegated across. Custom %: The relationship itself allows for the % cost to be assigned |
The figures displayed within the Availability fields are automatically calculated by the application, using the Item Lifecycle as it moves between online and offline States:
|
Availability |
|
|---|---|
|
Avg Repair Time |
Entries displayed here are automatically calculated based on the average length of time an Item is offline. |
|
Avg Time To Fail |
Figures displayed here are automatically calculated based on the average time between an Item being offline. |
Billing Enabled
When Billing is enabled, a Service Level hyperlink is available within the Costs screen. This provides access to the Service Level Agreement details that govern the lifecycle for Requests logged against the Item.
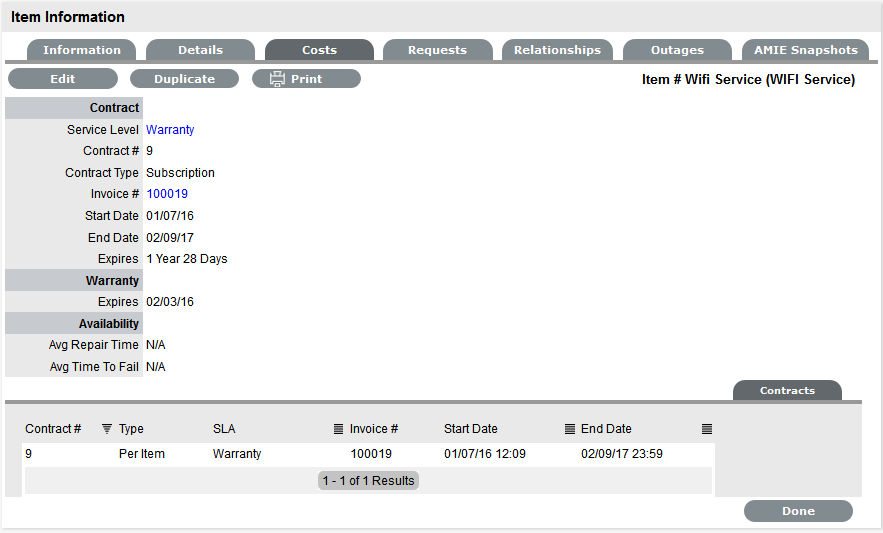
If Invoices are also enabled, an Invoice Number hyperlink is available and when selected, will display the invoice details for the Contract that covers the Item. The Start Date and End Dates stipulate the contract length covered for the Item. It is summarized by the days or hours recorded in the Expires field.
The Contract tab within the Item Information Costs tab summarizes the contract details that cover the Item. Further Contract details can be found within the relevant Contract Number within the Finance>Invoices screen.
Create a Contract
Through the Item Costs tab, Contracts with an associated Invoice Number (if relevant) can be generated for an Item, after it has been logged in the system.
To add a Contract to an Item, within the Configuration>Item screen:
-
Select the Item Number
-
Move to the Costs tab
The Contracts tab is visible in the bottom right corner of the screen
-
Click Edit
The Add and Delete buttons are made available within the Contracts tab

-
Click Add
(If Invoices are enabled in the system, an Invoice number will be automatically generated and assigned to the Contract).
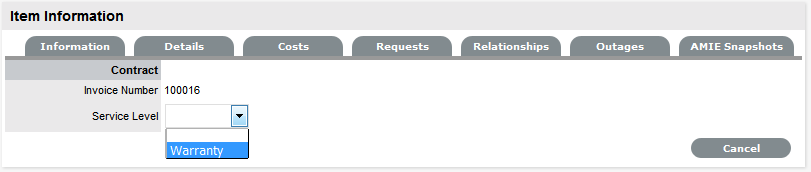
-
Select an SLA from the drop-down option
The screen will display the SLA details and the Contract Type locked to Per Item.
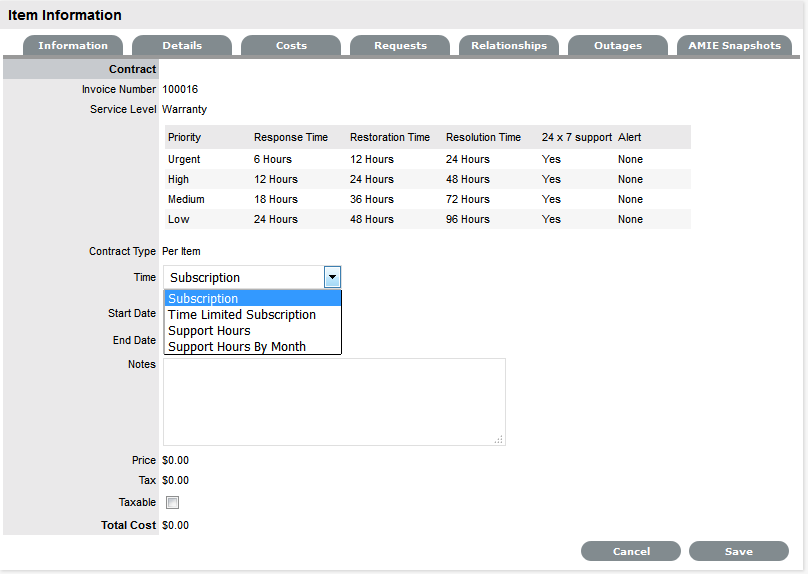
-
Assign the Time period to be covered by the Contract:
If Subscription is selected, the Start and End Dates are automatically completed by the system, but can be edited if required.
If Time Limited Subscription is selected, the Support Hours field is displayed and the number of support hours purchased by the Customer should be entered. Also, the Start Date and End Date fields should be completed manually, entering the length of time for the subscription period.
If Support Hours is selected, the number of support hours purchased by the Customers should be entered.
If Support Hours by Month is selected, set the number of hours purchased per month and define which day of the month contract is to rollover to start the new month. The Total Support Hours will automatically be calculated based on the Start and End Dates set for the Contract.
(If a Contract is forward dated with a Start Date set in the future, the Pending Contract status is assigned. See Pending Contracts.)
-
Add any relevant Invoice Notes
-
Check the Taxable box, if the Contract is to be taxed
-
Click Save.
If Invoices are enabled in the system, an Invoice number will be automatically generated for the Contract and made available within Finance>Invoices. Payment will need to be processed by a Finance User before the Contract can be enabled in the system. If invoice payment is required before the contract can be enabled in the system the following Warning message is displayed:

-
Click Next
The Contracts information is only populated after the Invoice has been processed. To process the Invoice, as a Finance User move to the Finance>Invoices tab. Once the relevant Invoice payment has been processed the Contract details will be visible in the Costs >Contracts tab.
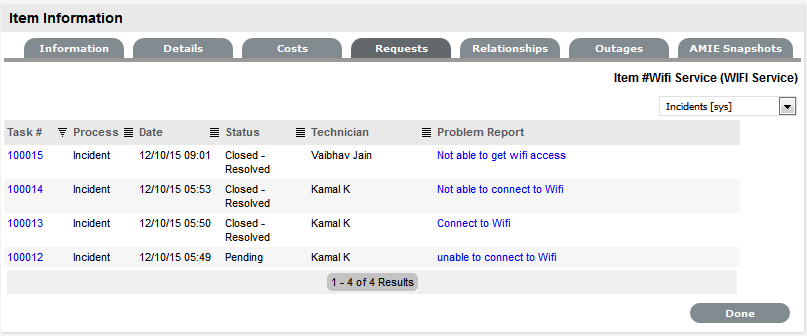
Requests
This section lists all the requests that have been logged against an Item.
Use the system list filter to display the relevant type of request or task. To expand and view the request in full, select the Task # or Problem Report hyperlink.
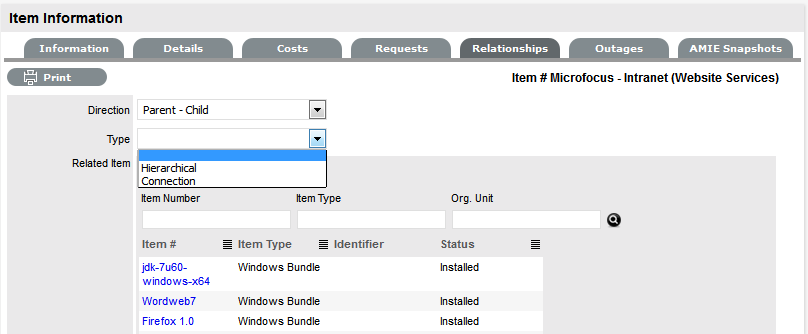
Item Relationships
This Relationship Tab allows Users to view and/or create a Relationship Map for the current Item, with other Items within the CMDB.
The Relationship direction can be defined as:
-
Service Oriented - Parent-Child Relationship
-
Component Oriented - Child-Parent Relationship.
Within each view the Relationship Class can be defined as:
-
Hierarchical Relationship
-
Connection - an association between the selected Items.
For a Service, such as the Email or Web Site Service, it is recommended that the Hardware be defined as the Parent for the Software Items and the Software be defined as the Parent of the Email or Web Site Service.
Create a Relationship
To create a new Item Relationship:
-
Select Configuration>Items
-
Select an Item
-
Select the Item's Relationship tab
-
Click Edit
-
Click New
-
Select the Relationship Direction and Class from the drop-down menus
-
Define the Relationship by selecting a description from the drop-down list
NOTE:If the Relationship Type has the Inherit Parent Ownership option enabled, Child Items that use this relationship will inherit the Parent Item's owners. The ownership will not be editable and no other Parent Item can be assigned to the Child Item. A warning will be displayed if a relationship type has the Inherit Parent Ownership option enabled.
-
Use the Find Item field to locate the relevant Item
-
Click on the Item Number hyperlink to create the Relationship
-
Click Save to default to the Relationship Map view.
Relationship Map
Within the Relationships tab of the Item Information screen, a Relationship Map visually displays the connections that have been defined for an Item. All Item Relationships are listed in the Relationships Table beneath the Map. The Relationship Map can display up to 48 Child Items and 16 Parent Items in the one diagram.
The central icon of a Map is a visual representation of the selected Item. Scroll over an Item label to view any information recorded on the Information and Details tabs of the Item. To drill-down through the relationships, click on an Item label. To change the focus of the Relationship Map to another Item, click on the Item label and the system will request that OK be selected before updating the central node of the Map.
The Relationship Table data displayed at the base of the map can be filtered using the Direction filter view of Parent-Child or Child-Parent.
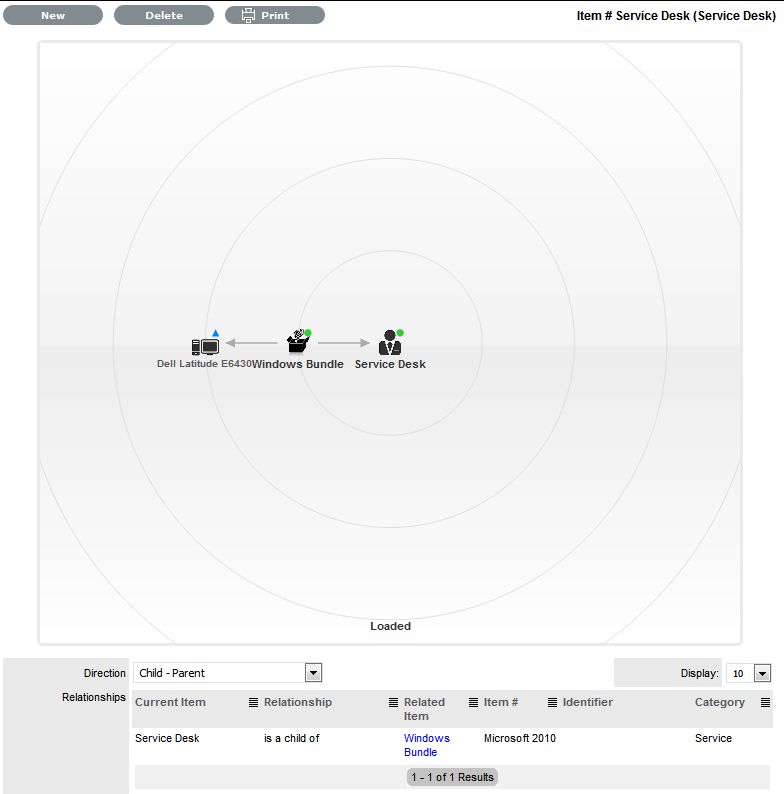
The map displays the relationship between each Lifecycle State by using different colors to represent the type of Lifecycle State.
|
Color |
|
|---|---|
|
Green Circle |
CI is assigned an online status. |
|
Red Square |
CI is assigned an offline status. |
|
Blue Triangle |
Service CI is assigned a pre-production status. |
The Lifecycle State name can be accessed by scrolling over the Item icon within the Map.
To delete a Relationship:
To remove the Relationship between Items:
-
Select the relevant Item within the Configuration tab
-
Move to the Relationships tab
-
Click Edit
-
Select Delete
A table with the Relationship details is displayed.
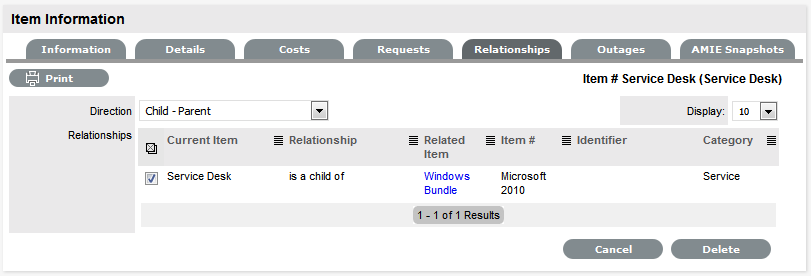
-
Select the Relationship Direction to display the relevant Relationship table
-
Mark the checkbox next to the Relationship that is to be removed
-
Select Delete
-
Click Done to return to the Item list.
AMIE Item Imports and Relationships
Items with Item relationships that have been imported using the AMIE engine, retain the relationships that exist within the Asset Management Tool. A visible map of the relationships is recorded within the Relationships tab.
Outages
Planned outages can be created for an Item under the Outages tab. This is a period of time an Item will not be available for a Customer's use.
If an Item has an SLA with a specified Blackout Period, Outages should be planned to fall within this time. The Blackout Period is an agreement between the Customer and the Service Desk regarding a period of time when the Customer has no service expectations. This can also be the preferred time for Item upgrades and maintenance without affecting service availability.
When an Outage is being created, the Blackout Periods times are displayed to ensure the User creates a new Outage that does not breach the Item's SLA.
Creating an Outage
To create an Outage:
-
Select Configuration > Items
-
Select the Item Number
-
Go to the Outages tab
-
Click Edit
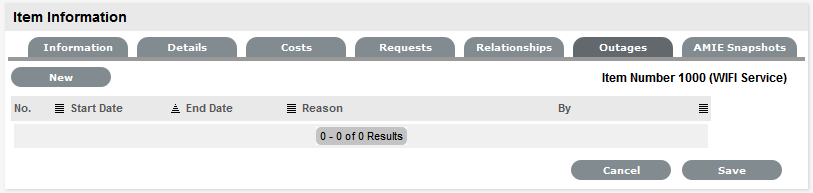
-
Click New
The screen will expand to display the Outage Editor screen including the Blackout Period, if defined for the Item associated SLA.
Planned Outages
Details
Description
Interval
Select One Time if the Outage is a one off, or set regular outages based on a weekly or monthly basis.
Start Date
Select the Start Date within the calendar, and modify the Time accordingly inside the calendar pop-up.
End Date
Select the End Date within the calendar, and modify the Time accordingly inside the calendar pop-up.
Notification
Select Email or SMS Notification about the Outage is to be sent to the Primary Contact of the Org. Unit, or All Customers/Owners associated with the Item.
Reminder
This option is displayed when a Notification is set for the Outage.
If a Reminder notification is to be applied to the Outage, check the box and define the period of time prior to the Planned Outage period that the reminder is to be issued.
Reason
Enter a description that details why a Planned Outage is being scheduled.
Within the table the Start and End Time is displayed as Local Time and Actual Time.
-
Local Time is based on the time zone of the logged in User
-
Actual Time is based on the SLA time zone.
-
-
Define the Interval for the Outage
Select One Time if the Outage is a one off, or set regular outages based on a weekly or monthly basis.
-
Enter the Outage details
Select the Start/End Date within the calendar, and modify the Time accordingly inside the calendar pop-up
-
Set the Notification method and recipients, for when the Outage is saved
-
Set Reminders, if required
Tick the Reminder Email field, if a reminder is to be emailed to defined recipients prior to the Outage time. Define the length of time before the Outage occurs that the reminder is to be sent.

-
Define the Offline Status and Online Status for the Item
These are the States the Item will be automatically assigned in the CMDB when the Planned Outage commences and ends.
-
Complete the Reason for the Outage
-
Click Save.
The Outage notification is sent to the defined recipients upon save.
-
Click Save and Done.
To view the details of the Outage, select the Outage No. link in the Outage List View.
See Outages for more information on setting up and viewing Item Outages.