Active Directory Integration
Active Directory is a unique implementation of the LDAP standard, as the requirements for communication need to conform to the various protocols. To meet this need, it is necessary to enter all domains from which Users will authenticate. Multiple user sources can be synchronized with the system, if required.
Note:
-
From ZENworks Service Desk 8.3.1 onwards, Setup > LDAP is changed to Setup > User Sources.
-
Additionally, Azure Active Directory is available as one of the user sources.
For more information on Azure Active Directory Integration, see Azure Active Directory Integration.
Configuring the Active Directory Integration
To configure the Active Directory integration:
Select
Setup>User Sources
Click
New
The User Source Configuration tab is displayed.
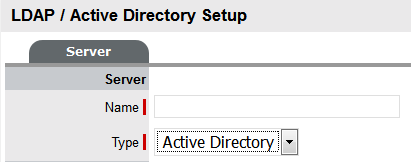
Enter
the Server Name
Select
Active Directory within the Type drop down list
Define
all the Domains from which Users will be authenticated
Domains will need to be entered in both NT and Windows 2000 domain
naming systems formats. This is because Active Directory conforms
to Microsoft™, Windows NT and Windows 2000 authentication protocols.
Make entries with care, as they are not validated against the Directory
Server by the system Domain Editor.
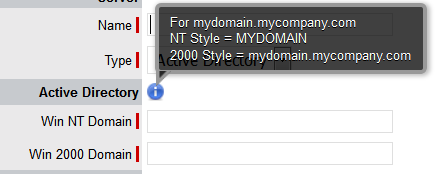
Here is
an example of both the naming conventions for the domain:
mydomain.mycompany.com
NT Style = MYDOMAIN
2K Style = mydomain.mycompany.com
Enables Import Groups, if you have configured Store and want to assign store items to an LDAP group using "LDAP Group Extension". To import LDAP Groups, select Import Groups and specify Group Admin DN, Password and Group Node/Base DN.
Click
Save
Using
the drop-down arrow, select the Default Domain, which is used in the
following three ways:
Enter
all other required fields to configure the Directory Server
Settings |
Description |
Security |
Determines how the integration layer
will authenticate. For Active Directory this should be set
to Cleartext– Username + Password. Anonymous connections
to Active Directory are rarely enabled.
When you select the Security as SSL-Anonymous or SSL-User name + Password, a certificate icon will be displayed, click the icon to view the certificate.
|
Server Host |
Enter the hostname
or IP address of the Active Directory
Server. On a Windows NT domain this will be the primary domain
controller. If you are using SSL, then you can view the server certificate by clicking on the  icon. icon. |
Server Port |
The default Active Directory Server
Port is 389. This is rarely changed. |
Username |
Used by the system to authenticate against
the Active Directory Server when reading account information.
The domain prefix/suffix will be appended, based on the default
domain, when connecting to the Server. |
Password |
Enter the Password for the Username account. |
Users Node |
The component of the base domain name
that refers to the location of the User Groups .For
example, if the location of the User Groups is the following:
ou=UserGroups, ou=MIS, dc=myoffice,
dc=mycompany, dc=com (See
LDAP/Active
Directory Advanced Settings for information on Group configuration.)
Groups must be in the default domain,
in this case myoffice.mycompany.com.
The Users Node only needs the location of the Groups within
the default domain, so the Users Node in this example will
be: ou=UserGroups, ou=MIS. |
Additional Filter |
LDAP Query In this field, you can specify an additional LDAP query to filter-out records based on specified criteria. Filter Query is applied on user attributes and will be applied only within the group names specified in the Advanced tab.
Following is an example of the LDAP Query:
(&(mail=*epm.com)(|(department=Biology)(department=Chemical)))
Note: The filter query should be standard LDAP query (vendor specific).
|
Groups |
Group Admin DN: Specify the group admin DN.
Example: cn=user, cn=users, dc=domain, dc=com
Password: Specify the password of the DN.
Group Node/Group Based DN: If this field is not specified, then it considers the value specified in Users Node/Base DN.
Note: Note: The above options are enabled only when you select Import Groups checkbox in the Groups section. This is used to assign a store item to an imported LDAP Group using the LDAP Group Extension.
|
Locale |
Default
Timezone |
Select the default Timezone to be applied
to all User accounts imported via Active Directory. |
Click
Save.
Repeat the above process to add more than one authentication server
for authorizing User access.
Test Button

The Test button creates a connection to
the Active Directory Server, applying the configuration settings. If successful,
it will attempt to determine how many Users are in each group and display
a Results Screen.
Sync Button

The Sync button runs the synchronization process to import all Users
from the Server Directory. If new Active Directory Accounts have been
created and those Users require immediate access to the system, a manual
synchronization would be used.
Only one synchronization can run at a time. When multiple Users need
access, create the accounts, then run a single manual synchronization.
A manual synchronization may take some time as it depends on the connection
speed with the external service. The manual synchronization works best
for small directories. Larger Active Directory implementations can take
some time to propagate the changes, so account information may not be
immediately available.
Imported Account Usernames
Accounts imported from Active Directory
use the UPN as the Username, as opposed to the NT style login. The domain
component of the UPN is derived from the selected domain in the popup
on the login page, which means Users need to enter their login name only
to connect to the support application.
Login details are passed directly to the
directory server for authentication and are not retained within the service
management system.
Azure Active Directory Integration
Azure Active Directory is a unique implementation of the LDAP standard, as the requirements for communication need to conform to the various protocols. To meet this need, it is necessary to enter all domains from which Users will authenticate. Multiple sources of Active Directory can be synchronized with the system, if required.
Prerequisites:
Register ZENworks Service Desk as an application with the Azure Active directory.
For more information, see Registering an Application or any documentation provided by the service provider.
Note:
While registering the application, use the following URLs as the redirect URI with Web platform:
- https://<FQDN>/LiveTime/WebObjects/LiveTime.woa/wa/oauthlogin
- https://<FQDN>/servicedesk/login
Ensure that you select platform type as Web.
Ensure that you add redirect URIs of all the public interfaces (IP or domain name) of ZENworks Service Desk.
Obtain OAuth parameters (Tenant Id, Client Id, Client Secret) from the Azure for the registered ZSD application
Provide required Azure API permissions for the registered ZSD application as displayed in the ZSD UI
Configuring the Azure Active Directory Integration
To configure the Azure Active Directory integration, perform the following steps:
Select Setup > User Sources
Click New
The User Source Configuration tab is displayed.
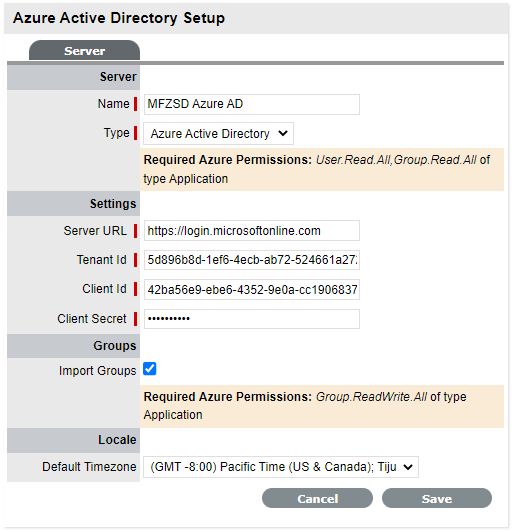
In the Server panel, specify the Server Name
In the Type drop down, select Azure Active Directory.
Ensure that you provide the User.Read.All, Group.Read.All permissions in the Application that you had created in the Azure portal.
In the Settings section, specify the following details that is obtained from the Azure portal after registering the application:
Server URL
Tenant ID
Client ID
Client Secret
Enables Import Groups, if you have configured Store and want to assign store items to an LDAP group using "LDAP Group Extension".
To additionally import groups for the store assignment, ensure that you provide Group.ReadWrite.All permissions in the application that you had created in the Azure portal.
In the Default Timezone, select the default Timezone to be applied to all User accounts imported via Active Directory.
Click Save
Test Button
The Test button creates a connection to
the Azure Active Directory Server, applying the configuration settings. If successful,
it will attempt to determine how many Users are in each group and display
a Results Screen.
Sync Button
The Sync button runs the synchronization process to import all Users
from the Server Directory. If new Azure Active Directory Accounts have been
created and those Users require immediate access to the system, a manual
synchronization would be used.
Only one synchronization can run at a time. When multiple Users need
access, create the accounts, then run a single manual synchronization.
A manual synchronization may take some time as it depends on the connection
speed with the external service. The manual synchronization works best
for small directories. Larger Azure Active Directory implementations can take
some time to propagate the changes, so account information may not be
immediately available.
Login
After successful configuration and import of user account, user can log into ZSD by providing their complete username. Click Login with Azure, you will be redirected to the Azure portal to complete the login process. After successful login, you will be redirected back to the ZENworks Service Desk portal.
Note: After successful login, ZENworks Service Desk will maintain its own session and will not depend on Azure session. Hence, Logging out from ZENworks Service Desk will not log you out from Azure.