
The Knowledge Base consists of Articles submitted by Users with Knowledge creation and publication rights. It is also the repository for Solutions, Backout Procedures, Workarounds and general information. Customers and Users can search Articles to find resolutions to common issues in order to handle the support load efficiently.
Following are some of the important sections in this page:

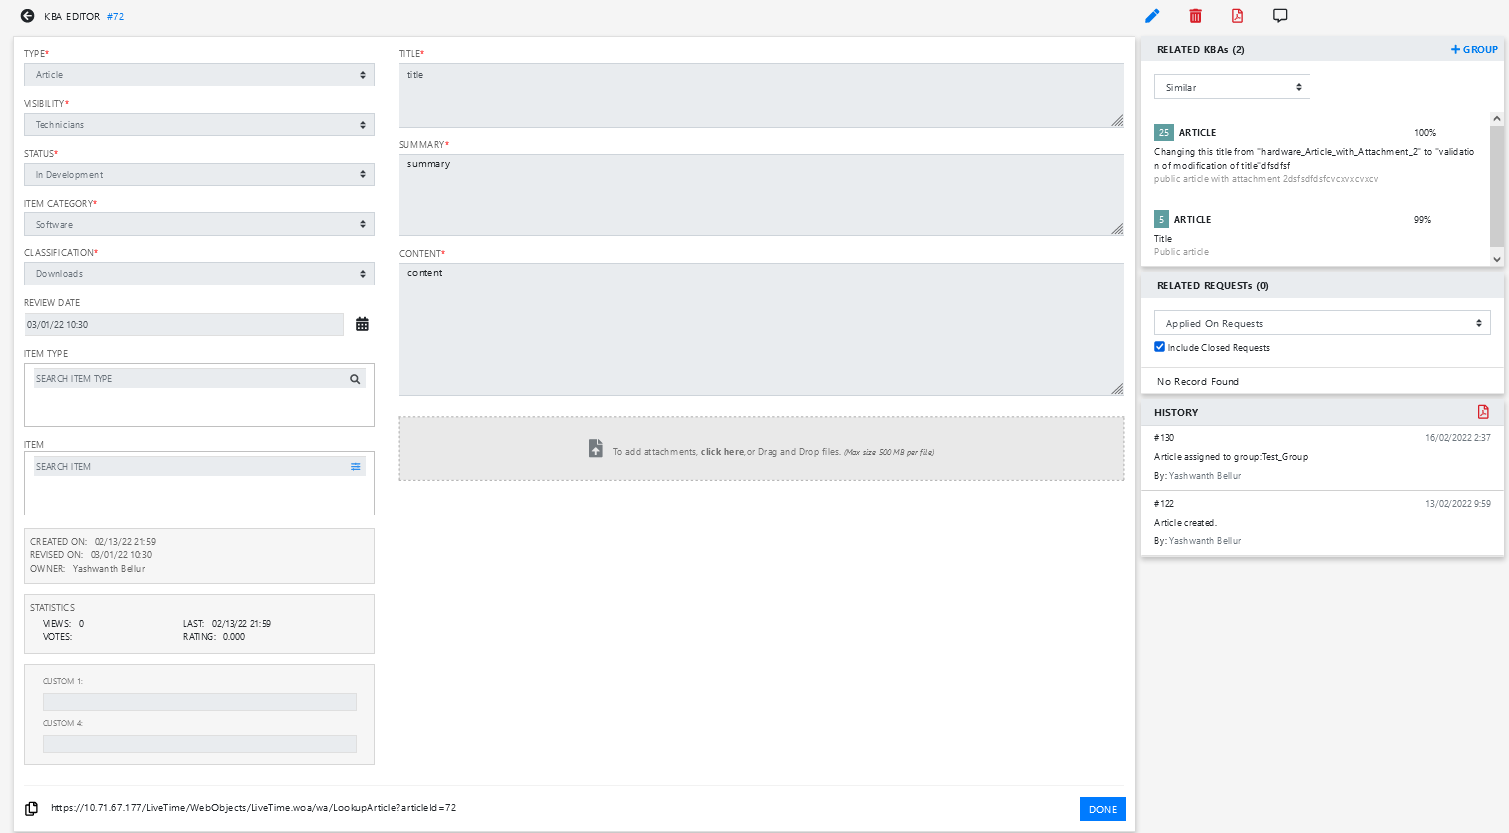
To create a new Article or FAQ, perform the following steps:
Click the ![]() icon at the bottom of the page.
icon at the bottom of the page.
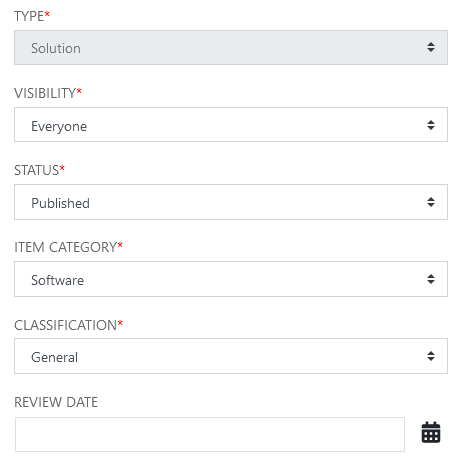
On the left-hand side, in the TYPE field, select the Article Type - Article or FAQ
Select the degree of public visibility from the Visibility drop-down menu
Visibility Options |
Description |
Technicians |
Accessible to all technicians |
Technicians & Customers |
Visible to technicians and Customers logged into the application. |
Everyone |
Available publicly, without logging into the system. |
Select the Status of the Article from the drop-down menu options, as follows:
Status |
Description |
In Development |
The Article is under development and
is not accessible via a Knowledge Base search. |
Pending Publication |
The Article has moved from development
but requires approval before it is accessible via a Knowledge
Base search. |
Published |
The Article has been approved and is included in a Knowledge Base search. |
Archived |
The Article is no longer accessible in the Knowledge Base. Users can search on Archived content and return to a Published state, if required. |
Select
an Item Category
The Item Type search box and Classification list is displayed.
Assign the Classification for the Article from the drop-down options
Set
the Review Date
This option is displayed if Review KBA is enabled within Admin>Setup>Privileges>System.
If the Review Date field is left blank, it will be auto-completed
based on the system Setup. To remind Users to review article content,
an alert and email will be sent to the author of the Article based
on the number of days set for the Review KBA Alert in the system Setup.
If the User is no longer active in the system, the reminder will be
sent to the Supervisor of the User.
Select at least one Item Type or Item.
An item type must have an item associated with it for there to be visibility for the knowledgebase articles created within Service Desk.
Enter a Title, Summary and Content for the Article
If required, you can add an attachment.
Click Create.
To View the Knowledge Base details, click the required KB ID. The following details are displayed in the Knowledge Base details page:
To edit a Knowledge Base, click the ![]() icon.
icon.
User who has created the article, or users with Edit privilege can modify the content of an Article.
When the Control KBA via Request option is enabled and published KBA content is edited, a request for approval will automatically be generated when the edited content is saved. However, until the request is approved, the Article retains its published state and displays the pre-edited content.
Users are designated editing rights within the User Information screen.
Users that have the Delete privilege can
delete a published Article by clicking its number in the Articles list
and Clicking the ![]() button.
button.
When the Control KBA via Request option is enabled and a published KBA is marked for deletion, a request for approval is automatically generated. However, until the request is approved, the Article remains accessible in the Knowledge Base.
Users are designated deleting rights within the User Information screen.
A Direct Link field is displayed when an
Article is published and has the visibility defined for Technicians &
Customers or Everybody. This
link can be sent to system Users as a means of providing instant access
to the Article. Click the ![]() icon to copy the link.
icon to copy the link.
For each Article, the Statistics field shows:
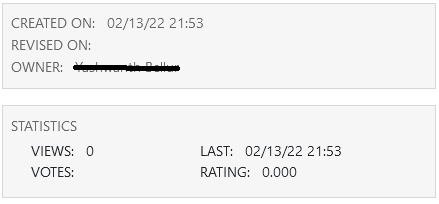
when an Article was created
when an Article was last reviewed
the number of times it has been viewed
the date an Article was last viewed
an
average rating score.
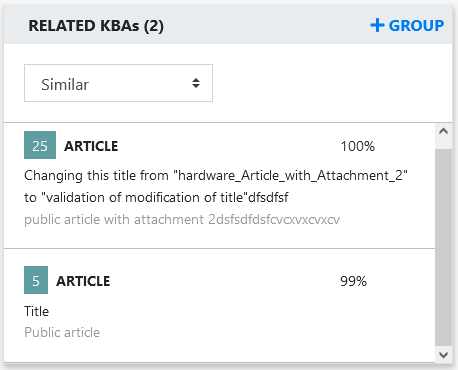
The Related KBAs lists Similar Articles/FAQs and the percentage of relevant text contained in the Article. To view the content of KBAs, click the ID.
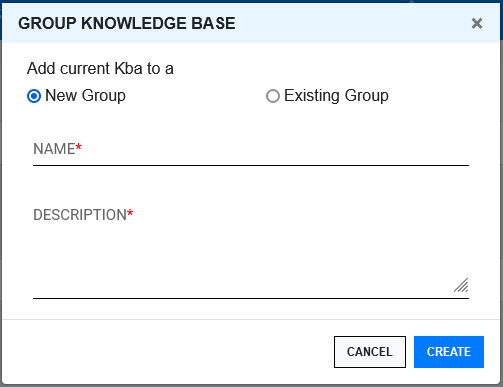
In this panel, you can group the current KBA with other KBAs. To group, click +GROUP, and then add the current KBA to a new group or an existing group.
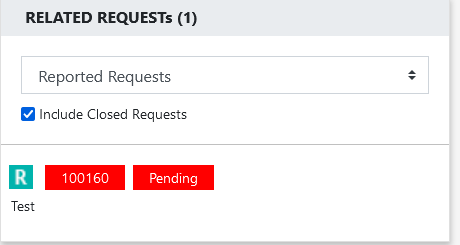
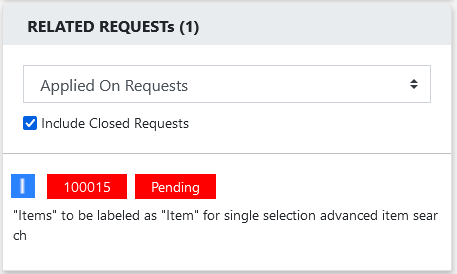
The Related Requests lists the requests on which this KBA was implimented. The following are the available options:
Applied on Requests:
Reported Requests:
RFC Requests:
When a Solution or Workaround is assigned within a request, the Article editor will display an additional tab, called Requests. This tab will list all the requests that have been associated with the Article.
Files can be attached to the Article either by draging and droping the required file, or by clicking inide the Attachments panel.
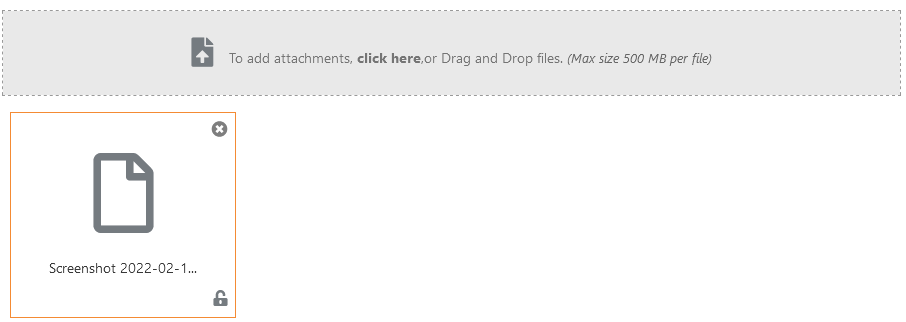
To delete an attachment, click the remove button.
To view the historical changes of a Knowledge Base Article, select the History tab inside the Article editor. The History is an audit trail of the Article, recording all activities from creation to publication of the Article. If changes are made to the Article a historical entry is recorded, and displayed with a Rollback option. This option allows the Article to be returned to a previous state, if the change is not required or permitted.
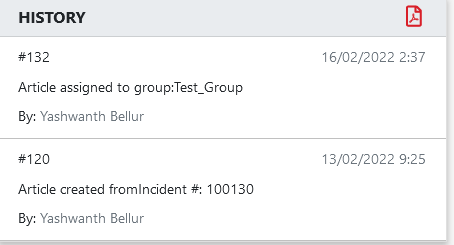
You have an option to export the article history into a PDF file. To export the data, click the PDF icon.
By setting the status of a newly created Article to In Development the Article can be held in the author’s Development list until it is ready to be published.
When it is ready to be published, the author can move the Article status to Pending Publication. Articles with a status of Pending are accessible in the Pending Articles filter of the Knowledge Base.
Articles are made available for reference in the Knowledge Base when they are assigned a Published status.
When the Control KBA via Request option is enabled in the Setup>Privileges>Request tab, Knowledge Base content with a Pending Publication status automatically generates a request that requires approval by Users with publishing privileges before the content is accessible in the Knowledge Base. (See: KBA Content Approval)
Users are designated publishing rights within the User Information screen.
When the Review KBA is enabled within Admin>Setup>Privileges>System each new KBA is created with a review date. If the Review Date field is left blank at the point of creation, it is auto-completed based on the system Setup. Article authors are sent an alert and email reminding them to review content when the reminder Alert date is triggered.
To review an Article, within the Knowledge Tab:
Open the relevant Article
Click the ![]() icon
icon
Update content in the relevant fields
Click Review
Complete the Next Review Date field, or leave blank for the system to auto-populate the field based on system settings
Click Save
Click Done.
When the Control KBA via Request option is enabled in the Setup>Privileges>Request
tab, Knowledge Base content with a Pending Publication status automatically
generates a request that requires approval by Users with publishing privileges
before the content is accessible in the Knowledge Base. (See: KBA
Content Approval)
To re-index the Knowledge Base requires the Administrator go to the Setup> Privileges>System tab and click on the Re-Index button. The size of the Knowledge Base will affect the length of time this process takes, so consider selecting a time that is suitable for all Users of the application.
The privilege to create, edit, delete and publish Articles is defined for Users within the User Information screen.
For information regarding the implementation of the Knowledge Base content approval process, see: KBA Approval Process.
To enable comments section, Go to Setup, click Setup > privileges > System > Enable KBA Comments.
To add a comment in the Knowledge Base, open the knowledge base, click the ![]() icon.
icon.
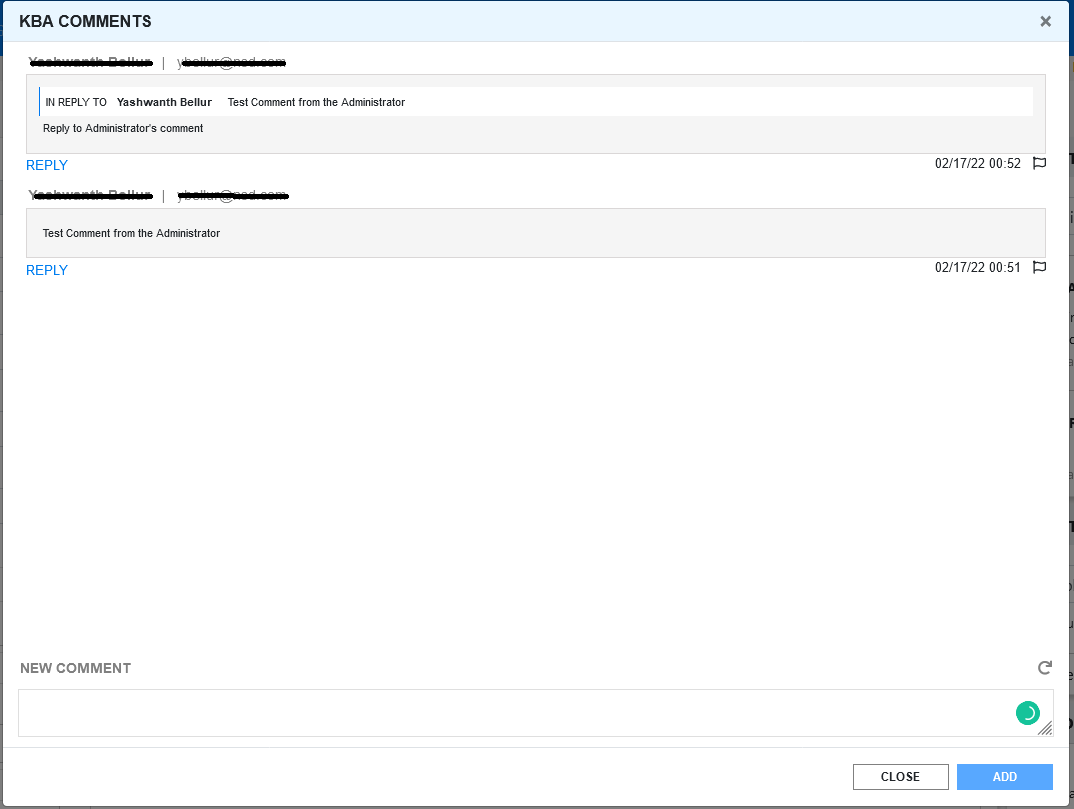
In the comments pop-up, specify the required comment in the New Comment text box, and then click Add.
You can also reply to the previous comments. You can also mark the comment as inappropriate (irrelevant) by clicking on the flag icon beside the comment. Only owner of the KBA can mark the comment as inappropriate.