B.1 Using the Migration Utility to Configure Migration Options
You can use the Options windows of the Migration utility to configure certain options before migrating objects to ZENworks Configuration Management To launch the Options window, click  on the top right corner of the utility.
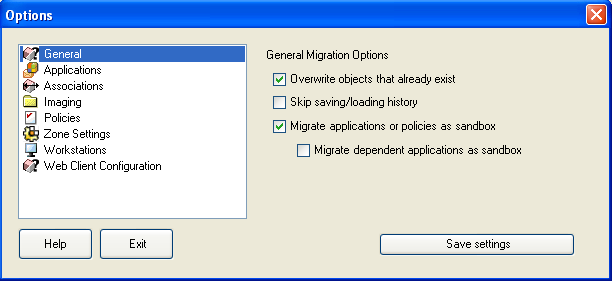
Figure B-1 Global Migration Options
Review the following sections for more information on the configuring the migration options by using the Migration Utility:
B.1.1 General
When you are migrating an object that already exists in ZENworks Configuration Management, you can use the option to cause the latest object being migrated to be used instead. The existing object is overwritten with the new migration object in the ZENworks Configuration Management database.
NOTE:If you choose to remigrate an application to ZENworks Configuration Management with the option enabled, you must ensure that the version of the application you want to remigrate is higher by one than the version of the existing ZENworks Configuration Management bundle. This is required to avoid inconsistent results on the managed device when the bundle is assigned to it.
The option allows you to dramatically improve performance on large migrations by not storing the local history.
The option enables you to migrate applications or policies as Sandbox. This option is selected by default. If you want the migrated applications or policies to be available to the assigned users or workstations, you must publish the Sandbox.
The option enables you to migrate the dependent applications also as Sandbox.
|
Task |
option is deselected |
options is selected |
|---|---|---|
|
Migrating applications or policies that have not yet been migrated to the destination zone. |
The applications or policies are migrated with the same version to the destination zone. |
The applications or policies are migrated as Sandbox versions. If you choose to publish the Sandbox in the destination zone, the published object (application or policy) has the same version that it had at the time of migration. Select the option to also enable the dependent applications of the migrating application, to be migrated as Sandbox. |
|
Migrating applications or policies that have already been migrated to the destination zone and a published version of the objects (applications or policies) exist in the destination zone. |
The objects (applications or policies) are migrated as new versions of the objects with a version number incremented by one from the latest published version of the object in the destination zone. |
Sandbox versions of the objects are created from the latest published version of the objects (applications or policies) in the destination zone. Select the option to also enable the dependent applications of the migrating application, to be migrated as Sandbox. |
|
Migrating applications or policies that have already been migrated to the destination zone and a Sandbox version of the objects (applications or policies) exist in the destination zone. |
The migrated objects (applications or policies) overwrite the existing Sandbox versions in the destination zone and publish them as new versions of the objects with a version number incremented by one from the latest published version of the object in the destination zone. |
The migrated objects (applications or policies) overwrites the existing Sandbox versions of the objects. You can choose to publish the Sandbox versions. Select the option to also enable the dependent applications of the migrating application, to be migrated as Sandbox. |
B.1.2 Applications
The option forces application migration when the utility fails to migrate one or more attributes to the MSI.
An MSI bundle is considered to be failed when a warning is produced while converting an AOT Application object to an MSI. These bundles can often be migrated successfully in spite of the warning. For example, the warning might be produced because a Windows shortcut link contained in the AOT is no longer valid.
If you enable this option, the warning messages are not presented. You can review the migration log for information on what attributes were not migrated.
The option means the application is created and migrated, but the directory holding the temporary files and new MSI file is not automatically deleted. This allows you to have access to the newly created MSI before it is incorporated into the content service in Configuration Management.
The option lets you upload content to the content server. This option is selected by default.
The applications are migrated as Install MSI action to the ZENworks Configuration Management server and also uploaded to the content server if the option is selected and the source path of the file is resolved to a local path or UNC path at the time of migration.
The applications are migrated as Install Network MSI action to the ZENworks Configuration Management server and are not uploaded to the content server in the following scenarios:
-
The option is deselected.
-
The option is selected but the source path of the file is not resolved to a local path or UNC path at the time of migration, or the file is not found.
The option lets you migrate the distribution options in applications as individual actions such as Edit INI action, Registry Edit action, or Run Script action that can be edited. By default, it is selected. Deselect the option to migrate the distribution options in applications as MSI.
If the option is enabled, then the applications are migrated as specific actions:
-
An application having registry changes is migrated as a bundle with Registry Edit action.
-
An application having INI settings is migrated as a bundle with an Edit INI File action.
-
An application having text file changes is migrated as a bundle with an Edit Text File action.
-
An application having icons or shortcuts is migrated as a Windows bundle with a Run Script action or File Removal action.
-
An application having application files changes is migrated as follows:
-
Files as Copy Files or Install Files action.
-
Directory as a Copy Directory, Install Directory, or Create/Delete Directory action.
-
Deletion of files as a File Removal action
-
Deletion of directory as a Create/ Delete Directory action.
-
If the option is disabled, then the application is migrated as an Install MSI action. But, the Edit Text File action, Copy Directory, Install Directory, File Removal are not a part of this Install MSI action.
The option allows you to place the temporary migration files in a different location than the default users %TEMP% directory. If you migrate an application with a very long path (longer than 256 characters), this option enables you to make the temporary path short, such as c:\temp.
B.1.3 Associations
The option prompts for redirection to the appropriate migration task when you migrate the associations for an object that is not yet migrated. After migrating the object, you can return to and click to resume migrating the associations. This option is useful if you are migrating just a few items and want to deal with association failures on the spot. If you want to perform an unattended migration, do not select this option.
The option enables you to specify the context to search for the matching entities in the destination user source during migration of the groups and container associations. If you do not specify the context, then the search is performed in the entire destination user source.
For example, if the destination user source is migration.orgunit.org.com and you specify the context as OU1/OU2/users, the utility looks for matching entities in migration.orgunit.org.com/OU1/OU2/users.
If you do not specify the context, the search is performed in the entire destination user source, which is migration.orgunit.org.com.
B.1.4 Imaging
When you are migrating an image object whose image file already exists in the content server, you can use the option to overwrite the image file. This option is disabled by default.
B.1.5 Policies
When you are migrating Launcher Configuration settings from Novell eDirectory, select the option to convert the settings into a Launcher Configuration policy in Configuration Management. During migration, an assignment from the identity object to the new Launcher Configuration policy is automatically created unless you turn off this function in the Options dialog box by selecting to skip the assignment.
B.1.6 Zone Settings
No global migration options are currently defined for Management Zone settings.
B.1.7 Workstations
No global migration options are currently defined for workstations.
B.1.8 Web Client Configuration
allows you to configure the settings for uploading files to the content server.
The option uploads data in chunks.This option is selected by default. Migration might fail when a proxy is enabled on the device hosting the migration utility. To perform the migration, disable the option.
The option establishes a persistent connection with the ZENworks Configuration Management Server.
The option allows you specify the timeout period for the read or write operation. By default, this option is set to .
The option allows you specify the timeout period to receive the response from the ZENworks Configuration Management Server. By default, this option is set to
To restore the default settings, click