7.2 Creating a BartPE ERD
-
Add the ZENworks Full Disk Encryption BartPE plug-in to the PE Builder plug-in directory:
-
Locate the PE Builder plug-in directory.
The default directory is c:\pebuilder<version>\plugin. For example, c:\pebuilder3110a\plugin.
-
In the plugin directory, create a pe_erd directory.
The result should be a directory structure like:
c:\pebuilder3110a\plugin\pe_erd.
-
Copy all contents (folders and files) from the EN directory of the Emergency Recovery application directory created in Prerequisites to the pe_erd directory created for PE Builder.
For example, copy all contents from c:\zen_er_app\EN to c:\pebuilder3110a\plugin\pe_erd.
-
-
(Optional) Add ERI files to the PE Builder directory structure.
In order to recover a device, the Emergency Recovery application must have access to the device’s ERI file.
If you are creating the ERD to recover a specific device, you might want to add the ERI file to the ERD so that everything required to recover the device is on the ERD. If you are creating a generic ERD for use with any device, you might want to wait until a recovery situation arises with a device and then add the device’s ERI file to a USB device that can be distributed with the ERD.
For information about accessing ERI files, see Section 3.0, Retrieving ERI Files and Passwords.
-
In the PE Builder pe_erd\files directory, create an eri directory.
The result should be a directory structure like:
c:\pebuilder3110a\plugin\pe_erd\files\eri
-
Copy any ERI files to the directory.
-
-
If you are using a Windows XP CD as the source for the Windows installation files, make sure the CD is loaded in the Windows XP device.
-
Start PE Builder.
-
(Conditional) If this is the first time PE Builder has run on the device:
-
Read the PE Builder license, then click .
-
When you receive the prompt, click to skip the search and to display the PE Builder dialog box.
-
-
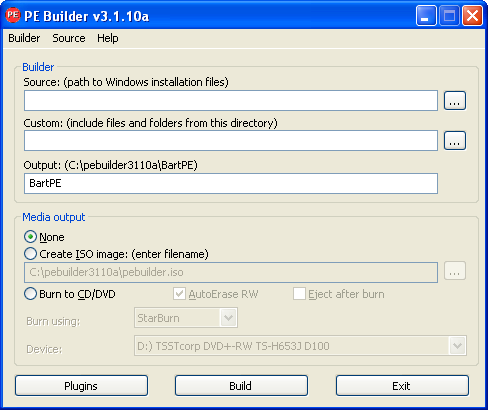
In the field, click the browse button and select the source location of the Windows installation files.
or
If you don’t know the location of the Windows installation files, click the menu, click , then follow the prompts to search for and select the Windows installation files.
-
Under , select one of the following options:
-
Create ISO image: Select this option to create an ISO image that you can burn to a CD/DVD. After you select the option, you can specify the name and target location for the ISO image.
-
Burn to CD/DVD: Select this option to burn directly to a CD/DVD. After you select this option, enable if you are using an erasable CD/DVD, leave set to , and select your CD/DVD burner in the list.
At this point, the PE Builder dialog box should contain information similar to the following example:

-
-
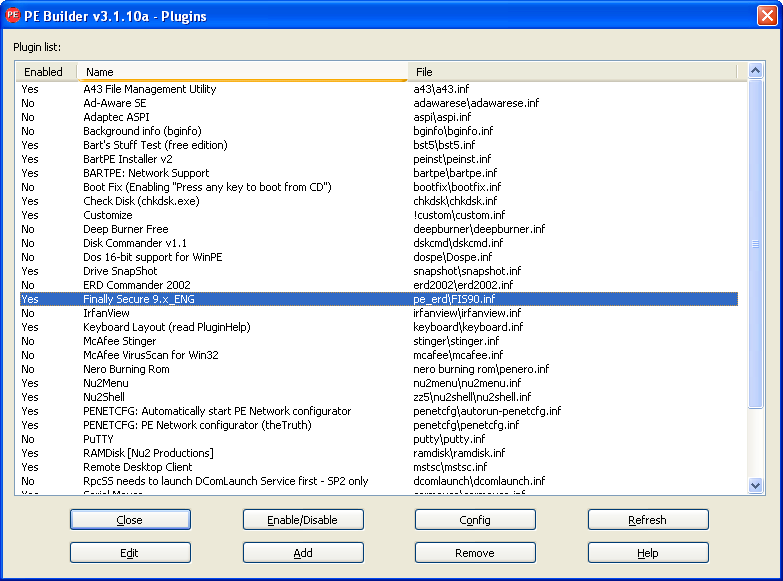
Click the button to display the Plugin list.
-
In the Plugin list, do the following:
-
Make sure the Emergency Recovery application plug-in (Finally Secure 9.x_ENG) is displayed in the list and is enabled.
If the plug-in is not in the list, exit PE Builder and repeat the steps to this point, paying careful attention to Step 1.
If the plug-in is in the list but is not enabled, select the plug-in, then click the button.
-
Click to close the Plugin list.
-
-
Click the button to start the build and open the Build dialog box.
-
When the build is complete, click to close the Build dialog box.
-
Click to close PE Builder.
-
If you created an ISO image, burn the image to a CD or DVD.
The ERD is ready to use.