Configuring the Application in eDirectory
After you have prepared the application for distribution (see Preparing a Simple Application), you are ready to create the application as an Application object in eDirectory, define its distribution rules, and associate it with users and workstations.
You can create the Application object in any container you want. Because Application Launcher accesses the object on behalf on the logged-in user or workstation, you should place it in a container whose partition (or a replica of the partition) is available to the user or workstation over a local area connection rather than a wide area connection. For more information, see Reference: Application Object Location.
To create the Application object in eDirectory and configure it:
-
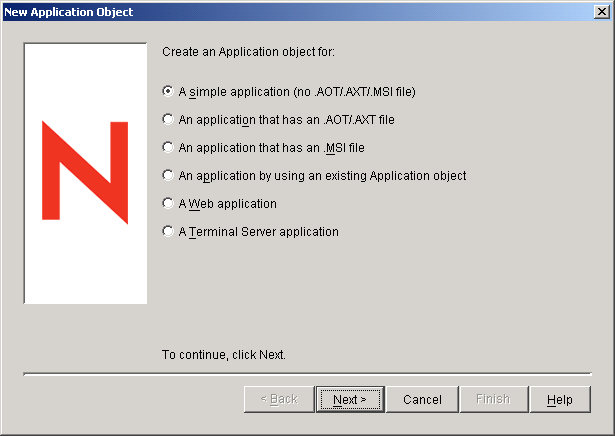
In ConsoleOne®, right-click the container where you want to create the Application object, click New, then click Application to display the New Application Object dialog box.
-
In the New Application Object dialog box, select the Simple Application (No .AOT/.AXT/.MSI File) option, then click Next.
-
In the Object Name field, type a name for the Application object.
The Application object's name must conform to the following rules:
- The name must be unique in the container.
- Special characters are allowed. However, plus (+), equals (=), and period (.) must be preceded by a backslash (\) if used.
- The following characters are valid in Application object names but are invalid when used in Windows folder and file names:
\ / : * ? " < > |
If you use these characters in the Application object name, they are replaced by an underscore (_) when displayed in locations controlled by Windows and not Novell Application Launcher (for example, on the Windows desktop).
- Uppercase and lowercase letters, as well as underscores and spaces, are displayed as you first entered them, but they aren't distinguished. For example, ZENworks_Desktop_Management and ZENWORKS DESKTOP MANAGEMENT are considered identical.
The Application object's name is visible in eDirectory. By default, the name is also used as the Application object's icon title when displayed by Application Launcher on a user's workstation. You can, if necessary, change the icon title after the Application object has been created (Application object > Identification tab > Icon page).
-
Click Next to display the Path to File field, then enter the path to the location from which the application's executable file runs.
As you specify the path, be aware of the following:
- Include the executable file in the path.
- If, as part of the distribution process, Application Launcher copies the executable file to a target directory on the workstation, specify that location as the path.
- For Application Launcher to launch an application from a network server, the workstation must have the appropriate network client (Novell Client or Client for Microsoft Networks) installed. This is because the ZENworks Desktop Management Agent and Middle Tier Server do not support opening or executing of files from a network server; only copying of files is supported. In a clientless environment, the alternative to launching the application from a network server is to have Application Launcher first copy the application files to the local workstation and then launch the application locally. For more information about file system access in a clientless environment, see File System Access Overview.
- When specifying a path to a network server, you can use a mapped drive or UNC path (with server name or IP address). If you use a UNC path and your workstations have multiple network clients, applications might launch more slowly than with a mapped drive because the Windows Multiple UNC Provider (MUP) must resolve the UNC paths to the appropriate network client. For more information, see Microsoft Knowledge Base Article Q150807.
-
Click Next, then define the rules used by Application Launcher to determine if a workstation meets the requirements for the application.
The distribution rules ensure that Application Launcher does not distribute the application to workstations that cannot support the application. For example, if the application runs on Windows 2000/XP only, you can create an operating system rule that prohibits distribution to Windows 98 workstations.
NOTE: The requirement for an operating system to be defined before an application is available has been removed.
In previous ZENworks versions, an OS platform had to be defined in the System Requirements before an application would be available for distribution and launching. This requirement has been removed.
The new behavior uses the following logic: If an application runs only on a specific operating system, define an operating system distribution rule. If an application does not require a specific operating system, there is no need to define a distribution rule. By default, applications without a defined operating system distribution rule are available on all supported platforms (Windows 98, Windows 2000, and Windows XP).
To add a distribution rule:
-
Click Add, then select the type of rule you want to define.
-
Fill in the information for the requirement (click Help for information about the requirement or refer to Distribution Rules Page), then click OK to add the requirement to the list.
If you want to create additional distribution rules for the application at a later time, you can use the Distribution Rules page on the Application object. For information, see Distribution Rules Page.
-
-
Click Next, then associate the Application object with the users or workstations that you want to distribute the application to. To do so:
-
Click Add, then browse for and select User or Workstation objects.
Each workstation that you want to associate with applications must first be imported into eDirectory as a Workstation object. If a workstation with which you want to associate the application has not been imported as a Workstation object, see Automatic Workstation Import and Removal.
You can also select Group objects, Workstation Group objects, and container objects (Organizational Unit, Organization, or Country). If you select a container object, you are given the choice of associating all the container's User and/or Workstation objects with the application.
NOTE: Associating an Application object with a Group, Workstation Group, or other container object is the preferred method of associating the Application object in eDirectory. Associating the application to a large number of User or Workstation objects (for example, more than 250) might cause increased server utilization.
IMPORTANT: Do not associate the Application object with Alias objects. Alias objects are not supported.
-
After you add the user or workstation to the list, select the appropriate check boxes for the user or workstation to set the characteristics (Force Run, App Launcher, Start Menu, Desktop, System Tray, Quick Launch, and Force Cache) you want applied to the application. Click Help for a description of each of these characteristics, or refer to Associations Page.
If you want to associate the application with additional users or workstations at a later time, you can use the Associations page on the Application object. For information, see Associations Page.
-
-
Click Next, review the Application object settings, then click Finish to create the Application object.
-
If, as part of the distribution process for the application, Application Launcher needs to copy files to the workstation, right-click the Application object, click Properties, then complete the remaining steps.
or
If the application runs from the network or is already located on the workstation, skip the remain steps and continue with Establishing File System Access.
-
Click the Distribution Options tab, then click Application Files.
You need to add the files to the Application Files list in order for Application Launcher to copy them to the workstation.
-
Click Add, click File, then fill in the following fields.
Source File: Select the file you want copied to the workstation (for example, \\server1\sys\public\notepad\notepad.exe).
Target File: Enter the full path, including the file name, of where you want the file copied (for example, c:\notepad\notepad.exe).
-
Click OK to add the file to the list.
-
When finished adding files, click OK to save the Application object information.
-
Continue with then next section, Establishing File System Access.