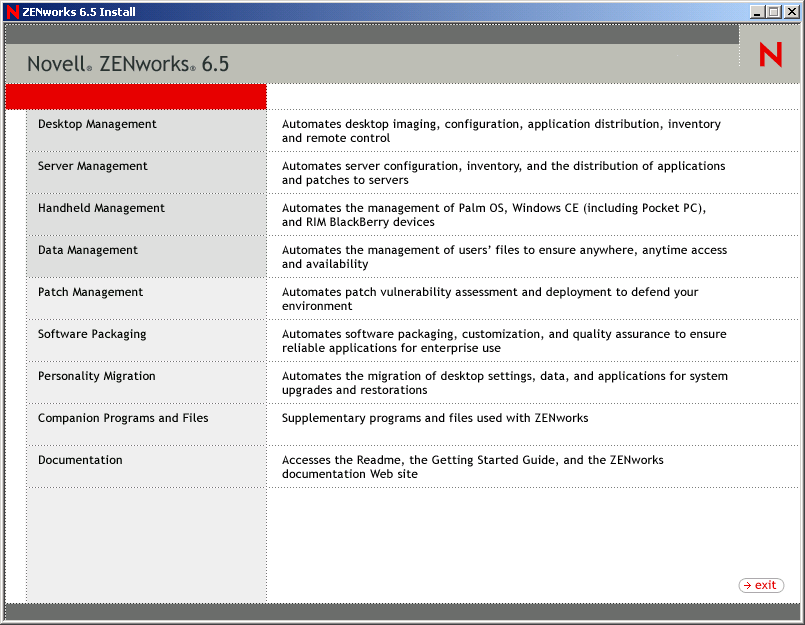
Installing ZENworks in a Windows Network Environment
When you install ZENworks in a Windows network environment/Active Directory test environment, you need perform the following tasks in order:
- Configuring a Test Lab
- Accessing Software on the ZENworks 6.5 Companion CDs
- Running the eDirectory Installation Program
- Verifying the Viability of the Directory Tree
- Creating an Administrator Active Directory Account for DirXML
- Installing DirXML
- Configuring DirXML Drivers
- Installing Password Synchronization
- Finalizing DirXML Driver Configuration
- Verifying that eDirectory, DirXML, and Password Sync Are Working Properly
- Installing the Desktop Management Server
- Installing the ZENworks Middle Tier Server
- Installing ODBC Drivers for Sybase
- Deploying the Desktop Management Agent to User Workstations
Configuring a Test Lab
An actual enterprise environment might include many servers used for a variety of things, such as application execution, terminal services, and so on. This section uses the following small-scale Windows network configuration as a sample test lab environment:
- A Windows Server 2003, which will serve as the Active Directory Domain Controller of the ZENDEMO domain. This server is designated as SRV-01.
- A Windows Server 2003, which will have Novell eDirectory, the ZENworks Desktop Management Server, and Password Synchronization installed. This server has IIS installed and is a member of the ZENDEMO domain. It is designated as SRV-02.
- A Windows Server 2003, which will have the ZENworks Middle Tier Server installed. It is designated as SRV-03.
NOTE: Password Synchronization and the ZENworks Middle Tier Server cannot be installed on the same server. Doing so will cause a conflict that prevents the launch of password synchronization.
- A Windows XP Professional SP1a workstation, which will operate in the Desktop Management Agent mode (that is, where all components of the Desktop Management Agent are installed). This workstation is designated as WKS-01.
- A Windows XP Professional SP1a workstation where the Application Browser View of the Novell Application LauncherTM is installed. This workstation is designated as WKS-02.
NOTE: In a standard Windows setup, you might want to install the ZENworks Middle Tier Server on a separate server to provide maximum performance. We use this configuration as an example only to minimize hardware requirements.
Accessing Software on the ZENworks 6.5 Companion CDs
As you set up ZENworks 6.5 in a Windows network environment, you will need to access one of the two Novell ZENworks 6.5 Companion CDs.
You can access the contents of the Companion CDs through the installation program. To do so, insert any Novell ZENworks 6.5 CD into the CD drive of a Windows workstation. The installation program should run automatically. If it does not, run winsetup.exe from the root of the CD. Click Companion Programs and Files, insert the CD you are prompted for (if needed), then browse for the component you need on one of the two menu pages.
You need the following components from the Companion CDs:
- DirXML 1.1a for Windows Server 2003, available on the Novell ZENworks 6.5 Companion 2 CD in the \novell dirxml starter pack folder.
- DirXML Password Synchronization for Windows (pwdsync.exe), available on the Novell ZENworks 6.5 Companion 2 CD in the \novell dirxml starter pack\nt\dirxml\passwordsync folder.
- Novell eDirectory 8.7.3 for Windows Server 2003. eDirectory 8.7.3 is available from the Novell ZENworks 6.5 Companion 1 CD in the \novell edirectory for windows 2k folder.
- The updated DirXML Active Directory driver and utilities, available on the Novell ZENworks 6.5 Companion 2 CD in the \novell dirxml starter pack\nt\dirxml\drivers\ad\rules folder.
The following files are included in this folder:
- ad-driver.xml
- ad-driver_en.xlf
Creating an eDirectory Evaluation License Diskette
ZENworks provides a one-for-one license of eDirectory for Windows. You can obtain an eDirectory 8.7.x evaluation license from the Novell eDirectory 8.7.x Evaluation License Download Web site. You are required to complete some contact information to enable Novell to send you an e-mail with two files attached: an .nfk file and an .nlf file.
Although not required, we recommend that you format a diskette, create a \license directory off the root of this diskette, and save the two files in this directory. You are prompted for this diskette/file during the product installation.
Running the eDirectory Installation Program
To start the eDirectory installation program for the SVR-02 server in your Windows network environment test system:
-
Log onto the SVR-02 Windows Server 2003 as administrator and launch the eDirectory installation program from the Novell ZENworks 6.5 Companion 1 CD (see Accessing Software on the ZENworks 6.5 Companion CDs). The CD should autorun. If not, run winsetup.exe located at the root of the CD.
-
Select Companion Programs and Files, select Novell eDirectory to launch a program that unpacks the eDirectory installation files into a specified directory, specify the c:\edir873 directory to unzip the files, then click Close when the files are extracted.
-
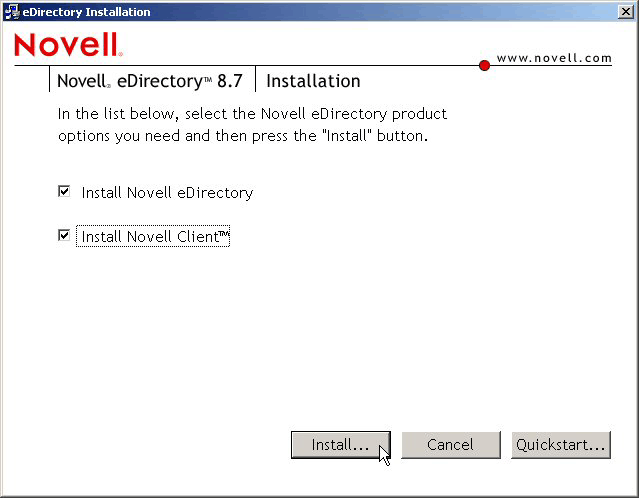
Browse to the c:\edir873\nt directory and launch setup.exe. Select Install Novell eDirectory and Install Novell Client, then click Install.
After the main installation program is launched, several subinstallations are executed:
- The Novell Client Subinstallation
- The eDirectory License Subinstallation
- The NICI Subinstallation
- The eDirectory Subinstallation
- The ConsoleOne Subinstallation
The Novell Client Subinstallation
The first subinstallation of the eDirectory product is for the Novell Client, which is executed by the Novell Client Installation Wizard.
-
In the Novell Client license agreement dialog box, click Yes.
If you do not agree with the terms of the license agreement, do not install the software. Click Cancel.
-
Select Custom Installation, then click Next.
-
Verify that only the client is selected on the modules list, then click Next.
-
Verify that NMAS and NICI are selected and that NetIdentity is deselected, then click Next.
-
Select IP Only and Remove IPX (if present), then click Next.
-
Select NDS to instruct the client to default to using NDS® connections, click Next, then click Finish.
The eDirectory License Subinstallation
When the Novell Client has been installed, the Novell eDirectory License Installation Wizard helps you install the server license for eDirectory.
-
On the Welcome Page of the License Installation wizard, click Next to view the license agreement.
-
Read the License agreement, then click I Accept if you agree with the terms of the license agreement.
If you do not agree with the terms of the license agreement, do not install the software. Click Cancel.
-
In drive A:, insert the license diskette you created in Creating an eDirectory Evaluation License Diskette.
-
Select Specify path to License File, browse to and select the .nfk license file in the directory you created on the diskette, then click Next.
-
In the Licensing Success dialog box, click Close.
The NICI Subinstallation
When the Novell Client and the eDirectory license are installed, the Novell International Cryptographic Infrastructure (NICI) Installation Wizard autoruns. When the NICI installation is complete, the Windows server prompts for a reboot.
-
Remove the licensing diskette from drive A:, then click OK in the reboot request dialog box.
The server reboots and the eDirectory installation sequence continues.
-
At the Novell Client login dialog box, press Ctrl+Alt+Delete.
-
In the login dialog box, select Workstation Only, log on to the server as the administrator, then click OK.
The eDirectory Subinstallation
When the Novell Client, the eDirectory License, and NICI are installed, the eDirectory installation continues.
-
At the eDirectory Installation Welcome dialog box, click Next.
-
Read the license agreement, then click I Accept if you agree with the terms of the license agreement.
If you do not agree with the terms of the license agreement, do not install the software. Click Cancel.
-
Select a language for the installation, then click Next.
-
Click Next to accept the default installation path.
-
Click Yes to create a new directory that does not exist.
-
Select Create a New eDirectory Tree, then click Next.
-
Set up the access to the new tree and server.
-
Specify a name for the new tree, such as ZENTREE.
-
Specify a Server object context, such as SVR-02.SERVICES.ZEN.
NOTE: This document assumes that you are creating an Organization container in eDirectory named ZEN, an Organizational Unit container named SERVICES where SVR-02 will reside, and an Organizational Unit container named USERS where the Admin user object will reside.
-
Specify the name of the Admin user object, such as Admin.
-
Specify the password of the Admin user object, such as Novell, then click Next.
-
-
On the HTTP Server Port Configuration page, accept the HTTP Stack Ports as default, because there will be no conflicting ports on this server, then click NEXT.
-
On the LDAP Configuration page, specify which LDAP ports to use.
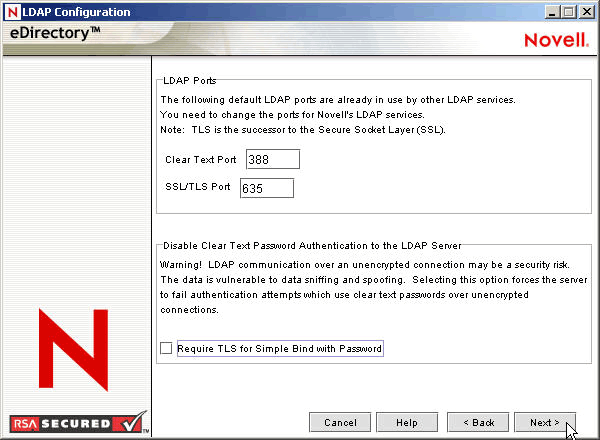
When Active Directory and eDirectory are installed on the same Windows server, you need to choose other LDAP ports, because eDirectory must not interfere with default Active Directory ports 389 and 636.
-
Click Next to accept the default NMASTM login method.
-
Click Finish to complete the eDirectory installation.
The eDirectory installation program performs the installation on the SRV-02 server. When the program completes successfully, click Close in the Success dialog box.
The ConsoleOne Subinstallation
When the eDirectory installation is complete, you need to manually install ConsoleOne on SRV-02. Use the following steps to install ConsoleOne:
-
Insert the Novell ZENworks 6.5 Companion 1 CD into the CD drive of SRV-02. If the CD does not autorun, run winsetup.exe from the root of the CD.
-
Select Companion Programs and Files, then select Novell ConsoleOne.
-
On the Winzip self-extractor dialog box, click setup to launch the extraction and to start the ConsoleOne installation program.
-
On the ConsoleOne Installation Wizard welcome page, click Next.
-
Read the License agreement, then click I Accept if you agree with the terms of the License Agreement.
If you do not agree with the terms of the license agreement, do not install the software. Click Cancel.
-
Accept the default installation path, then click Next.
-
Accept the default components for installation, then click Next.
-
On the Additional Languages page, select any additional languages you want to install, then click Next.
-
Read the JInfoNet Licensing Agreement page, then click I Accept if you agree with the terms of the license agreement.
If you do not agree with the terms of the license agreement, do not install the software. Click Cancel.
-
On the ConsoleOne Installation Summary page, click Finish to install ConsoleOne on the SRV-02 server.
-
On the ConsoleOne Installation Success page, click Close.
Verifying the Viability of the Directory Tree
When the installation of eDirectory and ConsoleOne is complete, verify that the tree is viable by performing the following steps:
-
Log in to eDirectory.
-
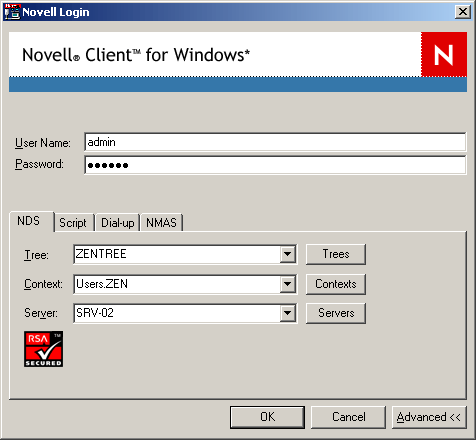
From the Windows server desktop, right-click the red N in the taskbar and select NetWare Login.
-
Type Admin in the Username field.
-
Type novell in the Password field.
-
Click Advanced to open the NDS page of the login dialog box.
-
Type ZENTREE in the Tree field.
-
Type USERS.ZEN in the Context field.
-
Type SRV-02 in the Server field, then click OK to log in to eDirectory.
-
-
To verify that you are logged into the tree as Admin, right-click the red N in the taskbar, select NetWare Connections, verify that a resource is listed for ZENTREE and for the username (CN=Admin).
The authentication state for this connection should be listed as Directory Services.
-
Click Close to close the NetWare Connections dialog box.
-
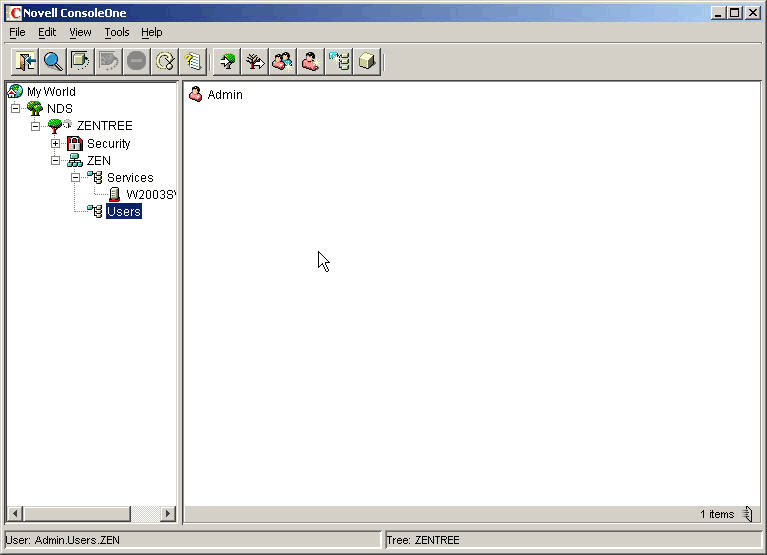
In ConsoleOne, verify that the tree object is visible, that the Admin user is visible in the Users container, and that the SRV-02 server is visible in the Services container.
-
Create a shortcut on your server for c:\novell\nds\ndscons.exe.
NOTE: NDSConsole is a utility that lets you view the state of the eDirectory tree and the services that are running.
-
Click the NDSConsole shortcut, then verify that at least ds.dlm and nldap.dlm are running.
You now have an eDirectory tree running on your Windows Server 2003.
Creating an Administrator Active Directory Account for DirXML
In order to isolate changes that might occur with other administrator accounts, we recommend that you create a separate account for DirXML with Administrator privileges in Active Directory.
-
Log on to the SRV-01 server as administrator of the domain.
-
From the SRV-01 server desktop, click Start > Programs > Administrative Tools > Active Directory Users and Computers to launch the monitoring console.
-
On the Active Directory Users and Computers page, select the container where you want to add the DirXML administrator user, then click Create a New User.
-
Type the names for the user.
For example, type Novell as the First name, then type DirXML as the last name, then type Novell DirXML as the full name. The User login name in this example is dirxml@zendemo.com.
-
Enter a password for the new user, then select Password Never Expires so that an expired password won't disable the driver unexpectedly.
-
Click Next, review the summary, then click Finish.
-
In the Tree view of the domain, select Builtin > right-click the Administrators object > click Properties to open the Administrators Properties dialog box.
-
In the Administrators Properties dialog box, click the Members tab, click Add, click Advance, then click Find Now.
-
Select the full name of the user you created (Novell DirXML), then click OK in three succeeding dialog boxes.
-
Close the Active Directory Users and Computers page.
-
From the Windows desktop, click Start > Programs > Administrative Tools, then select Domain Controller Security Policy.
-
In the Tree view, click Security Settings > Local Policies > User Rights Assignment.
-
Double-click Log On As a Service > click Security > Add User or Group > Browse > Advance > Find Now.
-
Select the user you created (Novell DirXML), click OK, then click OK again in the three succeeding dialog boxes.
-
Close the Domain Controller Security Policy, then reboot the server.
Installing DirXML
When eDirectory is running and stable, you need to install DirXML so that users can be synchronized between your Active Directory Domain and eDirectory.
IMPORTANT: Make sure that no ZENworks services are running on the Windows server when you install DirXML.
-
Log on to the SRV-02 Windows Server 2003 as administrator and into eDirectory as admin.
-
Insert the Novell ZENworks 6.5 Companion 2 CD into the CD drive of SRV-02, then use Windows Explorer to browse to the Novell DirXML Starter Pack folder.
-
Double-click setup.bat to launch the DirXML 1.1a installation program.
-
On the DirXML Welcome page, click Next.
-
Read the License agreement, then click I Accept if you agree with the terms of the license agreement.
If you do not agree with the terms of the license agreement, do not install the software. Click Cancel.
-
On the component selection page, select DirXML Engine and Drivers, select DirXML Management Utilities, select PasswordSync Agent, then click Next.

-
On the next component page, select DirXML Engine and the appropriate Core Driver (DirXML Driver 2.0.2 for Active Directory), then click Next.
-
On the Schema Extension page, verify that the tree is appropriate (ZENTREE), type or browse to and select the fully distinguished name (DN) of the admin user and the user's password (admin user name is CN=admin.OU=Users.O=ZEN), then click Next.
-
Select ConsoleOne Snap-Ins for DirXML and DirXML Preconfigured Drivers as additional components you want to install, then click Next.
-
Deselect all of the preconfigured drivers except the appropriate Active Directory driver, then click Next.
-
Read the Summary screen, then click Finish.
The DirXML installation program shuts down eDirectory and then proceeds.
-
Click OK in the dialog box that warns about a possible eDirectory and LDAP conflict (this condition was avoided when you installed eDirectory).
When the file copy is complete, eDirectory is launched again.
-
In the final installation dialog box, click Close to end the installation program.
When you have finished installing DirXML, you must configure the DirXML drivers before synchronization can occur. For more information, see Configuring DirXML Drivers.
Configuring DirXML Drivers
When you have finished installing eDirectory and DirXML on the SRV-02 server, you need to configure the DirXML drivers to begin synchronization between Active Directory Domain and eDirectory.
-
Log on to the SRV-02 server as administrator, then log in to eDirectory as admin.
-
Insert the Novell ZENworks Companion 2 CD into the server's CD drive, browse to novell dirxml starter pack\utilities\ad_disc\adshimdiscoverytool.exe, then double-click adshimdiscovertool.exe to run the executable.
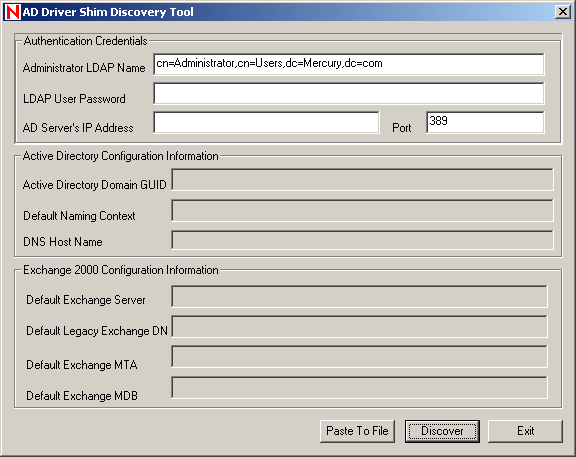
-
At tool's interface, fill in the fields:
Administrator LDAP Name: Type the Active Directory administrator's LDAP Name.
LDAP User Password: Type the Active Directory administrator's password.
AD Server's IP Address: Type the IP address for the Active Directory Server for which you want the GUID.
-
Click Discover.
The tool runs and discovers data that is filled in for the other fields, including the Active Directory Domain GUID.
-
Cut and paste the Active Directory Domain GUID into a text file so that you can have access to the data later (see Step 11).
-
-
Launch ConsoleOne.
-
Extend the eDirectory schema to accommodate the new Active Directory driver.
-
Launch c:\novell\nds\ndscons.exe
-
Select install.dlm, then click Start.
-
Click Install Additional Schema Files, then click Next.
-
Type the eDirectory admin login name (admin), type the context (ZEN\Users), type the password (novell), then click OK.
-
Browse to and select c:\novell\nds\drv_ext.sch, then click Open.
-
Click Finish to apply the schema.
-
Click the close (X) button in the NDSCons window.
-
-
In ConsoleOne under the ZEN organizational container, create a new organizational unit (OU) container, then name this OU container DirXML.
You will create all of the objects related to DirXML under this container.
-
Select the parent container (named ZEN) of the new DirXML container, then, from the menu, select Wizards > Create a New Application Driver.
-
In the Application Driver Creation Wizard, select In a New Driver Set, then click Next.
-
On the New Driver Set Properties page, fill in the fields:
Name: Type a driver set name, for example ADDriverSet.
-
Click Next.
The wizard creates the objects for the driver set.
-
Select Import Preconfigured Driver, browse to and select ad-driver.xml from the \novell dirxml starter pack\nt\dirxml\drivers\ad\rules folder of the Novell ZENworks 6.5 Companion 2 CD, then click Next.
IMPORTANT: The DirXML installation program places the addriver.xml file in the system. This will also be available on the list. Be sure that you choose the new ad-driver.xml file (note the spelling difference) that you obtained from the Novell ZENworks 6.5 Companion 2 CD.
-
Configure the driver parameters that are listed on the Application Driver Creation Wizard (visible by scrolling) by filling in the fields:
Driver Name: Leave the name of the driver as the default.
Authoritative ID: Type the domain administrator account you created (dirxml@zendemo.com).
Authoritative Password: Type the password for the dirxml domain administrator account.
Retype the Password: Retype the dirxml domain administrator account password.
Authentication Server: Type LDAP://svr-01.zendemo.com in the Address of Active Domain Controller field. Do not enter an IP address. This LDAP value is the DNS name of SVR-01.
Domain GUID: Copy and paste the GUID (the GUID that you saved in a text file from running adshimdiscoverytool.exe in Step 2) into this field.
Configure Data Flow: Leave Bi-Directional as the default.
Base Container in Active Directory Type the name of the base container in Active Directory. This is the container where you want users to be synchronized with eDirectory (for example, CN=Users,DC=zendemo,DC=com).
Base Container in eDirectory: Specify the container where you want your users to be created and synchronized with Active Directory (for example, users.zen). You can browse for this container by clicking Browse. If you are going to mirror the Active Directory containers, this would be the top container in eDirectory.
Publisher Placement: Select Flat or Mirror. If you choose Flat, all user objects coming from Active Directory are placed in the same container. If you choose Mirror, all user objects and containers are re-created in eDirectory.
Subscriber Placement: See the Publisher Placement field to choose your placement.
Driver Polling Interval: Specify the polling interval you want. In a lab environment, the interval should be set at approximately one minute. In a production environment, you should set the interval at approximately 15 minutes.
Use Secure Authentication: Leave the default (Yes).
Enable PasswordSync: Leave the default (Yes).
Install Driver as Remote/Local: Set the field at Local.
Remote Host Name and Port: Leave the default setting.
Driver Password: Leave the field blank.
Retype the Password: Leave the field blank.
Remote Password: Leave the field blank.
Retype the Password: Leave the field blank.
Support Exchange 2000: Change the default (Yes) to No.
Default Exchange Server: Leave the field blank.
Default Exchange DN: Leave the field blank.
-
Click OK.
-
Click Yes to set the security equivalences of the driver.
-
Click Add, browse to and select the admin.da user, add this user to the list, then click OK.
-
Click Yes in the Novell Recommends You Identify All Objects that Represent Administrative Roles dialog box.
-
Click Add, and then browse to and select all users that are administrators of eDirectory, then click OK.
This will prevent the users from being created in the Active Directory domain and synchronized later.
-
Click Finish on the Summary page.
Before the DirXML driver can run, you need to install the Password Synchronization software. For more information, see Installing Password Synchronization.
Installing Password Synchronization
Password Synchronization allows each user object automatically created in DirXML to have the same password as the corresponding user you created in Active Directory. This is necessary to allow for single-login to both Active Directory and eDirectory when users log into their workstations.
Password Synchronization requires that platform-specific password policies are not in conflict with each other. Password policies that are in conflict will prevent successful password synchronization. For example, if eDirectory passwords are required to be at least eight characters in length and Windows passwords have no length requirements, users could create shorter Windows passwords that would not be accepted by eDirectory. Password Synchronization does not override platform policies.
DirXML lets you generate an initial password for an account based on the account's attributes or other information available through Java services. For instance, you can generate a password based on a user's surname plus a four-digit number. Generating an initial password requires driver customization, but it is a good way for you to manage passwords when you provision an account through an existing personnel management toolset.
ConsoleOne lets you set an initial password when you create a user account if you select Assign NDS Password, then select Prompt During Creation. In this case, ConsoleOne sets the password before an account is associated in NT or Active Directory accounts. This prevents the initial password from being synchronized. Passwords are synchronized only after the first password change. To avoid this delay, you can do one of the following things:
- Deselect Assign NDS Password During User Creation and assign the password later. A brief delay allows account associations to be completed.
- Select Prompt User on First Login so that password setting is delayed until the account is actually used.
The Microsoft Management Console (MMC) lets you set an initial password on a user account by typing the password when you create the account. The password is set before Password Synchronization is able to associate an eDirectory account with the Active Directory account, so the Password Synchronization service is not able to update the eDirectory account immediately. However, the service will retry the password update and the account will be properly updated within several minutes.
To install Password Synchronization on your servers, make sure that ConsoleOne is not running, then follow these steps:
-
Log in to the SRV-02 server as administrator, then log in to eDirectory as Admin.
-
Make sure that ConsoleOne is closed.
-
Click Start > Settings > Control Panel, then double-click Password Synchronization.
-
Click Yes on the Password Synchronization Installation Wizard Welcome page.
-
On the Setup page, select the ZENDEMO domain, browse to the ADDriver (AD-Driver.ADDriverSet.DirXML.ZEN) object in edirectory, then click OK.
-
In the Object Name field, leave the default value, in the Context field, verify that the value is the DirXML container that you created, then click OK.
-
When prompted for the password sync object rights, select the container where your user objects (those synchronized from Active Directory) are expected to reside, make sure you give these rights for every container of users that you are synchronizing (usually, it is best to set this at the organization of the tree; for example, O=ZEN), then click OK.
-
When prompted to put filters on each Domain Controller, click Yes.
The Password Filters page is displayed with a list of Domain Controllers.
-
Select SRV-01, then click Add.
Adding a server will cause it to be rebooted.
-
Wait until the server reboots and the dialog box shows that it is running.
-
Click Close, then click Finish.
-
Make sure that you reboot the SRV-01 and SRV-02 servers.
Finalizing DirXML Driver Configuration
When you have installed and configured both the DirXML drivers and the PasswordSync driver, you need finalize the configuration so that these drivers will start automatically and function properly.
-
Log on to the SRV-02 server as administrator, then log in to eDirectory as Admin.
-
From ConsoleOne, open the DirXML container, right-click the ADDriverSet object, then click Properties.
-
Click the DirXML tab, click Drivers, then click Properties.
-
Click Driver Module, make sure that Native is selected and that addriver.dll is entered in the field.
-
Click Startup Option, change the Startup value to Auto-Start, click Apply, then click Close.
-
Select the ADDriver in the list, click Start, then watch the status field change to Running to verify that the driver has started.
-
Open ndscons.exe, then verify that dirxml.dlm is running.
Verifying that eDirectory, DirXML, and Password Sync Are Working Properly
To verify that eDirectory, DirXML, and Password Synchronization are working properly in your environment, you need to create a few users in Active Directory to verify that they are automatically created in eDirectory with the proper passwords.
-
Log on to server SRV-01 as the administrator of the Active Directory Domain.
-
Launch the Active Directory administration tool and create a test user in Active Directory
-
Log in to SRV-02 as the administrator of the domain and as admin in eDirectory.
-
Open ConsoleOne, then verify that TestUser1 has been created in the administered container.
You might have to wait for a synchronization cycle to complete before the user is listed in eDirectory.
-
Log in to eDirectory as TestUser1, verify that the password is the same as the one given in Active Directory, then verify that you successfully authenticated to eDirectory.
Another synchronization cycle might be necessary before the password is updated.
-
For completeness, create a user in eDirectory (using ConsoleOne while logged in as Admin), then verify that the user is now in the domain and that you can log in to the domain as that user using the password you specified in eDirectory.
The default synchronization rules do not create an Active Directory user until the full name attribute field is populated in eDirectory. Check this in ConsoleOne > User_object > Properties > General.
Installing the Desktop Management Server
Although you might not choose to install all of these components, this section explains the installation procedure for each of them.
Use the following steps to install the Desktop Management Server onto SRV-02 server, where you previously installed eDirectory.
-
Log on to the SRV-02 server as administrator, then log in to eDirectory as Admin.
-
At a Windows workstation, insert the Novell ZENworks 6.5 Desktop Management CD.
The winsetup.exe program will autorun. If it does not autorun, launch it from the root of the CD.
If you run the installation from a directory location where you have copied the ZENworks Desktop Management ISO files, make sure that all of these files are copied to the same location from which you are running winsetup.exe.
In this situation, the installation program will notify you that it might not run properly. This is because the options you choose during the installation might require a CD swap.
IMPORTANT: If you remove the Novell ZENworks 6.5 Desktop Management CD from the CD drive during the installation, or if you lose your connection to the server you are installing to, the installation program stops and will not proceed. To terminate the installation process, in the Windows Task Manager click Processes, select javaw.exe, then click End Process.
-
Click Desktop Management to display a page with options to install in various languages.
-
Click English to display a page with Desktop Management installation options.

-
Click Desktop Management Services to launch the Desktop Management Server installation wizard.
-
On the first Installation page, read the details about running the installation program, then click Next.
-
Read the License agreement, then click Accept if you agree with the terms of the License Agreement.
If you do not agree with the terms of the license agreement, do not install the software.
-
On the Installation Requirements page, read the requirements for installing the Desktop Management Server software, make sure that the server where you plan to install meets the listed requirements, then click Next.
-
On the Tree Selection page, type or browse to the name of the Novell eDirectory tree on the SRV-02 server (ZENTREE). If you have not already extended the schema for this installation (see Extending the Schema Before the Installation), select Extend Schema to extend the schema on the tree where you will be installing Desktop Management Server software, then click Next.
NOTE: You cannot install Desktop Management Server software on multiple trees at the same time.
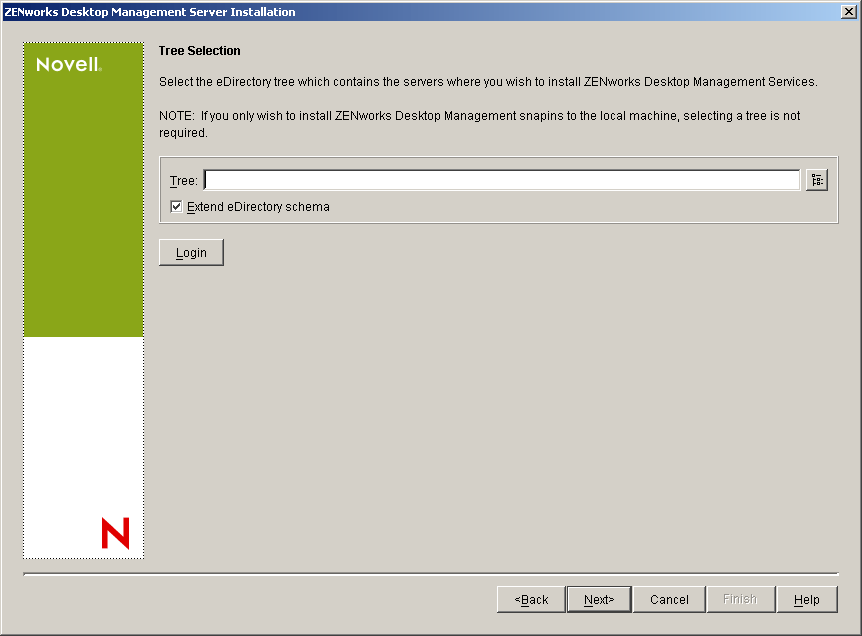
You need to extend the schema on a tree only once. You can authenticate to a tree by clicking the Login button and entering a user ID and password with the appropriate rights.
-
On the ZENworks Desktop Management Licensing page, specify the license code that was e-mailed to you as part of the SmartCert product registration package.
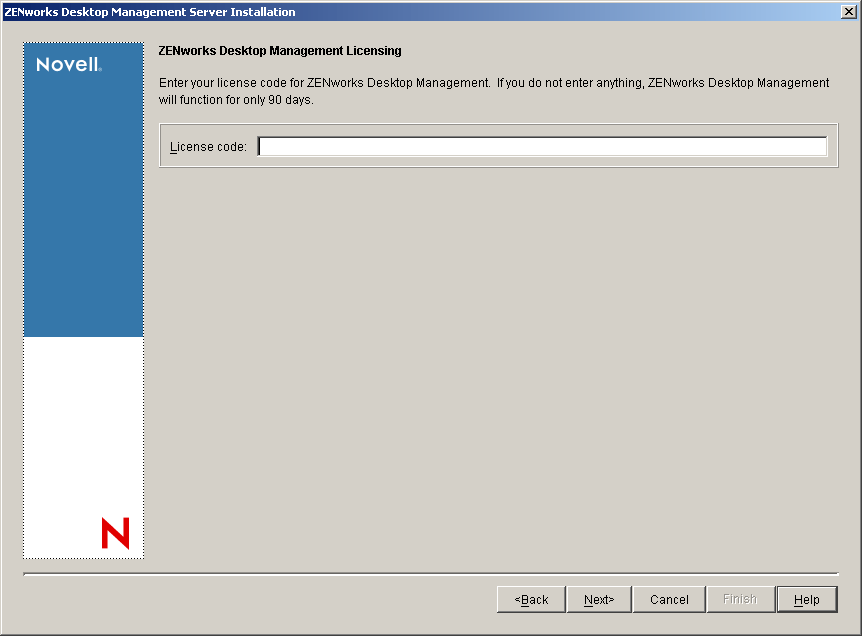
If you do not specify a license code on this page, the wizard considers this installation of ZENworks Desktop Management to be an evaluation version. If you install for an evaluation, you will be reminded to license the product at periodic intervals. After 90 days, the product evaluation version no longer functions.
-
On the Server Selection page, click Add Servers to browse to the SRV-02 server.
You can select servers only from the ZENTREE tree. You can install to up to 7 servers at a time.
-
(Optional) In the Add Servers dialog box, you can list servers by their eDirectory tree names. To install to a server, select eDirectory Trees, browse to and click the name of the SRV-02 server, click the right-arrow button to move your selected servers to the Selected Servers pane, then click OK.
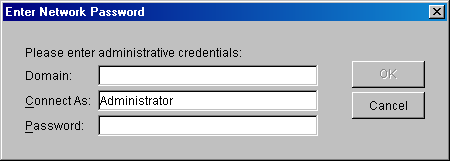
NOTE: If you want to add a Windows server that you might not be authenticated to, you can double-click the server icon to display a dialog box where you can enter credentials to allow for Windows authentication.
-
(Optional) In the Add Servers dialog box, you can specify the hostname or IP Address of a server in the Add Server Via Hostname/IP Address field. The value that you provide must be resolvable to the name of a server.
Click
 to begin the name resolution process and add the server to the Selected Servers list.
-
-
On the now-populated Server Selection page, you can further specify the services you want to install for the Desktop Management components you previously selected, then click Next to save your settings.
The list of settings includes the following:
Local Workstation: Even though the ConsoleOne 1.3.6 installation program lets you install ConsoleOne files to a local hard drive (minor performance enhancements can be achieved by doing so) such an installation will not include the Desktop Management Services snap-ins.
You have the option of installing Desktop Management Services snap-ins to your local workstation by selecting Desktop Management Service Snap-ins under the Local Workstation option. ConsoleOne must be installed on the workstation before the snap-ins can be added.
Desktop Management Services: Desktop Management Services (collectively referred to as the "Desktop Management Server") are commonly used files and programs that enable the configuration and distribution of workstation applications and policies. These services provide automatic management of Windows applications, user and workstation configurations, processes, and behaviors.
Application Management: Select this option to install software that enables the automated distribution, healing, and tracking of applications, updates, and patches.
Workstation Management Common Components: Select this option to install workstation-resident modules that are used to authenticate the user to the workstation and network, and used to transfer configuration information to and from eDirectory.
Remote Management: Select this component to install files and programs that enable the remote management of workstations from a central console. Make sure that the selected servers do not have the ZENworks for Servers 3.0.2 (or earlier) Remote Management component already installed.
Additional Options: If you want to customize your deployment of Desktop Management Services, there are a number of services to choose from, each with a specialized purpose.
Desktop Management Database: Select this option if you want to install a network database to be used by the Novell Application LauncherTM as a repository for data about application events (install, launch, cache, and so forth) that have occurred.
Inventory Database: Select this option if you want to install a network database to be used by Workstation Inventory as a repository for hardware and software inventory information collected from inventoried workstations.
IMPORTANT: If you want to use the Inventory database with an existing Oracle or MS SQL setup, do not select this option during the Server Inventory installation. Follow the steps in the Novell ZENworks 6.5 Desktop Management Administration Guide.
Inventory Server: Select this option if you want to install files and programs to enable the gathering and viewing of hardware and software inventory information for managed workstations.
If the selected servers have the Server Inventory component of ZENworks for Servers 3.0.2 or earlier installed, you must upgrade the component to ZENworks 6.5 Server Management.
Inventory Proxy Server: Select this option if you want to install a proxy service that enables the roll-up of inventory scan data to an Inventory server located across a network firewall. Make sure that the selected servers do not have the ZENworks for Servers 3.0.2 (or earlier) Inventory component already installed.
Imaging Server: Select this option if you want to install a Linux imaging environment to be used to create, store, send, or restore workstation image files to a workstation.
NOTE: You should install the Imaging Server service and the PXE Server service on the same server; do not install the PXE Server service separately.
PXE Server: Select this option if you want to install Preboot Execution Environment (PXE) protocols and programs to be used by the server to communicate with a PXE-enabled workstation and to enable sending imaging tasks to that workstation.
When you install Preboot Services, one of the components that is installed is the Proxy DHCP server. If the standard DHCP server is on the same server where you are installing the Proxy DHCP server, you must set option tag 60 in DHCP services.
NOTE: You should install the Imaging Server service and the PXE Server service on the same server; do not install the PXE Server service separately.
Workstation Import/Removal Server: Select this option if you want to install files and programs that add workstation objects into eDirectory (or remove those already added), where they can be managed to receive applications or computer settings.
Desktop Management Services Snap-Ins: Select this option if you want to install additions to ConsoleOne to enable you to launch Desktop Management tools and utilities, to view Desktop Management object property pages in eDirectory, and to browse and configure those objects.
NOTE: You can perform a "custom selection" by selecting one or more servers and right-clicking to display a pop-up menu with options to add Database Services, Inventory Services, or Imaging Services to all of the servers you have selected. The Default option returns the selections to their initial state. The Custom selection launches another dialog box that you can use to select specific components for all of the selected servers. This selection overrides any other selections you might have made.
-
(Optional) Prerequisite Check is selected by default. Retain the selection if you want the installation program to verify that the server or servers meet the installation requirements for ZENworks Desktop Management Services. The installation program checks the version of the server's network operating system (including any required service or support packs), the presence and version of the Novell Client (4.9 SP1a) on Windows servers and on the installing workstation, and the presence and version of ConsoleOne (1.3.6).
If the server operating system and support/service packs are not the correct version, the installation displays a warning message, and does not continue. The installation displays a warning and will not continue until the required software is installed and detected or until you deselect the check box.
-
(Optional if Workstation Inventory or Remote Management is selected.) On the File Installation Location page, select one or more target servers in the Selected Servers list, then browse for or enter the volume or drive where you want the Workstation Inventory or Remote Management files to be installed. The default is C: for Windows servers.
NOTE: If a previous installation of ZENworks 6.5 Workstation Inventory or Remote Management component is detected on the machine, the existing path is displayed and dimmed. The current installation will install all the files in the same path.
-
(Optional) The Database Location Installation page is displayed if you choose to install the Inventory database or the Desktop Management database. Select a previously designated server in the left pane, then in the Database Path field, browse for or type in the name of the volume or drive where the database file will be installed, then click Next.
You can provide a different drive for each database server. However, you cannot have multiple instances of the database files on the same server because you can run only one instance of the database engine per server.
-
(Optional) The Inventory Standalone Configuration page is displayed if you choose to install the Inventory Server and the Inventory Database on the same server. If you want the installation program to automatically create the Server Package and to start the Inventory Service on the server, configure the settings on the Inventory Standalone Configuration page.
Select Configure Standalone, select the server or servers that you want to point to a common Database Location Search Policy, type in the name or browse to the tree container where you want to create and configure the Server Package containing this policy, then click Next.
-
(Optional) On the Inventory Proxy Service Configuration page, select the server or servers with a port you want to designate as one to allow XMLRPC requests pass through to the Inventory Proxy service, then in the Proxy Port field, designate the port you want to use.
You can configure the same port number for all servers by selecting all of them, or you can define the values individually by selecting the servers one at a time. If you want to change the Port 65000 default, specify a value between 0 and 65535. Ensure that the port number is not used by other services on the server.
-
On the Summary page, review the list of components and their parts that are to be installed. If the summary is correct, click Finish to launch the installation program.
You can click Back as many times as necessary to make changes.
If you click Cancel, no installation information is saved.
You can review the installation log file after the installation has completed. The log file name is datestamp_timestamp_zdmserver_install.log (for example: 20040304_024034_zdmserver_install.log). It is located in the \novell\zfdtemp directory on the machine you are installing from. This log file indicates whether any component failed to install.
You can also review the installation summary to review the selections you made. The summary is saved in a log file named datestamp_timestamp_zdmserver_installsummary.log (for example: 20040304_024034_zdmserver_installsummary.log). It is also located in c:\novell\zfdtemp.
-
In ConsoleOne, select the tree where you installed the Desktop Management Server software, then right-click the LDAP Group > click Properties > General > select Allow Clear Text Passwords.
If you use ConsoleOne 1.3.6, Require TLS For Simple Binds With Password must be deselected in the LDAP Group Object for each server acting as the Authentication Domain for a ZENworks Middle Tier Server. If you need to set this parameter after you have installed the Desktop Management Server, make sure you reboot the ZENworks Middle Tier Server after you change the setting.
If you are installing to Windows servers in an Active Directory domain, configure the LDAP group object for servers that are to be used as Authentication Domains to use an alternate port number, because Active Directory will use ports 389 and 636.
If you have already installed the ZENworks Middle Tier Server, you need to reboot the ZENworks Middle Tier Server so that it will recognize the change to LDAP clear text passwords at the Desktop Management Server.
Installing the ZENworks Middle Tier Server
To deliver Desktop Management features through an Internet browser, you must install the ZENworks Middle Tier Server. In this deployment scenario, you install the software on SRV-02, where the Microsoft IIS Web server has already been installed. The Middle Tier Server installation program requires the presence of the Novell Client on the installing workstation or server, so you must first install the Novell Client on the SRV-03 server and then install the ZENworks 6.5 Middle Tier Server on the same server. You can download the Novell Client (version 4.90 SP1a or later) from the Novell downloads Web site.
When the client has been installed, you can use the following procedure to install the Middle Tier Server:
-
Log on to SRV-03 as local workstation administrator of the server.
-
Insert the Novell ZENworks 6.5 Desktop Management CD.
The winsetup.exe program will autorun. If it does not autorun, launch the program from the root of the CD.
If you run the installation from a directory location where you have copied the ZENworks Desktop Management ISO files, make sure that all of these files are copied to the same location from which you are running winsetup.exe.
In this situation, the installation program will notify you that it might not run properly. This is because the options you choose during the installation might require a CD swap.
IMPORTANT: If you remove the Novell ZENworks 6.5 Desktop Management CD from the CD drive during the installation, or if you lose your connection to the server you are installing to, the installation program stops and will not proceed. To terminate the installation process, in the Windows Task Manager click Processes, select javaw.exe, then click End Process.
-
Click Desktop Management to display a page with options to install in various languages.
-
Click English to display a page with Desktop Management installation options.
-
Click Middle Tier Server to launch the Middle Tier Server installation program.
-
On the first Installation page, read the details about running the installation program, then click Next.
-
Read the License agreement, then click Accept if you agree with the terms of the License Agreement.
If you do not agree with the terms of the license agreement, do not install the software.
-
On the Installation Requirements page, read the requirements for installing the Middle Tier Server software, make sure that the server where you plan to install meets the listed requirements, and then click Next.
-
On the eDirectory Location and Credentials page, fill in the fields:
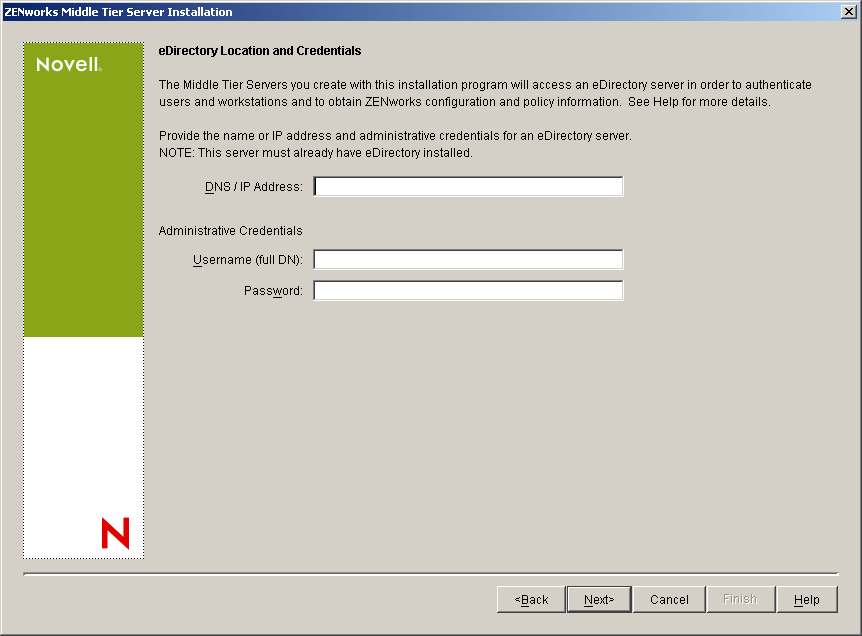
DNS/IP Address: Specify the DNS name or IP address of the SRV-02 server, where eDirectory is installed.
Username (full DN): Specify the fully-qualified distinguished username of the Middle Tier proxy user account (for example,admin.users.zen). To ensure that these credentials remain secure, you can set up an arbitrary user with specific administrative rights.
For a description of the required rights, see Required Rights for the Middle Tier Proxy User Account.
Password: Specify the eDirectory password for the Middle Tier proxy user.
-
On the ZENworks User Context page (Users Context field), specify the eDirectory context where the Middle Tier Server can look for user objects that will be used by Desktop Management. For this example, the context is Users.
You should use the context of the highest-level container where user objects reside. This value is passed to the ZENworks Middle Tier Server, which will use it as a starting point in searching for a user.
For any Middle Tier Server you designate during this installation, currently configured authentication domains (for example, the authentication domain configured for NetStorage) are replaced by a single authentication domain having the context that you specify here.
After the installation, you can reconfigure this authentication domain context using the NSAdmin utility. You can open the utility in a Web browser (http://srv-02/oneNet/nsadmin).
NOTE: The installation program verifies the existence of the context (that is, the container) before continuing.
-
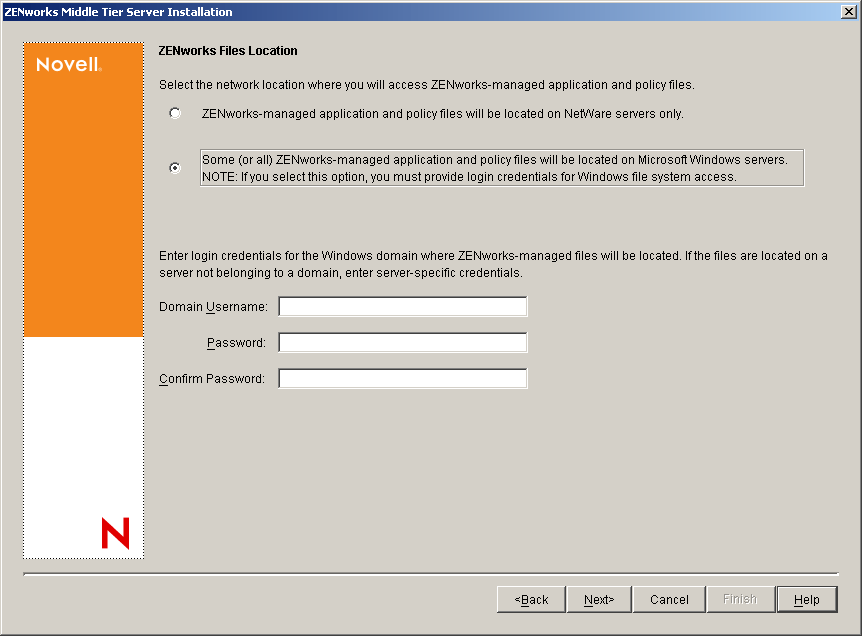
On the ZENworks Files Location page, select the network location where you will access application and policy files managed by ZENworks.
The ZENworks Middle Tier Server requires access to ZENworks files installed elsewhere on your network. As the ZENworks Administrator, you define the location of these files when you create policies or applications for distribution. The information you provide on this page is used to help the Middle Tier Server determine how to access different file systems. This decision is necessary for the installation now, even if you have not yet created any ZENworks files.
- Select the first option button if your ZENworks-managed application and policy files will be located on NetWare servers only.
- Select the second option button if some or all of your ZENworks-managed application and policy files will be located on Microsoft Windows servers.
If your ZENworks files will be located in a Windows file system, the Middle Tier Server might not be able to access them using a username and password for Novell eDirectory; instead, it requires Windows domain credentials to access the files.
If the files are located on a server not belonging to a domain, enter server-specific credentials.
Domain UsernameSpecify the username of any user in the Microsoft domain who has Windows file system rights to the ZENworks file locations.
PasswordSpecify the password for the user in the Microsoft domain who has file system rights to ZENworks files.
Confirm PasswordSpecify the same password to confirm that it was entered correctly.
-
On the Server Selection page, you need to build a list of target servers that you want to function as Middle Tier Servers. The Add Servers button calls a dialog box that is used to find and add servers to the list. The Remove Servers button lets you delete servers from the target list after they are added. Click Add Servers.
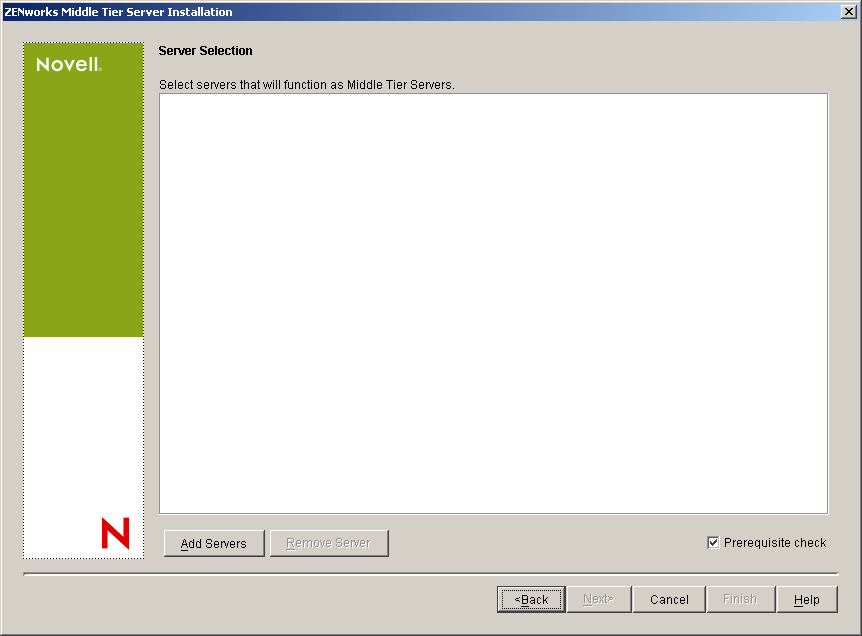
-
(Optional) Prerequisite Check is selected by default. You can retain this selection if you want the installation program to verify that the server or servers meet the installation requirements for ZENworks Middle Tier Servers.
The installation program checks the version of any previously installed Middle Tier Server software, the server's network operating system (including any required service or support packs), the presence and version of the IIS Web server on Windows servers, the presence and version of the appropriate Web server on NetWare servers, and the presence and version of NetStorage (2.6.0) on target servers.
If the server operating system and support/service packs are not the correct version, the installation displays a warning message, but can continue. If other requirements are not met, the installation displays a warning and does not continue until the required software is installed and detected.
-
On the Add Servers dialog box, open the List Servers By drop-down list to show the options of listing the servers according to their location in Novell eDirectory trees, in Microsoft Windows Network structures, or in Microsoft Active Directory trees.
You can install the ZENworks Middle Tier Server software to several servers during the installation. When you have finished adding servers to the list, click OK.
-
(Conditional if you want to list servers in Microsoft Windows Network structure.) In the List Servers By drop-down list, select Microsoft Windows Network to list all of the Windows Workgroups and Microsoft Domains to which you are currently authenticated, browse the structure to the server of your choice, then click the double-right arrow to move it to the Selected Servers list box.
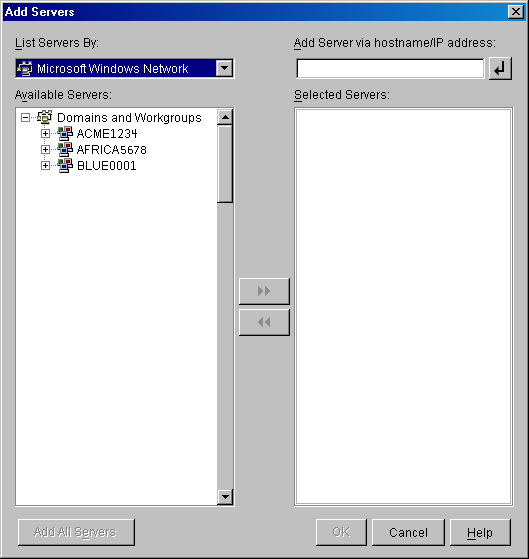
Other options in this dialog box include the following:
- You must be an administrative user for a server in order to add it to the Selected Servers list. If you are not authenticated to a server, the object is designated by a question mark. You can double-click the question mark to authenticate to the server, then click the double-right arrow to move the server to the Selected Servers list, provided it is a supported server platform for ZENworks 6.5 Desktop Management.
- When you list servers in Microsoft domains, NetWare servers are not listed for browsing because ZENworks files that are located on a Windows server cannot be obtained through a Middle Tier Server installed on NetWare.
- You can specify the hostname or IP Address of a server in the Add Server Via Hostname/IP Address field. The value that you enter must be resolvable to the name of a server located in the designated operating environment.
Click
to begin the name resolution process and add the server to the Selected Servers list.If you are using multiple hostname aliases for a Windows server, the first alias must be the physical name of your Windows server.
- If the credentials you provided for authentication to the server (see Step 11) are not administrative credentials, you can add it as a target server, but you will be re-prompted for Administrative credentials when you close the Add Servers dialog box.
- Click Add All Servers to add all of the servers in a selected domain or workgroup. Selecting a domain or workgroup selects all of the authenticated servers in that domain or workgroup.
- To remove a server from the Selected Servers list and return it to the Available Servers list, click the server name in the Selected Servers list, then click the double left-arrow. You can remove multiple servers from the Selected Servers box by selecting them with the Shift and Ctrl keys.
-
(Conditional if you want to list servers in a Microsoft Active Directory.) In the List Servers By drop-down list, select Microsoft Active Directory. If your workstation is a member of an Active Directory, the domains in the Active Directory trees are displayed. You can browse to all of the servers listed in Active Directory (on a per domain basis), browse the structure to the server of your choice, then click the double right-arrow to move it to the Selected Servers list box.
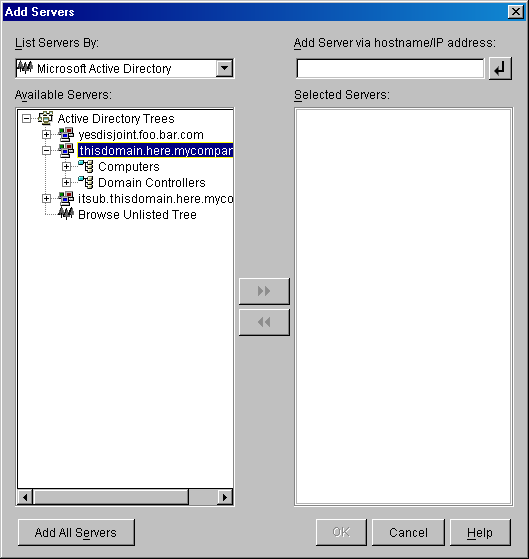
Other in this dialog box include the following:
- You can also click Browse Unlisted Tree to open a dialog box where you can specify the name of the domain you want to add, then authenticate to it with the proper credentials prior to displaying its servers in the List Servers By drop-down list.
- You can specify the hostname or IP address of a server in the Add Server Via Hostname/IP Address field. The value that you enter must be resolvable to the name of a server located in the designated operating environment.
Click
to begin the name resolution process and add the server to the Selected Servers list. - Right-click a domain object to select one of three search methods:
Search Standard Locations: Lists the computers and domain controllers at the root of the domain. This is the default search method.
Search Entire Directory: Lists all directory containers where computers are located.
Browse Directory Hierarchy: Lists all of the containers in the directory, which you can expand and browse one at a time to find the computer you want. This search method might be useful if you have computers in a non-standard location of a large directory.
- Click Add All Servers to add all of the servers in a selected domain or container. Selecting a domain or container selects all of the servers in that domain or container.
- To remove a server from the Selected Servers box and return it to the Available Servers list box, click the server name in the Selected Servers box, then click the double left-arrow. You can remove multiple servers from the Selected Servers box by selecting them with the Shift and Ctrl keys.
- You can also click Browse Unlisted Tree to open a dialog box where you can specify the name of the domain you want to add, then authenticate to it with the proper credentials prior to displaying its servers in the List Servers By drop-down list.
-
-
On the Summary page, review the location where you have chosen to install the ZENworks Middle Tier Server software and the Desktop Management Server to which it is associated, then click Finish to begin the installation process if the summary is correct.
The Middle Tier Server Installation Wizard launches another installation program. Wait until this program is completed.
IMPORTANT: You can review the installation log file after the installation has completed. The log file name is datestamp_timestamp_zdmmidtier_install.log (for example: 20040304_024034_zdmmidtier_install.log). It is located in the \novell\zfdtemp directory on the machine you are installing from. This log file indicates whether any component failed to install.
You can also review the installation summary to review the selections you made. The summary is saved in a log file named datestamp_timestamp_zdmmidtier_installsummary.log (for example: 20040304_024034_zdmmidtier_installsummary.log). It is also located in c:\novell\zfdtemp.
-
In ConsoleOne pointing to eDirectory on the Desktop Management Server, make sure you have set up the Desktop Management Server to allow clear text passwords.
-
Reboot the server where you installed the ZENworks Middle Tier Server software.
-
Verify that the ZENworks Middle Tier Server is installed and running by entering one of the following URLs at a browser on the workstation:
http://srv-02/oneNet/xtier-stats
http://srv-02/oneNet/zen
If the ZENworks Middle Tier Server is running, the first URL opens a Web page where server statistics are displayed. You should be able to see where the request count increases by clicking the Refresh button on your browser.
The second URL launches a dialog box that prompts for user credentials.
-
At a network browser, enter http://srv-02/oneNet/nsadmin and log in as the Admin user to eDirectory to change the LDAP ports to match those you changed in Step 9.a of the The eDirectory Subinstallation.
NOTE: Because eDirectory and Active Directory are installed on the same network server, you might not be able to log in to eDirectory. If this is the case, go to the registry of the server where the ZENworks Middle Tier is installed, then change the LDAP Port DWord value of the HKLM\Software\Novell\Xtier\Configuration\Xsrv registry key to the port you specified in Step 9.a of the The eDirectory Subinstallation.
Installing ODBC Drivers for Sybase
Before running the inventory reports, review the following:
- Make sure that the appropriate ODBC client for Sybase, Oracle, or MS SQL is installed on the machine running ConsoleOne. The ODBC driver will be automatically configured on the machine when you invoke the Inventory report.
To install the ODBC driver for the Sybase database,
- 1. In the Novell ZENworks 6.5 Companion 2 CD, open the \database drivers directory
- 2. Follow the instructions in the ODBCreadme.txt file in the \database drivers directory. The information helps you to set up the address of the Sybase database and verify that you can make a connection
For Oracle, you must install the appropriate client for ODBC. For example, for Oracle 8i Inventory database, install the Oracle 8i client because Inventory reports are not compatible with either the older or the later version of the client.
For MS SQL, the client is available on all Microsoft Windows operating system.
- Make sure that at least MDAC 2.6 SP1 (Microsoft Data Access Component) is installed particularly on a Windows NT machine for running Crystal Reports. Check the version of MDAC on your box: select Control panel > ODBC Data sources > the About tab pane. The minimum version required is 3.520.7326.0. If the version you have does not match the minimum requirement, you need to upgrade the ODBC core components by downloading from Microsoft site
Deploying the Desktop Management Agent to User Workstations
When ZENworks Desktop Management is running in a Windows server environment., you need to install the Desktop Management Agent onto user workstations and begin to use the Desktop Management features to manage those workstations.
The Desktop Management Agent Distributor facilitates the initial deployment and future upgrades of the ZENworks Desktop Management Agent through the use of Microsoft domains and Microsoft Active Directory. The Agent Distributor uses Microsoft domains and Active Directory when selecting target workstations and during deployment of the Desktop Management Agent to those same target workstations.
For more information about using the Desktop Management Agent Distributor to deploy the Desktop Management Agent to workstations in your Windows network, see Using the Desktop Management Agent Distributor to Deploy the Agent to Workstations in a Microsoft Domain.