Using the Traffic Analysis Agent for Windows
The Traffic Analysis Agent (version 1.30) for Windows runs on a Windows server or on a Windows workstation. The Traffic Analysis Agent for Windows monitors traffic on Ethernet, FDDI, or token ring segments.
The Traffic Analysis Agent for Windows is an RMON agent that implements functionality defined by the RMON MIB. It implements token ring extensions for RMON (RFC 1513) for token ring media, and a Novell proprietary MIB for FDDI media, in addition to implementing an RMON (RFC 1757) for Ethernet media.
The agent collects information about activity on your network and makes it available to Novell ConsoleOne via SNMP. The Traffic Analysis Agent for Windows also implements the first two groups of RMON2 (RFC 2021).
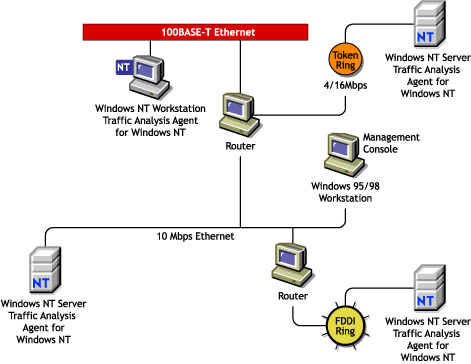
The following figure illustrates a functional view of the Traffic Analysis Agent for Windows:
Changes Made During Installation
When you install the Traffic Analysis Agent for Windows, the following files are copied to Windows:
IMPORTANT: The default directory location for the LANZCON application is zfs_agnt\lanzcon. You can change the location of LANZCON during installation.
The following sections provide information about optimizing and using the Traffic Analysis Agent for Windows:
Planning to Install the Traffic Analysis Agent for Windows
The Traffic Analysis Agent for Windows requires configuration of the Windows SNMP service before installing the agent.
Installing and Configuring the Windows SNMP Service
Before installing the Novell ZENworks Server Management agent, you must install and configure the Windows SNMP service. This is required to enable communication with the management server.
To install and configure SNMP on Windows:
-
Install the SNMP service.
-
Configure SNMP to start automatically.
-
Configure the SNMP Trap service to start automatically.
-
Specify the trap community name and trap destination address so that the agent sends traps to the management server.
-
In the Control Panel, double-click Network.
-
Click the Services tab then select SNMP Service.
-
Click Properties.
-
Click the Traps tab.
-
Select a name from the Community Names box then click Add.
The Add button is disabled if there are no Community Names available.
-
If the public community name is not present, enter public.
-
Click Add.
-
Use the Trap Destinations box to add other DNS names and IP addresses in addition to the loopback IP address for the workstations or servers that should receive traps.
-
Click OK.
-
-
Set the SNMP security options trap community name so that SNMP packets from any host are accepted by the agent.
-
In the Control Panel, double-click Network.
-
Click the Services tab then select SNMP Service.
-
Click Properties.
-
Click the Security tab.
-
In the Accepted Community Names box, click Add.
-
In the Community Name box, enter public.
The Accepted Community Names list displays the community names from which Windows will accept requests.
-
Click Add.
-
Select Accept SNMP Packets from Any Host then click OK.
-
Installing and Configuring the Windows 2000 SNMP Service
Before installing the Novell ZENworks Server Management agent, you must install and configure the Windows 2000 SNMP service. This is required to enable communication with the management server.
To install and configure SNMP on Windows 2000:
-
Install the SNMP service.
-
In the Control Panel, select Administrative Tools then Configure Your Server.
-
In the Application Server option, select Terminal Services.
-
Click Start.
-
In the Windows Components Wizard, double-click Management and Monitoring Tools.
-
Select Simple Network Management Protocol.
-
Click OK.
-
Click Next.
SNMP is started automatically after installation.
-
-
Configure the SNMP Trap service to start automatically.
-
Specify the trap community name and trap destination address so that the agent sends traps to the management server.
-
In the Control Panel, select Administrative Tools > Services
-
Double-click SNMP Service.
-
Click Properties.
-
Click the Traps tab.
-
Select a name from the Community Names box then click Add.
The Add button is disabled if there are no Community Names available.
-
If the public community name is not present, enter public.
-
Click Add.
-
Use the Trap Destinations box to add other DNS names and IP addresses in addition to the loopback IP address for the workstations or servers that should receive traps.
-
Click OK.
-
-
Set the SNMP security options trap community name so that SNMP packets from any host are accepted by the agent.
-
In the Control Panel, select Administrative Tools > Services.
-
Double-click SNMP Service.
-
Click Properties.
-
Click the Security tab.
-
In the Accepted Community Names box, click Add.
-
Select a name from the Community Name box.
The Accepted Community Names list displays the community names from which Windows 2000 will accept requests.
-
Click Add.
-
Select Accept SNMP Packets from Any Host > click OK.
-
IMPORTANT: After installing the SNMP services, you should re-install the service packs again.
Optimizing the Traffic Analysis Agent for Windows
The Traffic Analysis Agent for Windows parameters are configured for optimal performance on Windows. You can optimize the performance of the agent to suit your networking environment.
This section explains how to optimize the agent and monitor the functionality Traffic Analysis Agent for Windows using the agent console (LANZCON) for Windows. For details, see Using LANZCON.
The following sections explain the Traffic Analysis Agent for Windows configuration options:
- Configuring the Traffic Analysis Agent for Windows
- Configuring the Modules of the Traffic Analysis Agent for Windows
- Configuring the Parameters of the Traffic Analysis Agent for Windows
- Automatically Loading the Agent with the SNMP Service
Configuring the Traffic Analysis Agent for Windows
The Traffic Analysis Agent for Windows provides default values for modules and parameters. You can change the default values to optimize the performance of the Traffic Analysis Agent for Windows.
You can configure the following modules of the Traffic Analysis Agent for Windows:
- Packet Capture
- Station Monitor
- Token Ring Manager
- FDDI Manager
For details, see Configuring the Modules of the Traffic Analysis Agent for Windows.
You can configure the following parameters of the Traffic Analysis Agent for Windows:
- Memory Bound
- Memory Age
- Top N Station
- Generate Duplicate IP Address Alarms
- Trend Files Location
For details, see Configuring the Parameters of the Traffic Analysis Agent for Windows.
Configuring the Modules of the Traffic Analysis Agent for Windows
By default, all agent modules are enabled to load. You can choose to disable the modules.
To disable the modules of the Traffic Analysis Agent for Windows:
Configuring the Parameters of the Traffic Analysis Agent for Windows
The Traffic Analysis Agent for Windows modules are loaded with default parameters. You can modify the parameters to optimize the performance of the agent.
The following table describes the parameters of the Memory Manager module:
To modify the Memory Bound parameter:
-
From the LANZCON main menu, click Configure > Traffic Analysis Agent Parameters.
-
Click the Memory Manager tab.
-
Move the Memory Bound slider to the point you want to set as the memory bound value.
To modify the Memory Age parameter:
-
From the LANZCON main menu, click Configure > Traffic Analysis Agent Parameters.
-
Click the Memory Manager tab.
-
Move the Memory Age slider to the point you want to set as the memory age value.
IMPORTANT: Restart the Traffic Analysis Agent for Windows to ensure that the agent utilizes the changed parameter values. For details, see "Management and Monitoring Services Installation" in the Novell ZENworks 6.5 Server Management Installation Guide.
The following table describes the parameters of the Station Monitor module:
To specify the number of TopN reports you want the agent to generate:
-
From the LANZCON main menu, click Configure > Traffic Analysis Agent Parameters.
-
Click the Station Monitor tab.
-
Select the number of TopN reports.
To stop generation of duplicate IP address alarms:
-
From the LANZCON main menu, click Configure > Traffic Analysis Agent Parameters.
-
Click the Station Monitor tab.
-
Deselect the Generate Duplicate IP Address Alarms check box.
The following table describes the Network Trend parameter:
| Parameter | Default Path | Description |
|---|---|---|
Trend Files Location |
system root\GTREND |
Specifies the directory path and location where trend files (*.GT) are created and updated. |
IMPORTANT: If you delete the *.GT file. all the previous trend information will be lost.
To specify a path to a location for storing trend data:
Automatically Loading the Agent with the SNMP Service
The Traffic Analysis Agent depends on the Microsoft* SNMP service on Windows. When SNMP starts, it loads agent DLLs in its address space. After the agent is installed, it will be always loaded by the SNMP service, by default, whenever the service starts.
You can enable or disable loading of the agent DLLs with SNMP by checking the desired options in the Novell Traffic Analysis Agent Loading with SNMP dialog box. If you disable the agent, the SNMP service will start normally but the Traffic Analysis Agent will not work. The Traffic Analysis Agent will neither capture packets by placing the NIC cards into the promiscuous mode nor will respond to SNMP requests.
Using LANZCON
This section explains how you can use the LANZCON utility to configure and diagnose the Traffic Analysis Agent for Windows.
LANZCON for Windows is a graphical user interface provided by the Traffic Analysis Agent for Windows to configure the agent modules and parameters and to diagnose the agent. You can use LANZCON to obtain information about network segments monitored by the agent to help you troubleshoot problems.
To open the LANZCON utility, do one of the following:
- From the Windows Programs menu, click Traffic Analysis Agent for Windows > LANZCON.
- Double-click the LANZCON icon
 on your desktop.
To use LANZCON utility with different SNMP community strings, do the following:
-
Go to the \lanzcon directory.
-
Enter the following at the command prompt:
LANZCON <community name>
IMPORTANT: If you launch LANZCON without using the command line argument, the default community string is PUBLIC.
You can perform the following tasks with LANZCON:
- Viewing Network Adapters
- Enabling or Disabling Network Adapter Monitoring
- Viewing the Agent Log
- Viewing the Agent Status
- Viewing RMON Tables
- Viewing SNMP Traps
Viewing Network Adapters
On loading LANZCON, you will see the Network Adapters window. The Network Adapters window displays information about monitored adapters in two panes.
The following table describes the two panes in the Network Adapters window:
| Pane | Displays | Description |
|---|---|---|
Left pane |
Adapter Tree view |
Displays a list of network adapters discovered by the Traffic Analysis Agent for Windows. The default view displays a collapsed tree. You can expand each network adapter in the tree to view the list of RMON tables for the selected adapter. |
Right pane |
Table view |
Displays details about the object you select in the left pane. If you select an adapter in the left pane, interface table (RFC 1213) details such as media type, MAC address, and description of the selected adapter are displayed in the right pane. If you select an RMON table in the left pane, table data is displayed in the right pane. |
Enabling or Disabling Network Adapter Monitoring
The Traffic Analysis Agent for Windows collects information about monitored adapters and displays it in the right pane of the Network Adapters window.
By default, adapter monitoring is enabled. LANZCON lets you disable adapter monitoring. If you disable adapter monitoring, the Traffic Analysis Agent for Windows will stop collecting data for the adapter and the RMON tables for the adapter will be deleted.
IMPORTANT: You cannot disable monitoring FDDI adapters through LANZCON.
To enable adapter monitoring:
-
Select an adapter in the left pane of the Network Adapters window.
-
Click View > NetWork Adapters > Enable.
To disable adapter monitoring:
Viewing the Agent Log
The Traffic Analysis Agent for Windows logs significant events and error messages that occurred during a session.
To view the agent log:
Viewing the Agent Status
You can view the status of the agent from the Traffic Analysis Agent Status window. The agent status window indicates whether the agent modules are loaded or not loaded.
To view the agent status:
Viewing RMON Tables
RMON tables are listed under each network adapter. You can view the RMON tables by selecting a table in the left pane of the Network Adapters window. RMON table data is displayed in the right pane.
The Network Adapter tree displays the following RMON tables:
- Statistics
- History Control
- History Data
- Host Control
- Host Entry
- Host TopN Control
- Host TopN Entry
- Matrix Control
- Matrix SD Entry
- Filter, Channel, and Buffer
The Alarm Information tree displays the following RMON tables:
- Alarm
- Event
- Log
Viewing SNMP Traps
The Traffic Analysis Agent for Windows monitors network segments and sends traps to the management server. Novell ConsoleOne displays the alarm when it receives the trap from the management server.
Trap information is displayed in the SNMP Traps window. For each trap, the table shows trap data that can be obtained.
| Statistic | Explanation |
|---|---|
Receive Time |
Displays the time when the trap occurred |
Trap Summary |
Displays a description of the trap |
IMPORTANT: LANZCON will receive trap notifications if you have ensured that Windows SNMP has been configured to send traps to a loopback trap destination address. For details, see Planning to Install the Traffic Analysis Agent for Windows.
To view SNMP traps from LANZCON main menu, click View > SNMP Traps.