Optimizing Server Management
Examine each of the configuration options in the sections that follow to determine whether you require any of the functionality provided:
- Setting Default Trends and Thresholds
- Controlling Alarm Generation
- Defining Recipients for SNMP Alarms
Setting Default Trends and Thresholds
You can modify the default trends and threshold values from within Novell ConsoleOne or manually modify files on servers that have the Management Agent for NetWare or Management Agent for Windows software installed.
When server agents are first loaded, the initial (default) values for trends and thresholds are read from the ntrend.ini file (NetWare) or the n_nttren.ini file (Windows). The initial values are also used whenever a new trend file is created. A new trend file is created when an instance of a monitored object (volume, disk, interface, and so on) is discovered on the server.
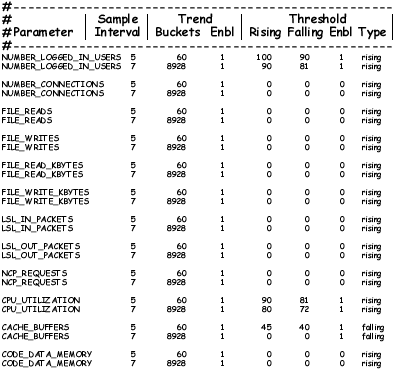
The following is a sample excerpt from an ntrend.ini file:
After the Management Agent for NetWare and Management Agent for Windows software is running, trend and threshold values can be changed (using Novell ConsoleOne) by making use of the threshold-setting features of Novell ZENworks Server Management. If the server is brought down, it retains the last trend and threshold settings that were set. Initial values are reset when any of the following situations occurs:
- Trend files have been deleted manually.
- If the server configuration is modified, for example, by adding a new volume, disk, or interface.
IMPORTANT: Trends are not maintained for CD volumes. Therefore, changing trend parameters for CD volumes has no effect.
The following sections contain information to help you modify initial trend and threshold values:
Changing the Initial Trend Values
The trend values in the ntrend.ini file (NetWare) and n_nttren.ini file (Windows) specify the time interval (Sample Interval) at which a particular trend parameter is sampled, the duration of time for which those samples are kept (Trend Buckets), and whether this sampling parameter is enabled (Enbl). For each value specified by a line in the ntrend.ini file or n_nttren.ini file, a trend record is stored in a separate file in the sys:\ntrend directory on a NetWare server and the \trenfile directory on a Windows server.
The following illustration depicts a line in the ntrend.ini file for the NUMBER_LOGGED_IN_USERS trend parameter with a Sample Interval of 5, Trend Buckets specified at 60, and the enable parameter specified at 1 (enabled).

The following sections describe how to set or alter each of the parameters required for a trend file:
- Setting the Sample Interval
- Setting the Trend Buckets
- Enabling or Disabling a Trend File
- Backing Up Trend Data
You can specify more than one sampling interval or duration for any trend parameter by creating another line in the ntrend.ini file or n_nttren.ini file.
Setting the Sample Interval
The trending software enables you to collect samples of a specified parameter at any of 12 possible time intervals (Sample Interval), from 5 seconds to 1 day.
Each of these sample intervals is specified by a code number in the ntrend.ini file and the n_nttren.ini file. The following table specifies the codes used in the ntrend.ini and n_ntrend.ini files for the permitted sample intervals. For example, if you want to sample a particular trend parameter once every hour, you would use the code 9.
| Sample Interval | Code |
|---|---|
5 seconds |
1 |
10 seconds |
2 |
15 seconds |
3 |
30 seconds |
4 |
1 minute |
5 |
5 minutes |
6 |
15 minutes |
7 |
30 minutes |
8 |
1 hour |
9 |
4 hours |
10 |
8 hours |
11 |
1 day |
12 |
Setting the Trend Buckets
After you have determined a sample interval for collecting samples, you must set a duration of time for which you want to collect samples. For example, if you selected a sample interval of one hour for a particular parameter, you might decide that you want to be able to review the state of that parameter for every hour over the duration of a day.
You determine the duration of time for which a parameter is collected by the number of trend buckets you specify. You must specify a trend bucket for each sample that is collected over a specific period of time. For example, to review the state every hour for 1 day, 24 trend buckets (1 per hour x 24 hours in a day) are required.
The number of trend buckets required for any particular time duration and sample interval is calculated easily. However, for your convenience, the following table shows the number of trend buckets required for each sample interval allowed, for each of seven possible time durations of from 1 hour to 1 year.
After you set the sample interval and the time duration for trend collection, you can compute the size of trend files. The number of trend buckets possible, and the approximate size in kilobytes (in parentheses), for a given sample interval and time duration are also given in the following table. The size of each trend bucket is 4 bytes plus 512 bytes for the header file. For example, if the sampling interval is 5 seconds for a period of 1 hour, the file size would be 720 trend buckets x 4 bytes long (rounded to the closest 4 KB boundary) plus 512 bytes for a total of 4.5 KB. There are always as many trend files as there are enabled trends.
After a particular time duration is exceeded for a file (all the trend buckets have been filled), the oldest samples are overwritten by the most recent samples. This means that the file contains the most recent duration recorded. For example, if you select a sample interval of 1 hour for a duration of 24 hours (using 24 trend buckets), the associated file contains the trend data for the last 24 hours.
Enabling or Disabling a Trend File
Each line in the ntrend.ini file and the n_nttren.ini file contains a parameter that either enables or disables the trending value to begin creating a trend file at startup. To enable the collection of data for a trend file, set this parameter to 1. To disable the collection of data for a trend file at startup, set this parameter to 0.
Changing the Initial Threshold Values
The default threshold values in the ntrend.ini file and the n_nttren.ini file specify when a trap is generated. User-defined values are stored in the trend file header. If the parameter rises above or falls below the set threshold value, a rising or falling trap type is sent.
The following sections describe how to set or alter each of the parameters required for a threshold value:
Setting Rising and Falling Thresholds
Each line in the ntrend.ini file and the n_nttren.ini file contains a parameter for the rising threshold and the falling threshold. For each sample interval, a rising or falling trap can be generated as specified. After a trap is generated, another such trap is not generated until the sampled value falls below this threshold and reaches the falling threshold.
The following figure provides an example of this process for a rising threshold trap:
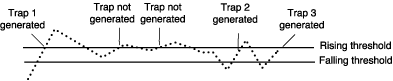
In this example, Trap 1 is generated because it is the first time that the parameter value rises above the Rising Threshold. The next two times the parameter value rises above the Rising Threshold, a trap is not generated because the parameter did not fall below the Falling Threshold. Trap 2 and Trap 3 are generated because the parameter value dropped below the Falling Threshold before exceeding the Rising Threshold.
Enabling or Disabling a Threshold Trap
Each line in the ntrend.ini file and n_nttren.ini file contains a parameter that enables or disables the ntrend.nlm software to send traps as determined by the rising and falling thresholds. This parameter is set to 1 to enable the software to send a trap for the values given, or to 0 to disable the software from sending a trap for this parameter.
Controlling Alarm Generation
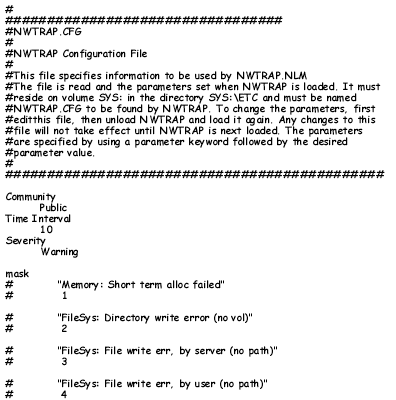
Each managed server has files that specify which system events result in a trap. On NetWare, the nwtrap.cfg and ndstrap.cfg files are stored in the sys:\etc directory. On Windows, this file is nttrap.ini, which is stored in the mw\ini directory.
On NetWare, the trap configuration file is read only when nwtrap.nlm is loaded; therefore, any changes made to the file do not take effect until the next time you load nwtrap.nlm or ndstrap.nlm.
The .cfg files on NetWare contain the list of supported traps. You can modify the .cfg files or nttrap.ini file with the following:
- Types of alarms forwarded to Novell ConsoleOne
- Community strings used for sending SNMP traps
- List of traps to be disabled, using the mask keyword
- Specific alarms that you want to prevent from forwarding
The configuration file consists of keywords and their associated data (case is ignored). Each keyword must be on a line by itself (except for mask values, where they might span several lines), and must be followed by one or more lines of associated data.
You can place comments anywhere in the file, even between a keyword and its associated information. A comment starts with a number sign (#), and continues to the end of the line.
The following is an example of an nwtrap.cfg file:
The following sections contain information to help you control alarm generation:
Setting the Time Interval (Management Agent for NetWare Only)
Sometimes an alarm repeats rapidly (several times per second or per minute) with identical or nearly identical parameters. When this occurs, the second and later alarms within a time interval are usually not as interesting as the first alarm.
To prevent the network and Novell ConsoleOne from being inundated with identical alarms, you can specify a time interval to be applied to every alarm generated. During this interval, alarms that are identical to an initial alarm are discarded.
You can define the time interval in the configuration file as follows:
Time Interval
n
where n can take any value from 0 to 232 to indicate the number of seconds that must elapse before a later alarm is not discarded.
The default time interval is 10 seconds.
Configuring Alarm Severity Levels
Use the severity keyword to set a minimum alarm severity level so that traps for lesser severity alarms are not sent.
The severity levels you can set in the nwtrap.cfg and nttrap.ini files are informational, warning, recoverable, critical, and fatal. The following table lists the NetWare severity level and corresponding SNMP and Novell ZENworks Server Management severity levels.
The default keyword is warning. Under the default, all alarms with a severity level of warning or greater are forwarded.
Defining Recipients for SNMP Alarms
You can configure the Management Agent for NetWare to send SNMP traps (alarms) to the Novell ZENworks Server Management server or to other management nodes.
NOTE: For setting trap destinations on Windows servers, see the documentation on the SNMP Service provided with the Microsoft Windows operating system software.
Steps for designating trap target destinations are described in the following section.
Editing the traptarg.cfg File Manually (Management Agent for NetWare Only)
You can configure trap recipients by manually adding them to the traptarg.cfg file. This is useful for sending traps to third-party management consoles other than the Novell ZENworks Server Management server.
You must add trap recipients manually by specifying their addresses in the traptarg.cfg file, which is located in the sys:\etc directory of all NetWare servers.
The traptarg.cfg defines the recipients of SNMP traps. You can use this file to define recipients of SNMP traps over IPX and UDP/IP. The file is fully annotated to show you how to divide the file into IPX and UDP/IP sections and how to write the IPX and IP addresses of recipients.
The traptarg.cfg file is read only when SNMP is loaded. In most cases, this means bringing the server down and restarting it because a variety of modules must be unloaded and reloaded as well. Thus, any changes made to the traptarg.cfg file do not take effect until the next time you load nwtrap.nlm.
IMPORTANT: The nwalarm.mib file imports symbols from the Host Resources MIB (RFC1514.MIB), which can also be found in sys:\novell zenworks\mms\mwserver\mibcserver\mibserverpool\mibpool.