Setting Up Discovery
The discovery software on a management server automatically discovers the nodes on your network. Network nodes include servers, desktops, routers, hubs, switches, and any other network devices. The Consolidator on the server populates the database with the discovered data. The Atlas Manager on the server reads the database and creates the atlas.
Novell ZENworks Server Management allows discovery in two different environments:
- Pure IP environment
- IP/IPX environment
You must have IP enabled between Novell ConsoleOne and the management server.
Before starting discovery, you must verify the following configurations to ensure that the discovery system is complete:
- Ensure that the router to which Novell ZENworks Server Management server is attached is specified as the seed router in NXPCON. If necessary specify, additional IP routers also. For more information on specifying seed router and additional IP routers, see Specifying a Seed Router and Additional IP Routers
- Ensure that the community strings used for all the devices to be managed are specified in NXPCON. For more information on changing SNMP community strings, see Changing the SNMP Community String.
- Ensure that the Novell ZENworks Server Management server is privileged to query the routers in your network if the routers are configured to restrict access to only specified IP addresses. For more information on IP router discovery, see IP router discovery on IP networks only..
- If you want to restrict the scope of IP or IPX discovery, specify proper scoping entries. For more information on changing the discovery scope, see Changing the Discovery Scope.
- Ensure that the DNS configuration file sys:\etc\resolv.cfg has a valid DNS server's IP address. If a valid DNS server is not specified, discovery will fail to discover the DNS names of hosts.
- For effective discovery, ensure that the Traffic Analysis Agent is installed and running on each network segment that you want to discover and manage. Also, ensure that the names and addresses of these agents are specified in NXPCON. For more information on specifying Traffic Analysis Agents, see Specifying Traffic Analysis Agents to Be Queried by NXPLANZ.
- If a MAC address is being associated with different network numbers, all such network numbers will be merged into a single segment. To avoid the merger, you must specify all such MAC addresses in upper case in the installation_directory\mms\mwserver\bin\consolidator.ini file.
In consolidator.ini, specify the MAC address as a key value pair in the [DuplicateMacAddress] section.
A sample consolidator.ini is as follows:
[DuplicateMacAddress]
mac1="00C04F59910D"
mac2="00C04F5991AB"
...
key_name=value
In consolidator.ini, ensure that the keys are unique.
Before starting the Novell ZENworks Management and Monitoring Services server, edit the zenworks_installation_directory\mms\mwserver\properties\sloader.properties file to append the ARGUMENTS value under TOPOLOGY MANAGER with the following entry:
-ini "installation_directory\mms\mwserver\bin\consolidator.ini"
The following tasks will start discovery initially and help you customize discovery to meet your organization's needs:
- Starting Discovery
- Checking the Status of Initial Discovery
- Checking the Results of Discovery
- Changing the Default Configuration
- Configuring the Java Processes
- Unloading the Management Server
Starting Discovery
Discovery starts automatically when the discovery software is loaded on the management server.
To manually start autodiscovery and load the back-end services (management site services), refer to the steps in "Management and Monitoring Services Installation" in the Novell ZENworks 6.5 Server Management Installation Guide.
Restarting the Management Server
If you bring down the management server (for example, for maintenance), the restart affects discovery in the following ways:
- Each time you reload the discovery modules, a new version of netexplor.dat is created.
- The initial discovery cycle starts again.
- The Consolidator processes all the discovery data again as Novell ZENworks Server Management rediscovers the network.
To unload the discovery modules:
To load the discovery modules:
Checking the Status of Initial Discovery
As discovery progresses, your topology maps in Novell ConsoleOne reflect the discovered data. However, in a large network, it might take a day or two before the initial discovery is complete.
The easiest way to determine whether initial discovery is complete is to use the NXPCON utility on the management server and check the status of each NetExplorer module. Each module must complete at least one full cycle to draw a complete map.
To view the discovery status, look at the discovery status fields at the top of the NXPCON screen. See Using the Discovery Configuration Utility for information about how to access this screen.
The NXPCON main screen gives you the information you can use to monitor the status of discovery.
The following information is displayed:
NetExplorer Up Time: Shows the time since NetExplorer started running.
NetExplorer System Status: Shows the overall status. It can have one of the following values:
- Waiting to start - Waiting for one or more of the discovery modules to start.
- Running - Discovery modules are running.
Module Status: Shows the status of each module and the number of cycles each module has completed. The module status can be one of the following values:
- Not Loaded - Module is not loaded.
- Waiting to Start - Module is loaded but not started.
- Running - Module is running and collecting data.
- Suspended - Module is suspended because it reached the end of the schedule in which it was running.
- Completed - Module completed a discovery cycle.
- Unknown - NetExplorer cannot obtain the module status. (This is usually seen if the module is not loaded.)
Checking the Results of Discovery
When the Consolidator has finished updating the database after the initial discovery, verify if the network topology is accurately represented on the maps.
NetExplorer might not have discovered the type if a node is not on the map. If a node does not appear in the correct segment, NetExplorer may not have received sufficient information to place it correctly. For more information, see What Is Discovered. The following characteristics are captured:
- IP - Discovers IP routers; IP hosts; IP services such as HTTP, Telnet, SMTP, DNS, FTP; and DHCP.
- IPX - Discovers IPX workstations, IPX routers, and IPX services (file, print, any other Service Advertising Protocol [SAP]).
- Subnet mask
- Services
- Novell eDirectory names and tree
- DNS Names
The Consolidator on the management server communicates with NetExplorer to obtain network discovery data. The Consolidator reads the netexplor.dat file and populates the database.
IMPORTANT: The NETEXPLOR.DAT file is reset every time you restart NetExplorer.
The Consolidator communicates with two Java* components: the Bridge Agent and the SN3 agent. The Bridge agent retrieves bridges present in the network and the related topology of the network. The SN3 agent does SLP-based discovery for NetWare 5.x servers and gets the corresponding Novell eDirectory name for each IP and IPX address discovered.
IMPORTANT: NetExplorer and the Consolidator can run independent of each other on the management server.
NetWare 5.x servers are discovered faster because NetWare 5.x supports the Service Location Protocol (SLP).
Ensuring Complete Discovery
IPX workstations are discovered with a username if the user is logged in to or attached to a NetWare server running management agent software. To ensure that the usernames for IPX devices and workstations on your network can be discovered, install a management agent on all NetWare servers where users log in.
If you want NetExplorer to discover AppleTalk* devices, you need to install the NetWare Traffic Analysis Agent on one server on each segment.
Changing the Default Configuration
The discovery software is installed with default configuration designed to work in most environments. However, if your network or the data on your database is not discovered, you need to reconfigure discovery.
Read the following sections for more information:
- Using the Discovery Configuration Utility
- Choosing Which Discovery Modules to Load
- Changing the SNMP Community String
- Changing the Discovery Scope
- Specifying Traffic Analysis Agents to Be Queried by NXPLANZ
- Specifying a Seed Router and Additional IP Routers
Using the Discovery Configuration Utility
You can use the NXPCON utility on the management server to change the discovery configuration. For example, you can change the scope of discovery or view the status of the initial discovery process.
To access the NXPCON utility:
-
Access the server console on the management server either directly from the server prompt or remotely.
-
If the discovery modules are already loaded on the server, click the NetExplorer Console Utility option in the Available Screens window.
or
If the discovery modules are not loaded, enter netxplor at the server prompt.
NXPCON is loaded automatically when NetExplorer is loaded and is accessible at the management server.
If NXPCON is not loaded on your management server, check to see if NetExplorer is running. If NetExplorer is running, enter load nxpcon at the system console prompt. If NetExplorer is not running, enter netxplor at the system console prompt.
Choosing Which Discovery Modules to Load
By default, the Novell ZENworks Server Management installation loads the NXPCON utility with all modules running. If you are not using IPX on your network, you can configure NXPCON to not load the NXIPX module.
IMPORTANT: Make sure TCP/IP is bound to at least one of your server's network boards.
To view or modify which modules are being loaded:
-
In NXPCON, click Configuration Options > NetExplorer Modules.
-
Select the field you want to change, then press Enter.
-
Select Yes or No to load or unload the module, then press Enter.
-
Press Esc to exit the NetExplorer Modules dialog box.
-
Click Yes.
You can enable IP host discovery or file-based discovery. To enable or disable:
-
At the management server prompt, unload NetExplorer by entering unxp.
-
Reload the NetExplorer modules by entering netxplor.
Changing the SNMP Community String
In Novell ZENworks Server Management, the default community string is PUBLIC. If your organization's SNMP community string is not PUBLIC, reconfigure the SNMP community string in NXPCON.
NOTE: In order to prevent burdening the routers, some organizations add one more level of control by allowing only certain IP addresses to do SNMP queries to the routers. If this is true in your organization, make sure that the IP address given to the Novell ZENworks Server Management sever is privileged to query the routers in the network. Otherwise, the discovery will not be complete and incomplete network information will appear under "Islands" in the atlas.
To view, add, modify, or delete SNMP configuration information, such as community strings used for IP and IPX discovery:
-
In NXPCON, click Configuration Options > SNMP.
-
In the SNMP dialog box, click Edit Community Name List.
-
To add a community string, press Insert.
or
To modify a community string, click the community string, then press Enter.
or
To delete a community string, click the community string, then press Delete.
-
Press Esc, then click Activate Changes from the Configuration Options window. For more information about Activate Changes, see Refreshing the SNMP Configuration Settings of NetExplorer Using Activate Changes.
-
Respond to the prompts accordingly.
For information about other configuration options in the SNMP window, see Using the Discovery Configuration Utility, or Novell ConsoleOne online help.
Changing the Discovery Scope
By default, NXPCON is set to discover all IPX and IP networks. You can, however, limit the discovery scope.
You could, for example, limit discovery to discover the IPX addresses or the IP subnet addresses. If you are managing a large network, by setting the scope of discovery, you will be limiting the discovery to a section of your network, which will reduce the network traffic and in turn make your atlas more manageable
If you do not accurately specify the scope of discovery, you will not be able to discover your target device. Therefore it is imperative to specify in the scope, all the devices that are present in the path leading to the target device you want to discover.
For example, consider the following scenario:
Your discovery server D1 is connected to network N1. Router R1 connects network N2 with N1. Assume you need to discover network N2. To do this, the following entries need to be set in the scope:
- Discovery server D1 with subnet mask 255.255.255.255
- Router R1 with subnet mask 255.255.255.255
- Network N2 with its appropriate subnet mask number.
In this scenario, network N2 can be reached from the discovery server through Router R1, and therefore R1 needs to be in the scope even if the user is not interested in the network N1 that R1 is routing.
After initial discovery, until you reset the database, nodes remain in the database even if they have been removed from the network.
Changing the discovery scope does not affect devices that are already in the database due to prior runs of discovery. In particular, devices that were discovered due to a wider scope (or no scope) will not be removed when a restrictive scope is set for later runs of discovery. If it is desired that the atlas shows only those devices that fall in scope, the database needs to be reset to ensure that segments and devices that are out of scope do not appear in atlas. Note that the database being reset would result in loss of data like alarms and alarm disposition unless they are migrated. Alternatively, if the number of such devices which are out of scope is very small, the user can manually delete them from the database using the Database Object Editor.
You can restrict the scope of IP or IPX discovery by entering the IPX network numbers or IP address ranges specified by the mask fields you want to discover. To view of restrict the IP or IPX scope:
-
In NXPCON, from the Configuration Options window, click Discovery Scope.
-
Select IP Discovery Scope or IPX Discovery Scope.
-
Press Enter to view or configure the scope of your discovery.
-
Press Insert to add a new IP or IPX discovery scope entry.
or
Press Enter to modify a discovery scope entry.
or
Press Delete to delete a discovery scope entry.
For IP Networks: Discovery scope is tightly bound to the network numbers. The scope can be restricted by specific networks as illustrated in the following diagram.
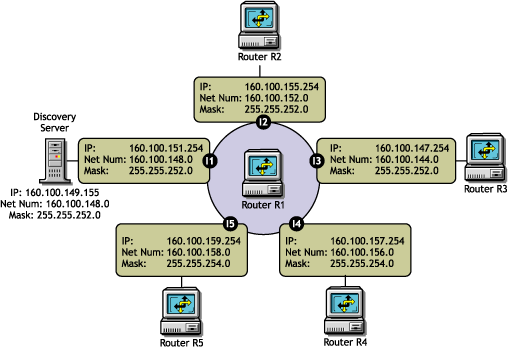
Case 1: To exclude 160.100.148.0 and discover the other four networks, specify the scope as:
160.100.149.155 , 255.255.255.255
160.100.151.254 , 255.255.255.255
160.100.144.0 , 255.255.252.0
160.100.152.0 , 255.255.252.0
160.100.156.0 , 255.255.254.0
160.100.158.0 , 255.255.254.0
The 255.255.255.255 mask for the Novell ZENworks Server Management server and the router interface on the local network acts as a machine specific scope. This prevents other machines in the network 160.100.148.0 from being discovered.
Case 2: To discover only the local network 160.100.148.0, specify the scope as:
160.100.148.0 , 255.255.252.0
The network 160.100.148.0 (Mask: 255.255.252.0) has IP addresses in the range 160.100.148.1 to 160.100.151.254.
Consider a case where all the important servers in your network have IP addresses in the range 160.100.149.1 to 160.100.149.254. You might specify the following scope:
160.100.149.0 , 255.255.255.0
The above scope is not allowed by the discovery system. You cannot set a scope to discover only a part of the subnet. You will have to set the entire subnet in scope.
Case 3: To discover only 160.100.156.0 and 160.100.158.0 scope should be given as:
160.100.149.155 , 255.255.255.255
160.100.151.254 , 255.255.255.255
160.100.156.0 , 255.255.254.0
160.100.158.0 , 255.255.254.0
Replacing the last two scoping entries with a single entry 160.100.156.0 , 255.255.252.0 might not have the same effect.
You cannot create a single scoping entry to cover two or more subnets. You have to create a scope for each subnet.
For IPX Networks: Restrict the scope to the IPX networks to be discovered by entering a single IPX network number and a mask.
The mask indicates which part of the network number needs to match. An F in the mask means that the corresponding digit must match; a 0 (zero) means that no match is required.
For example, network number 12340000 and mask FFFF0000 will match any network number starting with 1234.
Network number C00000FF and mask FF0000FF will match any network number starting with C0 and ending with FF, such as C01234FF or C00000FF.
-
Enter the address and mask for your discovery scope.
-
Press Esc, then click Yes to save changes to the configuration file.
-
Press Esc to return to the Discovery Scope window.
-
Unload and reload the NetExplorer modules or restart your management server for the changes to take effect.
Specifying Traffic Analysis Agents to Be Queried by NXPLANZ
Traffic analysis agents in your network are usually discovered by the NXPLANZ module. If SLP is disabled or if SAP packets are filtered by the routers in your network, NXPLANZ might not be able to discover all the Traffic Analysis Agents in the network.
To specify Traffic Analysis Agents to be queried by the NXPLANZ module:
-
In NXPCON, click Configuration Options > NXPLANZ Discovery.
-
To add an agent, press Insert.
-
Enter the address and mask for your discovery scope.
-
Press Esc, then click Yes to save changes to the configuration file.
-
Unload and reload the NetExplorer modules or restart your management server.
-
To modify an agent, select the agent, then press Enter. Modify the required information.
-
To delete an agent, select the agent, then press Delete.
Specifying a Seed Router and Additional IP Routers
Seed router is the router to which Novell ZENworks Server Management server is connected. For router discovery to be effective, always specify the seed router using NXPCON and ensure that Novell ZENworks Server Management server can query the seed router by specifying the proper community name in NXPCON.
You need to specify additional IP routers if you want to discover one part of your network and the Novell ZENworks Server Management server does not have access to one of the intermediate routers.
To specify a seed router or additional IP Routers:
-
In NXPCON, click Configuration Options > IP Discovery > IP Router Discovery.
The default for IP Seed Router is <local>, which is the Novell ZENworks Server Management server.
-
To add a seed router, select IP Seed Router and press Enter.
-
Enter the IP address.
-
To add additional routers, select Additional IP Routers and press Enter.
-
Enter the IP address.
-
Press Esc, then click Yes to save changes to the configuration file.
-
Unload and reload the NetExplorer modules or restart your management server.
Refreshing the SNMP Configuration Settings of NetExplorer Using Activate Changes
When you change the SNMP configuration settings of NetExplorer (such as the SNMP community string), the NetExplorer can be automatically updated with the changes without restarting NetExplorer. To automatically update NetExplorer with new settings, select Activate Changes from the Configuration Options window of NXPCON.
However, if you change any other configuration options of NXPCON (for example, the Discovery Scope), you must restart NetExplorer for these changes to be applied on NetExplorer. For more information on how to restart NetExplorer, see Stopping and Starting the Discovery NLM Files.
Configuring the Java Processes
The following are the three Java processes of the discovery system:
- Topology Manager
- Bridge Discovery
- SN3 Discovery
These Java processes form a part of the Management Site Server and exist as sections in the sloader.properties file in the installation_path\novell zenworks\mms\mwserver\properties directory. They are specified in the following format:
- [Topology Manager]
- Name = Topology Manager
- Load Option = auto
- Other options
To configure the Java processes:
- Change the value of the Load Option from Auto to Manual to prevent the process from starting the next time you enter the SLOADER command on the server.
IMPORTANT: If you modify the sloader.properties file after you start the Management Site Server, you must restart the Management Site Server for the changes to take effect.
- Do not change the Load Properties and the Load Sequence options in the sloader.properties file. These options are necessary for the Management Site Server to work correctly.
Customizing Starting and Stopping Discovery
You can choose to stop or start the discovery NLM files or the Java discovery processes without affecting the other services of the site server, such as the Alarm Manager Service.
Stopping and Starting the Discovery NLM Files
To stop the discovery NLM files, enter UNXP at the server console.
To start all the discovery NLM files, enter NETXPLOR at the server console.
NOTE: You cannot start the Discovery NLM files if the Java processes are running. Stop the Java processes and then enter NETXPLOR at the server console to start all the discovery NLM files.
Stopping and Starting the Java Discovery Services
To stop the discovery NLM files, enter STOPDIS at the server console.
To start all the discovery NLM files, enter STARTDIS at the server console.
You can customize starting or stopping any of the Java discovery processes at any point in time. For example, you decided not to run the Bridge discovery initially but decide to run it anyway. In such a scenario, you need not stop all the services and restart them.
You can edit the startdis.ncf file in the \Novell ZENworks\mms\mwserver\bin directory, which has the following contents:
MWSETENV.NCF
java -Xbootclasspath/p:$mwxbpath -classpath $MMSCP;$CLASSPATHcom.novell.utility.servicemanager.ui.Start "Topology Manager" "Bridge Discovery" "SN3 Discovery" <ip address of the server> sloader
In the above file, the Java discovery process names like SN3 Discovery must match the names of the sections in the sloader.properties file. By changing just the names in the NCF files, you can create similar NCF files to selectively stop and start the Java discovery services.For example, if you want to start just the Bridge discovery process:
- Create a startbri.ncf file with the following contents:
mwsetenv.ncf
java -Xbootclasspath/p:$mwxbpath -classpath $MMSCP;$CLASSPATHcom.novell.utility.servicemanager.ui.Start "Bridge Discovery" <ip address of the server> sloader
- Copy the startbri.ncf file to the \novell zenworks\mms\mwserver\bin directory.
- Run the startbri.ncf file to start the Java discovery bridge service.
For example, to stop the Java discovery process for the SN3 Agent:
- Create a stopsn3.ncf file with the following contents:
mwsetenv.ncf
java -Xbootclasspath/p:$mwxbpath -classpath $MMSCP;$CLASSPATHcom.novell.utility.servicemanager.ui.Stop "SN3 Discovery" <ip address of the server> sloader.
Unloading the Management Server
To unload the management server:
-
If restarting the server is not feasible, make sure all Service Loader processes are exited. At the server console prompt, enter
stopService.ncf
This process might take some time to unload the services.
To know the status of "com.novell.zfs.mms.utility.servicemanager.zfs_MMS_Services" and "com.novell.zfs.mms.utility.servicemanager.zfs_MMS_LanzSlpDis," enter java - show at the server console prompt.
You can use java -exit if you can terminate all other Java processes. Unload Java, if all the services are not closed.
-
If you are not running any other components of ZENworks 6.5 Server Management or ZENworks 6.5 Desktop Management that use the naming server, enter stopmms -n to unload all ZENworks 6.5 Server Management components.
-
Switch to the Sybase* process by pressing Ctrl+Esc then enter q to terminate the Sybase database engine.