Upgrading to a Support Pack Using a Wizard or Script
For Policy and Distribution Services, Distributor and Subscriber servers can be upgraded to a support pack in any order.
There are two platform-based options for upgrading to a support pack using a wizard or script:
NetWare and Windows Servers: For these platforms, the wizards are started on the Windows workstation from installation menu options run from an executable file included in the support pack download.
Policy and Distribution Services, Server Inventory, Remote Management, and Management and Monitoring Services can all be upgraded to a support pack using this method.
Linux and Solaris Servers: For these platforms, a script file is used. It is provided in the support pack download and is run locally on each Linux or Solaris server to be upgraded.
Only Policy and Distribution Services can be upgraded using this method.
To automate installation to multiple Subscriber servers on all supported platforms, we recommend upgrading these servers using the Server Software Package method (see Upgrading to a Support Pack Using a Server Software Package).
To upgrade ZENworks 6.5 Server Management to a support pack using a wizard or script:
- Upgrade Concepts and Issues
- Selecting the Servers to Upgrade
- Upgrading Policy-Enabled Server Management on NetWare and Windows Servers
- Upgrading Policy and Distribution Services on Linux and Solaris Servers
- Upgrading Management and Monitoring Services on NetWare Servers
Upgrade Concepts and Issues
Review the following to understand what the support pack upgrade does, and to understand the issues involved:
- What the Support Pack Upgrade Does and Does Not Do
- Upgrading Servers Incrementally
- Upgrading Servers on Multiple Trees
- Cluster Issues with Upgrading
What the Support Pack Upgrade Does and Does Not Do
In the following table, the applicable Server Management components are indicated for the upgrade actions. A "T" means the statement is true for the component; an "F" means it is not; and, a "-" means it is not applicable to the component.
| Action | P | S | R | M |
|---|---|---|---|---|
The support pack does not upgrade ZENworks for Servers 3.x to ZENworks 6.5 SPx. You must first follow the instructions in Policy and Distribution Services, Server Inventory, Remote Management, or Management and Monitoring Services before applying the support pack. |
T |
T |
T |
T |
The support pack does not install ZENworks components where they previously were not installed. |
T |
T |
T |
T |
The support pack does not upgrade Novell eDirectoryTM objects. |
T |
T |
T |
T |
The support pack includes all ZENworks 6.5 hot patches through Hot Patch 5. |
T |
- |
- |
- |
The GUI wizard upgrades the ZENworks 6.5 Policy-Enabled Server Management software on the servers where it discovers upgradable software. It uses the installation paths where ZENworks 6.5 was installed. |
T |
T |
T |
T |
The script upgrades ZENworks 6.5 Policy and Distribution Services software to the support pack on the Linux or Solaris machines where you locally run the script. |
T |
- |
- |
- |
In the GUI wizard, you cannot select or deselect any check boxes. Their status is determined by the wizard when you select the machines for upgrading. |
T |
T |
T |
- |
The wizard automatically stops and restarts the services, if they are running. It leaves the services in the same state they were in before upgrading. |
T |
F |
F |
F |
The services are not restarted if they were not running before the wizard started. |
T |
F |
T |
F |
You have an option to restart the services if they were not running before the wizard started. |
F |
F |
F |
T |
Files are always copied, replacing both older and newer files with the upgraded files. Files copied to locations outside of the ZENworks directories are replaced only if they are older. |
T |
T |
T |
T |
If you already have a hook driver installed on the machine where you are upgrading, the hook driver is uninstalled during the upgrade. |
- |
- |
T |
- |
The wizard upgrades the ConsoleOne® snap-ins to ZENworks 6.5 SPx on both the installation workstation and any target servers where ConsoleOne is found by the wizard. For the ConsoleOne check box to show as selected, version 6.5 of the snap-ins must have been previously installed. |
T |
T |
T |
T |
In the wizard, you cannot select Workstations where ConsoleOne is installed to update the Server Management snap-ins there. You must run the wizard on each workstation where you have the snap-ins installed in order to update them. |
T |
T |
T |
T |
The ZENworks 6.5 Server Management plug-ins for iManager are not upgraded by the Policy-Enabled Server Management menu option. You must do this with the Web-Based Management Components menu option after you have exited the support pack wizard. This task is covered in Upgrading the Novell iManager Plug-Ins. Also, if you have iManager 2.0.2 or 2.5 installed, you can install the plug-ins for the first time using the task covered in Upgrading the Novell iManager Plug-Ins. |
T |
- |
- |
- |
NOTE: P = Policy and Distribution Services; S = Server Inventory; R = Remote Management; M = Management and Monitoring Services; T = true; F = false; and, - = not applicable.
Upgrading Servers Incrementally
Incremental upgrading does not apply to Remote Management or Management and Monitoring Services.
You can upgrade all ZENworks 6.5 servers to the support pack in one pass, or incrementally (such as for geographical locations).
The wizard copies files to each server, one server after another. If you have many Subscribers, consider the time that it might take to upgrade them. If that time frame is too long, select your target Subscribers in groups so that you can upgrade one group at a time, or use the software package upgrade method.
Because upgrading Policy and Distribution Services on Linux and Solaris servers is done locally one at a time using a script, incremental upgrading doesn't apply. If you want to perform incremental upgrades of groups of Linux or Solaris servers, consider using a Server Software Package.
For more information on upgrading with software packages, see Upgrading to a Support Pack Using a Server Software Package.
Upgrading Servers on Multiple Trees
Upgrading across multiple trees does not apply to Remote Management or Management and Monitoring Services.
When selecting servers in the wizard, you select them by their NCP Server objects, not their ZENworks objects. If your ZENworks servers reside in multiple trees, you must be logged into each of those trees to be able to select the servers.
You can also upgrade servers across multiple trees by using a Server Software Package (see Upgrading to a Support Pack Using a Server Software Package).
Cluster Issues with Upgrading
The following cluster issues do not apply to upgrading Remote Management or Management and Monitoring Services:
- Upgrading Cluster Ready versus Cluster Aware Servers
- Cannot Upgrade Clustered Servers Using the Server Software Packages
Upgrading Cluster Ready versus Cluster Aware Servers
When you select servers for installing a support pack, you can select both the virtual server's cluster object and the NCP objects of the node servers in the cluster, and the installation program will allow you to install to both the virtual server and its nodes. However, if you install a support pack to both, you will have two different locations for the zfs.ncf startup file and it will be run from both locations, causing errors. Therefore, you must know whether you installed Server Management in a cluster ready or cluster aware environment before you select where to install a support pack.
If your ZENworks servers are installed as cluster ready:
- You must select only the virtual server object to install a support pack
- The support pack installation copies files to each node in the cluster
- The support pack installation sets up one zfs.ncf file for the cluster
If your ZENworks servers are installed as cluster aware:
- You must select only the node servers' NCP objects to install a support pack
- The support pack installation copies files to each node in the cluster
- The support pack installation sets up the zfs.ncf file on each node's server
For more information, see ZENworks Server Management in a Clustered Environment.
Cannot Upgrade Clustered Servers Using the Server Software Packages
The support pack ZENworks 6.5 SPx Companion CD download package includes the following Server Software Packages:
zsm651_polydist.cpk or zsm652_polydist.cpk
zsm651_invagnt.cpk or zsm65sp2_invagnt.cpk
zsm651_remmgmt.cpk or zsm65sp2_remmgmt.cpk
RemStandAlonePacPro.zip
These cannot be used to upgrade clustered servers to the support pack for the following reasons:
- Server Software Packages do not have eDirectory access
- Server Software Packages can only update the local box, leaving the other nodes not updated
Selecting the Servers to Upgrade
Incremental Issues: In determining which servers you want to upgrade to the support pack, consider any incremental upgrade issues. For more information, see Upgrading Servers Incrementally.
Servers to be Upgraded Using a Wizard: If you plan to run the support pack wizard, you might be able to wait until you are running the wizard to determine which servers to upgrade, because you can use one of the following methods for selecting NetWare® and Windows servers:
- If a small percentage of your servers have ZENworks 6.5 installed on them, and you know the NCPTM object names of the servers that have ZENworks 6.5 installed on them, you can individually select those servers when you are running the support pack wizard.
- If a large percentage (or all) of your servers have ZENworks 6.5 installed on them, you can select all of the servers in the tree or selected context. Only those that have upgradable ZENworks 6.5 components installed will be listed on the Server Selection page for upgrading.
Servers to be Upgraded Using a Server Software Package: If you plan to use the Server Software Package method, determine which servers you want to upgrade to the support pack:
- If a small percentage of your servers have ZENworks 6.5 installed on them, you can include all of your Subscriber servers in the Channel that you create for the Distribution. When you select a Subscriber server to be upgraded that also has the Distributor software on it, that software is also upgraded.
- If a large percentage of your servers have ZENworks 6.5 installed on them and you want to upgrade them incrementally, such as by geographic region, identify which servers you want in each group so that you can subscribe them to the Channels that you create for each group.
When upgrading to the support pack using a software package, you will create a unique Channel for the upgrade Distribution, then subscribe the Subscribers to be upgraded to the support pack to that Channel.
Servers to be Upgraded using a Script: If you do not plan to use the Server Software Package method for upgrading Linux or Solaris servers to a support pack, identify the servers where you need to run the script.
Upgrading Policy-Enabled Server Management on NetWare and Windows Servers
To upgrade ZENworks 6.5 Policy-Enabled Server Management to a support pack, perform the following tasks in order:
- Pre-upgrade Checklist
- Upgrading to a Support Pack
- Upgrading the Novell iManager Plug-Ins
- Starting the Services
- Verifying That the Services Are Running Successfully
- Verifying That the Server Has Been Upgraded to the Support Pack
- Repeating the Upgrade
- Post-Upgrade Inventory Task
- Post-Upgrade Manual Distribution Task
Pre-upgrade Checklist
- Review the ZENworks 6.5 Server Management Support Pack Readme on the ZENworks 6.5 Web site for any last-minute information concerning upgrading to the support pack.
- Make sure that ZENworks 6.5 Server Management has been installed on the servers you want to upgrade to the support pack.
- Make note of any clustered servers and determine whether they have ZENworks installed as cluster ready or cluster aware. For more information, see Cluster Issues with Upgrading.
- If you are upgrading Server Inventory, you must perform the following tasks:
1. Identify the servers that need Server Inventory reinstalled.
2. Stop the Inventory service.
- On a NetWare Inventory server: At the server console prompt, enter sys:\system\invstop.ncf.
If you do not want the Sybase database to be stopped automatically when you stop the Inventory services, comment the Unload dbsrv8.nlm line in the sys:\system\invstop.ncf file.
- On a Windows 2000/2003 Inventory server: In the Control Panel, double-click Administrative Tools, double-click Services, select Novell Inventory Service, then click Stop.
3. Stop the Inventory database.
- On NetWare: At the Sybase console prompt, press the Q key.
- On Windows 2000/2003: In the Control Panel, double-click Administrative Tools, double-click Services, select Novell Database - Sybase, then click Stop.
- On a NetWare Inventory server: At the server console prompt, enter sys:\system\invstop.ncf.
- If you have any instance of ConsoleOne running on a target server via a mapped drive from a workstation, or running from the installation machine, exit those instances of ConsoleOne before running the installation program.
If ConsoleOne is running on a target server via a mapped drive on your installation machine, or if it is running from the installation machine, the ZENworks Server Management snap-ins for ConsoleOne are not installed at those locations.
- If you have not already done so, log in to the eDirectory trees that contain the NCP Server objects for the servers where you will be updating the ZENworks 6.5 software to the support pack.
You are automatically authenticated to all of the target NetWare servers in the trees you are logged in to during installation, so that you can select those servers for installing the Server Management software.
If you are not logged in to a tree, you cannot select its server objects during the upgrade process.
You can run the wizard as many times as necessary.
- If you will install software to any Windows servers, make sure that you have authenticated to the servers.
This enables you to select Windows servers from their domains for installing the Distributor and Subscriber software. However, if you are not logged in to a Windows server before starting the installation, you can authenticate during installation using a username and password in the Add Server dialog box where you select the Windows server for installation.
- If you will install software to any Windows servers, make sure you have closed the Services window on each Windows server.
The installation program automatically stops all ZENworks Server Management services. However, the Server Management services cannot be registered if the Services window is left open during installation to the server.
- If you will be installing a support pack to a ZENworks 6.5 Inventory server that has been previously upgraded from ZENworks for Servers 3.x, you must start the Inventory service and the database at least once prior to upgrading the server to ZENworks 6.5 SPx Server Management.
Upgrading to a Support Pack
To upgrade ZENworks 6.5 Server Management to a support pack, do the following tasks in order:
Start the Support Pack Wizard
-
Run winsetup.exe.
Winsetup.exe is found at:
download_location\zen65sp1\winsetup.exe
or
download_location\zen65sp2\winsetup.exe
where download_location depends on where you unzipped the download file. The default is c:\temp.
This starts the wizard that contains the support pack upgrade menu options.
For instructions on downloading the support pack file containing the winsetup.exe file, see the ZENworks 6.5 Server Management Support Pack Readme on the ZENworks 6.5 Web site.
-
On the main menu, select Server Management.
-
Select Policy-Enabled Server Management to start the wizard and display the License Agreement page.
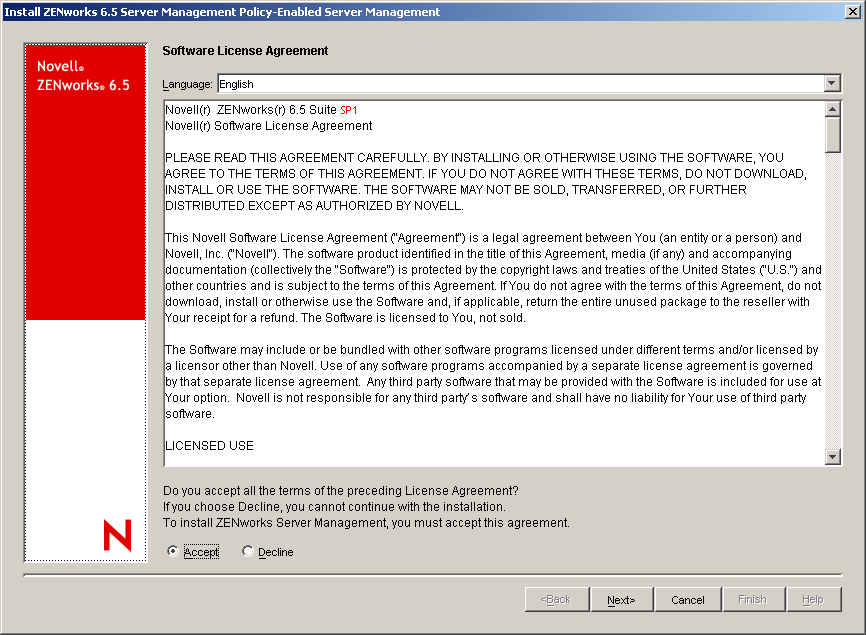
-
If you agree to the Software License Agreement, click Accept, then click Next; otherwise, click Cancel to exit.
The Server Selection page is displayed with only Local Machine displayed and its ConsoleOne snap-ins check box enabled, if the ZENworks 6.5 snap-ins are installed on that machine.
-
Continue with Select the Servers to Upgrade.
Select the Servers to Upgrade
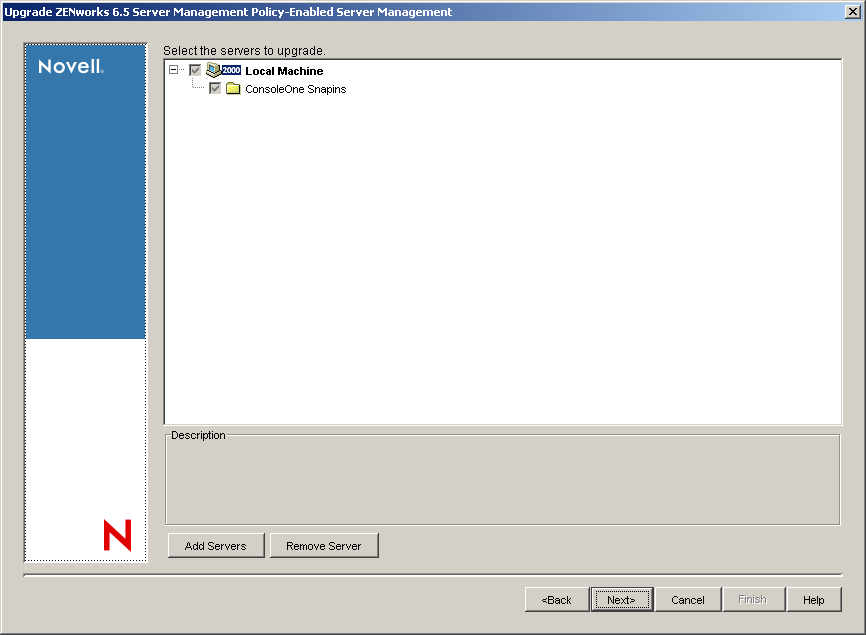
-
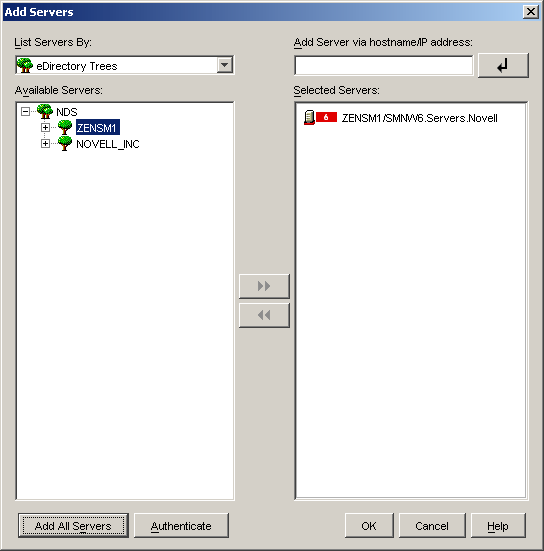
On the Server Selection page, click Add Servers to display the Add Servers dialog box.
-
Browse for the NCP Server objects where you want to install the support pack upgrade, then click OK.
You can browse for NetWare servers by selecting eDirectory Trees from a drop-down box, or browse for Windows servers by selecting Microsoft Domains (or Microsoft Active Directory) from a drop-down box. You can select servers in the following ways:
- Select servers individually or in multiples by using the Ctrl and Shift keys
- Select servers in groups by selecting eDirectory containers, Windows workgroups, or Microsoft domains, then clicking the Add All Servers button
IMPORTANT: If you choose to remotely install the Inventory Agent or the Remote Management Agent on a Windows 2003 server configured as Domain Controller, you must specify the hostname or the IP address of the server in the Add Server Via Hostname/IP Address field.
- Select all NetWare servers in the tree by selecting the tree and then clicking the Add All Servers button
IMPORTANT: If you select Add All Servers, the Selected Servers list box includes servers that cannot be upgraded (such as those that do not have ZENworks 6.5 installed). Then, when you click OK to continue, those servers will not be included on the Server Selection page. However, for each server that is not included, a message is displayed indicating this, and you must click OK to continue. To speed up the process, if you can determine in the Selected Servers listing which servers do not have ZENworks 6.5 installed, remove them from this list before clicking OK to continue to the Server Selection page.
For more information on using the Add Servers dialog box, click its Help button.
Make sure that you have selected all of the NetWare and Windows servers that you want to upgrade to the support pack before exiting the Add Servers dialog box.
The selected servers are displayed below the Local Machine option on the Server Selection page:
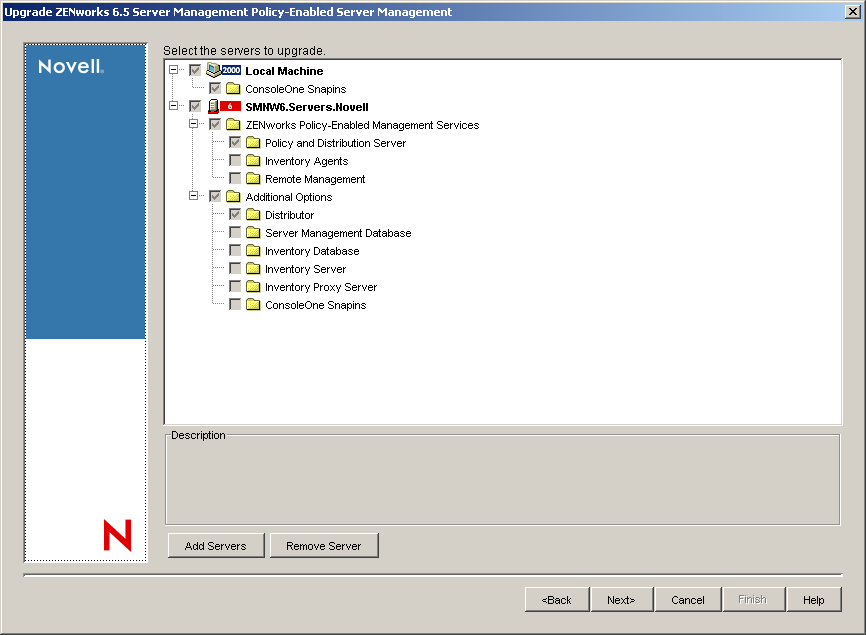
The ZENworks 6.5 Server Management components that have been installed and can upgraded to the support pack are indicated by a check mark in their check boxes. Click the plus signs to expand the tree structure to view the components.
-
You cannot install a support pack to both a virtual server's cluster object and the NCP Server objects for each of its nodes; therefore, if you have selected both, you must remove one or the other to prevent errors caused by zfs.ncf being run from two different locations in the cluster.
For more information, see Cluster Issues with Upgrading.
-
Click Next and continue with Review the Support Pack Upgrade Summary.
Review the Support Pack Upgrade Summary
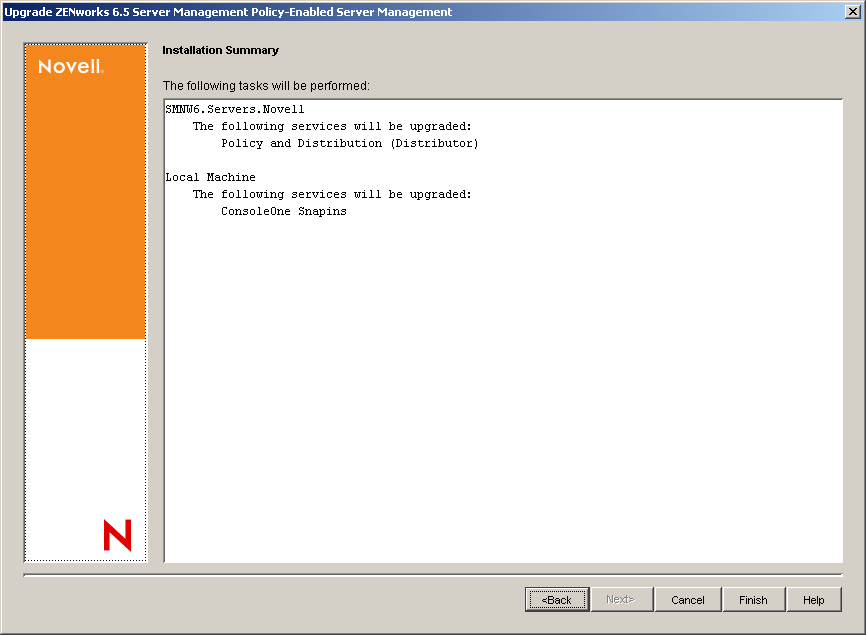
-
On the Installation Summary page, review the information to determine if the wizard will be doing what you planned.
You can click Back to make changes.
-
Click Finish to begin the support pack upgrade process.
-
After the support pack wizard has finished, review the installation log file to determine whether any components failed to install.
The log file is located in the installation machine's temporary directory as determined in its Windows environment settings. Examples:
Policy and Distribution Services:
%temp%\_resnnn.txt
where nnn is increased incrementally each time a new log is created.
%temp%\invrc.log
-
After successfully upgrading the software to the support pack, click Exit to close the wizard.
At this time, the software has been upgraded to the support pack and the Server Management services should be restarting on the upgraded servers, if those services were running on the server prior to being upgraded.
If a server did not have its Server Management services running before it was upgraded, you must restart them manually. These instructions are provided in the one of the next sections.
-
Continue with Upgrading the Novell iManager Plug-Ins.
Upgrading the Novell iManager Plug-Ins
This section is only applicable to Policy and Distribution Services.
If you have Novell iManager 2.0.2 or 2.5 installed in your network, and you need to upgrade the iManager plug-ins to ZENworks 6.5, or install the plug-ins for the first time, do the following:
-
Run winsetup.exe.
Winsetup.exe can be found at:
download_location\zen65sp1\winsetup.exe
or
download_location\zen65sp2\winsetup.exe
where download_location depends on where you unzipped the download file. The default is c:\temp.
This starts the wizard that contains the support pack upgrade menu options.
For instructions on downloading the support pack file containing the winsetup.exe file, see the ZENworks 6.5 Server Management Support Pack Readme on the ZENworks 6.5 Web site.
-
On the main menu, select Server Management.
-
Select Web-Based Management Components to start the wizard and display the License Agreement page.
-
Accept the License Agreement, then click Next to view the Login Information page.
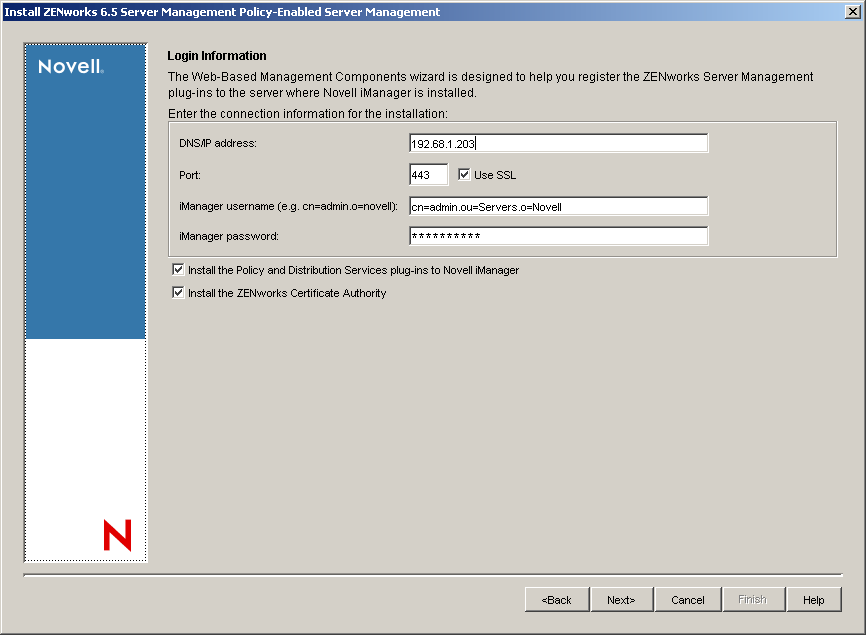
-
Fill in the fields:
DNS/IP Address: Specify the address of the server where iManager is installed.
Port: Specify the port number to use when communicating with iManager. It is most likely 443 if SSL is used; if not, use 8080.
Use SSL: By default, this check box is not selected. If you have iManager configured to use SSL, you should enable this check box.
iManager Username: Specify the iManager (fully distinguished) login name of the user with rights to iManager. This must be entered in the format indicated (for example, cn=admin.o=novell). Installation cannot continue if the username cannot authenticate.
iManager Password: Specify the iManager password of the user running the wizard.
Install the Policy and Distribution Services Plug-Ins to Novell iManager: Select the check box to install the Remote Web Console and Tiered Electronic Distribution plug-ins to iManager so that you can manage these components from a Web browser.
Install the ZENworks Certificate Authority: Select the check box to install the ZENworks certificate authority servlet for inter-server communications security. This provides additional security to ensure that data received from outside your secured network is from a trusted source, that it has not been tampered with en route, and that the data received can be trusted by other machines. This is accomplished through the use of signed security certificates and digital signatures.
-
Click Next to view the Summary page.
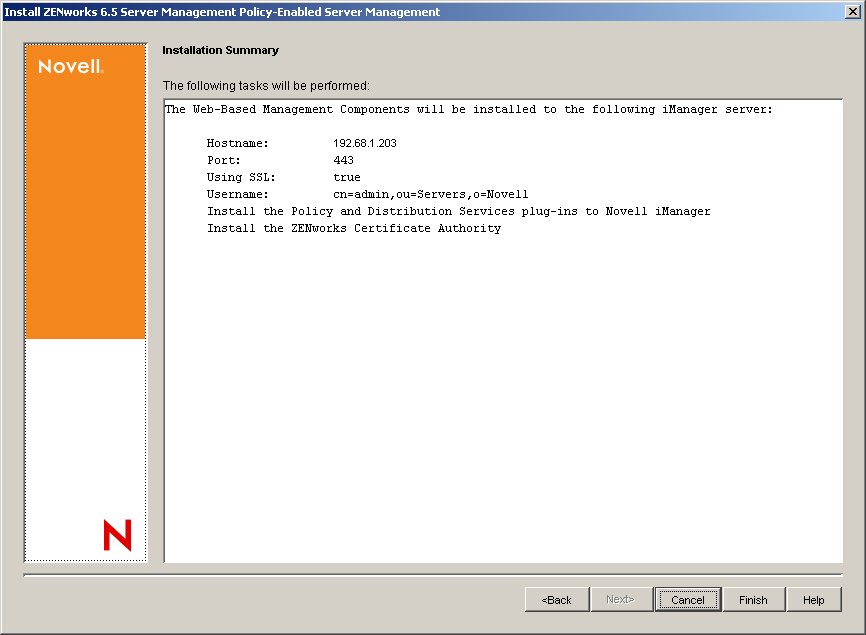
The installation summary indicates that the selected Web components are to be installed to the Tomcat installation directory.
-
Click Finish.
-
When the installation has completed, click Yes to view the installation log file.
If the log file contains errors, you can print it for reference. To look up error messages, see Installation Error Messages. Correct the error, then repeat the installation steps.
The ZENworks Server Management role in iManager should still be set up, because the information for it is stored in eDirectory.
-
After successfully upgrading the iManager plug-ins, close the log file.
-
If you installed the plug-ins to iManager 2.5, do the following:
-
For iManager to recognize the new plug-ins, stop Tomcat, then restart Tomcat:
-
Continue with Starting the Services.
Starting the Services
If the support pack upgrade did not automatically stop and restart the services, or the services were not running before you upgraded the server, and you want the services to be running at this time, start the services at this time.
IMPORTANT: If you have upgraded the Inventory server, you must manaully start the Inventory service after the support pack upgrade.
On NetWare Servers
For Policy and Distribution Services:
-
Enter the following command at the server's main console prompt:
zfs
This starts all of the Policy and Distribution Services services, including the database.
For Server Inventory:
For Remote Management:
-
Run the RConsoleJ Agent using any of the following methods:
- In ConsoleOne, right-click the NetWare server object that you want to remotely control and click Remote Management, or click the NetWare server object and then use the Tools option to click ZENworks Remote Management > Remote Console > NetWare.
- From the server console prompt, enter rconj.ncf.
- From the server GUI, click Novell > Programs > RConsoleJ.
Continue with On Windows Servers or Verifying That the Services Are Running Successfully.
On Windows Servers
For Policy and Distribution Services:
-
Open the Control Panel.
-
Double-click Admin Tools, then double-click Services.
-
Start the Novell ZENworks Service Manager service.
This starts all of the Policy and Distribution Services services, including the database.
For Inventory Services:
-
Open the Control Panel.
-
Double-click Administrative Tools, then double-click Services.
-
Select Novell Inventory Service, then click Start.
For the Inventory database:
-
Open the Control Panel., double-click Administrative Tools, double-click Services.
-
Select Novell Database - Sybase, then click Stop.
-
Select Novell Database - Sybase, then click Start.
For Remote Management, to restart the Remote Management Agent on a Windows 2000/2003 managed server:
-
From the Control Panel, double-click Administrative Tools.
-
Double-click Services.
-
Click Novell ZENworks Remote Management, then click Start.
Continue with Verifying That the Services Are Running Successfully.
Verifying That the Services Are Running Successfully
On NetWare Servers
-
On each server's console, press Ctrl+Esc to view the services:
- Sybase database
- ZENworks (if Policy and Distribution Services is installed)
- ZENworks Inventory Service
- ZENworks Web Server (if only Inventory Server or Inventory Proxy Service is installed)
-
If any service is missing, that component was not successfully started.
For steps to start a service, see On NetWare Servers.
-
After successfully starting the services, continue with On Windows Servers or Verifying That the Server Has Been Upgraded to the Support Pack.
On Windows Servers
-
On each Windows server, open the Control Panel, double-click Admin Tools > Services, then determine if the following services are running:
- Novell Inventory Service
- Novell Database - Sybase
- Novell ZENworks Service Manager
-
If any service is not running, that component was not successfully started.
For steps to start a service, see On Windows Servers.
-
After successfully starting the services, continue with Verifying That the Server Has Been Upgraded to the Support Pack.
Verifying That the Server Has Been Upgraded to the Support Pack
Using iManager
-
Log in to iManager.
-
Under the ZENworks Server Management role, select Remote Web Console.
-
Identify a server (NetWare or Windows), then click OK.
You can either enter the IP address or DNS name, or browse for the server's ZENworks object.
-
In the Display field, select Policy/Package Agent from the drop-down list.
-
Under the Configuration tab, review the Version information.
"ZENworks 6.5 Server Management Support Pack x" should be displayed, where x is the current support pack version.
-
Repeat these steps for each upgraded server.
On a NetWare Server
-
At the NetWare server's main console prompt, enter the following command:
zfsversion
-
View the current Server Management version information.
If a support pack was applied correctly, it should read:
ZENworks Server Management - Support Pack x
where x is the current support pack version.
-
Repeat these steps for each upgraded server.
-
If the version is correct, continue with On a Windows Server or Repeating the Upgrade.
The zfsversion command also writes a listing of ZENworks .jar files and their dates to:
volume:\zenworkszfsversion.log
On a Windows Server
-
On the Windows server, run \zenworks\zfsversion.bat.
This creates a zfsversion.log file in the \zenworks directory.
-
Open the log file to view the current Server Management version information.
-
Repeat these steps for each upgraded server.
-
If the version is correct, continue with Repeating the Upgrade.
Repeating the Upgrade
You might need to run the GUI wizard again for the following reasons:
- If you are upgrading incrementally, repeat the upgrade instructions beginning with Upgrading to a Support Pack.
You can also do this at a later date, because ZENworks 6.5 servers that are upgraded to the support pack work with ZENworks 6.5 servers that are not yet upgraded to the support pack. In other words, ZENworks 6.5 Distributors can send its Distributions to ZENworks 6.5 SPx Subscribers.
- If you have other workstations where the Server Management snap-ins to ConsoleOne are installed, you can repeat the upgrade instructions beginning with Upgrading to a Support Pack on each of those machines to upgrade them to the support pack. You do not need to select any servers. This ConsoleOne upgrade on workstations can be performed at any time.
- If you have Linux or Solaris servers to upgrade to the support pack, continue with Upgrading Policy and Distribution Services on Linux and Solaris Servers. Otherwise, you have completed upgrading Policy-Enabled Server Management to the support pack, except for the following post-upgrade tasks:
Post-Upgrade Inventory Task
-
Stop the Inventory service.
-
(Conditional) If a ZENworks 6.5 Inventory server receives ZENworks software dictionary updates from a ZENworks 6.5 SPx Inventory server, you must perform the following tasks on the ZENworks 6.5 Inventory server:
-
Make a reliable backup of desktopcommonutility.jar located in the Inventory_server_installation_path\zenworks\inv\server\wminv\lib directory.
-
Copy desktopcommonutility.jar from ZENworks 6.5 SPx Companion CD\companion2\zen65patch\inv\server\wminv\lib to the Inventory_server_installation_path\zenworks\inv\server\wminv\lib directory.
-
-
Add non-English enumerated values for Inventory Attributes to the database by running the AddEnums utility.
To run the AddEnums utility:
On Sybase Inventory database: Perform the steps explained in "Adding Non-English Enumerated Values for Inventory Attributes into the Sybase Inventory Database" in "Server Inventory" in the Novell ZENworks 6.5 Server Management Administration Guide.
On Oracle8i Inventory database: Perform the step "Add non-English enumerated (enum) values for certain Inventory attributes into the Inventory database."explained in "Creating the Oracle8i Inventory Database on a Windows Server" in "Server Inventory" in the Novell ZENworks 6.5 Server Management Administration Guide.
On Oracle9i Inventory database on Windows: Perform the step "Add non-English enumerated (enum) values for certain Inventory attributes into the Inventory database."explained in "Creating the Oracle9i Inventory Database on a Windows Server" in "Server Inventory"in the Novell ZENworks 6.5 Server Management Administration Guide.
On Oracle9i Inventory database on UNIX: Perform the step " Add non-English enumerated (enum) values for certain Inventory attributes into the Inventory database."explained in"Creating the Oracle9i Inventory Database on a UNIX Server" in "Server Inventory" in the Novell ZENworks 6.5 Server Management Administration Guide.
On MS SQL Inventory database: Perform the step "(Optional) Add non-English enumerated (enum) values for certain Inventory attributes into the Inventory database." explained in"Configuring the MS SQL Server 2000 Inventory Database" in "Server Inventory" in the Novell ZENworks 6.5 Server Management Administration Guide.
-
Start the Inventory service.
Post-Upgrade Manual Distribution Task
Manual Distributions created in ZENworks 6.5 do not work in a support pack. You must re-create them using the support pack Manual Distribution Wizard.
For steps on creating manual Distributions, see "Manually Importing and Exporting Distributions" in the ZENworks 6.5 Server Management Administration Guide.
Upgrading Policy and Distribution Services on Linux and Solaris Servers
The script for Linux and Solaris servers detects the existence of ZENworks 6.5 software and asks whether you want to upgrade or install. We recommend using the upgrade option, which is documented in the following steps.
For instructions on downloading the support pack file containing the script file, see the ZENworks 6.5 Server Management Support Pack Readme on the ZENworks 6.5 Web site.
To upgrade, do the following:
Running the Upgrade Script
Perform the following tasks individually on each Linux and Solaris server to upgrade it from ZENworks 6.5 Server Management to the support pack:
-
Review the ZENworks 6.5 Server Management Support Pack Readme on the ZENworks 6.5 Web site for any last-minute information concerning upgrading to the support pack.
-
Log in as root.
-
If you are running X Windows on the Linux or Solaris server, open an XTerm window.
-
To run the Policy and Distribution Services script, enter one of the following commands in an XTerm window:
Red Hat Linux: /mnt/cdrom/ZfS/TedPol/platform/zfs-pds-upgrade
SUSE LINUX: /media/cdrom/ZfS/TedPol/platform/zfs-pds-upgrade
where platform is either Linux or Solaris.
-
Press Enter to display the license agreement, press the Spacebar to scroll through the license agreement, type y, then press Enter to accept the license agreement.
The following is displayed (including errors, if any) for a Linux installation while the server is upgraded:
Installing the novell-zen-zfs RPM...
Preparing...         ######################################## [100%]
   1:novell-zen-zfs    ########################################### [100%]
Error messages are displayed at this point. After any error messages, the upgrade concludes by displaying the following:
ZENworks Server Management Policy and Distribution Services has been restarted.
You may check its status by running:
  /etc/init.d/novell-zfs status
You can reconfigure this service by running:
/opt/novell/bin/zfs-pds-configure -
To verify that Policy and Distribution Services is running, enter:
/etc/init.d/novell-zfs status
Policy and Distribution Services is now ready to use on your Linux or Solaris server.
-
Repeat Step 2 through Step 6 on each ZENworks 6.5 Server Management server to be upgraded.
-
Continue with Verifying That the Server Has Been Upgraded to the Support Pack.
Verifying That the Server Has Been Upgraded to the Support Pack
Using iManager
-
Log in to iManager.
-
Under the ZENworks Server Management role, select Remote Web Console.
-
Identify a Linux or Solaris server, then click OK.
You can either enter the IP address or DNS name, or browse for the server's ZENworks object.
-
In the Display field, select Policy/Package Agent from the drop-down list.
-
Under the Configuration tab, review the Version information.
"ZENworks 6.5 Server Management Support Pack x" should be displayed, where x is the current support pack version.
-
Repeat these steps for each upgraded Linux or Solaris server.
On a Linux Server
-
At the Linux server's console, enter the following command:
rpm -q novell-zen-zfs
or
rpm -qa / grp novell-zen
-
If a support pack was applied correctly, it should read:
novell-zen-zfs-6.5-1
novell-zen-zws-6.5-1
or
novell-zen-zfs-6.5-2
novell-zen-zws-6.5-2
-
Repeat these steps on each upgraded Linux server.
-
Continue with On a Solaris Server, if necessary.
Upgrading Management and Monitoring Services on NetWare Servers
Do the following in order to upgrade Management and Monitoring Services to a support pack:
Pre-upgrade Checklist
To prepare for upgrading Management and Monitoring Services component of ZENworks 6.5 Server Management:
- Review the ZENworks 6.5 Server Management Support Pack Readme on the ZENworks 6.5 Web site for any last-minute information concerning upgrading to the support pack.
- Make sure you have fulfilled all of the installation requirements listed in Preparation.
- Make sure that you have installed the Management and Monitoring Services Site Server of ZENworks 6.5 Server Management and ZENworks 6.5 Server Management SP 1.
- To upgrade the Server Management AgentTM (NMA), ensure that you have installed NMA 6.0.3, which shipped with ZENworks 6.5 Server Management and ZENworks 6.5 Server Management SP 1.
- To upgrade the Advanced Trending agent (ATA), make sure that you have installed ATA 6.5, which shipped with Zenworks 6.5 Server Management.
- Authenticate to the eDirectory tree that contains all of the NetWare servers that you want to upgrade.
- At the server console prompt, enter stopmms to stop the Management and Monitoring Services. It may take time to stop the services.
Use "java -show" command to verify that following Java services are absent:
com.novell.zfs.mms.utility.servicemanager.zfs_mms_LanzSlpDis
com.novell.zfs.mms.utility.servicemanager.zfs_mms_Services
Upgrading to a Support Pack
-
Run winsetup.exe.
Winsetup.exe is found at:
download_location\zen65sp1\winsetup.exe
or
download_location\zen65sp2\winsetup.exe
where download_location depends on where you unzipped the download file. The default is c:\temp.
This starts the wizard that contains the support pack upgrade menu options.
For instructions on downloading the support pack file containing the winsetup.exe file, see the ZENworks 6.5 Server Management Support Pack Readme on the ZENworks 6.5 Web site.
-
On the main menu, select Server Management.
-
Select the Management and Monitoring Services option.
-
Select the Site Management Services and Agents option.
The Management and Monitoring Services Upgrade Installation Wizard launches.
-
Click Next to continue.
-
After you have read and agreed to the Software License Agreement, click Yes to continue with the installation.
-
Select the desired ZENworks 6.5 Server Management support pack components listed in the following table:
-
Click Next.
-
If you selected to upgrade the Management Site Servers, complete the following; otherwise, skip to Step 10:
-
Browse to and select the volume name of the NetWare server that is your management site server, then click Next.
-
To start the auto-discovery process, select Start the Auto-Discovery Process.
-
To start the back-end services, select Start the Backend Services on the Server.
-
To copy the ConsoleOne snap-ins, select Copy ConsoleOne Snap-ins to the Management Site Server.
-
-
If you selected to upgrade only the Site server, skip to Step 12.
-
If you selected to upgrade the Server Management Agent or Advanced Trending Agent, select the NetWare servers to upgrade on each server, then click Next.
-
Review the summary list of selections you made in the preceding steps.
To change a setting, click Back.
-
Click Finish to upgrade ZENworks 6.5 Server Management to the support pack.
-
If you chose not to start all the backend services and the auto-discovery process during the upgrade, you need to manually start the backend services and the auto-discovery process now.
For Managed servers on NetWare, the ZENworks agents are automatically started.
-
Continue with Upgrade the ConsoleOne Snap-Ins.
Upgrade the ConsoleOne Snap-Ins
You can install multiple management consoles for accessing data on a management server. You must have Admin rights to the workstation to install the management console software on a Windows 2000/XP workstation.
To upgrade the ZENworks Server Management ConsoleOne software:
-
If you want to upgrade a remote server, you need to log in as an administrator or a user with Admin equivalent rights.
-
Run winsetup.exe.
Winsetup.exe is found at:
download_location\zen65sp1\winsetup.exe
or
download_location\zen65sp2\winsetup.exe
where download_location depends on where you unzipped the download file. The default is c:\temp.
This starts the wizard that contains the support pack upgrade menu options.
For instructions on downloading the support pack file containing the winsetup.exe file, see the ZENworks 6.5 Server Management Support Pack Readme on the ZENworks 6.5 Web site.
-
On the main menu, select Server Management.
-
Select Management and Monitoring Services, the select Site Management ConsoleOne Snap-ins.
-
Specify a destination folder for the snap-ins or click Next to accept the default destination folder.
The snap-in files are installed.
-
Select to view the Readme file, then click Finish.