8.2 MSI Installation
This procedure creates a MSI Package for the Endpoint Security Client 3.5. This package is used by a system administrator to publish the installation to a group of users via an Active Directory policy, or through other software distribution methods.
To create the MSI package;:
If you are installing from the CD or ISO master installer and if you’re not planning to run any command-line variables (see Section 8.2.1, Command-line Variables):
-
Insert the CD and wait for the master installer to launch.
-
Click .
-
Click .
-
Click .
If you are using just the setup.exe file for installation (the executable can be found on the CD under D:\ESM32\ZSC), begin with the following:
-
Right-click setup.exe.
-
Select .
-
Right-click the shortcut, then click .
-
At the end of the Target field, after the quotes, click the space bar once, then type /a.
For example: “C:\Documents and Settings\euser\Desktop\CL-Release-3.2.455\setup.exe" /a
Several command-line variables are available for MSI installation, see Section 8.2.1, Command-line Variables for more details.
-
Click .
-
Double-click the shortcut to launch the MSI installer.
When installation begins:
-
Click on the Welcome screen to continue.
-
Accept the Licensing Agreement, then click .
-
Select whether an Uninstall Password is required (recommended) and enter the password.
-
Select how policies will be received (from Distribution Service for managed clients, retrieved locally for an unmanaged configuration). If managed is selected:
-
Specify the Management Service information (FQDN or NETBIOS name depending upon how it was entered during Management Service installation).
-
Select if policies will be user-based or machine-based policies.
-
-
(Optional) Specify an e-ail address in the provided field to notify you if installation fails.
-
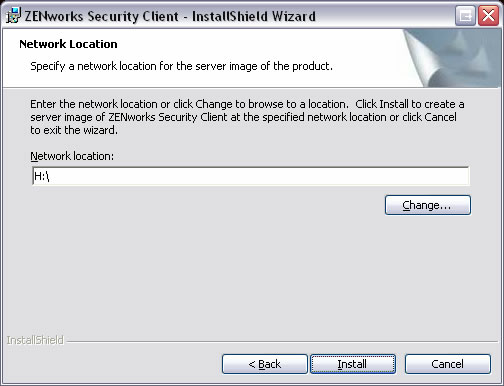
Specify the network location where the MSI image is created, or browse to that location by clicking the button.
Figure 8-4 Select Network Location for MSI Image
-
Click to create the MSI image.
-
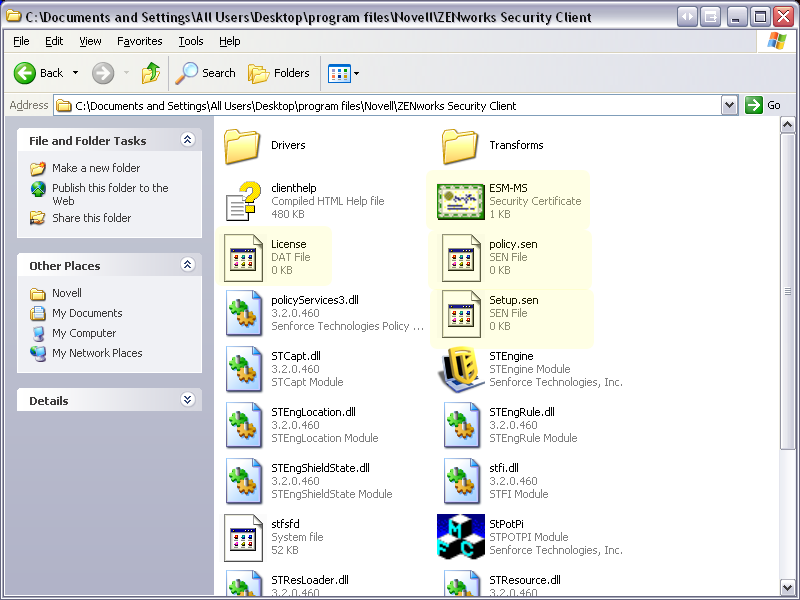
Browse to the created MSI image and open the "\program files\Novell\ZENworks Security Client\" folder
-
Copy the Management Service SSL certificate (ESM-MS.cer, or the enterprise certificate) and the Novell License Key into this folder, replacing the default 0 KB files currently in the folder. The ESM-MS SSL certificate is available in the ZENworks Endpoint Security Management Setup Files folder. The license key is e-mailed separately (if using the 30-day evaluation, no license key is necessary at this time).
Figure 8-5 Replace the Default Files in the MSI Package
To set the MSI package to be pushed down to user groups like a Group Policy:
-
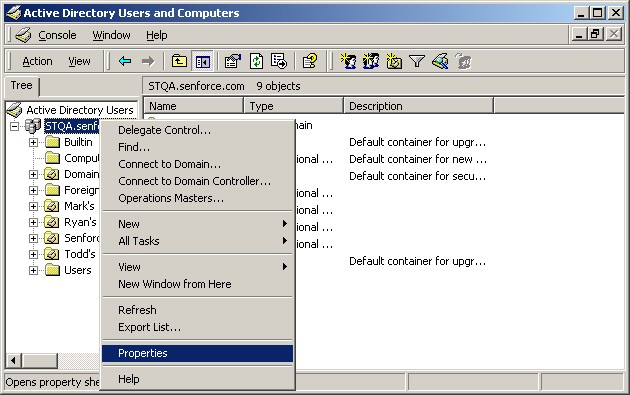
Open , and open either or .
Figure 8-6 Open Properties in either Root Domain or OU
-
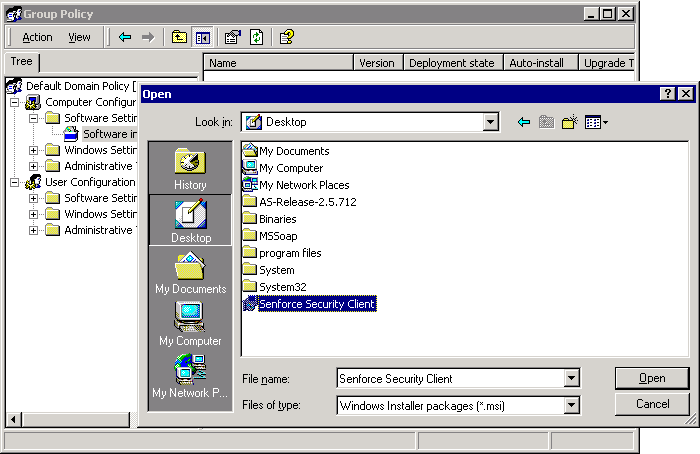
Click the tab, then click .
-
Add the MSI Package to Computer Configuration.
Figure 8-7 Select the MSI package to add
8.2.1 Command-line Variables
Command-line variable options are available for MSI installation. These variables must be set in the executable shortcut that is set to run in administrator mode. To use a variable, the following command-line must be entered in the MSI shortcut:
“...\setup.exe” /a /V"variables". Enter any of the commands below between the quotation marks. Separate multiple variables with a single space.
Example: setup.exe /a /V"STDRV=stateful STBGL=1" creates an MSI package where the Endpoint Security Client 3.5 will boot in All Stateful with strict white-listing enforced.
NOTE:Booting in stateful can cause some interoperability issues (DHCP address delays, Novell network interop issues, and so forth).
The following command line variables are available:
Table 8-1 Command Line Variables
|
Command Line Variable |
Description |
Notes |
|---|---|---|
|
STDRV=stateful |
NDIS driver all stateful at boot time. |
Changes the default state of the NDIS driver from All Open to All Stateful permitting all network traffic at boot time, until the Endpoint Security Client 3.5 has determined its location. |
|
/qn |
Quiet install. |
Use to suppress the typical MSI Installation process. Endpoint Security Client 3.5 will activate at next user reboot. |
|
STRBR=ReallySuppress |
No reboot after install completes. |
Security enforcement and client self defense are not fully functional until after the first reboot. |
|
STBGL=1 |
Strict white list enforcement on application control. |
A policy MUST be created that identifies the application on the white list, and distributed with this policy. |
|
STUPGRADE=1 |
Upgrade the Endpoint Security Client 3.5. |
Use when upgrading the Endpoint Security Client 3.5. |
|
STUNINSTALL=1 |
Uninstall the Endpoint Security Client 3.5. |
Use when uninstalling the Endpoint Security Client 3.5. For detailed uninstall instructions, see |
|
STUIP=password |
Uninstall with password |
Use when an uninstall password is active. |
|
STNMS=”MS Name” |
Change the Management Service name. |
Changes the Management Service name for the Endpoint Security Client 3.5. |
|
POLICYTYPE=1 |
Change Endpoint Security Client 3.5 to machine-based policies. |
Use to change MSI-installed Endpoint Security Clients to accept machine-based, rather than user-based policies. |
|
POLICYTYPE=2 |
Change Endpoint Security Client 3.5 to user-based policies. |
Use to change MSI-installed Endpoint Security Clients to accept user-based, rather than machine-based policies. |
|
STVA=”Adapter name” |
Add Virtual Adapter. |
Use to activate policy control over a virtual adapter |
|
/L*v c:\log.txt |
Turn on logging. |
Use to activate logging at installation. If not, this will have to be done through the Endpoint Security Client Diagnostics tools (see Administrator’s Manual). |
8.2.2 Distributing a Policy with the MSI Package
The default policy included at MSI installation can be replaced with an enterprise-configured policy. To push down a specific policy with the MSI image:
-
Create a policy to be distributed to all users through the Management Console (see the ZENworks Endpoint Security Management Administration Guide for details on Policy Creation).
-
Export the policy, then it as policy.sen.
NOTE:All policies distributed in this manner (unmanaged) must be named policy.sen in order for the Endpoint Security Client 3.5 to accept them. Policies not named policy.sen are not implemented by the Endpoint Security Client 3.5.
-
Open the folder the policy was exported into and copy the policy.sen and setup.sen files.
-
Browse to the created MSI image and open the "\program files\Novell\ZENworks Security Client\" folder.
-
Paste the policy.sen and setup.sen files into the folder. This will replace the default policy.sen and setup.sen files.
8.2.3 User Installation of the Endpoint Security Client 3.5 from MSI
When the user re-authenticates to the domain (through a reboot of the machine), the MSI installation package runs prior to logging in. After the MSI installation completes, the machine reboots and the user is permitted to log in to the machine. The Endpoint Security Client 3.5 is installed and running on the machine.