20.1 Windows 2000/XP Security Client Diagnostics Tools
The following sections explain the diagnostic tools available in the Windows 2000/XP version of the Security Client:
20.1.1 Creating a Diagnostics Package
If problems occur because of the Security Client’s presence on the endpoint device, administrators can provide detailed diagnostics information packages to Novell Support. This information is vital in resolution of any issues. The diagnostics package is defined by the following items:
-
Bindings: Captures the current driver bindings for the endpoint.
-
Client Status: Captures the current client status (displayed on the About window) as well as other internal status.
-
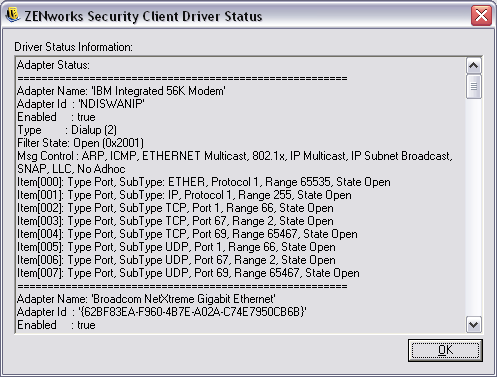
Driver Status: Captures the current status of all drivers on the endpoint (displayed in the Driver Status window).
-
Group Policy Object: Captures the current GPO for the user/endpoint as designated by your directory service (for example, Active Directory).
-
Log Files: Captures the designated logs (see Logging).
-
Policy: Captures the current policy running on the Endpoint Security Client (see View Policy).
-
Network Environments: Captures the current and detected network environments.
-
Registry Settings: Captures the current registry settings.
-
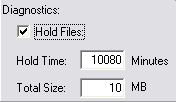
Reports: Captures any reports in the temp directory (see Reporting).
-
System Event Logs: Captures the current System Event logs.
-
System Information: Captures all system information.
To create a diagnostics package:
-
On the endpoint device, right-click the icon, then click .

-
Click .

-
Select the items to be included in the package (all are selected by default).
-
Click to generate the package.
The generated package (ESSDiagnostics_YYYYMMDD_HHMMSS.zip.enc) is available on the desktop. This encrypted zip file can now be sent to Novell Support.
The setting, which is only available when a password override is active in the policy, can be deselected to keep each package component type in a temporary directory. This setting should be deselected only when a Novell Professional Services representative is present on-site and wants to check individual logs. Otherwise, the files that are generated are not necessary and take up disk space over time.
20.1.2 Administrator Views
The Administrator views for the diagnostic tools, such the check box, display only when a password override is present in the policy. The button requires that either the password or a temporary password to be entered. After the password is entered, it does not need to be entered again, as long as the diagnostics window remains open.

The following sections contain more information:
View Policy
The button displays the current policy on the device. The display shows basic policy information and can be used to troubleshoot suspected policy issues.
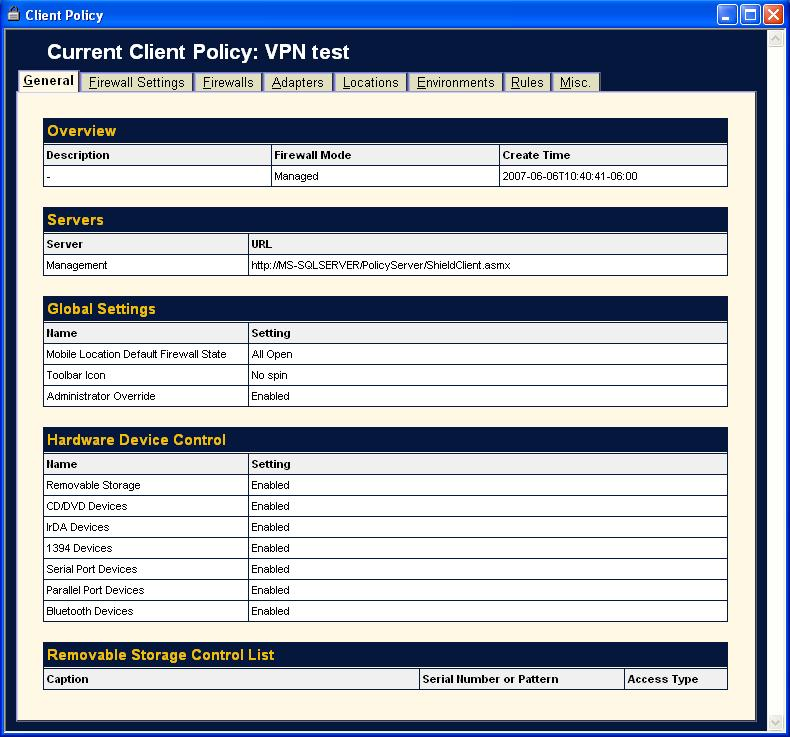
The policy display divides the policy components into the following tabs:
-
General: Displays the global and default settings for the policy.
-
Firewall Settings: Displays the Port, ACL, and Application groups available in this policy.
-
Firewalls: Displays the firewalls and their individual settings.
-
Adapters: Displays the permitted network adapters.
-
Locations: Displays each location, and the settings for each.
-
Environments: Displays the settings for defined network environments.
-
Rules: Displays integrity and scripting rules in this policy.
-
Misc: Displays assigned reporting, hyperlinks, and custom user messages for this policy.
Rule Scripting
The button allows the administrator to enter a specific script into the Security Client. The script runs only on this endpoint. You can use the scripting window to browse for an available script (scripts must be either JScript or VBScript), or a script can be created by using this tool.
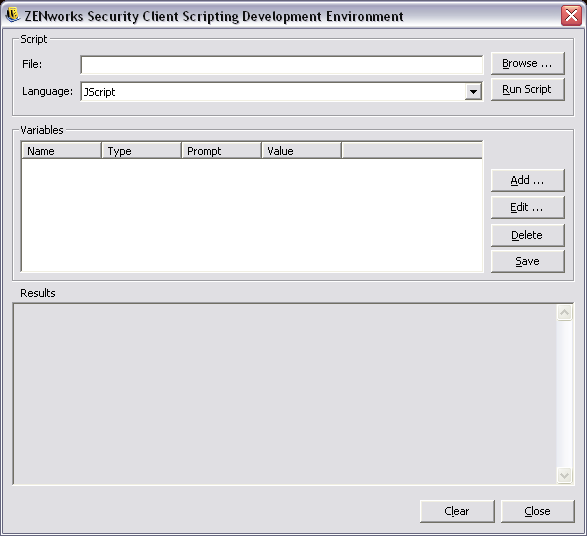
Variables are created by clicking , which displays a second window where the variable information can be entered.
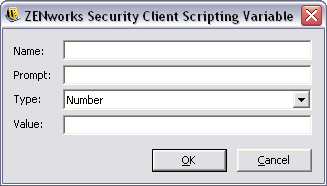
Editing a variable launches the same window, where you can edit as needed. removes the variable. Click in the main scripting window after a variable is set.
Driver Status
The button displays the current status of all drivers and affected components.
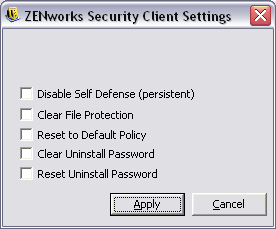
Settings
The button lets administrators adjust the settings for the Endpoint Security Client without re-installing the software. Select the actions you want to perform, then click the button.
The following sections contain more information:
Disable Self Defense
Disables all protections used to keep the client installed and active on the machine. Disabling should only be used when performing patch fixes to the Endpoint Security Client.
IMPORTANT:This must be deselected and applied again, or Client Self Defense remains off.
Clear File Protection
Clears the hashes from the protected files. The current policies and licensing information remains. After the hashes are cleared, the file can be updated. This can only be performed while Client Self Defense is turned off.
Reset to Default Policy
Restores the original policy to permit check-in when the current policy is blocking access.
Clear Uninstall Password
Clears the password that is required for uninstalling the Security Client. After the password is cleared, the Security Client can be uninstalled without a password prompt. Use this option when the uninstall password fails or is lost.
Reset Uninstall Password
Resets the password required to uninstall the Security Client. You are prompted to enter the new uninstall password.
20.1.3 Logging
Logging can be turned on for the Endpoint Security Client, permitting it to log specific system events. The default logs gathered by the Endpoint Security Client are XML Validation and Commenting. Additional logs can be selected from the checklist. When troubleshooting, you should set logging according to the directions of Novell Support and repeat the circumstances that led to the error.
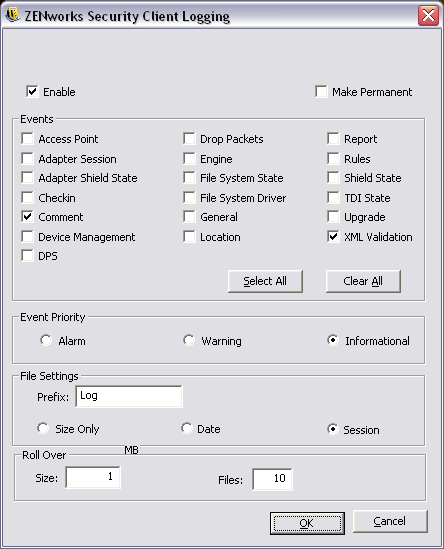
Additionally, the type of log created, file settings, and roll-over settings can be adjusted, based on your current needs.
To retain the new log settings after the device’s reboot, select the box; otherwise the Security Client reverts to its default logs at the next reboot.
Add Comment
The option to add a comment to the logs is available on the diagnostics window. Click the button to display the Add Comment window. Comments are included with the next batch of logs.
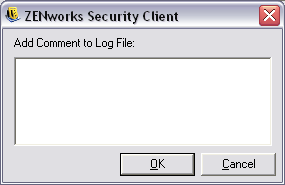
NOTE:If the option in logging is deselected, the button does not display.
20.1.4 Reporting
Reporting allows the addition of reports for this endpoint. Reports can be added and increased in duration; however, reports cannot fall below what was already assigned by the policy (for example, specific reporting, if activated in the policy, cannot be turned off). See Section 13.0, Configuring a Policy’s Compliance Reporting for descriptions of the report types.
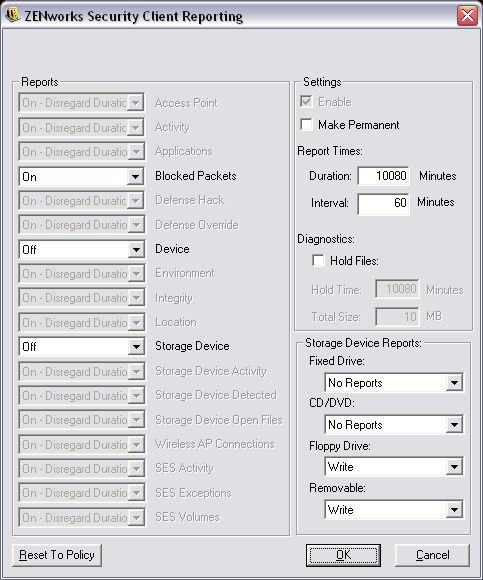
The duration settings for each report include:
-
Off: Data is not gathered.
-
On: Data is gathered based on the set duration.
-
On - Disregard Duration: The data is gathered indefinitely.
The duration and send interval can be set through the options on the right of the dialog box.
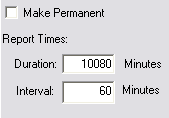
Select the box to continue uploading the new reports for just this end user; otherwise, reporting reverts to the policy default at the device’s next reboot.
Making Reports Available for a Diagnostics Package
To capture reports in the diagnostics package, select the box in the Reporting window. This option causes reports to be retained in the temp directory for the time/space defined in the Reporting window. These reports can then be bundled in the diagnostics package.